background image

Connect-Tek Over IP


16


Note: 

All of the above devices are not included except the 

CTIP-01

, one adapter, and one 3-in-1 KVM PS/2 

cable. And, the Power Bar, Mini-USB to USB cable, Serial Supervisor, and Modem device are optional. 


I. Connect to the Host Computer 

 
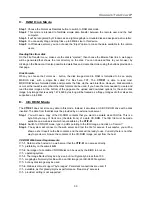
a. If your host computer uses the PS/2 keyboard and mouse, please follow the instructions below: 

1. Turn off your host computer and leave your 

CTIP-01

 powered down. If you purchase 

CTIP-01

 Rack 

Mounting Bracket (optional), please install it with 

CTIP-01

 on your rack or cabinet. 

2. Use

  3-in-1 KVM PS/2 cable

 (included) to connect the 

Host Keyboard

Host Mouse,


Video (IN)

 of 

CTIP-01

 with the PS/2 keyboard port, PS/2 mouse port, video port of your host computer. 

3. Use the 

CAT-5 Ethernet cable

 to connect the 

LAN

 port of 

CTIP-01

 with a network data jack such as the 

hub, switch, router, pre-wired wall jack, and so on. 

4. (Optional) If you would like to connect the 

WAN

 port of 

CTIP-01

 as well, please apply step 3 on the 

WAN


port. 

5. Connect the 

power cord 

(included) into an appropriate electrical outlet; plug the opposite end of the 

power cord into the

 AC/DC adapter

, then plug the power connector into the 

DC-in

 port of 

CTIP-01

. The 

LED underneath the power connectors will be solid green when the 

CTIP-01

 is powered. 

6. (Optional) If you would like to add power redundancy to the 

CTIP-01

, simply connect the 

optional second 

AC/DC adapter

 to the 

Spare

 port of 

CTIP-01

. This provides a load-balancing feature between the two 

power sources and allows the 

CTIP-01

 to function if one adapter fails. 

7. Turn on your host computer. 
 

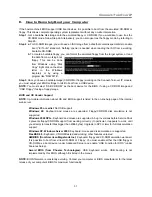
b. If your host computer uses the USB keyboard and mouse, please follow the instructions below: 

1. Turn off your host computer and leave your 

CTIP-01

 powered down. If you purchase 

CTIP-01

 Rack 

Mounting Bracket (optional), please install it with 

CTIP-01

 on your rack or cabinet. 

NOTE

: The 

CTIP-01

 is 

convection-cooled. Ensure the vents on both sides are unobstructed. 

2. Use the 

HDB-15 VGA cable

 to connect the 

Video (IN)

 port of 

CTIP-01

 with the video port of your host 

computer. 

3. Use the 

USB Type A to 5-pin mini-B cable

 (not included) to connect the 

mini USB

 port of 

CTIP-01

 with 

an available USB port on the host computer. This 

mini USB

 can emulate the keyboard and mouse. In the 

event that you do not have enough integrated USB ports on the host computer to directly connect the 
keyboard, mouse, and 

CTIP-01

, you may use a high-quality USB hub on one of the computer’s USB ports 

to make all of the connections. 

4. Use the 

CAT-5 Ethernet cable 

to connect the 

LAN

 port of 

CTIP-01

 with a network data jack such as the 

hub, switch, router, pre-wired wall jack, and so on. 

5. (Optional) If you would like to connect the 

WAN

 port of 

CTIP-01

 as well, please apply step 3 on the 

WAN


port. 

6. Connect the 

power cord 

(included) into an appropriate electrical outlet; plug the opposite end of the 

power cord into the 

AC/DC power adapter

, then plug the power connector into the 

DC-in

 port of 

CTIP-01

The LED underneath the power connectors will be solid green when the 

CTIP-01

 is powered. 

7. (Optional) if you would like to add power redundancy to the 

CTIP-01

, simply connect the 

optional second 

AC/DC power adapter

 to the 

Spare

 port of 

CTIP-01

. This provides a load-balancing feature between the 

two power sources and allows the 

CTIP-01

 to function if one adapter fails. 

8. Turn on your host computer. 
 

II. Connect to the Local Keyboard, Mouse, and Monitor 
 

The 

CTIP-01

 offers the 

Local Keyboard 

Port, 

Local Mouse

 Port, and 

Video (Out) 

(local monitor) Port, 

allowing the user to connect a keyboard, mouse, and a monitor for maintenance and monitoring locally. This 
allows a user to physically use the host computer as through the 

CTIP-01

 were transparent. 

Содержание CTIP-01

Страница 1: ...in the CTIP 01 18 B Configure your CTIP 01 19 I How to Setup the IP Address for your CTIP 01 19 II How to Edit the User Accounts 20 III How to Setup your CTIP 01 System Identification 21 IV How to Strengthen your CTIP 01 System Security 21 V How to Setup your CTIP 01 with the External KVM External Power Bar Keyboard Mapping and USB Keyboard Mouse Emulation 23 VI How to Setup Port Numbers 24 VII Ho...

Страница 2: ... the VNC Menu 33 C How to Use the Bribar 34 D How to Use the Main Menu 35 E How to Use the Virtkeys Menu 36 F How to Use the Video Tuning Menu 37 G How to Use the Disk Control Menu 38 Appendices 39 Appendix A Troubleshooting 39 Appendix B Specifications 42 Appendix C Supported Protocols 43 Appendix D Using Optional Serial Supervisor Module IPMI supported with the R Port of CTIP 01 44 Appendix E Us...

Страница 3: ...ceptable The CTIP 01 is controlled from any web browser eliminating the need for proprietary client access software saving thousands of dollars in per user licensing fees Security is assured for your sensitive data using several security mechanisms including Radius authentication SSH tunneling etc The CTIP 01 is compatible with most existing KVM switches and provides full cross platform and multip...

Страница 4: ... equipment It means the network cable is connected to working Ethernet hub or switch It lights up with a link connection and blinks with network activity The LEDs under the Ethernet connectors respond in a similar manner USB This lights up when the USB port is connected to a host and that host has configured the USB port for use It will blink when USB data is transmitted Video OK This light is lit...

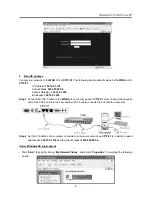
Страница 5: ...for this Quick Start Guide A CTIP 01 unit with a power adapter A hub with a power adapter A computer with a keyboard mouse and monitor 2 CAT 5 cables with RJ 45 connectors A DB9 RS 232 null modem cable or a DB9 RS 232 straight through cable 1 If you don t have DHCP Dynamic Host Configuration Protocol Step 1 Connect the CAT 5 cable to the WAN port on the rear panel of CTIP 01 And connect the opposi...

Страница 6: ...Connect Tek Over IP 4 b Right click on Local Area Connection and select Properties c Double click on Internet Protocol TCP IP ...

Страница 7: ...connected to the network via WAN port on the rear panel The DHCP will automatically assign an IP address to the CTIP 01 Step 3 Access the DHCP log from your file server A simple DHCP log looks similar to the following Step 4 From the above DHCP log you can easily find the DHCP assigned an IP to the CTIP 01 192 168 22 4 Once you have located this IP address do NOT power off the CTIP 01 or your DHCP...

Страница 8: ...ct HyperTerminal as following Step 3 If you never setup your HyperTerminal before it will ask you to input your phone area code please feel free to do so and then click OK you will get the following screen Please type any name you prefer for example abc ...

Страница 9: ...Connect Tek Over IP 7 Step 4 Choose the proper serial port you connect Step 5 Change Bits per second to 115200 Step 6 Press Enter you will get the following screen ...

Страница 10: ... turning it on Step 2 Please have your MAC address You can find it on a white sticker on the bottom of the CTIP 01 Here is an example 00 0E C5 00 08 1A Step 3 Power on the CTIP 01 and connected to the network via WAN port on the rear panel The DHCP will automatically assign an IP address to the CTIP 01 Step 4 Access the DHCP log from your file server A simple DHCP log looks similar to the followin...

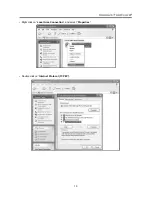
Страница 11: ... the CAT 5 cable to the WAN port on the rear panel of CTIP 01 And connect the opposite end of the CAT 5 cable to the hub Another CAT 5 cable connects the hub with the computer Step 2 Set the IP address of a computer connected on the same network as CTIP 01 to a similar unused address like 192 168 1 124 and the subnet mask of 255 255 255 0 Under Windows XP environment Click Start then right click o...

Страница 12: ...Connect Tek Over IP 10 Right click on Local Area Connection and select Properties Double click on Internet Protocol TCP IP ...

Страница 13: ...dvanced then click Add to add up the IP address of 192 168 1 124 and the Subnet mask of 255 255 255 0 Step 3 From that computer open a web browser and go to https 192 168 1 123 Login by using admin for both of username and password ...

Страница 14: ... as you set your IP addresses up simply press Commit 3 Serial Port DCE Connect the rear panel RS 232 serial port DCE to a computer that can be used temporarily for setup and control This serial port connection is not required once the unit is initially setup and configured It is an 115 200 BPS 8N1 connection A straight through 9 pin RS 232 cable is used not a null modem cable ...

Страница 15: ...owing Step 2 If you never setup your HyperTerminal before it will ask you to input your phone area code please feel free to do so and then click OK you will get the following screen Please type any name you prefer for example abc Step 3 Choose the proper serial port you connect ...

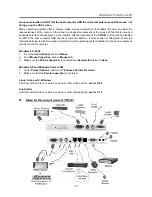
Страница 16: ...LAN port of CTIP 01 N key in your Netmask for the LAN port of CTIP 01 G key in your Network Gateway for the LAN port of CTIP 01 I2 key in your IP address for the WAN port of CTIP 01 N2 key in your Netmask for the WAN port of CTIP 01 G2 key in your Network Gateway for the WAN port of CTIP 01 Here is a reminder please type W after you made any change C Disabling Mouse Acceleration on the Host Comput...

Страница 17: ...te session is attempted Follow the instructions below to disable mouse acceleration for the operating system installed on the host computer as well as the client computer Windows 98 2000 1 From the Control Panel click on Mouse 2 From Mouse Properties click on Mouse tab 3 Make sure the Pointer speed bar is centered and Acceleration is set to None Windows XP and Windows Server 2003 1 Go to Pointer O...

Страница 18: ...e CTIP 01 Rack Mounting Bracket optional please install it with CTIP 01 on your rack or cabinet NOTE The CTIP 01 is convection cooled Ensure the vents on both sides are unobstructed 2 Use the HDB 15 VGA cable to connect the Video IN port of CTIP 01 with the video port of your host computer 3 Use the USB Type A to 5 pin mini B cable not included to connect the mini USB port of CTIP 01 with an avail...

Страница 19: ...01 simply connect the optional second AC DC power adapter to the Spare port of CTIP 01 This provides a load balancing feature between the two power sources and allows the CTIP 01 to function if one adapter fails 8 Power on the CTIP 01 and KVM switch E Access your CTIP 01 and Remote Control the Host Computer As soon as you finish the above initial settings and connections congratulations You are re...

Страница 20: ...Before you can access the Web configuration interface you must enter a user name and password The default username and password as shipped from the factory is username admin with a password of admin NOTE Before the login screen appears your Web browser may display a warning about an invalid security certificate This does not affect the security of your data in any way Whenever you are prompted abo...

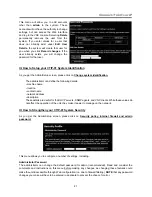
Страница 21: ...on IP address Netmask etc Dynamic Host Configuration Protocol DHCP Automatic network configuration using DHCP is Enabled Disabled This feature applies only to the LAN port on the rear panel and is enabled by default When enabled the unit will automatically configure itself with an IP address when a DHCP server is present When disabled the LAN port will use the values assigned to it on the IP Addre...

Страница 22: ... changes made on the page to the configuration but leaves the old settings active until the next time the unit restarts Clicking Make changes effective now applies the changes and restarts the CTIP 01 so the new settings take effect immediately Ethernet Bridging When Ethernet bridging is enabled the two Ethernet ports are virtually connected inside the CTIP 01 1 You may enable this feature so that...

Страница 23: ...ng details machine name location contact name network address description These details are useful for the DHCP servers SNMP agents and VNC clients While these values do not affect the operation of the unit they make it easier to manage on the network IV How to Strengthen your CTIP 01 System Security As you get the Admin Setup screen please click on Security policy internal firewall and admin pass...

Страница 24: ...If it is enabled fancy login will be required from Java VNC clients as well which is unfortunate because the one time password scheme cannot be used and Java VNC clients have already logged into the web server securely Also VNC normally encrypts passwords and uses a challenge hashed response system that is more secure than the fancy login method This isn t a concern if the entire connection is enc...

Страница 25: ...offers features that may offer enhanced functionality with certain KVM and power products These can be left at their default values in many situations External KVM Switch Brand Please simply select your KVM switch brand name from the list This enables an extra shortcut key on the VNC menu to allow direct access to the KVM on screen display OSD menu Choose Generic if your KVM is not listed Keyboard...

Страница 26: ...rily connected to the same host as the USB cable VI How to Setup Port Numbers As you get the Admin Setup screen please click on Port numbers to be used for different services This menu shows all network servers running on this machine For the security reasons some services may be disabled or moved to non standard ports VII How to Lookup your CTIP 01 System Status As you get the Admin Setup screen ...

Страница 27: ...ou get the Admin Setup screen please click on RADIUS authentication setup The RADIUS server requires the IP address the UDP port number 1812 default or 1645 and the shared secret The shared secret is used to encrypt communications and corresponds to a shared password for the RADIUS server and the client machine Two additional servers may be defined for backup purposes Each server will be tried in ...

Страница 28: ...ate and time is stored without consideration for time zone If you are controlling multiple sites in different time zones we recommend you use GMT for all machines XII How to Update your Firmware As you get the Admin Setup screen please click on Firmware and flash memory management The firmware of CTIP 01 is online upgradable When upgrading to the latest version please login as admin only the admin...

Страница 29: ...the progress of the upload The upload could simply be slow Each file that is distributed upgrades a different component of the system Therefore be sure to apply all files you are given as part of an upgrade The system knows what to do with each file you give it and they are checked for validity before being applied XIII How to Upload Custom Certificate As you get the Admin Setup screen please clic...

Страница 30: ...support in your browser before using the VNC screen to remote control the host computer however most modern browsers come with a version of Java that is compatible with this application From this screen you can do the bandwidth control There are 4 modes available Min Avg Max and Auto The white button is the mode that the system is currently operating If you choose Min Avg Max then you will overrid...

Страница 31: ... systems can Eject the disk once it is inserted but it can also be ejected from the Web or VNC When emulating a floppy disk or RAM disk the data is stored in RAM on the CTIP 01 itself In order to emulate a CD ROM disk drive a web server is required to provide the CD ROM image data The web server must be accessible to the module which communicates with it constantly as data is needed B Floppy Mode ...

Страница 32: ...ntire disk image Any image that is exactly 1 474 560 bytes long will be treated as a floppy Images of other sizes are supported up to 8MB D CD ROM Mode The CTIP 01 does not store any data in this mode Instead it emulates a USB CD ROM drive with a disk inserted The data from that disk must be provided by an external web server Step 1 You will need a copy of the CD ROM contents that you want to emul...

Страница 33: ...for the BIOS if using a CD ROM image and USB Floppy if using a floppy image BIOS and OS Vendor Support NOTE Up to date information about OS and BIOS support is listed in the on line help page of the internal web server Windows 95 or earlier No USB support Windows 98 Keyboard and mouse are supported Floppy CD ROM disk emulation is not supported Windows 2000 SP3 Keyboard and mouse are supported A bu...

Страница 34: ...enu or follow one of the two links on that page Java VNC with no encryption faster Java VNC with SSL encryption more secure You may need to upgrade or download your Java support in your browser before using the VNC screen to remote control the host computer however most modern browsers come with a version of Java that is compatible with this application The Java VNC client makes a connection back ...

Страница 35: ...f l admin L 15900 127 0 0 1 5900 61 71 117 163 sleep 60 vncviewer bgr233 127 0 0 1 15900 Same command but using the WAN port ssh f l admin L 15900 127 0 0 1 5900 203 204 80 148 sleep 60 vncviewer bgr233 127 0 0 1 15900 NOTE A copy of these commands with appropriate values filled in for your current system setting is provided in the on line help page This allows you to cut and paste the required co...

Страница 36: ...iled mouse and or keyboard connections in PS 2 mode USB Resets the USB connection by simulating an unplug and replug Forces operating system to recognize the USB keyboard mouse and emulated disk drive 4 8 Switches to thumbnail mode at indicated size Ctrl Alt Del Sends this key sequence to the host Works immediately Alt F4 Sends the key sequence to host closes windows Menu Shows the Main Menu refer...

Страница 37: ... of the functions operate immediately Other functions require a response to a confirmation prompt first before performing the requested function h Identification Fixed text label that is defined by the user in the Web interface This does not affect the operation of the system and is intended to assist with administration h Status Current status of the attached system and the status of the module h...

Страница 38: ...IP 01 this key makes accessing their built in menu easier especially from the Java client This button will only be shown when an external KVM has been enabled via the web interface h Bribar Closes or reopens the Bribar window along the bottom of the screen E How to Use the VirtKeys Menu This is a snapshot of the Virtual Keys window Clicking any button in the top half of the window simulates pressi...

Страница 39: ...e Help menu of the integrated web server You must arrange for that image to be shown on the host computer Do not allow scaling cropping or any other changes to that image Press the Auto button and the system will calibrate color for the best possible picture in approximately one minute If the system cannot find the test pattern on the screen it will say so Check that the pattern isn t scaled or co...

Страница 40: ...e or use a lower filter number At minimum these values must be greater than two G Disk Control Menu Here is a picture of the Disk Control Menu while using a CD ROM image Aside from status information there are only three buttons in this window Insert and Eject will simulate that action and only one option is enabled at any time based on the current state of the emulated disk USB Replug can be used...

Страница 41: ... host and doesn t re issue this warning I can t remember the Master Password Reset the master password Please refer to Quick Start Guide choosing the third way Using the HyperTerminal via Serial Port Use the S command and type a new password The old password is not required for this procedure And please remember to type W after you made any change The mouse on the remote site does not work or is n...

Страница 42: ...d Certificate warning shown while connecting via HTTPS It is normal for a warning dialog to be shown when connecting via HTTPS The SSL certificate we use is created when the unit is first produced It does not contain the correct hostname subject name because you can change the hostname as required Also it is not signed by a recognized certificate authority CA but is signed by our own signing autho...

Страница 43: ... must use SSH tunnel to connect to machine tunnel to port 127 0 0 1 5900 for VNC protocol and 127 0 0 1 80 for HTTP web control OR instead of SSH client open ports 443 and 15900 inbound for HTTPS and encrypted VNC protocol Then click always on the encrypted link This is easier because you don t need to setup SSH tunnels ...

Страница 44: ...5Hz 1600x1200 60Hz 1600x1200 65Hz 1600x1200 70Hz 1600x1200 75Hz 1600x1200 85Hz Maximum power consumption 18 watts Dimensions WxDxH mm 188 x 167 x 22 Input Connectors Video In Port for the host computer Host Keyboard Port PS 2 for the host computer Host Mouse Port PS 2 for the host computer Video Out Port for the local monitor Local Keyboard Port PS 2 for the local keyboard Local Mouse Port PS 2 fo...

Страница 45: ...B Protocol Server Standardized real time KVM network protocol Compatible with existing VNC client software VNCS SSL tunneled VNC VNC protocol tunneled via SSLTLS encryption For secure real time control of the server over public networks DHCP Dynamic IP Setup Config Eases network setup by locating IP address and other network settings from a centralized server RADIUS Centralized authentication Allo...

Страница 46: ...l Supervisor please have your second RJ 14 cable provided with your second Serial Supervisor to link up the first Serial Supervisor and the second one That s it And you can link up to 16 computers The following diagram is shows the whole connection For more specific information regarding cabling status indicators and how to change settings refer to the user s manual of the Serial Supervisor Config...

Страница 47: ...Refer to Appendix D for more information about purchasing and using the IPMI upgrade This feature will not appear on the menu if the upgrade is not installed You can make as many changes a needed on this menu at one time before applying your changes Once you are satisfied with the changes you have made click Commit changes to apply the new settings Click Refresh at any time to see an updated list ...

Страница 48: ...ultidrop network running at 115 200 bps It is possible that every Serial Supervisor device will not be inputting outputting data at the same rate at all time However since these devices use interactive logins it is unlikely that all channels would be busy at any one time Hardware handshaking is used to limit the output rate of individual channels as needed Ÿ A maximum of four users may simultaneou...

Страница 49: ...omputer Does Not Support IPMI If the host computer you are managing with the CTIP 01 does not support IPMI Connect Tek offers a non IPMI solution that also works via serial port and acts as a power concentrator and a power management device the 8 Outlet Serial Power Console and Switch For more information about this product visit www connect tek com Activating the IPMI Option The CTIP 01 contains ...

Страница 50: ...01 Configuring IPMI on the CTIP 01 Once you have connected the IPMI configured serial port to the CTIP 01 and enabled the software option you can begin to configure IPMI settings through the Web interface Log in to the Web interface as admin Click the Admin Setup link at the top of the page and choose IPMI IPMB setup Intelligent Platform Management You will be presented with the IPMI Status menu s...

Страница 51: ...Screen The CTIP 01 allows you to monitor the status of the host computer via IPMI using either the Web interface or the VNC client The information you will be able to view using the status screen will depend on the model of host computer being managed Since IPMI implementations vary widely across manufacturers the information you are able to see on your status screen may differ from the examples N...

Страница 52: ... Turn OFF Powers off the host computer VNC If you are inside an active VNC session and are logged in as admin you can use the Bribar to access IPMI features You have two choices from the Bribar Reset Equivalent to pressing the RESET button on the managed computer The computer will restart ON OFF Powers the host computer on or off depending on the current state of the host computer equivalent to pr...

Страница 53: ...y Connect Tek Activating the Modem Option A system without the modem option enabled The CTIP 01 contains the necessary hardware to attach a modem To enable the modem capability you must purchase the software option from Connect Tek unless you have purchased a model with the feature pre enabled To verify whether the modem feature is enabled on your unit login to the Web interface as Admin click the...

Страница 54: ... DCE Serial Port The DTE Serial port on the front panel can be used for serial port configuration when the modem is connected It requires the use of a null modem serial cable The DCE Serial port on the rear panel is used to connect the modem to the CTIP 01 and requires the use of a straight through serial cable Place the modem near the CTIP 01 and an available telephone jack Connect the modem to t...

Страница 55: ... Step 1 Open My Network Places from the desktop or the Start menu Step 2 Click View network connections Step 3 Click Create a new connection under Network Tasks Step 4 The New Connection Wizard window will open Click Next Step 5 Select Connect to the Internet and click Next Step 6 Select Set up my connection manually and click Next Step 7 Select Connect using a dial up modem and click Next Step 8 ...

Страница 56: ...esult Since the area around the mouse pointer is refreshed most frequently hold the pointer over an area to improve its clarity It may be beneficial to minimize any unnecessary icons backgrounds or other clutter on the host computer s desktop to make the dial up connection as efficient as possible When the modem feature is enabled you can use a line modem connection on the serial port using a seri...

Страница 57: ...n has occurred and a session has started Phone line rings An incoming call has been detected by the modem Modem answers xxxxxxxxx The connection speed and protocol used for a connection as reported by the modem The exact contents of the message will vary depending on the modem make and model Appendix F The Installation of Optional CTIP 01 Rack Mounting Bracket RACKMT IP A special bracket is availa...

Страница 58: ...CTUAL PRICE PAID BY THE PURCHASER FOR THIS PRODUCT AND WILL IN NO EVENT INCLUDE ANY CONSEQUENTIAL INCIDENTAL INDIRECT SPECIAL OR OTHER DAMAGES OF ANY KIND EVEN IF CONNECT TEK HAS BEEN APPRISED OF THE LIKELIHOOD OF SUCH OCCURRING OR IF SUCH DAMAGES WERE REASONABLY FORESEEABLE EXCLUSION OF WARRANTY THIS WARRANTY DOES NOT COVER ACCIDENT MISUSE FIRE FLOOD AND ANY OTHER ACT OF GOD INCORRECT LINE VOLTAG...

Отзывы: