background image

16

– 

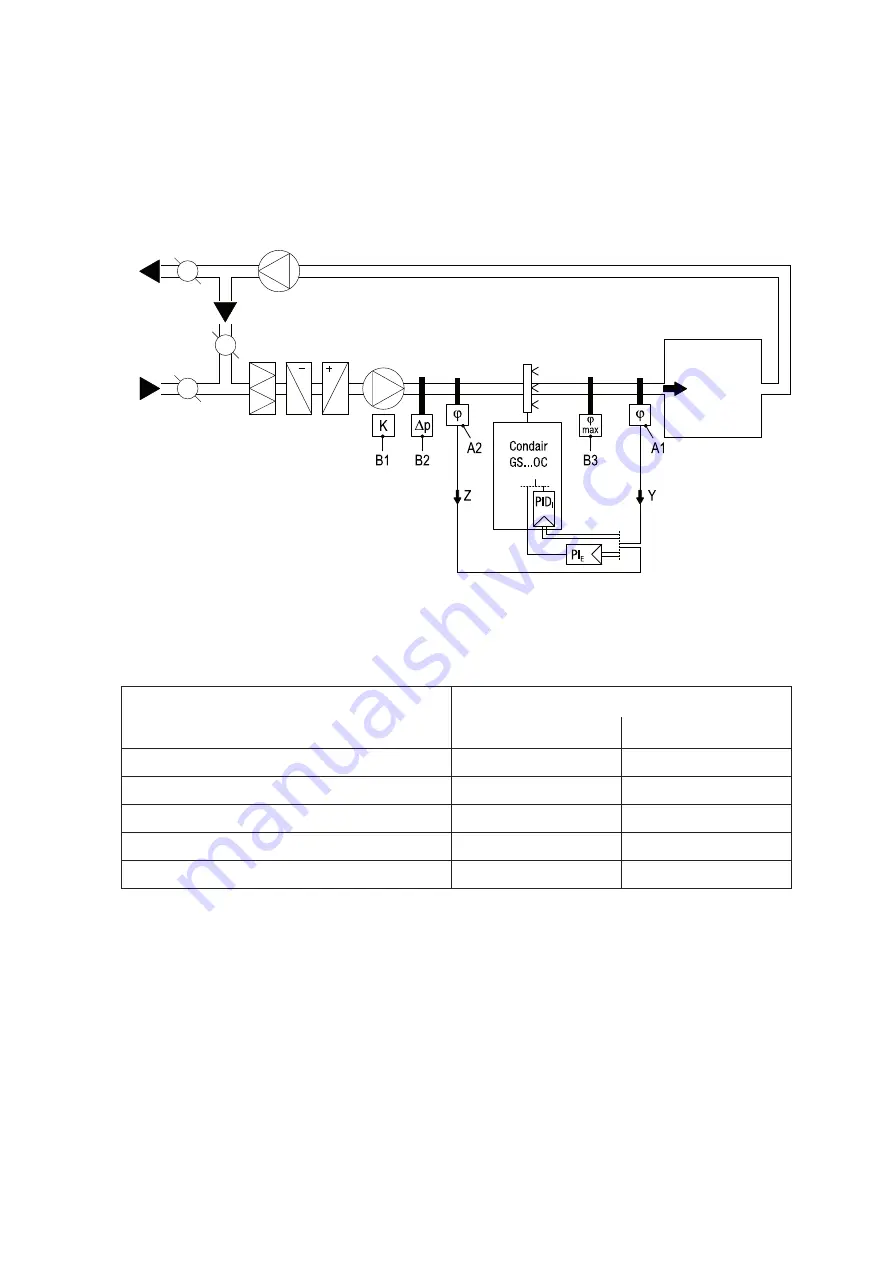
System 3: Supply air humidity control with continuous output limitation
Supply air humidity control (humidity sensor installed in supply air duct) should be used 

only where room humidity control is impracticable for technical reasons

. Such systems always 

require a PI­controller.

The humidity sensor (A1) is located in the supply air duct after the steam distribution pipe. The 

humidity sensor (A2) for the continuous output limitation is located in the supply air duct before the 

steam distribution pipe. Such a system requires

 the internal PID controller or

 an external PI­controller 

with the option to connect a second humidity sensor.

Which humidity control system for which application?

Application

Location of the humidity sensor

Room or exhaust air duct

supply air duct

Air conditioning systems with:

Supply air portion up to 33%

System 1

System 1

Supply air portion up to 66%

System 1 or 2

System 2 or 3

Supply air portion up to 100%

System 2

System 3

Supply air humidity control

–––

System 3

Please contact your Condair supplier, if your application meets the following conditions:
–  Humidification of small rooms up to 200 m

3

–  Air conditioning systems with a high number of air exchanges
–  Systems with variable air volume flow
–  Test facilities with extreme control accuracy requirements
–  Rooms with a high variation in max. steam capacity
–  Systems with temperature fluctuations
–  Cold rooms and systems with dehumidification

A1/2  humidity sensor

B1  ventilation interlock

B2  airflow monitor

B3  safety humidistat

PI

E

  external PI-controller

PID

I

  internal continuous controller (PID controller)

input signal from A1

input signal from A2

Содержание GS 120 OC

Страница 1: ...Gasfired steam humidifier outdoor version 2511510 EN 1204 Condair GS OC C series Installation commissioning and service instructions...

Страница 2: ......

Страница 3: ...5 7 Installation of control and monitoring devices 38 5 8 Electrical Installation 39 6 Inspecting the installations Check list 42 7 Operation 44 7 1 Safety instructions for operation 44 7 2 Function...

Страница 4: ...sories can be obtained in the respective instructions These installation commissioning and service instructions are restricted to the planning of a humidifying system that is to be equipped with a gas...

Страница 5: ...store or use gasoline or other flammable vapors and liquids in the vicinity of this or any other appliance Warning Improper installation adjustment alteration service maintenance or use can cause car...

Страница 6: ...inside the humidifier are very sensitive to electrostatic discharge Topreventdamage appropriatemeasuresagainstelectrostaticdischarge ESD protection must be taken when working on an open unit For safe...

Страница 7: ...ly in locations equipped with a water drain or with sensors that safely interrupt water supply in case of leak age To prevent excess humidification the operation of the Condair GS OC must be moni tore...

Страница 8: ...tural gas Ls GZ350 Propane gas P G31 model designation on rating plate The Condair GS OC gasfired steam humidifiers are built into an outdoor cabinet for outdoor installation The humidifiers are equip...

Страница 9: ...ll water connection 9 Check valve 10 Drain water connection 11 Drain water line building side 12 Shut off valve water supply building side 13 Auxiliary drain connection 14 Electrical connections build...

Страница 10: ...Construction of the gasfired steam humidifier 15 Ignition modules 16 Burner electronic 17 Combustion air blower 1 to 6 18 Flame sensor 19 Igniter 20 Drain pump 21 Air pressure switch 22 Gas pressure c...

Страница 11: ...is repeated a maximum of three times after which the ignition module will lock out and a respective error message will appear in the display The gas valve maintains a constant ratio of air to Natural...

Страница 12: ...tantly monitors the proper function of the level unit in regular intervals Steam generation control The steam is generated in the water tank via the heat exchanger s The steam production is regulated...

Страница 13: ...indirect room humidification or room volume to be humidified per hour in m3 h for direct room humidification specific gravity of air in kg m3 specific volume of air in m3 kg x2 desired absolute room a...

Страница 14: ...d in the room being humidi fied In addition the calculated steam capacity does not consider any losses caused by the draining rate depending on the water quality The total amount of losses depends on...

Страница 15: ...controller Y input signal from A1 System 2 Room humidity control with continuous limitation of the supply air humidity System 2 is suited for air conditioning systems with a large portion of supply a...

Страница 16: ...he humidity sensor Room or exhaust air duct supply air duct Air conditioning systems with Supply air portion up to 33 System 1 System 1 Supply air portion up to 66 System 1 or 2 System 2 or 3 Supply a...

Страница 17: ...meter DS80 number 1 2 3 4 5 6 Condensate hose meter KS10 number 1 2 3 4 5 6 Filter valve Z261 1 pc per system Control input signals The Condair GS OC is regulated via the internal PID controller or an...

Страница 18: ...81 1500 1500 1600 2000 50 81 1800 1800 2000 2400 50 81 2000 2000 2200 2600 50 81 2300 2300 2500 2900 50 81 2500 2500 2700 3100 50 1 Material CrNi steel 2 Special length on request 3 To fully exploit...

Страница 19: ...cation of the Condair GS OC the supply of clean fresh air is provided The unit must be placed at least 3 m away from any mechanical exhaust outlet Caution Operation of the humidifier with unclean air...

Страница 20: ...he immedi ate vicinity of the humidifier No combustible materials must be placed in the immediate vicinity of the Condair GS OC hu midifier Insulation materials wooden floor coverings etc Observe loca...

Страница 21: ...40 3 76 mm 1 3 4 45 mm BSP 1 2 BSP 1 2 BSP 3 4 BSP 1 2 209 252 GS OC 80 4 101 mm 3 76 mm BSP 1 2 BSP 3 4 BSP 3 4 BSP 1 2 251 338 GS OC 120 5 127 mm 3 76 mm BSP 1 2 BSP 1 BSP 3 4 BSP 1 2 342 539 GS OC...

Страница 22: ...Mounting instructions 1 At the place of installation make a curb foundation according to the following drawing Make sure the top of the curb is level in either direction Caution Make sure the curb and...

Страница 23: ...The values given in bold print only apply to steam distribution pipes 81 the values in brackets apply to the OptiSorp steam distribution system Input humidity 1 in rh Length of humidification distance...

Страница 24: ...distribution pipes are designed for either horizontal installation on the duct wall or with accessories for vertical installation in the duct floor The outlet orifices should always point up wards and...

Страница 25: ...1 6 1 6 1 6 H 1 7 1 7 2 7 1 7 1 7 H 1 7 1 7 2 7 1 7 1 7 1 7 1 7 1 6 1 7 H 1 7 1 7 1 7 1 7 H 1 8 1 8 2 8 1 8 1 8 H 1 8 1 8 2 8 1 8 1 8 1 8 1 8 1 7 1 8 1 8 1 7 gmin hmin gmin gmin gmin gmin gmin gmin g...

Страница 26: ...ucts passing through cold rooms should be insulated to prevent the humidified air from con densing along the duct wall Poor airflow conditions within the air duct e g caused by obstacles tight bends e...

Страница 27: ...s should be used e g produced using a pipe bend ing machine or constructed from a pair of 45 bends This reduces the performance loss due to the formation of condensate and in addition the static press...

Страница 28: ...of the hose The installation of a stop cock in the steam hose is not permissible Steam hoses must be prevented from sagging condensate pockets if necessary support with pipe clamps rails or wall brac...

Страница 29: ...ng machine or constructed from a pair of 45 bends This reduces the performance loss due to the formation of condensate and in addition the static pressure in the steam line Important Allowance must be...

Страница 30: ...stallation Overview water installation 1 Filling water connection BSP 1 2 outside thread 2 Water drain connection 3 4 3 Shut off valve installation recommended building side 4 Auxiliary water drain co...

Страница 31: ...supply temperature 1 30 C Notes on water quality For the water supply of the Condair GS OC use exclusively untreated drinking water or fully demineralized water Note The use of fully demineralized wat...

Страница 32: ...the purpose of inspection and cleaning The following connection data should be observed Connections on unit hose connection BSP 3 4 26 mm drain connection BSP 1 2 21 mm auxiliary drain connection War...

Страница 33: ...s A flexible sealant suitable for use with Natural Gas and Propane Gas is recommended Plan gas supply piping so it will not interfere with removal of gas valves or blower assemblies and front or side...

Страница 34: ...ing jurisdiction in the area of installation 1 Disconnect the humidifier from the electrical power supply and take precautions against inadvertent switching on 2 Turn off gas supply to appliance and s...

Страница 35: ...the gas pressure regulating valve and the air pressure switch 17 On multiple burner units repeat steps 4 to 16 for each gas valve assembly 18 Carry out a leakage test Refer to instructions in 5 5 2 1...

Страница 36: ...llation must be performed only by adequately quali fied personnel Ascertaining the qualifications is the customers responsibility 5 6 1 Performing flue gas installation Overview 1 Flue gas connection...

Страница 37: ...ure exceeds 200 C for safety reasons Use the supplied flue gas pipe with storm collar and rain cap exclusively The supplied flue pipe extension and the rain cap have built in mechanical locking band a...

Страница 38: ...ence nor within the path of the humidification process itself Install the safety humidistat in the duct after the steam distribution pipes and far enough away from these that all the steam has been ab...

Страница 39: ...K1 External safety loop 24 Vac Q External service switch or plug type connector RJ45 Communication interface for detailed informations refer to the separate documentation S1 Full tank blow down 24 Vac...

Страница 40: ...ust be electrically grounded in accordance with local codes if an external electrical source is utilized Connect ground wire to cabinet ground clamp External wiring sizes must be in accordance with ex...

Страница 41: ...type is configured by setting the jumper on JP3 5 Vdc max 500 mA or on JP4 24Vdc max 150 mA Full tank blow down 24 VAC S1 This input signal can be used for remote triggering a full tank blowdown If a...

Страница 42: ...ter of solid steam pipe Is the pipe properly insulated Is the correct installation material used Is the minimum internal diameter maintained over the entire pipe length Steam hose between steam hose a...

Страница 43: ...lue gas system Is the supplied flue gas pipe with storm collar and rain cap used Are all connections of the flue gas pipe properly sealed and secured Does the flue gas system comply with the local reg...

Страница 44: ...of electric shock With the lid of the unit open contact with current conducting components is a possibility Before switching the service switch On in the electrical supply circuit all covers on the u...

Страница 45: ...g message is shown in the display If he LED lights and simultaneously the green LED flashes the external safety chain is open ventilation interlock has triggered As soon as the safety chain is closed...

Страница 46: ...s shorter At the end of the filling cycle the control unit checks the function of the water level unit If the control unit has verified the proper function of the water level unit the ignition sequenc...

Страница 47: ...ormal operation mode The display shows the standard operating display first page of the indication level Note The contents of the standard operating display depends on the actual operating status and...

Страница 48: ...unit and the configuration settings pleaseobservetheinformationgivenintheseparateoperatinginstructionstotheCondairGScontrol Operating status display The unit operating status is signaled via the displ...

Страница 49: ...s less than 5 cm the interval can be extended Important Every service action must be documented in the Maintenance check sheet a copy of this document is provided in these installation commissioning a...

Страница 50: ...nsor X Every year or every 2000 hours which is reached first Remove and replace igniter and flame sensor special spares set Burner parts subject to wear Burner combustion air blower X Remove burner an...

Страница 51: ...the humidifier to cool before commenc ing cleaning work The combustion chamber walls are usually self cleaning Due to the expansion and contraction during the humidification process lime deposits peel...

Страница 52: ...ifold together with the gas pres sure re gulat ing valve 6 Undo the two screws of the electronic board if present and remove electronic board 7 Undo the nuts on the outlet side of the blower and remov...

Страница 53: ...ner Re installation is achieved by following the reverse sequence Renew the flange seal and replace igniter and flame sensor if necessary Tight the nuts of the burner flange with a torque wrench torqu...

Страница 54: ...s pipe connection of the gas pressure regulating valve 7 Pull off the hose connected to the pressure switch note the connection layout Then undo the three screws of the pressure switch support and rem...

Страница 55: ...4 2 Undo the brackets and open the right side panel s 3 Disconnect the wiring connection to the igniter and to the flame sensor 4 Unscrew the fixing nuts for the igniter and the flame sensor Now caref...

Страница 56: ...allation follows in the reverse sequence Make sure the cables and the hose are connected correctly 1 Take the humidifier out of operation as described in chapter 7 4 2 Undo the brackets and open the r...

Страница 57: ...nected correctly Replacing the drain pump 1 Take the humidifier out of operation as described in chapter 7 4 Important If drain pump is defective drain tank manually via the auxiliary drain 2 Undo the...

Страница 58: ...e sure the cables are connected correctly Replacing the fill valve 1 Take the humidifier out of operation as described in chapter 7 4 2 Undo the brackets and open the right side panel 3 Remove the con...

Страница 59: ...evel unit 4 Remove hose clamps on the level unit connections and pull off the hoses 5 Squeeze both sides of the mounting bracket to release it from the slots in the support bracket behind the water le...

Страница 60: ...en the right side panel 3 Remove hose clamps on the filling chamber connections and pull off the hoses 4 Undo the two nuts securing the filling chamber to the face of the tank then remove the filling...

Страница 61: ...er Important Note the connector assignment 6 Undo the coupling of the respective flexible gas pipe and remove the flexible gas pipe 7 Dismount the burner with the air blower and the gas pressure regul...

Страница 62: ...ts that have been cleaned in this way are to be rinsed with water Caution Do not use solvents for cleaning purposes nor aromatized or halogenized hy drocarbons or other aggressive substances Follow lo...

Страница 63: ...epresentative dealer Before commencing service and repair work the Condair GS OC must be taken out of operation as described in chapter 7 4 and prevented from being inadvert ently switched on 9 2 Erro...

Страница 64: ...ndo the 2 screws A of the display and control unit then carefully remove the display and control unit to the front 4 Undo the 7 fastening screws B of the control board then carefully pull off the cont...

Страница 65: ...system components if necessary unmounted by a qualified service technician 10 2 Disposal Recycling Components not used any more must not be disposed of in the domestic waste Please dispose of the uni...

Страница 66: ...6 152 mm Humidity control Possible control signals 0 5VDC 1 5VDC 0 10VDC 0 20mA 4 20mA Dimensions Height cm 138 with mounted flue gas venting 199 7 Width cm 126 2 Depth cm 54 5 70 8 110 4 110 4 150 1...

Страница 67: ...8 7 2 9 flue gas pressure Pa 80 5 80 5 exhaust diameter mm 127 127 Condair GS 160 OC energy consumption kW 146 10 5 146 10 5 gas consumption kg h 9 44 0 68 12 16 0 87 m3 h 13 9121 0 8695 16 1773 1 01...

Страница 68: ...ware version Location Responsible Internal no Date Time First Maintenance I Small Maintenance II Annual Maintenance III Working hours h Water hardness in d or ppm or mg l CaCO 3 Remarks e g height of...

Страница 69: ...69 Notes...

Страница 70: ...Notes...

Страница 71: ...Condair Ltd Printed in Switzerland Technical modifications reserved...

Страница 72: ...g Sales and Service Manufacturer Condair Ltd Member of the Walter Meier Group Talstrasse 35 37 8808 Pf ffikon Switzerland Ph 41 55 416 61 11 Fax 41 55 416 62 62 info condair com www condair com Reg No...

Отзывы: