94
EN
IDV1460
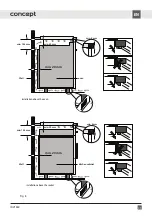
490
560
min. 50
min. 50
min. 50
Fig. 7
Follow the following instruction during installation:
1. Remove all the covering and marketing materials from the appliance before the first use.
2. The required dimensions of the built-in space in the worktop made of heat-resistant material of a minimum
thickness of 38–40 mm are on Fig. 7.
3. Leave min. 50 mm space for the adjacent cabinets on the sides. Leave at least 50 mm free space behind the hob.
4. We recommend installing a cook hood above the hob. The cooking hood should be at least 600 mm above the
hob - according to the type of hood.
5. A separate cabinet without a cooking hood should be at least 760 mm above the hob.
6. For sufficient air circulation the appliance needs to be installed as shown in Fig. 8 and the cabinet must be designed
so that the air can flow at the bottom - we recommend placing a ventilation grille in the lower plinth. Make sure
that the ventilation space of 20 mm, between the drawer, the rear wall and 50 mm between the drawer and the
hob, is free and under the worktop there must be a ventilation gap of min. 5mm, ideally if the design of the cabinet
allows it, even more (Fig. 8).
7. Make sure that the ventilation space of 50 mm, between the hob and the top of the below unit, is free.
8. If the appliance is installed above drawers make sure that the space, between the bottom of the appliance and the
upper drawer, is 50 mm.
9. Position the appliance onto the edge of the worktop and pass the mains cable through the opening so that the
plug or terminals remain accessible after installation.
10. Push the appliance carefully into place. Make sure not to cause damage to the mains plug or to the mains cable.
11. The bottom of the hob base is fitted with a sealant to prevent it from moisture and leakage of liquids. After
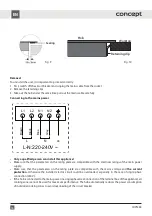
installation the space between the edge of the hob and the worktops should be min. 3 mm (Fig. 9).
12. Secure the hob in the required position from the bottom to the worktop with the supplied retaining clips (Fig. 10).
13. Connect the supply cable to the terminal box and then turn on the appropriate circuit breaker on.


