93
EN
IDV1460
5. To cancel the set cooking time, set the value on the timer “00” with the “-” button. The “-” symbol appears on the
display.
6. After the set delayed shut down time has elapsed, the “- -” symbol appears on the display and the selected cooking
zone, for which the delayed shut down was set, will shut down automatically.
7. For the respective cooking zone for which the next delay shut down time is set, a dot will flash in the lower right
corner next to the set power level.
8. After the set delayed shut down time has elapsed, the “- -” symbol appears on the display and the selected cooking
zone, for which the delayed shut down was set, will shut down automatically.
Note:
•
If the delayed shut down is only set for one cooking zone, only the cooking zone for which the delayed shut down
has been set is switched off after the set delay time has elapsed. Other cooking zones will remain on if no delayed
shut down is set for them.
•
Delayed shut down can be set for a maximum of 99 minutes.
CARE AND CLEANING
The hob itself does not warm up, so no food remains should get burnt on it. Therefore, you do not have to wait until
it cools down to clean the hob.
Do not use a steam cleaner or high-pressure cleaner to clean the appliance. Risk of damage to the hob!
•
Clean the hob with a protective and preservation agent specially designed for ceramic glass surfaces.
•
For removal of food remains and other dirt, apply dirt repellent to the hob, which will facilitate cleaning of the
hob surface.
•
Use only agents and repellents specially designed for ceramic glass surfaces.
•
Never use coarse sponges, abrasive agents or aggressive cleaners (e.g. spray for cleaning ovens) or stain removers.
•
Keep the control panel clean! Make sure the panel is always clean and dry.
•
Food and water residues negatively affect the operation of the control panel; therefore it may not be fully
functional.
•
Clean the hob after each cooking session. It will prevent the remains of food from burning during the next cooking
session.
•
For cleaning the lukewarm hob use a cleaning agent and a paper towel. Then wipe the hob with a damp cloth and
wipe it dry using a soft cloth.
•
If the hob is cleaned while hot, stains could appear on it.
•
Never leave residues of the cleaning agent on the hob; it could stain the glass surface.
•
Metallic-gloss colouring appears after the use of unsuitable cleaners or abrasion of the cookware bottom.
•
Its removal is very difficult. Use cleaning agents specially designed for ceramic glass surfaces.
•
For the removal of food remains and a layer of grease use a special scraper for the glass.
•
Clean the hob by placing the scraper at an acute angle and move the blade on the surface. Never use the handle
for cleaning the glass surface. Risk of scratches!
• WARNING!
The glass scraper is very sharp! Risk of injury! If the edge is damaged, replace it immediately.
•
After cleaning, secure the scraper again and keep it out of the reach of children.
INSTALLATION INSTRUCTIONS
• The warranty does not cover damages caused by incorrect installation.
•
The responsibility for installing the appliance lies with the buyer, not the manufacturer.
•
The manufacturer is not responsible for any injuries or damages that are the result of incorrect installation.
•
To ensure the correct function of the appliance, place it in a suitable furniture.
•
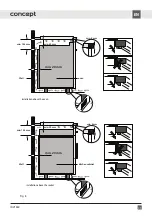
The appliance should be assembled into correct built-in units and work surfaces that align to the standards and
have dimensions shown in Fig. 7.
•
The kitchen furniture must be made of sufficiently heat-resistant material, at least 120 °C. The materials and
adhesives used must be resistant to heat from the appliance as according to the CSN EN 60335-2-6 standard.
Materials and adhesives that do not meet the stated standard may deform or peel-off.


