


www.comdronic.co.uk
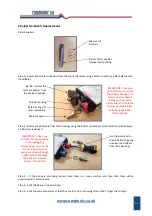
Strainer Removal / Replacement
Parts Required:
Step 1 – Remove the male connectors from the top of the meter using a 13mm wrench (or a black plastic tool
if available).
Step 2 – Remove the strainers from their housings using the 8.5mm screwdriver bit provided (or, alternatively,
an 8.0mm screwdriver).
Step 3 – If the strainers are being reused, clean them in a soapy solution and then flush them with a
pressurised air / water source.
Step 4 – Refit the cleaned / new strainers.
Step 5 – Refit the male connectors so that they are firm, but not overtight (and don’t forget the O‐rings!).
Spare set of
strainers.
8.5mm bit for strainer
removal and re‐fitting.
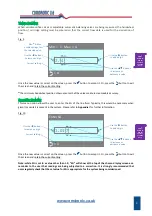
Gently unscrew the
male connectors from
the strainer housings.
IMPORTANT ‐ Take care
not to disturb (i.e. move)
the strainer housings. If a
male connector doesn’t
readily unscrew, use a
14mm wrench to hold the
strainer housing in place
before any additional
force is applied.
Retain O‐rings for
later reassembly.
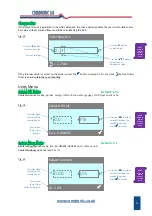
Use the 8.5mm bit in
the bit‐holder to gently
unscrew the strainers
from their housings.
IMPORTANT – Clean any
dirt that may be present in
the thread before
attempting to remove the
strainer. Any attempt to
unscrew a strainer through
a dirty thread may cause
the strainer to become
seized in its housing.
A3
Male connector.
Strainer housing.
Содержание AC6
Страница 2: ...www comdronic co uk ...
Страница 22: ...www comdronic co uk User Notes ...


