background image


SIENA 


44 


A73021514


EN

EN

EN

EN 

5.5. 

Edit day, time and program 

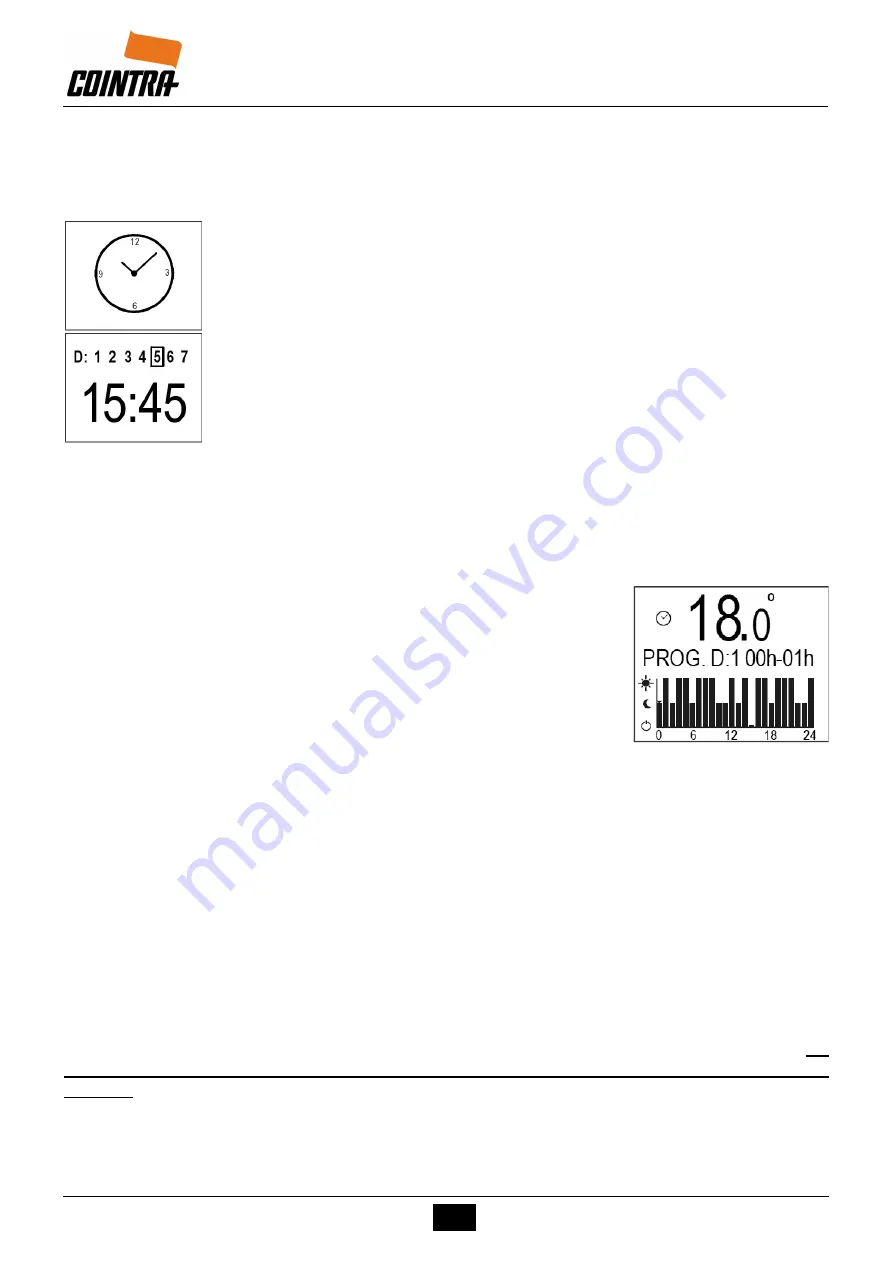
To  edit  the  day,  time  and  program,  press  and  hold  the 

mode

  key  for  2.5  seconds  (from  any 

mode) until the clock icon appears on the screen: 
 

The edition of the day of the week, time and program starts. This screen will 
also  be automatically displayed  when the  emitter  loses  the  time  after  being 
disconnected from the power supply for more than 4 days. 
 
First,  the  day of  the  week  is  selected  with  the 

and 

+

  keys  (indicated  by a 

flashing  box).  To  confirm  and  set  the day,  press  the 

OK

  key  and  it  goes  to 

edit the time; the hour digits are flashing. 
 
To change the hour, use the 

-

 and 

+

 keys. To confirm and set the hour, press 

the 

OK

 key. Then the minutes digits are flashing, which can be also changed 

with  the 

-

  and 

+

  keys.  To  confirm  press  the 

OK

  key,  and  it  goes  to  the 

program edition. 
 
*Note: If the emitter had simply lost the time and day, it does not enter the program edition, but 
returns to the last active mode.  
 
In  the  program  edition  screen,  information  about  the  selected  interval  and  its  set  point 
temperature is displayed at the top. 
 
For example "PROG. D: 1 00h-01h" indicates day 1 of the week and 
hour from 00h to 01h. 
 
"18.0  °C"  indicates  the  set  point  temperature  of  day  1  from  00h  to 
01h, which in this case is the eco setpoint. The "00h-01h" interval is 
flashing to indicate that it can be modified with 

-

 and 

+

 keys. 

 
At the bottom of the screen a 24 bar chart is displayed corresponding to one full day divided in 
the 24 intervals of 1 hour. The bar of the selected interval has a small triangle just above it and 
is  flashing  to  indicate  that  it  can  be  modified  with  the 

mode

  key.  The  length  of  each  bar 

indicates the mode: 


-

  Long length = 

Comfort


-

  Average length = 

Economy


-

  Short length = 

Heating off


On the left axis of the bar chart are the 3 mode icons; the mode chosen for the interval being 
programmed  also  flashes  at  the  same  time  as  the  bar.  To  change  the  mode  of  each  interval, 
press the 

mode 

key; it switches between comfort, eco and heating off. To move to the next or 

previous interval, press 

+

 or 

-

 respectively. 

 
By pressing the 

OK

 key, the current program is saved and it goes forward to the next day. 

By 

pressing and holding the OK key the program of the current day is copied to the next day 
or days.

 After Day 7, when confirming with 

OK

 key, it exits the program edition, returning to the 

mode in which it was. 
 
To finish editing the program edition at any time you can press and hold the 

mode

 key for 2.5 

seconds. 

Содержание SIENA

Страница 1: ...térmico elétrico fluido digital programável Programmable digital fluid electric thermal emitter ES ES ES ES INSTRUCCIONES PARA LA INSTALACIÓN Y EL USO PT PT PT PT INSTRUÇÕES PARA A INSTALAÇÃO E O USO EN EN EN EN INSTRUCTIONS FOR INSTALLATION AND USE A73021514 2022 09 ...

Страница 2: ......

Страница 3: ...SIENA 3 A73021514 ESPAÑOL 4 PORTUGUÊS 19 ENGLISH 34 ...

Страница 4: ...El emisor debe instalarse de tal modo que alrededor de él haya el suficiente espacio para una correcta circulación del aire caliente respetando siempre las distancias mínimas in dicadas en la sección EMPLAZAMIENTO Cualquier perso na que se encuentre en la bañera o en la ducha no ha de poder acceder a los interruptores y otros dispositivos de puesta en marcha respetándose 0 6 m de distancia entre e...

Страница 5: ...ben sólo encender apagar el aparato siempre que éste haya sido co locado o instalado en su posición de funcionamiento normal prevista y que sean supervisados o hayan recibido instruc ciones relativas al uso del aparato de una forma segura y entiendan los riesgos que el aparato tiene Los niños desde 3 años y menores de 8 años no deben enchufar regular y limpiar el aparato o realizar operaciones de ...

Страница 6: ...ectiva de aparatos eléctricos y electrónicos o bien se ha de devolver al distribuidor en el momento de la compra de un nuevo aparato equivalente El usuario es responsable de la entrega del aparato al final de su vida útil a los centros de recogida establecida La correcta recogida del aparato permitiendo el reciclaje del aparato al final de la vida útil del mismo el tratamiento de éste y el desmant...

Страница 7: ...gar el emisor 11 5 3 Modos de funcionamiento 12 5 4 Visualización de temperatura 13 5 5 Editar día hora y programación 14 5 6 Modos forzado o ausencia 15 5 7 Función Ventanas abiertas 15 5 8 Función Control de puesta en marcha adaptable 16 5 9 Bloqueo de teclado 16 6 TABLA DE ERRORES 17 7 MANTENIMIENTO Y CUIDADO 17 8 TABLA DE CARACTERÍSTICAS 18 9 TABLA DE ECODISEÑO 18 ...

Страница 8: ...ico debe leer atentamente estas instrucciones lo que le ayudará a conseguir un correcto funcionamiento del aparato con las máximas prestaciones y plena satisfacción Consérvelas a mano en caso de duda 2 EMPLAZAMIENTO El lugar ideal para situar el emisor térmico eléctrico es lo más cerca posible de la pared más fría de la habitación No se recomienda instalar el emisor térmico en paredes exteriores s...

Страница 9: ...ctarse a la línea eléctrica 230 V 50 Hz a través de su clavija La impedancia máxima admisible de red principal en el punto de conexión será Zmax 0 18 Ω Además se deben tener en cuenta las siguientes advertencias El emisor térmico no debe colocarse debajo de una toma de corriente o interruptor Se debe proteger la línea eléctrica con un dispositivo diferencial de alta sensibilidad 4 MONTAJE El emiso...

Страница 10: ...0 240 160 SIENA 1000 320 160 SIENA 1200 400 240 SIENA 1500 560 320 La primera cifra corresponde al número de soportes de plástico sobre los que se cuelga el emisor y la segunda corresponde al número de soportes de chapa que fija el emisor 2 Colocar los soportes correspondientes sobre cada una de las marcas realizadas ha ciendo coincidir el taladro inferior Seguidamente marcar los taladros superior...

Страница 11: ...sde Standby el emisor puede bloquearse ver punto 5 9 del manual Para cambiar el emisor entre Standby y Operativo la tecla Standby se distingue fácilmente por su posición central y su marca en relieve Ante un corte de corriente recuerda siempre el último modo de funcionamiento las temperaturas seleccionadas y el estado Standby Operativo y bloqueado desbloqueado Si es la primera vez que se enchufa o...

Страница 12: ...enos que la temperatura de confort seleccionada previamente Al subir o bajar la temperatura de confort sube o baja la temperatura ECO Como la temperatura de confort es de 12 C a 30 C la temperatura ECO es de 7 5 C a 29 5 C pero siempre entre 0 5 C y 4 5 C inferior a la temperatura de confort El modo economía se utiliza durante la noche o en periodos de ausencia cortos Evita que disminuya en exceso...

Страница 13: ...elo en ningún caso se puede modificar Sobre la barra de la hora actual se muestra un pequeño triángulo a modo de índice En el eje vertical del gráfico de barras se muestra sólo el icono del mo do de la hora actual Ver el apartado 5 5 Editar día hora y programación para modificar la pro gramación usada en este modo La pantalla de configuración está al final de la secuencia de modos antes de pasar a...

Страница 14: ...emplo PROG D 1 00h 01h indica día 1 de la semana y hora desde 00h hasta 01h 18 0 C indica la temperatura de consigna del día 1 desde 00h hasta 01h que en este caso es consigna eco El intervalo 00h 01h está intermitente para indicar que se puede modificar con y En la parte inferior de la pantalla se muestra un gráfico de 24 barras correspondiente a los 24 intervalos de 1 hora en los que se divide l...

Страница 15: ...peratura se seleccionará con las teclas y desde 7 C hasta 30 C en pasos de 0 5 C Desde las posiciones extremas 7 C y 30 C se podrá pasar al modo calentamiento apagado indicado en la pantalla con el icono de standby y cuatro rayitas Si no se pulsa nada en 30 segundos antes de confirmar finalmente la función volverá al último modo Para confirmar la temperatura seleccionada pulsar la tecla OK Aparece...

Страница 16: ... cada 5 minutos Esta función sólo trabaja bajo el modo Programación En la pantalla de programación cuando trabaja la función si está habilitada se muestra mediante un icono de reloj parpadeando junto al símbolo de termómetro hasta que llegue la hora del siguiente modo ya adelantado de calentamiento apagado a eco confort o de eco a confort El emisor progresivamente incrementa su temperatura de cons...

Страница 17: ...sor va a Standby sin ningún motivo lógico puede haber tenido un error 7 MANTENIMIENTO Y CUIDADO Los emisores térmicos SIENA requieren muy poco mantenimiento Las superficies del emisor no deben limpiarse con un producto abrasivo o con sustancias gra nulares Se recomienda la limpieza regular con productos de pH neutro Para limpiar el emisor se recomienda que el aparato esté desconectado de la red el...

Страница 18: ...tencia calorífica máxima continuada Pmax c 0 5 kW 0 75 kW 1 0 kW 1 2 kW 1 5 kW Consumo auxiliar de electricidad A potencia calorífica nominal elmax 0 000 kW 0 000 kW 0 000 kW 0 000 kW 0 000 kW A potencia calorífica mínima elmin 0 000 kW 0 000 kW 0 000 kW 0 000 kW 0 000 kW En modo de espera elSB 0 0013 kW Tipo de control de potencia calorífica de temperatura interior Control electrónico de temperat...

Страница 19: ...ta sensibilidade O emissor deve ser instalado de modo a que em torno do emissor de calor tem espaço suficiente para a circulação adequada do ar quente respeitando sempre as distâncias mínimas indicadas na secção LOCALIZAÇÃO Qualquer pessoa que está na banheira ou chuveiro não é para ter acesso ao interruptores e outros dispositivos de inicialização respeitando 0 6 m de distância entre o emissor e ...

Страница 20: ... menores de de 8 anos só deve ligar desligar o aparelho sempre que tenha sido colocado ou instalado em sua posição normal de funcionamento fornecido e são supervisionados ou tenha recebido instruções sobre o uso do aparelho com segurança e compreender os riscos que o dispositivo tem Crianças a partir dos 3 anos e com menos de 8 anos não deve ligar regular e limpar o aparelho ou realizar manutenção...

Страница 21: ...e recolhida diferenciada para aparélhos elétricos e eletrônicos ou melhor devolvido ao revendedor no momento da compra de um novo aparélho equivalente O usuário é reponsável pela a entrega do aparélho no fianal de sua vida útil de acordo com as normas de recolhida establecidas acima A correcta recolhida diferenciada para o posterior envío do aparélho em desuso a reciclagem ao tratamento e a recolh...

Страница 22: ... e desligar o emissor 26 5 3 Modos de funcionamento 27 5 4 Visualização de temperatura 28 5 5 Editar dia hora e programação 29 5 6 Modos forçado ou ausência 30 5 7 Função Janelas abertas 30 5 8 Função Comando de arranque adaptativo 31 5 9 Bloqueio de teclado 31 6 TABELA DE ERROS 32 7 MANUTENÇAO E CUIDADOS 32 8 TABELA DE CARACTERÍSTICAS 33 9 TABELA DE ECODESIGN 33 ...

Страница 23: ...ar o emissor térmico em funcionamento deve ler atentamente estas instruções o que ajudará a conseguir um correcto funcionamento do aparelho com as máximas prestações e plena satisfação Mantenha as instruções acessível em caso de dúvida 2 LOCALIZAÇÃO O local ideal para situar o emissor térmico é o mais próximo possível da parede mais fria da divisão Não se recomenda instalar o emissor térmico em pa...

Страница 24: ... deverá ser ligado à linha elétrica 230 V 50 Hz através da sua ficha A impedância máxima de rede permitida no ponto de conexão é Zmax 0 18 Ω Além disso deve observar os seguintes avisos O emissor térmico não deve ser colocado por baixo de uma tomada de corrente ou interruptor A linha eléctrica deve ser protegida com dispositivo diferencial de alta sensibilidade 4 MONTAGEM Deve pegar se no emissor ...

Страница 25: ... 160 SIENA 1000 320 160 SIENA 1200 400 240 SIENA 1500 560 320 O primeiro valor corresponde ao número de suportes de plástico sobre os quais é suspenso o emissor e o segundo corresponde ao número de suportes de chapa que fixam o emissor 2 Colocar os suportes correspondentes sobre cada uma das marcas efectuadas fazendo coincidir a perfuração inferior Em seguida marcar as perfurações superiores de ca...

Страница 26: ...andby o emissor pode ser bloqueado ver ponto 5 9 do manual Para mudar o emissor entre Standby e Operacional a tecla Standby se distingue facilmente pela sua posição central e as suas duas marcas em relevo Ante um corte de corrente lembra sempre o último modo de funcionamento as temperaturas selecionadas e o estado Standby Operacional e bloqueado desbloqueado Se for a primeira vez que é ligado ou p...

Страница 27: ... inferior à temperatura de conforto selecionada previamente Ao aumentar ou diminuir a temperatura de conforto aumenta ou diminui a temperatura ECO Como a temperatura de conforto é de 12 C a 30 C a temperatura ECO é de 7 5 C a 29 5 C mas sempre entre 0 5 C e 4 5 C inferior à temperatura de conforto O modo economia utiliza se durante a noite ou em períodos de ausência curtos Evita que a temperatura ...

Страница 28: ...nenhum caso poderá ser modificado Sobre a barra da hora atual se mostra um pequeno triângulo a modo de índice No eixo vertical do gráfico de barras se mostra só o ícone do modo da hora atual Ver o apartado 5 5 Editar dia hora e programação para modificar a programação usada neste modo O ecrã de configuração encontra se no final da sequência de modos antes de passar para o modo inicial de conforto ...

Страница 29: ...a dia 1 da semana e hora desde 00h até 01h 18 0 C indica a temperatura de consigna do dia 1 desde 00h até 01h que neste caso é consigna eco O intervalo 00h 01h está intermitente para indicar que se pode modificar com e Na parte inferior do ecrã se mostra um gráfico de 24 barras correspondente aos 24 intervalos de 1 hora nos que se divide a programação de 1 dia completo A barra do intervalo selecio...

Страница 30: ...gado A temperatura é selecionada com as teclas e dos 7 C aos 30 C em etapas de 0 5 C A partir das posições extremas 7 C e 30 C pode se passar para o modo aquecimento desligado indicado no ecrã com o ícone de standby e quatro riscas Se não se pressionar nada durante 30 segundos antes de confirmar finalmente a função voltará para o último modo Para confirmar a temperatura selecionada pressionar a te...

Страница 31: ...lculo é realizado cada 5 minutos Esta função só trabalha no modo Programação No ecrã de programação quando a função trabalha estando habilitada aparece mediante um ícone de relógio intermitente junto ao símbolo de termómetro até que chegue a hora do modo seguinte já definido de aquecimento apagado a eco conforto ou de eco a conforto O emissor progressivamente aumenta a sua temperatura de ajuste at...

Страница 32: ...terior Si o emissor va a Standby sin nenhum motivo lógico pode haber tenido um error 7 MANUTENÇAO E CUIDADOS Os emissores térmicos SIENA requerem pouca manutenção As superfícies do emissor não devem ser limpas com um produto abrasivo ou com substâncias granulares Recomenda se a limpeza regular com produtos de pH neutro Para limpar o emissor recomenda se que o aparelho seja desligado da rede elétri...

Страница 33: ...W Potência calorífica contínua máxima Pmax c 0 5 kW 0 75 kW 1 0 kW 1 2 kW 1 5 kW Consumo de electricidade auxiliar À potência calorífica nominal elmax 0 000 kW 0 000 kW 0 000 kW 0 000 kW 0 000 kW À potência calorífica mínima elmin 0 000 kW 0 000 kW 0 000 kW 0 000 kW 0 000 kW Em estado de vigília elSB 0 0013 kW Tipo de potência calorífica comando da temperatura interior Com comando eletrónico da te...

Страница 34: ... around it there is suf ficient space for proper circulation of hot air always respect ing the minimum distances indicated in the LOCATION sec tion Anyone who is in the bathtub or shower should not have access to the switches and other power operation de vices respecting 0 6 m distance between the emitter and the bath or shower Mounting is an important part of safety To perform the cor rect instal...

Страница 35: ... or have received instructions concern ing using the appliance safely and understand the risks as sociated with the device Children from 3 years and under 8 years old should not plug in regulate clean the appliance or perform maintenance CAUTION Some parts of this product can become hot and cause burns Pay particular attention when children and vulnerable people are present If the emitter is disca...

Страница 36: ...liances or must be returned to the distributor upon purchasing an equivalent new appliance Users are responsible for disposing of appliances at the end of their working life in established collection centres The correct collection of the appliance allowing for the appliance to be recycled at the end of its working life its treatment and its environment friendly dismantling help prevent any negativ...

Страница 37: ...trol panel 41 5 2 Turning the emitter on and off 41 5 3 Operating modes 42 5 4 Temperature display 43 5 5 Edit day time and program 44 5 6 Manual mode 45 5 7 Open Window function 45 5 8 Adaptive start control function 46 5 9 Keyboard lock 46 6 ERRORS TABLE 47 7 MAINTENANCE AND CARE 47 8 CHARACTERISTICS TABLE 48 9 ECODESIGN TABLE 48 ...

Страница 38: ...emitter on you must carefully read these instructions which will help you to ensure correct operation of the device with maximum performance and complete satisfaction Keep them close by in case of any doubts 2 LOCATION The ideal place to locate the emitter is as close as possible to the coldest wall in the room It is not recommended to install the emitter on external walls without any insulation h...

Страница 39: ...ter must be connected to the mains supply 230 V 50 Hz through its plug The maximum permissible impedance of the mains at the connection point will be Zmax 0 18 Ω In addition the following warnings must be considered The thermal emitter must not be located underneath an electrical outlet or switch The electric line should be protected with a high sensitivity differential device 4 MOUNTING The therm...

Страница 40: ... SIENA 750 240 160 SIENA 1000 320 160 SIENA 1200 400 240 SIENA 1500 560 320 The first number corresponds to the number of plastic brackets on which the emitter hangs and the second number corresponds to the number of metal locking brackets which fixes the emitter to the wall 2 Screw in each of the brackets using the lower hole and mark the upper holes of each wall bracket 3 Drill all the marked lo...

Страница 41: ...seconds From Standby the emitter can be locked see section 5 9 of this manual To switch the emitter between Standby and Operational the Standby key is easily distinguished by its central position and its raised bump In case of any power failure or disconnection the emitter will always remember the previous mode of operation the temperature and the state Standby Operational and locked unlocked If i...

Страница 42: ...ort temper ature the difference can be directly set by the user with the and keys When the comfort temperature is raised or lowered the ECO temperature automatical ly rises or falls by the set amount While the comfort temperature can be set from 12 C to 30 C the ECO tempera ture is from 7 5 C to 29 5 C but always between 0 5 C and 4 5 C below the comfort temperature Economy mode is used for short ...

Страница 43: ... at the time the anti frost set point can never be modified On the bar of the current time a small triangle is displayed as an index Only the icon for the current time mode is displayed on the vertical axis of the bar chart See section 5 5 Edit day time and program to modify the program used in this mode The configuration screen is at the end of the modes sequence before enter ing the initial comf...

Страница 44: ...1 of the week and hour from 00h to 01h 18 0 C indicates the set point temperature of day 1 from 00h to 01h which in this case is the eco setpoint The 00h 01h interval is flashing to indicate that it can be modified with and keys At the bottom of the screen a 24 bar chart is displayed corresponding to one full day divided in the 24 intervals of 1 hour The bar of the selected interval has a small tr...

Страница 45: ...f 0 5 C can be entered Unheated mode can be entered from either 7 C or 30 C by entering or keys once from each extreme Unheated is indicated by the standby icon and 4 dashes on the screen If no key is pressed within 30 seconds before final con firmation the emitter will return to the previous mode of operation When the desired temperature is entered confirm with the OK key ON will be displayed The...

Страница 46: ...d and knowing the heating speed of the unit the software calculates when it needs to start heating This calculation is made each 5 minutes This function only runs when the emitter is in Program mode When Adaptive Start is running a flashing clock icon is displayed next to the thermometer symbol The mode will only function on temperature rise e g from heating off to eco comfort or from eco to comfo...

Страница 47: ...n any previous mode or state If the emitter goes to Standby without any specific reason it may have recovered from an error 7 MAINTENANCE AND CARE The SIENA emitters require very little maintenance The surfaces of the emitter must not be cleaned with an abrasive product or those containing granular substances We recommend regular cleaning with PH neutral products In order to clean the emitter it i...

Страница 48: ... kW 1 0 kW 1 2 kW 1 5 kW Maximum continuous heat output Pmax c 0 5 kW 0 75 kW 1 0 kW 1 2 kW 1 5 kW Auxiliary electricity consumption At nominal heat output elmax 0 000 kW 0 000 kW 0 000 kW 0 000 kW 0 000 kW At minimum heat output elmin 0 000 kW 0 000 kW 0 000 kW 0 000 kW 0 000 kW In standby mode elSB 0 0013 kW Type of heat output room temperature control Electronic room temperature control plus we...

Страница 49: ...garantía Si el montaje no respeta las instrucciones que se suministran en la máquina La instalación de la máquina no respeta las Leyes y Reglamentaciones en vigor electricidad hidráulicas combustibles etc Defectos de instalación hidráulica eléctrica alimentación de combustible de evacuación de los productos de la combustión chimeneas y desagües Anomalías por incorrecto tratamiento del agua de alim...

Страница 50: ...a Se a instalação da máquina não respeitar as Leis nem as Regulamentações em vigor eletricidade hidráulicas combustíveis etc Defeitos de instalação hidráulica elétrica alimentação de combustível de evacuação dos produtos da combustão chaminés e esgotos Anomalias por tratamento incorreto da água de alimentação por incrustações de cal por tratamento desincrustante mal efetuado etc Anomalias causadas...

Страница 51: ...ing does not comply with the instructions supplied with the machine Installation of the machine does not comply with the Laws and Regulations in force electricity hydraulics fuels etc Faulty hydraulic or electrical installation faults in fuel supply systems combustion exhaust outlets chimneys or drainage systems Faults due to incorrect feed water treatment due to limescale deposits due to incorrec...

Страница 52: ...Avenida de Italia 2 Edificio Ferroli 28820 Coslada Madrid ESPAÑA www cointra es FABRICADO EN ESPAÑA FABRICADO EM ESPANHA MADE IN SPAIN A73021514 2022 09 ...

Отзывы: