8.2. MASTER/SLAVE mode
After having connected the projectors, as described in section
8.1 MASTER/SLAVE signal connection
, turn on power to the projec-
tors. Settings are made via the 4 button display panel.
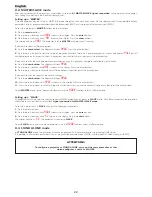
Setting up a “MASTER”
Only one projector may be set up as MASTER, the initial projector in the dmx daisy chain. Via the display panel, it is also possible various
parameters such as program execution speed between steps (WAIT) and the speed of colour changes (SPEED).
To set up a projector as
MASTER,
follow these instructions:
1.
Press the
menu
button
2.
Press the
+
or
-
buttons until
MODE
shows in the display. Press the
enter
button.
3.
Press the
+
or
-
buttons until
-MA-
shows in the display. Press the
enter
button.
The display will show
PRG.1
The projector is set to
MASTER
with program 1 running.
If you wish to select a different program:
4.
Press the
enter button.
The display will show
PROG
. Press the enter button.
5.
Press the
+
or
-
button to view the range of programs available. There are 4 preset programs as well as one named
PALL
runs all
available programs in sequence. Select the program you wish to run and then press the enter button.
If you wish to alter the wait time between execution of steps in a program, complete the following instructions:
6.
Press the
enter button.
The display will show
PROG
.
7.
Press the
+
or
-
button until
WAIT
is shown in the display. Press the enter button.
8.
Press the
+
or
-
button to select the wait time between steps then press the enter button.
If you wish to alter the speed of the colour changes:
9.
Press the
enter button.
The display will show
PROG
.
10.
Press the
+
or
-
button until
SPEE
is shown in the display. Press the enter button.
11.
Press the
+
or
-
button to select the speed at which you wish to have the colour change occur then press the enter button.
To exit
MASTER
mode, press the menu button and via the
MODE
function, select a different mode.
Setting up a “SLAVE”
All projectors which are to be connected to your MASTER projector must be set to
SLAVE
mode. All cabling connecting the projectors
should be set as described in section
8.1 Signal connection for MASTER/SLAVE mode
.
To set up a projector as a
SLAVE
carry out the following instructions:
1.
Press the menu button.
2.
Press the
+
or
-
buttons until
MODE
shows in the display. Press the
enter
button.
3.
Press the
+
or
-
buttons until
-SL-
shows in the display. Press the
enter
button.
The display will show
-SL-
. The projector is now set to
SLAVE
.
To exit
SLAVE
mode, press the menu button and via the
MODE
function, select a different mode.
8.3. STAND ALONE mode
In
STAND ALONE
mode, the projector functions independently. It therefore requires no incoming DMX signal.
It is possible to alter various parameters such as program step execution speed (WAIT) and the speed of colour changes (SPEED).
ATTENTION!
!
To configure a projector as STAND ALONE, carry out the same procedure as that
which configures a unit as a MASTER.
22
English


