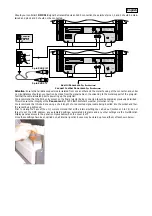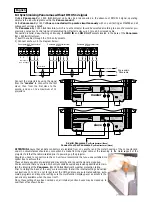
Should your controller’s
DMX 512
signal be transmitted via an XLR 5 connection,the polarity of pins 1, 2 and 3 should be main-
tained and pins 4 and 5 should not be connected.
Attention
: Ensure that all data conductors are isolated from one another and the metal housing of the connector.and under
no circumstances should any connection be made from the signal cable or the screening to the metal support of the projector.
Test that the cable is isolated prior to powering up the projector.
We recommend that the PG 9 entry socket on the final projector being connected should be sealed as previously described.
This will ensure the integrity of the
Panorama C
yc 1800
A
rchitectural
’s weather protection rating.
We recommend that this be done using a short length of unconnected signal cable being inserted into the socket and then
the socket being tightened.
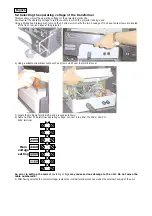
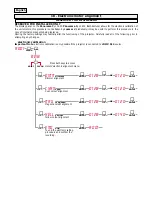
Prior to closing the base of the unit, we recommend that all the internal settings be carried out (sections 10 to 14); do not
forget to set the DMX address, any automated settings, automated programs and any other settings via the multifunction
display panel as access to the panel is only available when the cover is off.
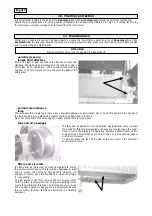
Once these settings have been carried out, all internal junction boxes may be closed up to seal them off as shown below.
out
in
Controller
Standard
DMX 512
OUT
3
2
1
5 pin XLR 5/M
3 pin XLR 3/F
made in italy by
coemar
spa
Castel Goffredo (mn)
serial number
Alimentazione: collegare SOLO a coemar ballast 1800W.
Per accedere alle connessioni di potenza e segnale riferitevi al manuale di istruzioni.
Main power: connect to coemar ballast 1800W ONLY.
To acces to mains and signal connections pls. refer to the instructions manual.
ATTENZIONE!
ALTA TENSIONE ALL'INTERNO DELL'APPARECCHIO. TOGLIERE TENSIONE
PRIMA DI EFFETTUARE QUALSIASI OPERAZIONE.
UNA BUONA CONNESSIONE DI TERRA E' ESSENZIALE.
WARNING!
HIGH VOLTAGE INSIDE. DISCONNECT FROM POWER SUPPLY
BEFORE OPENING. A GOOD GROUND CONNECTION IS ESSENTIAL.
pin1: gnd
pin2: data-
pin3: data+
pin4: optional-
pin5: o
dmx 512
in
out
3
2
1
AUto
auto sequence
MA.SL
link between fixture
AUSP
auto speed
AUdL
auto delay
diMM
dimmer
coLr
colour speed
LAMP
lamp function
tESt
single ch. test function
rESE
reset
rAtE
DMX speed
HoUr
working time (in hour)
LIFE
lamp life (in hours)
on
MASt
master
0000
time speed (m=min. s=sec.)
0000
number of frames
Strd
standard
Strd
standard
Strd
standard
oFF
slav
slave
01
to ...
01
to ...
SLoU
slow
SLoU
slow
Strd
standard
t01
to
t04
Set functions (function display)
menu
enter
enter
1
dimmer
2
cyan
3
magenta
4
yellow
5
function
Individual channel assignement
factory set main at:
208V
230V
240V
115V
out
in
made in italy by
coemar
spa
Castel Goffredo (mn)
serial number
Alimentazione: collegare SOLO a coemar ballast 1800W.
Per accedere alle connessioni di potenza e segnale riferitevi al manuale di istruzioni.
Main power: connect to coemar ballast 1800W ONLY.
To acces to mains and signal connections pls. refer to the instructions manual.
ATTENZIONE!
ALTA TENSIONE ALL'INTERNO DELL'APPARECCHIO. TOGLIERE TENSIONE
PRIMA DI EFFETTUARE QUALSIASI OPERAZIONE.
UNA BUONA CONNESSIONE DI TERRA E' ESSENZIALE.
WARNING!
HIGH VOLTAGE INSIDE. DISCONNECT FROM POWER SUPPLY
BEFORE OPENING. A GOOD GROUND CONNECTION IS ESSENTIAL.
pin1: gnd
pin2: data-
pin3: data+
pin4: optional-
pin5: o
dmx 512
in
out
3
2
1
AUto
auto sequence
MA.SL
link between fixture
AUSP
auto speed
AUdL
auto delay
diMM
dimmer
coLr
colour speed
LAMP
lamp function
tESt
single ch. test function
rESE
reset
rAtE
DMX speed
HoUr
working time (in hour)
LIFE
lamp life (in hours)
on
MASt
master
0000
time speed (m=min. s=sec.)
0000
number of frames
Strd
standard
Strd
standard
Strd
standard
oFF
slav
slave
01
to ...
01
to ...
SLoU
slow
SLoU
slow
Strd
standard
t01
to
t04
Set functions (function display)
menu
enter
enter
1
dimmer
2
cyan
3
magenta
4
yellow
5
function
Individual channel assignement
factory set main at:
208V
230V
240V
115V
Ad altri
Panorama C
yc
A
rchitectural
Connect to other
Panorama C
yc
A
rchitectural
English


