MEDIPULSE 2342se ERGONOMIC SUCTION BLAST CABINET
Page 14
© 2019
CLEMCO INDUSTRIES CORP.
www.clemcoindustries.com
Manual No. 24939, Rev. C, 03/19
5.5.3
Loosen the actuator bracket screws and
adjusting screw nut. Move the actuator bracket up or
down, and the adjusting screw sideways, as needed to
center the adjusting screw on the over-travel stop (in
center of detent sleeve). Tighten the bracket screws.
5.5.4
Turn the adjusting screw in or out as required to
engage the switch without applying excessive pressure
on it. Tighten the adjusting screw nuts.
5.5.5
Test the operation with the doors open and then
again closed. Negative pressure inside the cabinet may
cause the doors to flex inward. Tests should be
performed with the exhauster running. Point the nozzle
away from the door during the tests, and open the door
only enough to disengage the interlock switch. The
interlocks should stop the blasting when either door is
open and permit blasting when the doors are closed.
5.6
Pulse Pressure ‒ Figure 19
NOTICE
Do not pulse new dust collectors or
replacement cartridge until the cartridge is
properly seasoned, per Section 7.10. Pulsing
unseasoned cartridges can decrease the
efficiency of dust collectors and cause
premature cartridge failure.
5.6.1
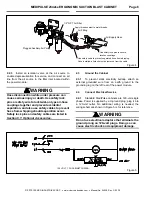
Adjust pulse pressure using the regulator
mounted on the pulse reservoir (refer to Figure 19).
Begin pulse at 60 psi. To adjust pressure, pull the knob
to unlock it, as shown in Figure 19, and then turn
clockwise to increase pressure or counterclockwise to
decrease pressure. Once operating pressure is set,
push the knob to lock it and maintain the setting.
Figure 19
5.6.2
As the filter cartridge cakes with dust, it may be
necessary to pulse between blasting, per Section 6.2.4.
5.6.3
When pulsing alone does not adequately clean
the cartridge, increase pulse pressure in increments of 5
psi until the maximum of 90 psi is reached. As dust cakes
on the cartridge, the differential pressure increases.
Using a gauge to measure the differential pressure is a
good way to tell if the cartridge is heavily caked.
5.6.4
When the maximum pulse pressure of 90 psi is
attained, and additional pulsing as described in Section
6.2.4 does not increase visibility or decrease differential
pressure, replace the cartridge, per Section 7.9.
5.7
Cabinet Air-Inlet Damper
5.7.1
Once the damper is initially set, per Section 2.5,
it seldom requires readjustment. The initial setting
produces approximately .5
to .75
of static pressure in
the cabinet enclosure.
Do not confuse cabinet static
pressure with reclaimer static pressure, which is
controlled by the outlet damper, as noted in Section
5.4. Reclaimer pressure must be set before cabinet
pressure.
5.7.2
Using a manometer (as noted in Section 5.8 and
listed in Section 9.1) is the most accurate method of
monitoring and adjusting cabinet pressure. Following the
instructions packed with the manometer, start the
exhauster and insert the needle into a glove, and adjust
pressure using the inlet damper. Open the damper
further to decrease static pressure or close it further to
increase pressure.
5.7.3
If a manometer is not available, use the gloves
as an indicator. With the exhauster ON, the gloves
should be inflated, but not elevated off the grate.
5.8
Optional Manometer
NOTE: These instructions show several methods of taking
static-pressure readings (negative pressure) on MediPulse
Reclaimers by using a flexible-tube manometer. Use the
method best suited for the application. The instructions
explain the processes for taking periodic readings and
show how to permanently install the manometer for taking
frequent readings. Permanent fittings should be installed
when the manometer installation is permanent. Use
silicone sealer or other sealant to seal around the fitting to
prevent leaks. The fitting should be capable of being
capped when the manometer tube is removed. This will
prevent leaks that alter the reclaimer’s separation
efficiency. Taking readings at different locations could
produce different readings. Static-pressure readings at the
door are generally 0.5" to 1" lower than reading taken
above the reclaimer. The readings are reference points,
so readings should be taken using the same method each
time the reading is taken.
Pulse Regulator
Mounted on pulse reservoir.
Adjustment Knob
Pull knob up to unlock
and adjust pressure.
Push down to lock.

