background image


The ISDN wizard enables connection to ISDN based networks, using up to 4 ISDN BRI 
lines, reaching connection bandwidth of up to 512 kbps. 

To configure ISDN settings: 
1.


Select 

Settings>Network>ISDN

. The ISDN Settings configuration wizard appears.  

NOTE: The ISDN configuration wizard includes two or three steps, 
depending on the switch type used, which is country dependant. 

The configuration wizard guides you through the steps depending 
on your selection of device and switch types. 

2.


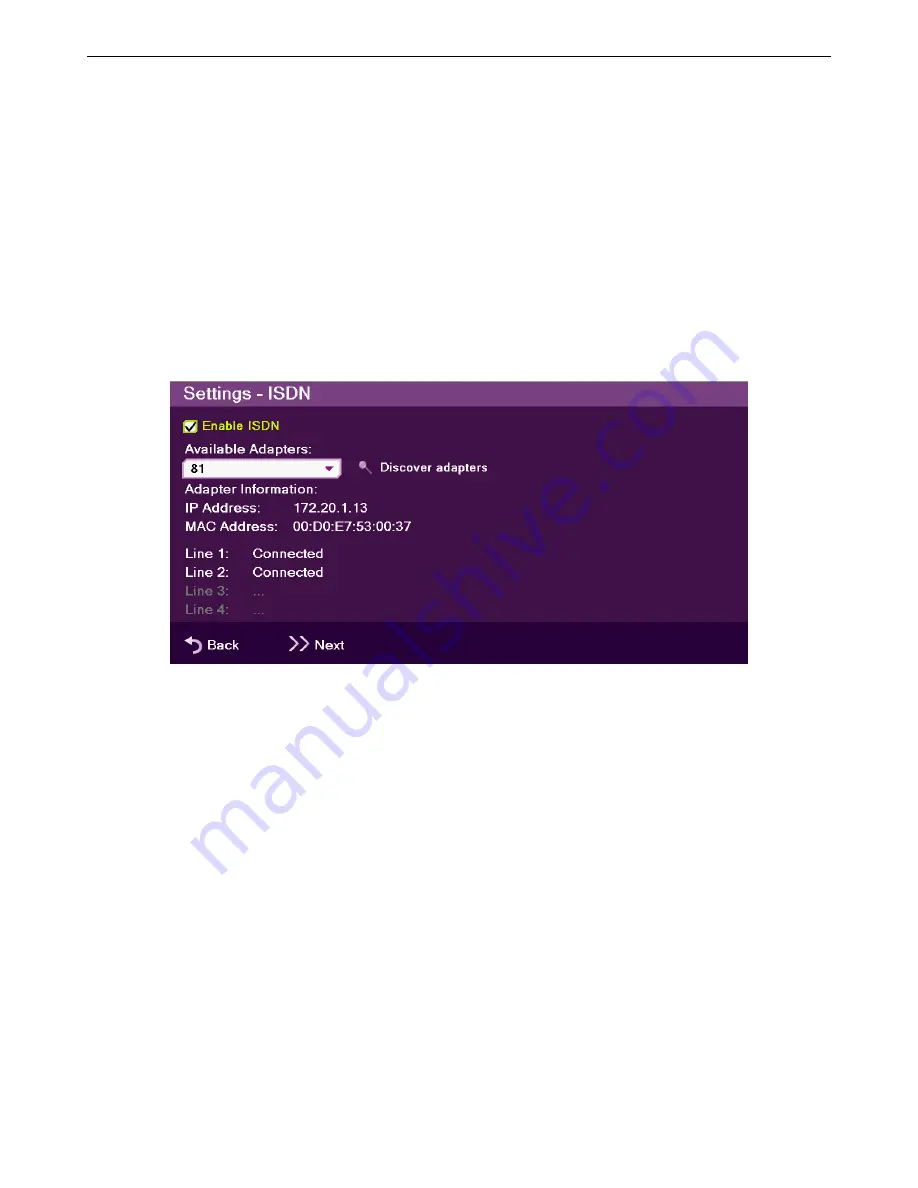
The ISDN Connection wizard screen includes the following properties: 


Enable ISDN

 – Select this option to enable or disable ISDN functionality. Once 

selected, the ISDN adapter detection may take up to a minute. 


Available Adapters

 – Displays the list of ISDN adapters available for this system. 

Click on Discover to populate the Available Adapters list, and select the desired 
adapter from the list. After you select an adapter, the Adapter Information, IP 
address and MAC address of the adapter are displayed. 


Discover adapters

 – Select this button to scan for available ISDN adapters. 


Adapter Information

 – 


IP Address

 – IP address of the ISDN adapter. 


MAC Address

 – MAC Address of the ISDN adapter. 


Line Indicators

 – Displays the line status after connecting: 


Line 1:

 ISDN line status for line number 1 


Line 2:

 ISDN line status for line number 2 


Line 3: 

ISDN line status for line number 3 


Line 4:

 ISDN line status for line number 4 

Collaborate Room: User Guide   59 

Содержание Collaborate FHD

Страница 1: ...COLLABORATE ROOM USER GUIDE...

Страница 2: ......

Страница 3: ...78 001 REV 2 2 DECEMBER 2012 2012 ClearOne and NetStreams All rights reserved No part of this document may be reproduced in any form or by any means without written permission from ClearOne and NetStr...

Страница 4: ......

Страница 5: ...onfiguration Basics 21 In this Chapter 21 Entering Your User Details 21 Configuring the Camera 21 Configuring the Audio 23 Configuring the Display 24 Chapter 4 Videoconferencing 27 In this Chapter 27...

Страница 6: ...Book 43 Editing Entries in the Personal Address Book 43 Deleting Entries from the Personal Address Book 43 Using the Call Log 44 Using the Call Log via the Remote Control 44 Displaying the Call Log fr...

Страница 7: ...Firewall and NAT Settings 66 Chapter 7 Web Access and Management 69 In this Chapter 69 Accessing Collaborate Room via Browser 69 Viewing a Stream Session 70 Viewing a Multicast Videoconference 71 Impo...

Страница 8: ......

Страница 9: ...4 video standard and clear crisp audio the Collaborate Room brings users face to face with other people and organizations Collaborate Room enables you to record and stream video calls to multiple loca...

Страница 10: ...sical installation including the connection of cables and devices to Collaborate Room refer to the Collaborate Room Installation and Setup Guide For the complete technical specifications refer to the...

Страница 11: ...point sessions Embedded broadcast viewer Calling via address book log entries or speed dial Calling via online directories Multipoint videoconferences support Configurable audio video and displays and...

Страница 12: ...Mbps Up to 6 Mbps Up to 6 Mbps H 239 Dual Video support PTZ camera FEATURE HIGHLIGHTS New features incorporated in version 3 0 of Collaborate Room include Support for VoIP calls using the Session Init...

Страница 13: ...Displaying System Information USING THE REMOTE CONTROL You can navigate the Collaborate Room on screen graphic user interface GUI using the infrared remote control bundled with the unit A separate inf...

Страница 14: ...u need to activate deactivate CAPS lock When DTMF dialing is requested use the numeric keypad COMMAND BUTTONS The following command buttons are available on the remote control Button Image Button Name...

Страница 15: ...ton you can navigate the GUI menus options in four directional movements Up Down Left and Right In addition to the joystick the following buttons are available around it Back Returns to the previous s...

Страница 16: ...te Room options prior to and during a videoconference call The main menu is accessed using the remote control see Using the Remote Control To display the Collaborate Room main menu Press OK on the rem...

Страница 17: ...sionally in the GUI appear in the context of use GUI Button Label Function OK Save changes Back Return to the previous window without saving changes Apply Apply changes or soft start your system Resto...

Страница 18: ...appears When Collaborate Room is in idle state the Status window displays the following information IP Address IP address of the Collaborate Room unit as automatically assigned by the DHCP server or...

Страница 19: ...ed to identify the unit if a Col or a gatekeeper is used DNS Suffix Suffix used System Name System name as defined in the system settings see Sy ISDN Number ISDN number that is currently being used Op...

Страница 20: ......

Страница 21: ...s General User The User Settings window appears 2 In the User Settings window enter the following details First Name Type your first name Last Name Type your last name Company Type your company detail...

Страница 22: ...ollaborate Room supports PTZ cameras only 2 Optional Set the percentage of Color Contrast Brightness and Hue You can leave the default settings of these parameters unchanged 3 Specify the Communicatio...

Страница 23: ...es without leaving this window or select OK in the GUI to save the changes and close the Camera Settings window CONFIGURING THE AUDIO The audio input output must be configured so that you will be able...

Страница 24: ...re when it is supported by an external device Lip Synchronization If the voice you hear is not synchronized with the lip movement in the video display move the slider as follows Towards Delay Video if...

Страница 25: ...lay Settings window set the following options Display Mode Single Mode Both videoconference parties are displayed on a single screen Dual Mode Conferences are displayed on two screens This option is a...

Страница 26: ......

Страница 27: ...sics and options using Collaborate Room and includes the following sections Starting Calls Auto Answering Calls Ending Calls Muting the Video Switching Image Modes Switching Call View Modes Using Pict...

Страница 28: ...Settings for more information see ISDN Settings 3 In the Type a Number Name field type the IP address or ISDN number to which you want to call Alternatively instead of an IP address you can also use a...

Страница 29: ...incoming call is received a message is displayed on the screen You can accept or reject the call using the buttons on the remote control or via the screen message Yes No NOTE Auto answering does not...

Страница 30: ...ling a quick presentation change FAR END MODE You can control the view at the Far End camera By pressing Far End you can control the camera of the remote person you are having a conversation with This...

Страница 31: ...e PIP completes a rotation to all corners then hides the PIP image and starts again on a subsequent button press The default video mode is PIP 1 in which the local caller s video is displayed in the s...

Страница 32: ...ferencing is taking place GUI Icon Indication The current call is encrypted The local microphone is muted The local speaker is muted Far End mode is on you can control the remote side camera Local net...

Страница 33: ...SING CALL TONES When making calls the call operator can request a Password or DTMF tone to connect OPERATOR REQUEST FOR PASSWORD The Operator can request you to access a conference password to proceed...

Страница 34: ...recorded sessions and download them for later viewing with Windows Media Player Alternatively using streaming remote users can view a live broadcast of whatever the camera and microphone are currentl...

Страница 35: ...e the locally saved recordings by selecting Data Sharing File NOTE You can switch the Recording display so that the data is on the big screen and the remote camera is displayed on in the PIP START STR...

Страница 36: ...ded in the webpage displaying the ongoing session On your network connected PC use the following address using Windows Explorer or via File Open URL in the Windows Media Player HTTP IP_ADDRESS 12100 I...

Страница 37: ...portable USB flash drive To view and share files from a USB flash drive 1 Insert a USB flash drive to one of the Collaborate Room USB ports The message USB device inserted is displayed 2 Select Data S...

Страница 38: ...TING Session multicasting allows you to multicast your session using the multicasting networking transport technology which allows users to send a video stream that can be received by multiple recipie...

Страница 39: ...he main menu appears 2 Select Join on the main menu The Join Multicast window appears 3 Select a multicast from the Ongoing Multicasts list and press Join Multicast STARTING STOPPING A MULTICAST CALL...

Страница 40: ......

Страница 41: ...om where calls can be made directly USING THE ADDRESS BOOK VIA THE REMOTE CONTROL You can select the address book using the remote control To select the address book via the remote control 1 On the re...

Страница 42: ...splayed When the call is answered on the far end the system switches to Call mode USING THE PERSONAL ADDRESS BOOK VIA THE NEW CALL BAR You can select the personal address book from the New Call bar To...

Страница 43: ...book and save them for repeated use To edit a contact s details in the personal address book 1 In the personal address book select the entry you want to edit and then press OK on the remote control 2...

Страница 44: ...ess Make Call The Calling screen is displayed When the call is answered on the far end the system switches to Call mode DISPLAYING THE CALL LOG FROM THE ADDRESS BOOK You can select Call Log via the ad...

Страница 45: ...peed dial via the remote control 1 Enter the speed dial index number and press Make Call or press Speed Dial The Speed Dial window opens 2 Select the number to dial The contact number is copied to the...

Страница 46: ...already in the Speed Dial To edit a speed dial number 1 Select the number you want to edit in Speed Dial select Edit and press OK The Name Address bar opens 2 Edit the contact s name and address and...

Страница 47: ...r the address of the contact is copied to the number field NOTE When the address book is open typing a letter in the ABC field causes it to jump to the first letter entered 3 Select Call or press Make...

Страница 48: ......

Страница 49: ...om and includes the following sections Administration Settings Call Settings Call Security Online Directory Properties H 323 Protocol Settings SIP Protocol Settings Quality of Service QoS Settings Lic...

Страница 50: ...ls and ISDN Password Enter the password that will restrict the access to the advanced configuration When typing the password each letter is visible for one second and then turn into an asterisk Advanc...

Страница 51: ...adjustment Enables videoconferences to proceed at reduced bandwidth if the network is congested Deselecting this option maintains a constant quality to the session but it may cause network problems Au...

Страница 52: ...rity settings 1 Select Settings General Security The Security window appears 2 In the Security Settings window select from the following options Automatic The default option enables encryption automat...

Страница 53: ...mation is stored as created on the Online Directory Server Domain Server s domain name for the Online Directory User Name Your user name as defined on the Online Directory server Password Your access...

Страница 54: ...sing and to communicate interact with either a Collaborate Central server or a standard gatekeeper server one of which you can choose to work with in order to gain better performance and flexibility i...

Страница 55: ...Number Enter the user number used for identification on the gatekeeper server Password Disabled when working with a gatekeeper because gatekeeper authentication is currently not supported Connection M...

Страница 56: ...up i e the call continues while the additional participant is being invited To add participants to the call in Collaborate Central mode 1 Select Collaborate Central Invite The Invite call window is di...

Страница 57: ...Network IP QoS The QoS Settings window appears 2 In the QoS Settings window set the following options and parameters No Priority QoS Select this option if QoS prioritization is not required on your ne...

Страница 58: ...cense settings 1 Select Settings General License The License Settings window appears 2 In the License Settings window the following details are shown Software Version The software and firmware version...

Страница 59: ...ctionality Once selected the ISDN adapter detection may take up to a minute Available Adapters Displays the list of ISDN adapters available for this system Click on Discover to populate the Available...

Страница 60: ...up to 4 lines To define the ISDN phone numbers 1 Enter the appropriate number for each field without the area or country code NOTE Depending on the switch type you selected an additional step may be r...

Страница 61: ...your network If using a DHCP server the address obtained from the DHCP server is displayed Default Gateway Set the IP address of the default gateway router If using a DHCP server the address obtained...

Страница 62: ...that passive viewers can benefit from Multicast sessions can be viewed by all ClearOne endpoints the free ClearOne Broadcast Viewer and the Apple QuickTime viewer The Multicast Settings window allows...

Страница 63: ...announcement rate in seconds Refresh Video Rate The video image refresh rate in multicast streams an interval of 5 seconds is set by default 3 Select Apply RECORDING AND STREAMING SETTINGS You can def...

Страница 64: ...endpoints one of which can be connected through ISDN NOTE Before using this functionality please verify the licensing capabilities of your system Go to the license page Menu Settings General License a...

Страница 65: ...the other parts and contains the image of the dominant speaker at any given time Answer Mode Set the default answer mode for the second and subsequent calls Accept Automatically accept incoming calls...

Страница 66: ...ccess Firewall NAT Settings 1 Select Settings Network IP Firewall NAT The Firewall NAT window appears 2 In the Firewall NAT window set the following options and parameters Connection Mode H 323 This s...

Страница 67: ...on number when you dial out through your organization LAN NAT Address If your organization uses NAT when communicating with parties in another LAN or WAN type the external address for your videoconfer...

Страница 68: ......

Страница 69: ...ulticast Videoconference Importing Exporting the License Viewing the Recording Archive Sending Running Text in a Call Viewing Call Status Performing System Upgrade Performing System Restore ACCESSING...

Страница 70: ...red by the video camera and microphone that are connected to Collaborate Room The stream is viewed in the browser using Window Media Player embedding NOTE Viewing a stream does not require you to ente...

Страница 71: ...In the browser s address bar type the direct IP address of the Collaborate Room unit The Collaborate Room Web login page appears 3 Click View Multicast a new browser window opens and displays the vid...

Страница 72: ...disabled The unit s LAN MAC address is also displayed VIEWING THE RECORDING ARCHIVE You can view the list of recordings that are stored in the Collaborate Room recording directory and you can also de...

Страница 73: ...You can click the adjacent Rename button if you want to change the file name Date Date on which the recording was made and saved Time Time at which the recording was made and saved Size Size of the r...

Страница 74: ...ng Text box appears In the text box type the message you want to send and display on the far end screen ick Start 2 3 and then cl NOTE To stop the display of the running text message on the far end cl...

Страница 75: ...sed in this call Video Bandwidth Bandwidth used by the video in this call Video Frame Rate Video frame rate used in this call Audio Codec Audio codec used to sound audio in this call Audio Bandwidth B...

Страница 76: ...settings To reset the Collaborate Room unit to its factory defaults 1 After logging in click System System Restore The System Restore box appears 2 In the Password box enter the password default 1234...

Страница 77: ...Key Description Arguments Example accept Accept incoming call accept change_camera Set current camera by index call cameralist for list of available video devices Index 1 9 change_camera 1 callinfo Re...

Страница 78: ...dial 125 0 1 2 lan 128 dial 7584568 isdn dtmf Send DTMF tone to remote endpoint identified by Participant ID Note Use sessions to retrieve Participant ID ParticipantID any valid participant number DT...

Страница 79: ...pixels CIF 352 x 288 pixels SIF 352 x 240 pixels VGA 640 x 480 pixels 4CIF 704 576 4SIF 704 x 480 720p 1280 x 720 pixels Rx Tx HD Rx SD 1080p 1920 x 1080 pixels Rx SD HD Tx Rx PHD and Tx Rx FHD 720 6...

Страница 80: ...G 729 AMR 3G Data Specifications Data Sharing Methods Laptop plug in USB storage key Documents PPT PPS Video clips AVI MPEG WMV etc Graphic files BMP GIF TIF etc HD DualStream Sharing of file or the...

Страница 81: ...all port sync NAT IP mask Port pinholing Adaptive Bandwidth Adjustment Packet loss recovery FEC Packet ordering Packet duplication control Jitter correction Lip sync correction Overhead prediction Max...

Страница 82: ...l NAT Network Address Translation Supports restricted access to users via admin Directory Services 1000 local number directory 10 000 global number directory H 350 support Collaborate Central mode LDA...

Отзывы: