background image

21

Intended Use

This device is intended to chop foodstuffs which are suitable for 

cutting.

It is only designed for this use and should only be used for this 

intended purpose.
Only use this device as instructed in this user manual. Do not 

use this device commercially.
No other use is intended and can cause damage or personal 

injuries.

Clatronic International GmbH is not responsible for any 

damages incurred due to improper use

Unpack Device

•  Take the device out of its packaging.

•  Remove all packaging materials, such as foils, filling 

materials, cable ties and cartons.

•  Check that all accessories are included in the box.


NOTE:


Clean manufacturing residues and dust from the device as 

described under “Cleaning”.

Start-Up

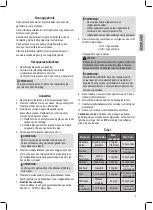
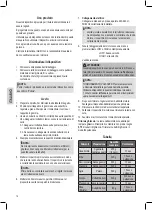
1.  Prepare the dish. Refer to the table below.

2.   Place the rubber mat on a level, flat surface. Place the 

glass container on the rubber mat.

3.  Use one knife or both knives depending on the quantity of 

the food. Fit the knife (or the knives) carefully into the glass 

bowl: 

3.1. Fit the knife with the shaft onto the glass pin in the 

center of the container. 

3.2. If required, fit the second knife with the blades facing 

down onto the shaft of the first knife. 

4.  Empty the desired foodstuffs into the container.


NOTE:


Do not overfill the container; otherwise the foodstuffs 

cannot be properly chopped (quantities see table)!

5.  Place the safety cover onto the container in such way that 

the blade shaft rests in the recess. The safety cover is 

properly positioned if it cannot be moved.


NOTE:


Before use, always check that the silicone seal fits 

correctly.

6.  Place the motor unit on the cover. In doing so, use the 

recesses in the safety cover.

7. 

Electric Connection


Connect the mains plug to a properly installed and earthed 

220-240 V~, 50/60 Hz wall outlet. 


NOTE:


•  The motor unit is fitted with a safety switch.

•  If the device cannot be switched on, check that the 

motor unit, safety cover and blade are fitted correctly.

8.  Hold the motor housing in your hand and press the LOW or 

HIGH button at the same time.

LOW = low speed

HIGH = high speed.

The unit starts up.


CAUTION: 

This device is suitable for short time operation (KB) of 

maximum 20 seconds. Leave to cool down for at least 


2 minutes before using the device again.


NOTE:


PULSE OPERATION: Briefly press and release the 

switch for pulse operation. Use the device in this mode for 

maximum 1 minute. Leave to cool down for at least 


2 minutes before using the device again!

9.  After chopping, take your hand off the motor unit. 

Disconnect from mains power supply.

10. Remove the motor unit from the transparent container.

11.  Lift off the safety cover and carefully remove the blade.

12. Now you can empty the contents in the transparent 

container.

Crushing ice: The blades in the mixing bowl are suitable for 

breaking ice cubes. Fill the container no higher than the 


0.75 marking with ice cubes. Only crush ice cubes in pulse 

mode.

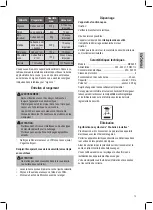
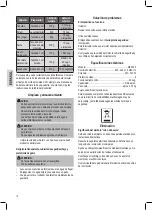
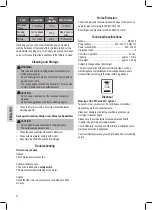
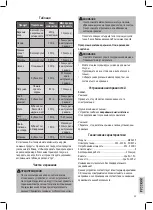
Table

Food 

Preparation

Max. 

Quantity

Max. Duration

Boiled eggs

Shelled, 

quartered

450 g 


(1/4 pieces)

10 sec

Herbs

300 g 

15 sec or pulse

Walnuts/ 

hazelnuts

Without 

nutshells!

300 g 

15 sec.

Almonds

Without shells!

300 g 

15 sec

Garlic

Peeled

300 g 

15 sec or pulse

Onions

2 cm cubes

300 g 

5-10 sec or pulse

Parsley

Wash, destalk

60 g 

10 sec

Bread 

(breadcrumbs) 2 cm cubes

80 g 

15 sec or pulse

Meat

2 cm cubes, 

without bones, 

skin and 

sinews!

300 g

15 sec or pulse

Содержание MZ 3435

Страница 1: ...de servicio Manuale dell Utente Instruction Manual Instrukcja obs ugi Gwarancja Haszn lati utas t s MZ 3435 Multizerkleinerer Universele hakmachine Hachoir multifonction Cortador de alimentos m ltiple...

Страница 2: ...l del usuario P gina 14 Especificaciones t cnicas P gina 16 Eliminaci n P gina 16 ITALIANO Indice Posizione dei comandi Pagina 3 Manuale dell utente Pagina 17 Specifiche tecniche Pagina 19 Smaltimento...

Страница 3: ...sicht der Bedienelemente Locatie van bedieningselementen Situation des commandes Ubicaci n de los controles Posizione dei comandi Location of Controls Lokalizacja kontrolek Akezel szervek elhelyezked...

Страница 4: ...ich f r unser Produkt entschieden haben Wir w nschen Ihnen viel Freude mit dem Ger t Symbole in dieser Bedienungsanleitung Wichtige Hinweise f r Ihre Sicherheit sind besonders gekenn zeichnet Beachten...

Страница 5: ...iegt Sie haben die Schutzabdeckung richtig platziert wenn sie sich nicht verschieben l sst HINWEIS Pr fen Sie vor jeder Benutzung den richtigen Sitz der Silikon Dichtung 6 Setzen Sie das Motorgeh use...

Страница 6: ...k nnten stumpf werden Diese Teile k nnen Sie von Hand in einem Sp lbad reini gen Sp len Sie mit klarem Wasser nach und trocknen Sie die Teile mit einem trockenen Tuch ab ZurAufbewahrung setzen Sie al...

Страница 7: ...en Zugangscode der Ihnen direkt nach IhrerAnmeldung per E Mail bermittelt wird k nnen Sie den Bearbeitungsablauf Ihrer Reklamation auf unserem Servicepor tal online verfolgen Alternativ k nnen Sie uns...

Страница 8: ...uiksaanwjzing Dank u voor het kiezen van ons product Wij hopen dat u het gebruik van het apparaat zult genieten Symbolen in deze gebruiksaanwijzing Belangrijke opmerkingen voor uw veiligheid worden sp...

Страница 9: ...t 6 Plaats de motoreenheid op het veiligheidsdeksel Maak daarbij gebruik van de uitsparingen in het veiligheidsdeksel 7 Elektrische aansluiting Steek de stekker in een goed ge nstalleerde en geaarde 2...

Страница 10: ...rden Was deze accessoires handmatig in afwaswater Spoel na met helder water en droog met een doek Zet de universele hakmachine v r het opbergen in elkaar Probleemoplossing Het apparaat werkt niet Oplo...

Страница 11: ...voir choisi notre produit Nous esp rons qu il vous apportera enti re satisfaction Symboles utilis s dans ce manuel Les notes importantes de s curit sont marqu es de fa on distincte Y faire attention a...

Страница 12: ...curit est correctement positionn s il est immobile NOTE Avant utilisation v rifiez toujours que le joint de silicone s adapte correctement 6 Placez le bloc moteur sur le couvercle Pour cela servez vo...

Страница 13: ...es dans le lave vaisselle Les surfaces peuvent ternir Lavez les accessoires la main avec du liquide vaisselle Rincez l eau claire et essuyez l aide d un chiffon Montez le hachoir multifonction avant d...

Страница 14: ...nte 5 Soporte de goma antideslizante Manual del usuario Gracias por elegir nuestro producto Esperamos que disfrute de su utilizaci n S mbolos en este manual del usuario Las notas importantes para su s...

Страница 15: ...siempre que el sello de silicona se ajusta correctamente antes de usar el dispositivo 6 Coloque la unidad del motor sobre la cubierta Para ello utilice el hueco de la cubierta de seguridad 7 Conexi n...

Страница 16: ...rios en el lavavajillas Podr a da ar su superficie Lave estos accesorios de forma manual en agua de fregar Enju guelos con agua limpia y s quelos con un pa o Vuelva a montar el cortador de alimentos m...

Страница 17: ...acquistato uno dei nostril prodotti Ci auguriamo che possiate utilizzarlo con la massima soddisfazione Simboli nel manuale dell utente Note importanti per la sicurezza sono segnate in modo chiaro Far...

Страница 18: ...l sigillo in silicone sia correttamente a posto 6 Mettere l unit motore sul coperchio Utilizzare a tal proposito le cavit nel coperchio di sicurezza 7 Collegamento elettrico Collegare la presa ad un p...

Страница 19: ...ti accessori manualmente in acqua con detersivi Pulire con acqua e asciugare con un panno Montare il multi trituratore prima di conservarlo Risoluzione di problemi Il dispositivo non funziona Soluzion...

Страница 20: ...er 5 Non slip rubber mat User manual Thank you for selecting our product We hope that you will enjoy use of the appliance Symbols in this user manual Important notes for your safety are marked distinc...

Страница 21: ...6 Place the motor unit on the cover In doing so use the recesses in the safety cover 7 Electric Connection Connect the mains plug to a properly installed and earthed 220 240 V 50 60 Hz wall outlet NO...

Страница 22: ...Chopper before storage Troubleshooting Device does not work Solution Check mains power connection Further possible causes The device is fitted with a safety switch This prevents accidental starting of...

Страница 23: ...o u ytkowanie b dzie ze sob nios o wiele korzy ci Symbole u yte w instrukcji u ytkowania Wa ne wskaz wki dotycz ce bezpiecze stwa s wyra ne zaznaczone Nale y wzi je pod szczeg ln uwag aby unikn wypadk...

Страница 24: ...yciem sprawdza czy silikonowa uszczelka jest prawid owo dopasowana 6 Ustawi urz dzenie nap dowe na pokrywie Wykonuj c to nale y u y wn k w pokrywie zabezpieczaj cej 7 Po czenie elektryczne Pod czy wty...

Страница 25: ...yny Urz dzenie nap dowe posiada wy cznik bezpiecze stwa Zapobiega to przypadkowemu w czeniu silnika Rozwi zanie Sprawdzi czy prawid owo zamocowano urz dzenie nap dowe pokryw zabezpieczaj c oraz ostrze...

Страница 26: ...poz 1176 Usuwanie Znaczenie symbolu kub a na k kach Nale y zadba o rodowisko i nie wyrzuca urz dze elektrycznych razem z odpadami gospodarstwa domowego Stare lub uszkodzone urz dzenia elektryczne nale...

Страница 27: ...nket v lasztotta Rem lj k hogy r m t leli majd a k sz l k haszn lat ban A Haszn lati tmutat ban Tal lhat Jelz sek Az n biztons g ra vonatkoz fontos tudnival kat k l n kiemelt k K rj k mindenk ppen gy...

Страница 28: ...n t m t s megfelel en illeszkedik 6 Helyezze a motoregys get a v d burkolatra ehhez haszn lja a biztons gi v d burkolaton l v m lyed seket 7 Elektromos csatlakoz s Csatlakoztassa a t pk belt egy megfe...

Страница 29: ...l mossa el tiszt t szeres v zben Tiszta v zben bl tse le s egy ruh val t r lje sz razra T rol s el tt szerelje ssze a t bbfunkci s apr t t Hibaelh r t s A k sz l k nem m k dik Megold s Ellen rizze a h...

Страница 30: ...30 1 2 3 4 5...

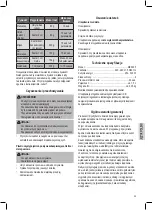
Страница 31: ...31 Clatronic International GmbH 1 2 3 3 1 3 2 4 5 6 7 220 240 50 60 8 LOW HIGH LOW HIGH KB 20 2 1 2 9 10 11 12 0 75 450 10 300 15 300 15 300 15...

Страница 32: ...32 300 15 2 300 5 10 60 10 2 80 15 2 300 15 1 150 15 20 1 150 20 1 300 10 15 MZ 3435 220 240 50 60 250 300 II 20 1 5 2 05...

Страница 33: ...33...

Страница 34: ...34 1 2 3 4 5 Clatronic International GmbH 1 2 3 3 1 3 2 4 5 6 7 220 240 50 60 8 LOW HIGH LOW HIGH KB 20 2 1 2 9 10 11 12 0 75...

Страница 35: ...35 450 10 300 15 300 15 300 15 300 15 2 300 5 10 60 10 2 80 15 2 300 15 1 150 15 20 1 150 20 1 300 10 15 MZ 3435 220 240 50 60 250 300 II 20 1 5 2 05 CE...

Страница 36: ......

Страница 37: ......

Страница 38: ...Stand 09 11...

Отзывы: