background image

18

NX501A

English

Owner’

s Manual

Watching to a disc

1. To load a disc: 

Insert the disc into the center of the insertion slot the 
label side facing up.


CAUTION

For your safety, the driver should not 
insert or eject a disc, opening the 
operation panel while driving.

Note:

• Never insert foreign objects into the disc insertion slot.
• If the disc is not inserted easily, there may be another 

disc in the mechanism or the unit may require service.

• 8cm (single play) discs cannot be used.

2. Disc starts playing automatically.

 WARNING

Some videos may be recorded at higher 

than desired volume levels. Increase the 

volume gradually from the minimal setting 

after the video has started.

Ejecting a disc

1. To eject a disc press eject 

[ ]

 button. The play 

mode then switches to the Tuner mode.

  If the disc is left in the ejected position for 15 

seconds, the disc is automatically reloaded. In this 
case, the play mode will remain in the Tuner mode.

Note:

 If you force a disc into before auto reloading, it 

may damage a disc.

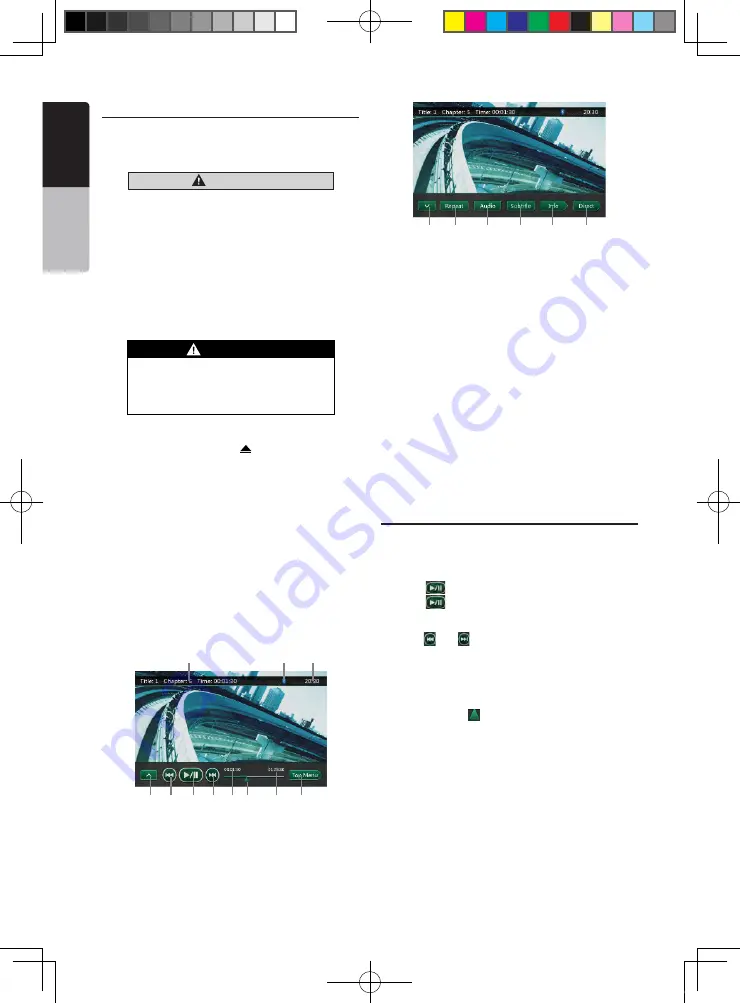
Showing DVD Player mode screen

After disc is loaded, the play mode is automatically 
engaged.
Touch any place of the screen to display DVD Video 
menu touch the screen again to return the playback 
screen. The display will return to the playback screen, 
if you do not touch the screen for 10 seconds.

1

2

3

4

5 6

7

8

9

10

11

12

13

14

15

16

17

  1 - Next page Buttons
  2 - Previous Track /Fast Backward Button
  3 - Play/Pause Button
  4 - Next Track/Fast Forward Button
  5 - Elapsed playing time
  6 - Seek bar
  7 - Total time
  8 - Top Menu Button
  9 - System time
10 - Bluetooth status
11 - DVD playback info
12 - Previous page Button
13 - Repeat switching Button
14 - Audio Channel switching Button 
15 - Subtitle switching Button
16 - INFO Button
17 - Direct chapter or title searching Button

Operate the DVD Player menu

You can select the button items displayed in the DVD 
menu by directly touching it.

Play/Pause Playback

1. Touch 

[

]

 button to pause during playback.

2. Touch 

[

]

 button again to resume playback.

Skip (Search) a Chapter

1. Press 

[ ]

 or 

[ ]

 button during playback.

Chapters are skipped down or up from current 
locations, as many times as the button is pressed, and 
playback starts.

Skip use seek bar

Press the triangle 

[ ]

 on seek bar and drag it to any 

position where you want to start playback.

NX501A_Usermanual_EN-CM-110414.indd   18

2011-4-14   14:19:56

Содержание NX501A

Страница 1: ...2 DIN DVD MULTIMEDIA STATION WITH BUILT IN NAVIGATION 6 2 TOUCH PANEL CONTROL NX501A Owner s manual Installation manual...

Страница 2: ...B AUDIO OPERATIONS 26 Notes on using USB memories 26 Select USB Audio mode 26 Playing MP3 WMA files in USB memory 27 11 USB VIDEO OPERATIONS 29 Notes on using USB memories 29 Select USB Video mode 29...

Страница 3: ...PERATIONS 45 General Setup Menu 45 Video Setup Menu 45 Audio Setup Menu 45 Navigation Setup Menu 46 Others Setup Menu 46 Set the Anti Theft code 46 20 MONITOR OFF 47 21 TROUBLESHOOTING 48 GENERAL 48 D...

Страница 4: ...Wheel Remote Ready Compatible with iPod iPhone via USB Expanding Systems NOTE The items listed outside the frames are the commercial products generally sold Expanding visual features Rear Monitor Rear...

Страница 5: ...ces of information used Please respect current traffic conditions and regulations at all times while driving Where actual road conditions and highway regulations differ from the information contained...

Страница 6: ...re forms on the optical parts of the player do not use the player for about one hour The condensation will disappear naturally allowing normal operation 2 Driving on extremely bumpy roads which cause...

Страница 7: ...o work properly Some models may not operate correctly When the memorized data is lost or damaged by any chance Clarion shall not be liable for any damage When using an USB memory stick we recommend th...

Страница 8: ...use commercially available disc protection sheets or discs equipped with stabilizers etc These may damage the disc or cause breakdown of the internal mechanism Storage Do not expose discs to direct su...

Страница 9: ...ect disc from unit MENU Button Press this button to display main menu press again to return current source Press and hold this button for 3 seconds to turn off the monitor Press any place of the scree...

Страница 10: ...operly can cause them to explode Take note of the following points When replacing batteries replace both batteries with new ones Do not short circuit disassemble or heat batteries Do not dispose of ba...

Страница 11: ...r return current resource PIC Button Press and hold this button to change your monitor brightness ENT Button Press to fix the entered data in the Key Pad screen or enter the item the cursor is on TAG...

Страница 12: ...tton Press to switch the AUDIO channel of the disc while playing DVD SUB T Button Press to switch next available subtitle while playing DVD Press to display Video menu in iPod mode ANGLE Button Press...

Страница 13: ...isplay the Navigation mode Rear Button Press the button to display the rear menu Setting Button Press the button to display the setting menu Rear Zone Source Rear Disc Video Press the button to displa...

Страница 14: ...hown below Multi story function When a DVD video contains more than one story for a film you can select the story you wish to enjoy The operation procedures vary with the disc observe the instructions...

Страница 15: ...ber ALL 3 or any combination of numbers that also incorporate a 3 The DVD video region number is marked on the disc jacket as shown below This product incorporates copyright protection technology that...

Страница 16: ...word and touch the OK key or input 4356 to reset password Input a new password and touch the OK key Input the same new password again and touch the OK key Note When a disc with view restrictions is in...

Страница 17: ...the play mode is automatically engaged Touch any place of the screen to display DVD Video menu touch the screen again to return the playback screen The display will return to the playback screen if y...

Страница 18: ...number input mode Title A large segment to divide the data area of the disc Chapter A small segment to divide the data area of the disc 2 Input the number of the title chapter that you want to play w...

Страница 19: ...itles are turned off Switching angles On DVD discs in with video images have been recorded in two or more angles you can switch among the angles during playback 1 Touch Angle key on the remote control...

Страница 20: ...ton Playback resumes from start of the folder which playing track is in Repeat Playback This operation plays back video files recorded on the disc repeatedly The repeat set as the factory default is R...

Страница 21: ...yback 1 Touch button to pause during playback 2 Touch button again to resume playback Switch to Previous next file or track Press or button during playback to play previous next file Pressing button s...

Страница 22: ...the numerical keypad Touch Button will close the option window and display playback screen Rotation Effect On Off This operation allows turn on turn off rotation effect The factory default is On 1 To...

Страница 23: ...back will be impossible Number of files or folders 1 The maximum allowable number of folders is 255 including root directory the maximum allowable number of files is 1500 max 255 per folder This repre...

Страница 24: ...tle of current folder The number on the folder symbol is the number of files and folders number in current folder Touch the title of current folder play list will show files and folders in upper folde...

Страница 25: ...playback may be impossible The maximum allowable number of folders is 65535 including root directory and folders with no MP3 WMA file The maximum allowable number of files in a folder is 65535 You ca...

Страница 26: ...repeat set as the factory default is Repeat Folder Touch the button once for Repeat Track again for Repeat Folder Note The repeat in all USB files function is not available Shuffle Playback 1 Touch b...

Страница 27: ...ill continue Searching with the Track Number This operation allows searching using the track numbers in playing folder 1 Touch Button to show button 2 Touch button The numerical keypad will appear on...

Страница 28: ...ected last the system will play back where it left off Playing video files in USB memory If the video is playing touch the screen of the playing video to display Operation buttons The display will ret...

Страница 29: ...ack 1 Press the button on remote control more than 1 second Playback is stopped 2 To resume playback press the button Playback resumes from the first valid media file of the folder Repeat Playback The...

Страница 30: ...ect the iPod iPhone after charging the battery if it has run down Selecting the iPod Audio mode Connect your iPod iPhone to the USB connector via CCA 748 cable The system will automatically detect the...

Страница 31: ...Pause and Next Track can be operated Refer to 17 17 Close the Settings Page 18 18 Display video of iPod iPhone Follow operation steps to display video of iPod iPhone in Simple Control Mode Connect the...

Страница 32: ...list is in root press the button can close the list 26 Closed the List 27 Search with the first alphabet in current list Selecting the iPod Video mode Connect your iPod iPhone to the USB connector vi...

Страница 33: ...mode Please refer to the iPod Audio Mode operation key Note Video playback is not available on all iPod iPhone devices Please contact your Clarion dealer for details An optional connection cable or a...

Страница 34: ...etooth audio player has been established the icon is displayed at the top of the screen Bluetooth audio player settings Confirming Bluetooth Information and setting Pass Key You can confirm various in...

Страница 35: ...istered perform the following operation 1 Touch the Device key to display the Device Select screen 2 Touch the currently connected device then press the key to disconnect the active device 3 Touch the...

Страница 36: ...tion condition Select the BT Phone mode 1 Press MENU button on Operational Panel to return to the Main Menu 2 Touch the Bluetooth Telephone key to select the Bluetooth Telephone mode The Telephone scr...

Страница 37: ...r end of the telephone has a reception problem Register your cellular phone Pairing You can register up to 5 cellular phones The registering method is as same as Registering your Bluetooth audio playe...

Страница 38: ...orm the Object Push transfer operation of the Phone Book data on the current cellular phone For details of the operation see the operation manual of the cellular phone Note Some cellular phones may no...

Страница 39: ...e key to hang up Making a call using the History The system will memorize the Dialed Received calls record data in the memory You can confirm it and use it to make a call from this unit 1 Touch the ke...

Страница 40: ...emory 1 Touch the desired Band key to select the band you wish to store 2 Tune to a station you want to store using the seek tuning step tuning or preset tuning 3 Touch and hold the desired Preset key...

Страница 41: ...external device Press Menu button on Operational Panel to return to the Main Menu You cannot directly control external devices connected to AUX 1or AUX 2 input 17 CAMERA OPERATIONS Switching to Camer...

Страница 42: ...ow Buttons Press the button can display the hidden button 2 Previous chapter 3 Play or Pause video 4 Next chapter 5 Elapsed playing time indicator 6 Top Menu Button 7 Front Rear switching button If th...

Страница 43: ...Rear Source mode screen 6 Repeat Button Same as iPod function of front source 7 Front Rear button If the screen displays Rear Source press to switch to Front Source If the screen displays Front Sourc...

Страница 44: ...three options Day Night and Auto Tel Speaker There are two options Left and Right For example if current setting is Left when BT phone is coming in only left speaker can hear the phone Camera Input F...

Страница 45: ...rn info window will pop up in the top of the AV screen to indicate the key point Off Turn off this function Voice Guidance Enable or disable the navigation voice guidance Others Setup Menu This menu i...

Страница 46: ...reen the TFT screen will turn on again When the Anti theft is On you need enter correct Anti theft code to turn the unit on If you enter wrong code three times the unit is locked and must be unlocked...

Страница 47: ...k The battery of the remote control unit is dead or there is no battery in the remote control unit Check the battery of the remote control unit Problem Cause Measure Disc cannot be loaded A disc is al...

Страница 48: ...WMA files encoded properly The video of iPod iPhone image is disturbed The TV Signal setting of the iPod iPhone is not set correctly Set the TV Signal setting NTSC PAL of the iPod iPhone correctly Bl...

Страница 49: ...n Note that though there are effective pixels of 99 99 or more pixel missing or normally lit pixels account for 0 01 22 ERROR DISPLAY If an error occurs one of the following displays is displayed Take...

Страница 50: ...tage 1 0 Vp p 75 Screen Size 6 2 wide type Pixels 1 152 000 Resolution 800 x 480 x 3 RGB Bluetooth Specification Bluetooth Ver 2 1 EDR Profile HFP1 5 Hands Free Profile HSP1 0 Headset Profile A2DP Adv...

Страница 51: ...ns Remote Control weight 50g including battery 52 mm m m 4 2 1 12 mm 178 mm 6 1 3 m m 4 1 5 m m 100 mm Note Specifications comply with JEITA Standards Specifications and design are subject to change w...

Страница 52: ...able 3 Double face tape for GPS Antenna 1 Remote control unit 1 Battery CR2025 1 Installed in remote control Trim ring 1 Cleaning cloth 1 Owner s manual and Installation manual 2 Electro tap 2 2DIN tr...

Страница 53: ...ittle cold or warm water to a soft cloth and wipe off the dirt gently 4 Cautions on Installation 1 Prepare all articles necessary for installing the source unit before starting 2 Install the unit with...

Страница 54: ...6 2 Wire as shown in Section 7 3 Reassemble and secure the unit in the dashboard and set the face panel and center panel Installing the Main Unit in NISSAN Vehicle Note 1 Position the face panel with...

Страница 55: ...installation bracket interferes with the unit bend and flatten it with a nipper or similar tool Vehicles other than NISSAN and TOYOTA In some cases the center panel may require modification Trimming...

Страница 56: ...wiring is correct If a fuse is blown replace it with a new one of the same amperage rating as the original 15A FUSE 4 To replace the fuse remove the old fuse on the back of the unit and insert the ne...

Страница 57: ...r L Line Out Front R Line Out Front L Purple Gray Black White Red White Red White Red CAMERA VISUAL IN SWI VIDEO OUT 2 ZONE OUT Black Red White Red EX MIC iPod iPhone CCA 748 sold separately Video Out...

Страница 58: ...n Black Blue White Orange White Red Brown Blue 12V main power Ground Rear right Rear right Parking brake cord Purple White Reverse gear cord Front right Front right Front left Front left Rear left Rea...

Страница 59: ...es The iPod iPhone connection will charge your iPod iPhone unless the iPod iPhone battery is completely depleted If the specified cord of the cellular phone is connected to the phone interrupt cord of...

Страница 60: ...Clarion Co Ltd All Rights Reserved Copyright 2011 Clarion Co Ltd 2011 09 NX501A_CM NX501A CM_Usermanual_EN Cover indd 2 2011 8 30 16 46 41...

Страница 61: ...Clarion Mobile Map NX501A User Manual...

Страница 62: ...s manual to fully understand the screens and features Easy navigation map updates It is easy to keep the navigation system up to date Simply download new map data from Clarion s portal site store them...

Страница 63: ...1 Selecting the destination of a route 22 3 1 1 Entering an address or a part of the address 22 3 1 1 1 Entering an address 22 3 1 1 2 Entering the midpoint of a street as the destination 25 3 1 1 3...

Страница 64: ...oute 54 3 4 7 Checking route alternatives for an existing route 55 3 4 8 Changing the vehicle used in route planning 56 3 4 9 Changing the road types used in route planning 57 3 5 Saving a location as...

Страница 65: ...NX501A English 5 5 Glossary 75 7 Copyright note 77...

Страница 66: ...d that you operate Clarion Mobile Map before you start your journey Plan the route before your departure and stop if you need to change the route You must obey the traffic signs and follow the road ge...

Страница 67: ...plication interface Later you can change it in Regional settings page 74 2 Read the End User Licence Agreement Tap to continue 3 The Configuration wizard starts Tap to continue 4 Select the language a...

Страница 68: ...ration or you are about to lose some of your data or settings Otherwise Clarion Mobile Map saves your selections and applies the new settings without confirmation as soon as you use the controls Type...

Страница 69: ...to enter text and numbers Each key is a touch screen button 2 1 1 Using keyboards You only need to enter letters or numbers when you cannot avoid it You can type with your fingertips on the full scree...

Страница 70: ...essing the following buttons to reach extra functions x Tap and hold on list and menu screens the Map screen appears x Tap and hold any of the and buttons on the Map screen you can rotate tilt or scal...

Страница 71: ...map area When there is no GPS position the Vehimarker is transparent It shows your last known position You see coloured dots circling around a satellite symbol in the top left corner The more green d...

Страница 72: ...u screens Default data fields when navigating a route tap and hold any of the fields to change its value Field Description Shows the distance you need to travel on the route before reaching your final...

Страница 73: ...est or an alert point the object will be selected you see a red circling border around the object and you can get information about this object or use it as a route point 2 2 3 Objects on the map 2 2...

Страница 74: ...e appropriate lane in order to follow the recommended route If lane information is available in the map data Clarion Mobile Map displays the lanes and their directions using small arrows at the bottom...

Страница 75: ...ges in terrain elevations or depressions in the land when you view the map in 2D and use it to plot the route map in 3D when you navigate Hills and mountains are shown in the background of the 3D map...

Страница 76: ...o browse it during navigation The map stops following the current position the Vehimarker a red arrow by default is not locked in a fix position on the screen any more and control buttons appear to he...

Страница 77: ...ode The direction of the compass shows North Tap the button to switch to North up view and then tap again to rotate the map in the previous direction Location information Tap this button to open a new...

Страница 78: ...ations Find Favourite page 44 This button opens the History list You can select one of your previous destinations Find History page 46 This button opens the route editing function My Route Edit Route...

Страница 79: ...ter use My Route More Save Route With this function you can replace the active route with a previously saved route My Route More Load Route With this function you can search for Places of Interest in...

Страница 80: ...accurate x House number on the left x House number on the right x In the middle of the screen you can see whether the position is current or the time left since it was last updated x Address details w...

Страница 81: ...or enter a coordinate x Tap to display the route parameters and the route in its full length on the map You can also perform route related actions such as editing or cancelling your route setting a st...

Страница 82: ...ithout a house number or the names of two intersecting streets page 22 x Enter an address with postal code page 29 This way you do not need to select the name of the city town and the search for stree...

Страница 83: ...Start entering the name of the city town on the keyboard c Find the city town you need x The most likely city town name is always shown in the input field To accept it tap x If the desired name does...

Страница 84: ...tering the address If the entered house number cannot be found the midpoint of the street is selected as the destination 7 A full screen map appears with the selected point in the middle If necessary...

Страница 85: ...ouse number is not available 1 If you are on the Map screen tap to return to the Navigation menu 2 In the Navigation menu tap the following buttons 3 If necessary modify the country and city town as d...

Страница 86: ...p to select a different destination 7 After a short summary of the route parameters the map appears showing the entire route The route is automatically calculated Tap to modify route parameters or tap...

Страница 87: ...list appears immediately x In case of a longer street the keyboard screen appears Start entering the name of the intersecting street on the keyboard As soon as the street names that match the entered...

Страница 88: ...ons 3 If necessary modify the country as described earlier page 22 4 Select the destination city town a Tap b Start entering the name of the city town on the keyboard c Find the city town you need x T...

Страница 89: ...lated Tap to modify route parameters or tap and start your journey 3 1 1 5 Entering an address with a postal code All of the above address searching possibilities can be performed with entering the po...

Страница 90: ...u need x The most likely street name is always shown in the input field To accept it tap x If the desired name does not show up the names that match the string appear in a list after entering a couple...

Страница 91: ...esults All other characters are greyed out x As you are typing the most likely result is always displayed in the input field If the guess is correct tap to select it x After entering a couple of lette...

Страница 92: ...only a few screen taps x you can search for a Place by its category x you can search for a Place by its name In addition you can search for special services from the Where Am I screen 3 1 2 1 Quick s...

Страница 93: ...cted Place Tap to return to the map 7 If necessary tap the map somewhere else to modify the destination The Cursor appears at the new location Tap to confirm the destination or tap to select a differe...

Страница 94: ...osition is not available either no GPS signal they are searched around the last known position x x If an active route exists restaurants are searched along the route x If there is no active route dest...

Страница 95: ...r appears at the new location Tap to confirm the destination or tap to select a different destination 9 After a short summary of the route parameters the map appears showing the entire route The route...

Страница 96: ...s useful when you search for a later stopover that results in a minimal detour only such as searching for upcoming petrol stations or restaurants The result list will be ordered by the length of the n...

Страница 97: ...er the list tap 11 Browse the list if necessary and tap one of the list items A full screen map appears with the selected point in the middle The name and address of the Place is displayed at the top...

Страница 98: ...it is not available around the last know position The result list will be ordered by the distance from this position x Tap to search for a place within a selected city town The result list will be or...

Страница 99: ...main Place categories e g Accommodation to search in or tap to search among all Places 7 Select one of the Place subcategories e g Hotel or Motel to search in or tap to search in the selected Place c...

Страница 100: ...displayed at the top of the screen 13 optional Tap to see the details of the selected Place Tap to return to the map 14 If necessary tap the map somewhere else to modify the destination The Cursor ap...

Страница 101: ...lected point in the middle The name and address of the Place is displayed at the top of the screen 8 optional Tap to see the details of the selected Place Tap to return to the map 9 If necessary tap t...

Страница 102: ...an instant list of that type of Places 5 optional The Places in the list are ordered by their distance from the current or last known position from the selected city town from the destination or by t...

Страница 103: ...t your journey 3 1 3 Selecting a map location as the destination 1 If you are on the Map screen tap to return to the Navigation menu 2 In the Navigation menu tap the following buttons 3 Locate your de...

Страница 104: ...layed 3 Tap the Favourite that you want to set as your destination If necessary browse down to see more of the list or tap and enter a few letters from the name of the Favourite destination 4 A full s...

Страница 105: ...n tap and then tap this button can be added to the Quick menu in Settins page 69 x If you are in the Navigation menu tap and then tap 2 A full screen map appears with the selected point in the middle...

Страница 106: ...were last selected If necessary scroll the list to see earlier destinations 3 Select a destination from the list 4 A full screen map appears with the selected point in the middle If necessary tap the...

Страница 107: ...ssary tap then and enter the coordinate in UTM format 6 When finished tap 7 A full screen map appears with the selected point in the middle If necessary tap the map somewhere else to modify the destin...

Страница 108: ...ap the map somewhere else to modify the destination The Cursor appears at the new location Tap to confirm the destination or tap to select a different destination 6 After a short summary of the route...

Страница 109: ...points the start point of the route normally the current GPS position 5 Tap to select the destination 6 The Destination menu appears and you can select the destination of the route the same way as des...

Страница 110: ...information are displayed x The name and or address of the destination x Warning icons if any They provide extra information about your route e g unpaved roads or toll roads to be taken x The total t...

Страница 111: ...you select a new destination as described in the above sections the application will ask you whether to start a new route add a new waypoint intermediate destination to the route or append the newly...

Страница 112: ...ing point of the route to a different location than the current GPS position 1 If you are on the Map screen tap to return to the Navigation menu 2 In the Navigation menu tap 3 If you already have a ro...

Страница 113: ...tions Edit Route You can edit the route by modifying the list of destinations You can add or remove destinations modify the start position or reorder the list 1 If you are on the Map screen tap to ret...

Страница 114: ...need to tap until all waypoints are deleted x In the Navigation menu tap and then tap The active route is deleted with all its waypoints 3 4 6 Checking route alternatives when planning the route You c...

Страница 115: ...e orange line now shows the new recommended route 3 4 7 Checking route alternatives for an existing route To recalculate the active route with a different route planning method you can modify the Rout...

Страница 116: ...th different routing methods 7 Select one of the route alternatives then tap and hold for a few seconds to return to the Map screen Clarion Mobile Map recalculates the route The orange line now shows...

Страница 117: ...lowing options their order depends on the selected vehicle type x You might need to avoid motorways when you are driving a slow car or you are towing another vehicle x Charge roads are pay roads where...

Страница 118: ...rites the list of frequently used destinations Planning a route to one of the Favourite destinations is described on page 44 1 Select a destination as described before It can be an address a Place any...

Страница 119: ...ewly opened screen select the type of the alert point the direction from which you expect the alert and if applicable the speed limit for this alert point 5 Tap to save the location as a new alert poi...

Страница 120: ...the alert point 3 8 Watching the simulation of the route You can run a simulated navigation that demonstrates the active route Do as follows 1 If you are on the Map screen tap to return to the Navigat...

Страница 121: ...r a few seconds but you can open them again if you tap the map x Jump to the next route event manoeuvre x Pause the simulation x Jump to the previous route event manoeuvre x Tap to increase the speed...

Страница 122: ...screens x Daytime colours are similar to paper road maps and the menus are bright x The night colour themes use dark colours for large objects to keep the average brightness of the screen low Clarion...

Страница 123: ...n x Walkways are excluded from routes x x All manoeuvres are available in intersections x Directional constraints are taken into account the way that opposite direction is allowed with a low speed x A...

Страница 124: ...They cannot take elevations turns curves and traffic conditions into account Also this routing is not meant to give you the greenest route of all It is still important to travel quickly so the result...

Страница 125: ...en speed limit x Only when speeding The audio alert is only played when you exceed the given speed limit x When approaching The audio alert is always played In order to draw your attention the alert c...

Страница 126: ...e map Tap the Details button to see the exact sunrise and sunset times for all your route points your current location all waypoints and the final destination If you save your trip logs when you arriv...

Страница 127: ...are is equipped with both open source community maps and paid maps from professional map content providers You can select which maps you wish to use You can fine tune the appearance of the Map screen...

Страница 128: ...ust ensure on your own liability that using this feature is legal in the country where you intend to use it This button is not displayed when GPS position is not available or if you are in certain cou...

Страница 129: ...r or to be excluded from the route if possible Excluding a road type is a preference It does not necessarily mean total prohibition If your destination can only be accessed using some of the excluded...

Страница 130: ...e in intersections x Directional constraints are taken into account the way that opposite direction is allowed with a low speed x A private road is used only if the destination is there x Walkways are...

Страница 131: ...ample the motorway instead of a series of smaller roads or streets 4 3 4 Green routing settings These settings determine how Green routes will be calculated They are also used to display the cost and...

Страница 132: ...hanging the map content the software is restarted If you already have a planned route it will be recalculated to match the newly selected map 4 3 6 Map settings You can fine tune the appearance of the...

Страница 133: ...u can also revert to the default visibility settings 4 3 7 Visual guidance settings Settings related to guidance on the map screen can be adjusted here The data fields in the corner of the Map screen...

Страница 134: ...listed units in some voice guidance languages Select between 12 and 24 hours time display and the various international date display formats By default time zone is taken from the map information and...

Страница 135: ...Themes are custom graphic settings and they can have different colours for streets blocks or surface waters in 2D and 3D modes and they display shades or shadows in different ways in 3D mode One dayti...

Страница 136: ...vents i e manoeuvres for example turns and roundabouts to reach the destination The route contains one start point and one or more destinations The start point is the current or last known position by...

Страница 137: ...ording without the express written consent of Clarion 2010 Clarion Data Source 2006 2010 Tele Atlas All rights reserved This material is proprietary and the subject of copyright protection database ri...

Страница 138: ...Clarion Co Ltd All Rights Reserved Copyright 2011 Clarion Co Ltd Printed in China Imprime au Chin Impreso en China 2011 07 NX501A_CM...

Отзывы: