background image


uTouch User Manual 

v1.6 

27 

12.1


Hardware 

Here you can set various non standard hardware settings: 

1.


Card reader 

2.


Wiegand interface 

3.


Input / output states from GPIO interface 


12.1.1


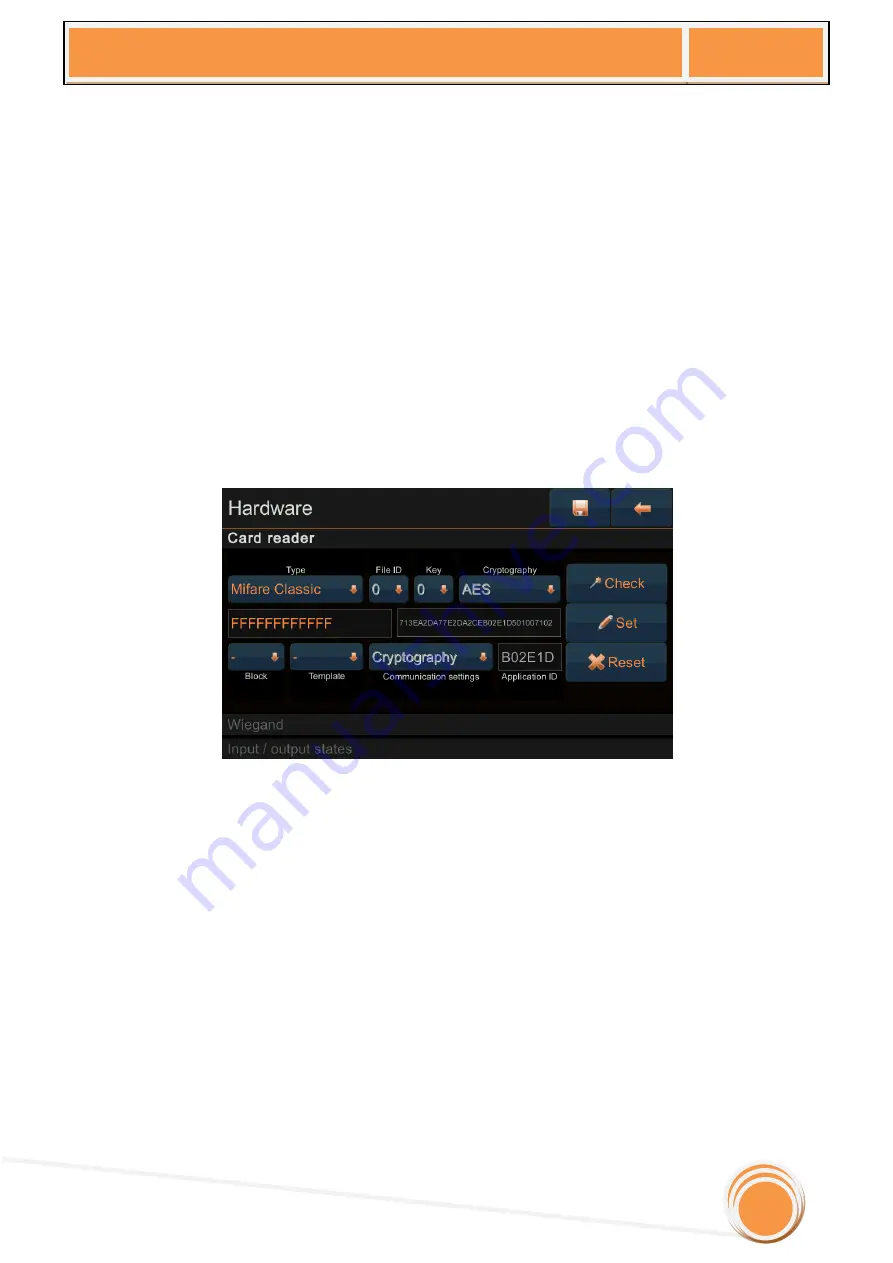
Card reader 

At this version of BoneID Embedded two types of cards are supported. 

1.


Mifare Classic 

2.


DESFire EV1 

Notice that below first row of combo boxes are two boxes containing hexadecimal key values 

needed for successful card operation. Left box is KEY-A in Mifare mode, while in DESFire EV1 mode 
left box is Master key and right box is Application key. 

"

Check

" means you can check with your card if settings are OK. 

"

Set

" will reprogram card from default settings to your settings. 

"

Reset

" will return card to factory state (for Mifare will set KEY-A to default for all selected 

blocks, while for DESFire EV1 will delete application and reset master key to default, if specified) 


12.1.1.1


Mifare Classic 

Mifare classic cards can be used in three different ways: 

1.


Read only card ID 

a.


Block and Template combo box must be on "-" 

b.


KEY has no effect 

2.


Read data from specific data block 

a.


Choose Block from 1 to 62 

b.


Leave Template on "-" 

3.


Read template 

a.


Leave block on "-" 

b.


Chose  one  of  offered  block  ranges.  Template  will  use  all  blocks  in  selected 
range. 

c.


Templates can be added to cards from menu "Users" (section 7.2) 


Содержание uTouch

Страница 1: ...uTouch User Manual v1 6 Civintec uTouch Smart Multi purpose terminal with BoneID Embedded User manual Based on BoneID Embedded v1 6 168 ...

Страница 2: ... About security FAR and FRR 12 7 1 2 Choosing proper FAR value 12 7 2 Adding managing fingerprint templates 15 7 3 Adding managing cards 16 8 Settings 17 8 1 General 17 8 2 Camera and appearance 18 8 3 Job codes 19 8 4 Outputs and relays 20 9 Date and time 21 10 Transactions 22 11 Network 23 11 1 Ethernet 23 11 2 Mobile connectivity 24 11 3 Remote access 24 11 3 1 Setting up FreeDNS DDNS service 2...

Страница 3: ...uTouch User Manual v1 6 12 4 Anti Passback 33 12 4 1 Solo 33 12 4 2 Card reader 33 12 4 3 Second device 33 ...

Страница 4: ... user can check in with his her RFID card only with SmartCard which contains user s finger template check in in 1 1 mode with PIN or in 1 N AFIS automatic fingerprint recognition mode and also by using NFC Each user can have up to 10 fingers enrolled for easier verification or authentication Standard network connections allow easy integration with existing 100MBit 1GBit networks while Wi Fi and GP...

Страница 5: ...Fingerprint image 272x320 pixels Fingerprint identification mode 1 1 mode with PIN or 1 N mode configurable per user Template capacity 1900 templates by default 9500 on request User capacity 100 000 users Log capacity 1 000 000 events LED signaling Color controllable LEDs green red Communication TCP IP via RJ45 connector 2 connectors RS232 RS485 USB 2 ports WIFI GPRS 3G option Wiegand interface 2x...

Страница 6: ...es in the unit Images can be stored during enrolment process so that the image can show on the screen whenever the user checks in on the unit Camera can also be used to store the image with each transactions so it is possible to compare user photographs over time LED signal lights additional signal to the user along with the main display RFID card reader Smart card reader and or NFC module see spe...

Страница 7: ... with input and output connections Here is the detailed view of the connections Side view shows power switch SD Card slot two USB 2 0 ports slave connector and a boot reset button SD Card slot and USB ports are used for service purposes only These can be used for updating firmware to the unit SIM card slot Power socket LAN connectors SAM card slot Relay status LEDs Input output terminals ...

Страница 8: ...0 conn for Wiegand Input 1 GPO 4B General Purpose Output 4 GPI 1B General Purpose Input 1 RS232_RX Receive conn for RS232 communication GPI 2B General Purpose Input 2 RS232_TX Transmit conn for RS232 communication GPI 3B General Purpose Input 3 RS485 B B connection for RS485 communication GPI 4B General Purpose Input 4 RS485 A A connection for RS485 communication RL1 NC Normal Closed contact for R...

Страница 9: ...RFID SAMCARD SOCKET socket for SAM security card RJ45_JACK1 connector used for TCP IP communication RJ45_JACK2 secondary TCP IP connector must be used when powering the unit with PoE Power connector standard connector on the pin for power supply 12V Right below the SIM2 slot there are 3 LED indicators showing status of 3 relays If illuminated red the relays are in active state If not illuminated t...

Страница 10: ...ose them you can use M1 5 to M2 5 screws with bugle heads and with adequate anchors if needed After mounting the back plate firmly on the mounting surface connect all the cables needed for installation to the respective terminals Because of limited space between the unit and the surface make a bigger hole in the surface to house the needed cables in needed length After making all the connections p...

Страница 11: ...1 1 mode is selected this is done by entering the PIN on the virtual keyboard on the screen and placing one of the enrolled fingers on the fingerprint sensor Check in with template if 1 N mode is selected here the user just needs to press the checkmark symbol and places one of the enrolled fingers on the fingerprint sensor Change unit settings this is done by pressing the gear icon in the top left...

Страница 12: ...o activate the unit is described in section 12 of this manual When in demo mode the unit is working with following limitations On each reboot all data stored in the unit users settings transactions will be erased If the unit is turned on for more than one day the unit will reboot at midnight resulting in loss of all data Upload of templates and cards from the PC will be disabled Download of transa...

Страница 13: ...etwork set up communication parameters Tools various system tools There is a set of icons in the top row of the screen which are used in the user interface Here is the description of the icons Pen icon Edit the selected entry Magnifying glass search Cancel cancel all changes you have made and restore to previous data Back go to the previous screen changes you made in the selected screen will not b...

Страница 14: ...user with last name stated first Level user level which allows each user to change certain settings on the unit Type user type this shows the way the user checks in on the unit T this field shows if the user has enrolled fingerprint templates C this field shows if the user has an RFID card assigned The list can be sorted by any key For example the list shown in the figure below is sorted by PIN fr...

Страница 15: ...ng the fingerprint template of a person who is actually authorized to access the unit These two figures are directly connected and choosing the right value depends on the person and the application of the unit If there is need for lower security time and attendance public kiosks etc security level can be lower that means FAR value needs to be higher to increase passage speed If there is need for h...

Страница 16: ...Fingerprint 1 1 User needs to enter his her PIN and present one of the enrolled fingers on the sensor Maybe this way is a bit slower than just pressing your finger on the sensor but the comparison process is much faster especially if there are many more than 10 000 templates in the system Fingerprint 1 N AFIS With AFIS Automated Fingerprint Identification System enabled the user just needs to touc...

Страница 17: ...emove picture option Repeat these steps until you are satisfied with the picture taken The picture is stored on the unit and afterwards on the server in the main database The picture is in 240x320 px resolution This picture will be shown on the display every time the user checks in on the unit Be aware that the picture is saved and shown afterwards as a mirror image of the picture taken This is be...

Страница 18: ...ser has problems checking in on the unit you can enroll more than one finger up to 10 fingers per person can be enrolled by using the same process You can check if user s fingers are properly enrolled as many times as you wish by touching the Check button and presenting user s finger to fingerprint sensor If the user needs to re enroll the templates first it is necessary to delete existing templat...

Страница 19: ...and present the card to the reader If successful the card code will be shown in the Card ID field under the Check card button on the left side of the screen If the card is already assigned to other user the unit will show the warning and will not assign the card until it is unregistered from its previous user It is even possible to register more than one card to each user Managing cards is otherwi...

Страница 20: ... AFIS mode where button check mark is used to initiate AFIS Pin length defines the number of Pin digits It is best to configure this depending on number of people who are supposed to check in on the unit If there is 50 workers in a company there is no need to use a 4 digit Pin Pin can contain maximum 9 digits Verification screen timeout defines time for how long will the screen with successful che...

Страница 21: ...someone else s card or more than one card You can select whether this option is inactive active only on a successful check in or on all transactions Background picture selects one of the predefined wallpapers Custom wallpapers can be uploaded to the unit by using CN8Tool Windows application Skin restart on change selects general skin of the interface It is possible to choose either white or dark s...

Страница 22: ...or job codes Job codes are the types of work absence which last only for a part of the day This can be private leave official leave lunch break visit to the doctor etc as stated in the example below To set these up just touch the appropriate box enter needed text and press Save button When you exit settings screen entered text will show in appropriate button on the main screen ...

Страница 23: ... 1 Activation of input 1 SYS Entry failed Unsuccessful attempt to enter system settings SYS Entry System settings entered SYS Boot Unit boot process finished RDC Verified 2 User verified with card on Wiegand input RDC Verified User verified with card on built in card reader RDC No access User verified with card but access is denied RDC Error 2 Error reading card on Wiegand input RDC Error Error re...

Страница 24: ...n there are two ways to do it One way is to select BoneID Net time which makes the unit synchronize its time with BoneID Net application installed on a Windows computer The unit compares its time with BoneID Net application all the time and synchronization process is performed if time difference is greater than 15 seconds This is way to synchronize the clock if the unit is part of the network whic...

Страница 25: ...ransactions which occurred on the unit This is a great way to quickly check unit events right on site without the need for a special software and a computer Also when you select a single transaction you can see the details about that transaction Here you can also compare the pictures ...

Страница 26: ...e of the unit on the network You can ping this unit from a network PC or connect to it from CN8Tool application by using this name Server is the address or network name of the PC which will be server to the unit If left empty you can control the unit from any PC in the network Only the IP address should be entered in this field Of course this means that the server cannot have the address set up by...

Страница 27: ...er 11 3 Remote access You can also connect the unit to a network over Internet by using VPN connection over PPTP protocol or by using a DDNS Dynamic DNS service If you want to establish a VPN connection simply enable PPTP enter address of the server with which you need to establish VPN connection and username and password provided by VPN manager After entering needed parameters switch to Ethernet ...

Страница 28: ...ress bar a link looking similar to this will show up cn8 test com 31 45 217 161 http freedns afraid org dynamic update php VU1UalM2MzF VMVVBQUtaYkpPb0FBQUFUOjg3MzU5Nzg In the unit enter the token underlined red text after the update php string as username and leave the password field empty IMPORTANT If for some reason you decide to use option Rotate Authentication Token on FreeDNS web site you wil...

Страница 29: ...define input output scenarios in access control environment Manage some maintenance functions you will rarely use License Until you activate your unit it will be in demo mode for testing and demonstrational purposes only as described in section 5 2 This is required for normal unit operation Anti Passback settings for anti passback functionality Reboot the unit ...

Страница 30: ...eck means you can check with your card if settings are OK Set will reprogram card from default settings to your settings Reset will return card to factory state for Mifare will set KEY A to default for all selected blocks while for DESFire EV1 will delete application and reset master key to default if specified 12 1 1 1 Mifare Classic Mifare classic cards can be used in three different ways 1 Read...

Страница 31: ... can be used not just for reading cards but also to program cards If you want to program DESFire EV1 card and or add templates on card using uTouch you must supply Master card key left key box In order to use DESFire EV1 cards with uTouch you must use option Set on every card you want to use That option will create file 7 bytes long 0x00000000000000 Now you can assign that card to some user using ...

Страница 32: ...s By default inputs 1 and 3 are at low state while 2 and 4 are at high state All outputs are at low state 12 2 Events Events are powerful access control scenarios that may occur in various situations uTouch has predefined 5 most common scenarios By selecting one of scenario from left side you will be able to see definition On the first picture we have selected scenario for unsuccessful entry into ...

Страница 33: ...ngs menu section 8 4 of this manual On following picture we have third possible scenario when uTouch receives signal on input and at the same time relay event occurs Common scenario for this is when you want to have control of door even when person is exiting from protected area Diagram explanation Relay 1 event and Input 4 activated at the same time Button event is generated immediately This one ...

Страница 34: ...ance but you must also control exit through the same door That means you have to have Door button that will open door on the other side 2 If Door button is pressed we don t want to raise Door forced event but only Button event 3 To avoid generation of Door forced event we added deactivation event that must occur at last second after sensor on Input 3 detects that door is open 4 So if Door button w...

Страница 35: ...ckage and click once more on this button Spin box indicates volume of speaker Disable network access to uTouch this disables access to file system of device through telnet or FTP Set this unchecked only if you need to enter file system As soon as you are finished set this option to checked for security reasons Text below is debug log text which can indicate if there are some problems with file sys...

Страница 36: ...ard reader This type defines that card reader is connected to uTouch All logic operations are performed inside uTouch This is commonly used with uTouch without fingerprint module IN transaction type is RDC Verified while OUT transaction types are RDC 1 Verified or RDC 2 Verfied 12 4 3 Second device In this mode you can connect second uTouch using one of Wiegand inputs Wiegand is used for communica...

Отзывы: