Citizen CLP 7202e Скачать руководство пользователя страница 79

Appendixes 

78 


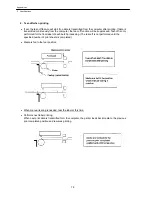
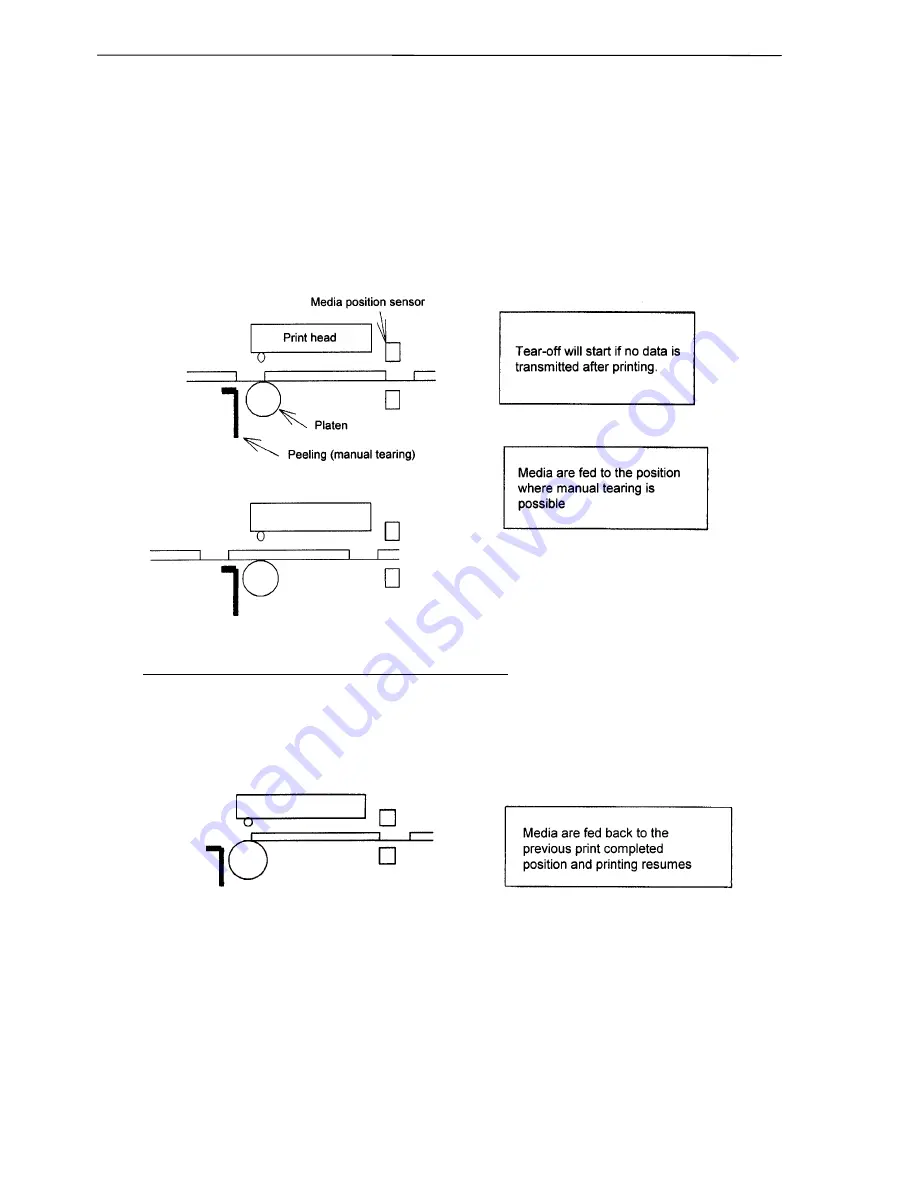
2.  Tear-off when printing 

  If set, the tear-off feature will start if no data is transmitted from the computer after printing. If data is 

transmitted continuously from the computer, the tear-off function will be suppressed. Tear-off is only 
performed for the final label of each batch processing. (The tear-off is not performed until the 
specified number of print sheets is completed.) 

  Media is fed to the tear position 


  When manual tearing is needed, tear the label at this time. 

  Performs next label printing. 

When next print data is transmitted form the computer, the printer feeds back media to the previous 
print completed position and resumes printing. 
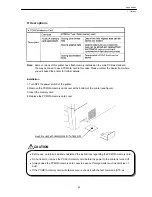
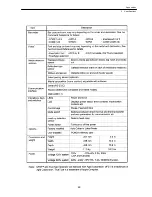


2  Specifications 

Содержание CLP 7202e

Страница 1: ...IMMEREN VOSSELAAR OUD TURNHOUT ARENDONK RAVELS WEELDE POPPEL BAARLE HERTOG MALLE OOSTMALLE WESTMALLE POPPEL RAVELS MOL HERENTALS LILLE POEDERLEE LILLE HERENTALS NOORDERWIJK EINDHOUT LAAKDAL VORST KEMP...

Страница 2: ...rence when the equipment is operated in a commercial environment This equipment generates uses and can radiate radio frequency energy and if not installed and used in accordance with the instruction m...

Страница 3: ...ever there is no guarantee that interference will not occur in a particular installation If this equipment does cause interference to radio or television reception which can be determined by turning t...

Страница 4: ...an extension cord is used with this product make sure that the total of the ampere ratings on the products plugged into the extension cord do not exceed the extension cord ampere rating Also make sure...

Страница 5: ...e of optional products and consumable supplies other than the designated products contained herein 6 Do not handle disassemble or repair the parts other than those specified in this manual 7 We are no...

Страница 6: ...Before Operation 5...

Страница 7: ...Before Operation 6...

Страница 8: ...he surface of the printer case do not use the cloth that is soaked in thinner trichloroethylene benzine ketone or similar chemicals 8 Do not use the printer where there is a lot of oil iron particles...

Страница 9: ...rinter and radio or television Radio or television reception could be adversely affected 8 Do not use a power voltage or frequency other than those specified 9 Do not put anything on the power cord or...

Страница 10: ...ral Precautions 7 Precautions When Installing the Printer 8 Contents 9 Main Features 11 Model Description 12 Chapter 1 Setup 1 Confirmation of Carton Contents 14 2 Part Names and Functions 15 3 Connec...

Страница 11: ...Adjustments 1 Use of Media Other Than the Recommended Printhead Offset Adjustments 48 2 Use of Narrow Media Ribbons Printhead Pressure Adjustments 49 3 Use of Narrow Media Ribbons Ribbon Tension Adjus...

Страница 12: ...d and high quality printing Powerful control language A powerful yet simple to use control language is standard to all of Citizen s label printers allowing easy design of labels and bar codes Alternat...

Страница 13: ...els are available The main different points between the two models are shown below Model Print resolution Printing speed Adjustable media sensor Flash Memory CLP 7201e 200dpi 2 7 IPS Standard Standard...

Страница 14: ...Chapter 1 Setup 13 Chapter 1 Setup 1 Confirmation of Carton Contents 2 Part Names and Functions 3 Connection to Power 4 Connection to a Computer...

Страница 15: ...arton The printer may cause injury or property damage if dropped Be sure to grip the printer housing firmly when taking it out of the carton Do not grip the printer by the foam packing material which...

Страница 16: ...Media holder Holds the roll holder See Chapter 3 8 Open lever To swing the printhead out of the way when loading the media or cleaning the printhead See Chapter 3 9 Printhead pressure adjustment knob...

Страница 17: ...l interface cable 2 USB interface connector To connect the USB interface cable 3 Parallel interface connector To connect the parallel interface cable 4 Power switch To turn on or off the power See Cha...

Страница 18: ...er the error indicator 3 PAUSE key Temporarily pauses printing 4 FEED key Feeds the media 5 STOP key Stops the printer operating 6 Media gap adjustment control To adjust the media gap sensor sensitivi...

Страница 19: ...2 Connect the connector of the power cord to the power inlet on the printer 3 Insert the plug of the power cord in the AC outlet 3 Connection to Power Use an AC outlet that accepts a three pronged pl...

Страница 20: ...r switches of the printer and the computer 2 Connect the connector of one end of the interface cable to the interface connector on the back of the printer and secure it with locks or locking screws 3...

Страница 21: ...Chapter 1 Setup 20...

Страница 22: ...rinter Operation 21 Chapter 2 Printer Operation 1 Power On Off 2 Normal Operating Mode 3 Printer Configuration Setting Mode 4 Self Test Mode Hex Dump Mode 5 System Maintenance Mode 6 Returning to Fact...

Страница 23: ...hapter 2 Printer Operation 22 1 Power On Off Turning on the power 1 Turn on the power switch on the back of the printer 2 The green LED is lit Check that the LCD screen displays On Line 1 Power On Off...

Страница 24: ...Chapter 2 Printer Operation 23 Turning off the power 1 Turn off the power switch on the back of the printer 2 The green LED goes off and any message on the LCD screen disappears 1 Power On Off...

Страница 25: ...current print job Pressing the STOP key during printing stops the printing immediately Pressing it again cancels the print job FEED key Advance to the top of the next label When Using continuous medi...

Страница 26: ...key functions are shown below The printer configuration settings are stored in memory so they are maintained even after the power is turned off Example Changing the media gap sensor to the black mark...

Страница 27: ...Chapter 2 Printer Operation 26 3 Change the media gap sensor to the black mark sensor with the FEED key 4 Return to normal operating mode with the STOP key 3 Printer Configuration Setting Mode...

Страница 28: ...Chapter 2 Printer Operation 27 Display Indications 3 Printer Configuration Setting Mode...

Страница 29: ...List of Mode Items Note When the printer is switched off and on the initial values for these menu items selected by the printer configuration setting mode will be retrieved from the flash memory 3 Pri...

Страница 30: ...laten If the absolute value to O value is larger than the absolute value to f value as the set value of O increases the media stop position may change However if the absolute value to f value is small...

Страница 31: ...te the printer in the following way 1 Turn ON the power switch while pressing and holding the FEED key When labels are used hold down the FEED key for two seconds and the printer will feed the media a...

Страница 32: ...st printing energy see Command Reference Partially blurred Printhead pressure unbalanced Adjust printhead pressure see Section 2 Chapter 4 Ribbon wrinkling and slipping Ribbon tension improper Adjust...

Страница 33: ...in memory so they are maintained even after the power is turned off Control key functions are shown in the following Example Setting the black mark sensor voltage 1 First turn OFF the power switch th...

Страница 34: ...2 Printer Operation 33 3 Change the media gap sensor voltage to the black mark sensor voltage with the FEED key pressed 4 Return to normal operating mode with the STOP key pressed 5 System Maintenanc...

Страница 35: ...eration 34 List of Mode Items Note When the printer is switched off and on the initial values for these menu items selected by the system maintenance mode will be retrieved from the flash memory 5 Sys...

Страница 36: ...nfiguration setting mode or system maintenance mode to the factory setting proceed as follows First turn OFF the power switch then press and hold the PAUSE FEED and STOP keys simultaneously and at the...

Страница 37: ...Chapter 2 Printer Operation 36...

Страница 38: ...pter 3 Media and Ribbon 1 Kinds of Approved Media 2 Configuration of Approved Media When Using Front Sensors 3 Configuration of Approved Media When Using Adjustable Sensor 4 Media Setting 5 Kinds of A...

Страница 39: ...Chapter 3 Media and Ribbon 38 1 Kinds of Approved Media 1 Kinds of Approved Media...

Страница 40: ...of the labels or tags Transparent type photosensor Detects gaps between labels and notches of tags Reflective type photosensor Detects black marks Note Make sure that the adjustable sensor is set to A...

Страница 41: ...Media When Using Adjustable Sensor The adjustable sensor is the standard for CLP 7201e but it is the optional for CLP 7202e Make sure that the adjustable sensor is set to AJSensON See Chapter 2 3 Con...

Страница 42: ...he open lever to open the printhead 2 Push down the open guide lever to lift the open guide up 3 Insert the roll holder with the roll guide in the core of roll media Load this onto the media holder an...

Страница 43: ...ide to close it 6 Push down the green part of the push button to close the printer mechanism at this time continue pushing until it clicks closed Note Make sure the green part of the push button is pr...

Страница 44: ...Chapter 3 Media and Ribbon 43 5 Kinds of Approved Ribbons 5 Kinds of Approved Ribbons...

Страница 45: ...down the open lever to open the printhead 2 Insert the ribbon shaft in the core of ribbon so that it is in its deepest position 3 Set the ribbon holder on the transfer mechanism 4 Pull the ribbon from...

Страница 46: ...ribbon must be removed from the bottom of the transfer mechanism 6 Push down the green part of the push button to close the printer mechanism until it clicks 7 Close the printer cover 8 Turn ON the p...

Страница 47: ...Chapter 3 Media and Ribbon 46...

Страница 48: ...1 Use of Media Other Than the Recommended Printhead Offset Adjustments Media Thickness Adjustments 2 Use of Narrow Media Ribbons Printhead Pressure Adjustments 3 Use of Narrow Media Ribbons Ribbon Te...

Страница 49: ...of the three lines by turning the offset adjustment screw with a screwdriver Then turn the offset adjustment screw two to four times counterclockwise with a screwdriver Factory setting two turns 2 Ma...

Страница 50: ...of white plastic with the width of media by turning the printhead pressure adjustment knob The printhead must be closed 2 Make fine adjustments by checking the self test print a When the print on righ...

Страница 51: ...on the LCD display To resolve this problem and obtain the optimum printing condition make adjustments in the following manner this should be done after the printhead pressure adjustments on the previ...

Страница 52: ...k on the feeding section to SUPER LOW by turning the adjust knob 4 When ribbon is broken during printing Ribbon may be broken if it is narrow in width and printhead heat temperature is high In that ca...

Страница 53: ...sensor to the required detection position by tuning the adjustable knob it is useful to align the mark yellow on the top of the adjustable sensor with the scale showing the required detection positio...

Страница 54: ...ethyl alcohol It is particularly important to clean the printhead after printing on thermal media for long periods which will guarantee the print quality and extend the life of the printhead Note Alwa...

Страница 55: ...Chapter 4 Printer Adjustments 54...

Страница 56: ...pter 5 Troubleshooting 55 Chapter 5 Troubleshooting 1 Error Messages 2 Power Troubleshooting 3 Media Feed Troubleshooting 4 Ribbon Feed Troubleshooting 5 Print Troubleshooting 6 Interface Troubleshoot...

Страница 57: ...Error Messages When there is a problem with the printer A buzzer sounds The error indicator lights up An error message is shown on the LCD screen Errors and corrective actions are shown below 1 Error...

Страница 58: ...Chapter 5 Troubleshooting 57 2 Errors and corrective actions 1 Error Messages...

Страница 59: ...Chapter 5 Troubleshooting 58 1 Error Messages...

Страница 60: ...Chapter 5 Troubleshooting 59 1 Error Messages...

Страница 61: ...Chapter 5 Troubleshooting 60 2 Power Troubleshooting 2 Power Troubleshooting...

Страница 62: ...Chapter 5 Troubleshooting 61 3 Media Feed Troubleshooting 3 Media Feed Troubleshooting...

Страница 63: ...Chapter 5 Troubleshooting 62 4 Ribbon Feed Troubleshooting 4 Ribbon Feed Troubleshooting...

Страница 64: ...Chapter 5 Troubleshooting 63 5 Print Troubleshooting 5 Print Troubleshooting...

Страница 65: ...Chapter 5 Troubleshooting 64 6 Interface Troubleshooting 6 Interface Troubleshooting...

Страница 66: ...Appendixes 65 Appendixes 1 Options 2 Specifications...

Страница 67: ...Appendixes 66 1 Options z Factory and dealer reseller options 1 Options...

Страница 68: ...ve the PCMCIA memory card cover at the bottom of the printer see figure 3 Insert the memory card 4 Replace the PCMCIA memory card cover Before use carefully read and understand the instructions regard...

Страница 69: ...Appendixes 68 2 Specifications z Main Specifications 2 Specifications...

Страница 70: ...Appendixes 69 2 Specifications...

Страница 71: ...Appendixes 70 2 Specifications...

Страница 72: ...cted to a computer and prints labels according to the command from the computer Two systems of interface connection to a computer are shown below 1 Serial interface RS 232C 2 Parallel interface IEEE12...

Страница 73: ...4 RS 232C loopback test After connector wiring as shown in the figure place the printer into self test mode The printer will receive data that has been transmitted by printer itself and the test of r...

Страница 74: ...When the receive buffer has less than 2K bytes available Note Even if each code is ready for output the same code will not be transmitted twice successively except when the power is turned on or the...

Страница 75: ...Appendixes 74 6 Interface pin assignment The serial and parallel pin assignment tables are shown below Serial interface pin assignment table 2 Specifications...

Страница 76: ...Appendixes 75 Parallel interface pin assignment table 2 Specifications...

Страница 77: ...Appendixes 76 z Example of Connection to a Computer When RS 232C is used IBM PC compatible Communication control XON XOFF or CTS DTR 2 Specifications...

Страница 78: ...r position after printing The printer will feed back media to the start print position when the next print job is sent If data is transmitted continuously from the computer the tear off function will...

Страница 79: ...off is only performed for the final label of each batch processing The tear off is not performed until the specified number of print sheets is completed Media is fed to the tear position When manual...

Страница 80: ...l tearing is needed tear the label at this time Perform next feeding or label printing If the Feed key is pressed or next print data is transmitted from the computer the printer will feed back media t...

Страница 81: ...ion value fnnn f735 73 5 mm The values higher or lower will increase or decrease the amount of feed in the tear off Parameter initialization values Initialization values of print and feed positions by...

Страница 82: ...ems Europe GmbH http www citizen europe com Mettinger Strasse 11 Park House 73728 Esslingen 643 651 Staines Road Feltham Germany Middlesex TW14 8PA United Kingdom Japan CBM Corporation CBM Bldg 5 68 1...

Отзывы: