


Be careful not to crimp any fiber cables that are connected to the MXP/TXP cards or DWDM cards. Some
might not have the fiber boot attached.
Note
Procedure
Step 1
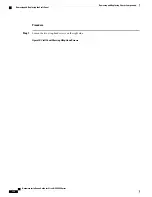
Remove the screw and washer from the chassis fixing point.
Step 2
Feed the screw through the ground cable ring lug, through the washer, and then into the machined block.
Figure 61: Installing the Door Ground Strap Retrofit Kit
Step 3
Using a Phillips screwdriver, insert and tighten the screws.
Hardware Installation Guide for Cisco NCS 4000 Series
123
Removing and Replacing Chassis Components
Replacing the Front Door
Содержание NCS 4000 Series
Страница 10: ...Hardware Installation Guide for Cisco NCS 4000 Series x Contents ...
Страница 70: ...Hardware Installation Guide for Cisco NCS 4000 Series 50 Installing Power Components Powering On the Chassis ...
Страница 162: ...Hardware Installation Guide for Cisco NCS 4000 Series 142 System Product IDs Accessory Product IDs ...
Страница 168: ...Hardware Installation Guide for Cisco NCS 4000 Series 148 Installation Roadmap for NCS 4009 Installation Roadmap ...
Страница 292: ...Hardware Installation Guide for Cisco NCS 4000 Series 272 System Product IDs Accessory Product IDs ...


