

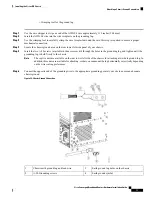


Step 3
Insert the four #6-32 Torx-head screws into the mounting flanges. Tighten the screws using a T10 Torx torque screwdriver
with a torque of 8-10 in-lb (0.90-1.13Nm) to secure the module.
What to do next
• For an AC-powered Cisco cBR chassis,
.
For a DC-powered Cisco cBR chassis,
•
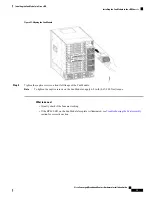
Installing the Power Module in the Cisco cBR Chassis
The chassis ships with the Power Module already installed.
Use this procedure to install the following modules in the chassis:
• AC Power Module
• DC Power Module
Before you begin
We recommend that you wire the chassis for 9 KW of power. If you wire it for less than 9 KW power, you
may need to add more power modules while adding new hardware or upgrading the existing hardware.
Important
If you are adding new hardware or upgrading the existing hardware, ensure that the power modules installed
in the chassis are adequate to support the hardware.
Warning
•
Install the Power Cassette Module
.
• Attach an ESD-preventive wrist strap to your wrist and connect the other end to the grounding lug
connected to the chassis.
•
.
• Be aware of the weight and size of the equipment. Handle it with care.
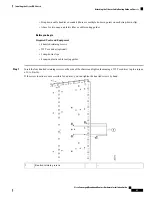
Required Tools and Equipment
• ESD-preventive wrist strap
• 3/16" flat-blade torque screwdriver
• AC or DC Power Module
Cisco Converged Broadband Routers Hardware Installation Guide
81
Installing the Power System in the Cisco cBR Chassis
Installing the Power Module in the Cisco cBR Chassis


