


• Torque wrench
• 7/16" hex socket
Step 1
Power down the DC FPEM using the power switch.
Step 2
Power down the circuit or power supply to which the positive and negative lead cables are connected.
Step 3
Remove the terminal block cover on the terminal block, from which you need to disconnect power, by pushing down on
the bottom tab then pivoting the bottom out.
Step 4
Loosen the 1/4-20 terminal bolts using a torque wrench and 7/16" hex socket and remove them. Disconnect the positive
lead cable.
Step 5
Loosen the 1/4-20 terminal bolts using a torque wrench and 7/16" hex socket and remove them. Disconnect the negative
lead cable.
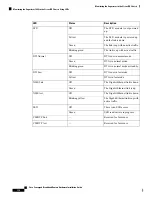
Figure 117: Removing the DC Power Connection from the DC FPEM
Step 6
Repeat
and
to disconnect each terminal block connection.
Step 7
Insert the 1/4-20 terminal bolts and secure them using a torque wrench and 7/16" hex socket with a torque of 45-50 in-lb
(5.08-5.65 Nm).
Step 8
Reinstall the terminal block covers by clipping them on the top edge of the terminal block housing and then rotating them
down until they snap into place.
Removing the Power Module from the Cisco cBR Chassis
Before you begin
• Attach an ESD-preventive wrist strap to your wrist and connect the other end to the grounding lug
connected to the chassis.
• Be aware of the weight and size of the equipment. Handle it with care.
Restrictions
• For the DC-powered Cisco cBR with N+1 redundancy, ensure that the chassis has at least five operational
DC Power Modules for the chassis to be functional.
• For the AC-powered Cisco cBR with N+1 redundancy, ensure that the chassis has at least four operational
AC Power Modules for the chassis to be functional.
Cisco Converged Broadband Routers Hardware Installation Guide
191
Maintaining the Power System in the Cisco cBR Chassis
Removing the Power Module from the Cisco cBR Chassis