background image

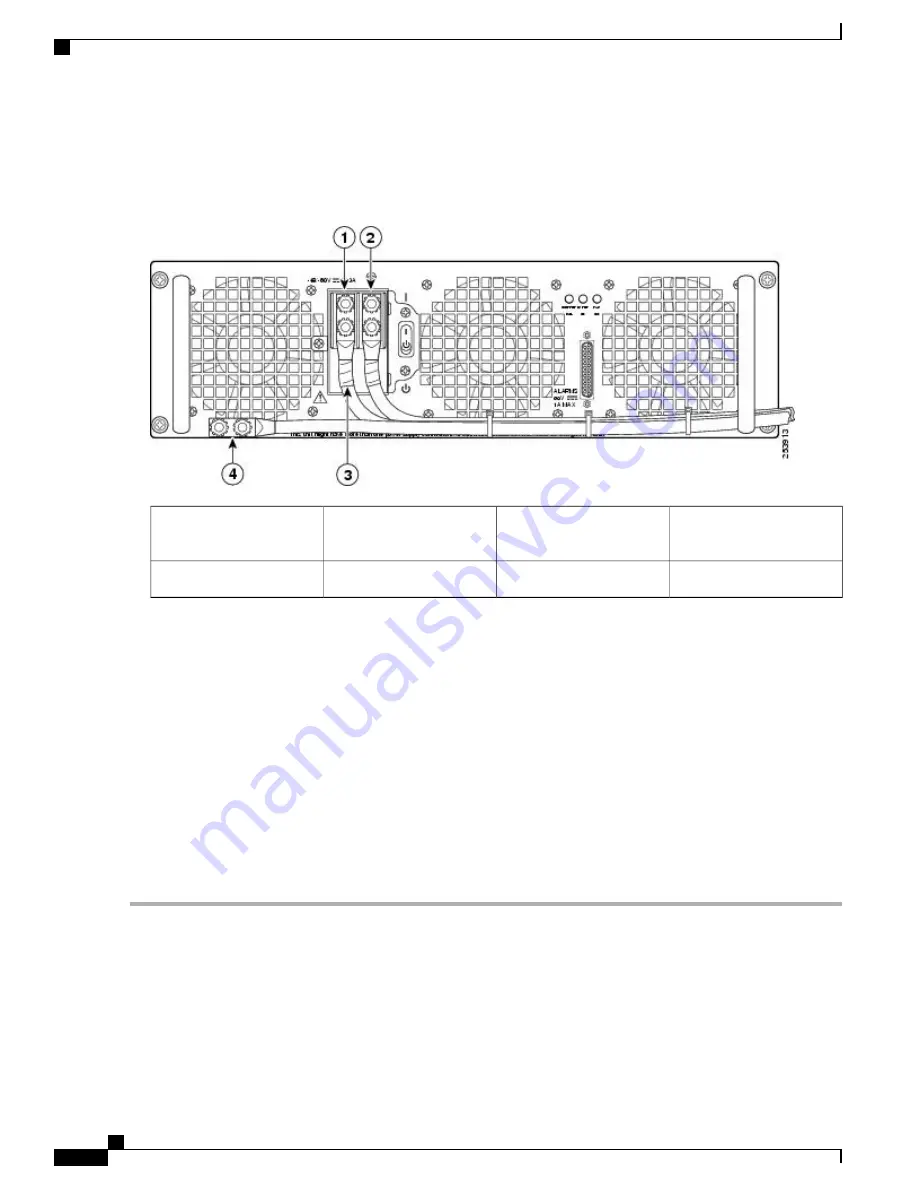
c) Follow Step 4b and remove the negative cable. The following figure shows the DC power supply terminal block.

Figure 296: Cisco ASR 1013 Router DC Power Supply Terminal Block Cable Connections

Protective sleeving around
the stud and cable

3

Negative lead

1

Ground stud and cable

4

Positive lead

2

When removing the unit, the ground connection must always be made first and disconnected
last.

Warning

Step 6

Loosen the four captive screws on the DC power supply.

Four power supplies must be installed in the chassis at all times, with a minimum of two power supplies (one
per zone) connected to the mains in order to power on the system and ensure sufficient cooling. The system
fans are inside the power supply units and must spin for cooling. Because all the system fans can be powered
by one power supply, the second power supply unit does not have to be powered on, but must be connected.

Note

If you remove a power supply from a system that has four power supplies that are connected and powered
on, the system can run only for a maximum of five minutes before shutting down. However, because the fans
and power elements are independent within the power supply, the replacement power supply does not have
to be energized within five minutes. The only requirement is that the power supply be installed in the chassis
in order to energize the fans and maintain proper system cooling.

Caution

Step 7

Grasping the power supply handles, pull the power supply from the chassis.

Step 8

Replace the DC power supply within five minutes.

What to Do Next

This completes the procedure of removing a DC power supply from the Cisco ASR 1013 Router.

   Cisco ASR 1000 Series Router Hardware Installation Guide

594

Removing and Replacing FRUs from the Cisco ASR 1000 Series Routers

Removing and Replacing a DC Power Supply in Cisco ASR 1013 Router

Содержание ASR 1001

Страница 1: ... Router Hardware Installation Guide First Published 2013 08 02 Americas Headquarters Cisco Systems Inc 170 West Tasman Drive San Jose CA 95134 1706 USA http www cisco com Tel 408 526 4000 800 553 NETS 6387 Fax 408 527 0883 ...

Страница 2: ... 2013 2017 Cisco Systems Inc All rights reserved ...

Страница 3: ... Cisco ASR 1000 Series Routers 2 Cisco ASR 1000 Series Router Features 3 Cisco ASR 1000 Series Routers Compatibility Information 5 Hardware Compatibility 5 Cisco ASR 1000 Series Router Configurations 7 Field Replaceable Units 7 Functional Overview 8 Chassis Slot and Logical Interface Numbering 9 MAC Address Information 9 Online Insertion and Removal 10 Environmental Monitoring and Reporting Functi...

Страница 4: ... Cisco ASR 1013 Router 33 Unsupported Active ASR1000 RP2 Requires Upgrade 34 When To Perform a CPLD Upgrade 35 Unsupported Standby ASR1000 RP2 or ASR1000 SIP10 Requires Upgrade 35 Image to Upgrade Field Programmable Hardware Devices 36 Cisco ASR 1000 Series Route Processor 36 Cisco ASR 1000 Series Route Processor Differences 37 Cisco Integrated ASR1000 RP1 for Cisco ASR 1002 Router 43 How Cisco AS...

Страница 5: ... Cisco ASR 1002 Router 71 Cisco ASR 1002 Router 24 VDC Power Supply 71 Cisco ASR 1002 Router 24 VDC Power Supply LEDs and Connector 72 24 VDC Power System Input for Cisco ASR 1002 Router 74 24 VDC Power System Output for Cisco ASR 1002 Router 74 Power Supplies for the Cisco ASR 1013 Router 76 AC Power Supply LEDs and Connector for Cisco ASR 1013 77 48 VDC Power Supply LEDs and Connectors for Cisco...

Страница 6: ...A P T E R 5 Preparing Your Site for Installation 111 Prerequisites and Preparation 111 Safety Guidelines 112 Safety Warnings 112 Safety Recommendations 113 Compliance Requirements 113 Cautions and Regulatory Compliance Statements for NEBS 114 Standard Warning Statements 115 General Safety Warnings 115 Site Planning 118 General Precautions 118 Site Selection Guidelines 119 Site Environmental Requir...

Страница 7: ...nts 134 Checking the Shipping Container Contents 135 Cisco ASR 1000 Series Router Installation Checklist 136 C H A P T E R 6 Cisco ASR 1006 Router Overview and Installation 139 Cisco ASR 1006 Router Description 139 Front View 140 Rear View 141 Cisco ASR 1006 Router Slot Numbering 142 Installation Methods 143 General Rack Installation Guidelines 143 Guidelines for an Equipment Shelf or Tabletop Ins...

Страница 8: ...hing Cable Retention Bracket on AC Power Supply 179 C H A P T E R 7 Cisco ASR 1004 Router Overview and Installation 181 Cisco ASR 1004 Router Description 182 Front View 182 Rear View 183 Cisco ASR 1004 Router Slot Numbering 185 Installation Methods 186 General Rack Installation Guidelines 186 Guidelines for an Equipment Shelf or Tabletop Installation 187 Equipment Shelf or Tabletop Installation 18...

Страница 9: ...3 Cisco Embedded ASR1000 RP1 for Cisco ASR 1002 Router Description 223 Cisco Embedded ASR1000 SIP10 and SPAs for Cisco ASR 1002 Router Description 224 Cisco ASR1000 ESP5 and ASR1000 ESP10 Description 224 Power Supplies in the Cisco ASR 1002 Router 226 AC Power Supply for Cisco ASR 1002 Router 226 48 VDC Power Supply for Cisco ASR 1002 Router 227 24 VDC Power Supply for Cisco ASR 1002 Router 230 24...

Страница 10: ...Cisco ASR 1002 F Router Overview and Installation 275 Cisco ASR 1002 F Router Description 276 Front View 276 Rear View 277 Cisco ASR 1002 F Router Slot Numbering 278 Cisco ASR 1002 F Router Components 279 Cisco Integrated RP and Cisco ASR 1002 ESP F Description 279 Cisco Integrated ASR 1002 SIP10 F and SPA for Cisco ASR 1002 F Router Description 282 Power Supplies in the Cisco ASR 1002 F Router 28...

Страница 11: ...P T E R 1 0 Cisco ASR 1002 X Router Overview and Installation 317 Cisco ASR 1002 X Router Description 318 Front View of the Cisco ASR 1002 X Router 319 Rear View of the Cisco ASR 1002 X Router 320 Cisco ASR 1002 X Router Slot Numbering 321 Power Supplies in the Cisco ASR 1002 X Router 322 AC Power Supply for the Cisco ASR 1002 X Router 323 48 VDC Power Supply for the Cisco ASR 1002 X Router 324 24...

Страница 12: ...358 Connecting a Terminal to the Console Port 362 Connecting External Cables to the Cisco ASR 1002 X Router 364 C H A P T E R 1 1 Cisco ASR 1013 Router Overview and Installation 365 Cisco ASR 1013 Router Description 365 Front View 367 Rear View 369 Cisco ASR 1013 Router Power Zones 370 Cisco ASR 1013 Router Slot Numbering 371 Installation Methods 371 General Rack Installation Guidelines 372 Guidel...

Страница 13: ...sco ASR 1001 Router Description 407 Cisco ASR 1001 Router Architecture 408 Cisco ASR 1001 Router Faceplate Common Components 416 Cisco ASR 1001 Chassis Front View 417 Cisco ASR 1001 Chassis Rear View 418 Cisco ASR 1001 Router Slot Numbering 418 Cisco ASR 1001 Router Components 419 Cisco Embedded ASR1000 RP1 for Cisco ASR 1001 Router Description 419 Cisco Embedded ASR1000 SIP10 and SPAs for the Cis...

Страница 14: ...for the Cisco ASR 1001 Router 444 Cisco ASR 1001 Router Power Supply Installation 444 Installing AC Input Power to Cisco ASR 1001 Router 446 Removing AC Power Supply from the Cisco ASR 1001 Router 449 Installing DC Input Power on the Cisco ASR 1001 Router 451 Wiring the DC Input Power Source 453 Removing DC Input Power from the Cisco ASR 1001 Router 459 C H A P T E R 1 3 Cisco ASR 1000 Series Rout...

Страница 15: ... ASR1000 RP2 Internal Hard Drive 486 Removing and Replacing the Hard Drive on the Cisco ASR 1002 X Router 487 Removing the Hard Drive from the Cisco ASR 1002 X Router 488 Replacing the Hard Drive on the Cisco ASR 1002 X Router 490 Removing and Replacing the Hard Drive on the Cisco ASR 1001 Router 491 Removing the Hard Drive from the Cisco ASR 1001 Router 492 Replacing the Hard Drive on the Cisco A...

Страница 16: ...on 534 Removing the Cisco ASR 1000 SPA Interface Processor 536 Replacing the Cisco ASR 1000 SPA Interface Processor 536 Removing a Shared Port Adapter from a SIP 537 Replacing a Shared Port Adapter in a SIP 538 Removing and Replacing the Cisco ASR 1006 Router Power Supplies 538 Removing and Replacing a AC Power Supply in Cisco ASR 1006 Router 538 Removing the AC Power Supply from Cisco ASR 1006 Ro...

Страница 17: ...ASR 1013 Router 587 Replacing the AC Power Supply in Cisco ASR 1013 Router 589 Removing and Replacing a DC Power Supply in Cisco ASR 1013 Router 590 Removing the DC Power Supply from Cisco ASR 1013 Router 592 Replacing the DC Power Supply in Cisco ASR 1013 Router 595 Removing and Replacing the Cisco ASR 1001 Router Power Supplies 598 Installing the AC Power Supply into Cisco ASR 1001 Router 600 Re...

Страница 18: ...r Auxiliary Port Signals and Pinouts 628 Cisco ASR 1002 Router BITS Port Signals and Pinouts 628 Cisco ASR 1002 X Router BITS Port Signals and Pinouts 629 Cisco ASR 1002 X Router BNC GPS Ports 629 Cisco ASR 1002 X Router Time of Day Port Pinout 630 Cisco ASR 1013 Router Specifications 630 Cisco ASR 1013 Router Memory and Storage Options 632 Cisco ASR 1013 Router Ethernet RJ 45 Port Pinouts 632 Cis...

Страница 19: ...ting Initial Startup Problems 645 Troubleshooting Overview 645 Online Troubleshooting Resources 646 General Troubleshooting Tips 646 Troubleshooting Using a Subsystem Approach 647 Normal Router Startup Sequence 647 Troubleshooting the Power Subsystem 648 Troubleshooting the Cooling Subsystem 650 Troubleshooting the Shared Port Adapter 651 Troubleshooting the Upgrade 652 Replacing or Recovering a L...

Страница 20: ...Cisco ASR 1000 Series Router Hardware Installation Guide xx Contents ...

Страница 21: ...ed Documentation page xxxiii Obtaining Documentation and Submitting a Service Request page xxxiv Document Revision History The Document Revision History table below records technical changes to this document Change Summary Date Added information about Cisco ASR1000 ESP200 July 2013 Added information about Cisco ASR 1002 X Router Cisco ASR1000 ESP100 and support for Cisco ASR1000 SIP40 on all route...

Страница 22: ...ASR 1001 Router at Cisco ASR 1001 Router Description on page 407 Cisco ASR1000 SIP40 and Cisco ASR1000 ESP40 products on the Cisco ASR 1004 Router November 2010 Added information about Cisco ASR 1000 Series Routers 40G products Cisco ASR 1013 Router Overview and Installation Cisco ASR 1000 ESP40 on page 89 Supported ASR 1000 Hardware Components on page 27 July 2010 Added information about the Cisc...

Страница 23: ...eased the first version of this document for the Cisco ASR 1000 Series Routers May 2008 Document Objectives This publication describes the installation of the Cisco ASR 1000 Series Aggregation Services Routers replacement or upgrading of field replaceable units FRUs and troubleshooting of the Cisco ASR 1000 Series Routers hardware The purpose of this guide is to enable the safe and efficient insta...

Страница 24: ... the ASR 1000 platform routers Chapter 3 Cisco ASR 1000 Series Routers Embedded Services Processors This chapter describes the Cisco SIPs for the ASR 1000 platform routers Chapter 4 Cisco ASR 1000 Series Router SPA Interface Processors SIPs This chapter provides site preparation guidelines for installing the ASR 1000 Series Routers Chapter 5 Preparing Your Site for Installation This chapter descri...

Страница 25: ...ry stick and the Cisco ASR 1000 Series Route Processors Chapter 14 Removing and Replacing FRUs from the Cisco ASR 1000 Series Routers This appendix provides system specifications and pinouts Appendix A Cisco ASR 1000 Series Router Specifications This appendix lists pinout specifications for the Cisco ASR1000 RP1 and the Cisco ASR1000 RP2 Appendix B Cisco ASR 1000 Series Router Route Processor and ...

Страница 26: ...formation the system displays appear in courier font courier font Nonprinting characters such as passwords are in angle brackets Default responses to system prompts are in square brackets An exclamation point or a pound sign at the beginning of a line of code indicates a comment line Means reader take note Note Means the following information will help you solve a problem Tip Means reader be caref...

Страница 27: ...IJKE VEILIGHEIDSINSTRUCTIES Dit waarschuwingssymbool betekent gevaar U verkeert in een situatie die lichamelijk letsel kan veroorzaken Voordat u aan enige apparatuur gaat werken dient u zich bewust te zijn van de bij elektrische schakelingen betrokken risico s en dient u op de hoogte te zijn van de standaard praktijken om ongelukken te voorkomen Gebruik het nummer van de verklaring onderaan de waa...

Страница 28: ... den übersetzten Sicherheitshinweisen die zusammen mit diesem Gerät ausgeliefert wurden BEWAHREN SIE DIESE HINWEISE GUT AUF Warnung IMPORTANTI ISTRUZIONI SULLA SICUREZZA Questo simbolo di avvertenza indica un pericolo La situazione potrebbe causare infortuni alle persone Prima di intervenire su qualsiasi apparecchiatura occorre essere al corrente dei pericoli relativi ai circuiti elettrici e conos...

Страница 29: ...r equipo considere los riesgos de la corriente eléctrica y familiarícese con los procedimientos estándar de prevención de accidentes Al final de cada advertencia encontrará el número que le ayudará a encontrar el texto traducido en el apartado de traducciones que acompaña a este dispositivo GUARDE ESTAS INSTRUCCIONES Advertencia VIKTIGA SÄKERHETSANVISNINGAR Denna varningssignal signalerar fara Du ...

Страница 30: ...Cisco ASR 1000 Series Router Hardware Installation Guide xxx Preface Warning Definition ...

Страница 31: ... traduzidos que acompanham o dispositivo GUARDE ESTAS INSTRUÇÕES Aviso VIGTIGE SIKKERHEDSANVISNINGER Dette advarselssymbol betyder fare Du befinder dig i en situation med risiko for legemesbeskadigelse Før du begynder arbejde på udstyr skal du være opmærksom på de involverede risici der er ved elektriske kredsløb og du skal sætte dig ind i standardprocedurer til undgåelse af ulykker Brug erklæring...

Страница 32: ...Cisco ASR 1000 Series Router Hardware Installation Guide xxxii Preface Warning Definition ...

Страница 33: ... to the Cisco ASR 1000 Series Routers is listed in the online Cisco ASR 1000 Series Aggregation Services Routers Documentation Roadmap Information in this master index includes troubleshooting tools and documentation regulatory compliance and safety information and installation and replacement information Also see the Cisco ASR 1000 Series Port Adapter Documentation Roadmap for specific shared por...

Страница 34: ...r router Cisco maintains the Software Advisor tool on Cisco com This tool does not verify whether modules within a system are compatible but it does provide the minimum IOS requirements for individual hardware modules or components Access to this tool is limited to users with Cisco com login accounts Note Obtaining Documentation and Submitting a Service Request For information on obtaining documen...

Страница 35: ...Branch or regional office aggregation Remote access aggregation Service provider applications Intended as the low end service provider edge and broadband aggregation device with similar throughput High end customer premises equipment CPE for business quality Internet access Service provider leased line aggregation Provider edge PE and high end customer edge CE for Layer 2 VPN or Layer 3 VPN servic...

Страница 36: ...is that can hold 6 SIPs and provides superslots more height and power for the Cisco ASR1000 RP2s and Cisco ASR1000 ESPs The Cisco ASR 1013 Router is designed with two zones Zone 1 and Zone 0 for redundancy and superslot spacing The Cisco ASR 1013 router has four 40G slots and two 100G slots The Cisco ASR 1001 Router is a one rack unit chassis that offers a compact form factor router that satisfies...

Страница 37: ...ion Recognition NBAR broadband aggregation and session border controller among others Cisco ASR 1000 Series Router Features The Cisco ASR 1000 Series Aggregation Services routers use different field replaceable units Cisco ASR 1000 Series route processor Cisco ASR1000 RP1 ASR1000 RP2 Cisco ASR 1000 Series embedded services processors ESPs Cisco ASR1000 ESP5 Cisco ASR1000 ESP10 Cisco ASR1000 ESP20 ...

Страница 38: ...nd full height shared port adapters FHSPAs The Cisco ASR 1001 Router does not support full height SPAs Note Single midplane design all connectors on one interface midplane One 10 100 1000 Mbps Ethernet Management port To be used only as a management port not to be used as an Ethernet interface port Both quarter rate 87 5 MHz and full rate 350 MHz shared port adapter operation The Cisco QuantumFlow...

Страница 39: ...0 Cisco ASR1000 ESP100 or Cisco ASR1000 RP2 Cisco ASR1000 ESP100 can be installed only on Cisco ASR 1006 and Cisco ASR 1013 routers Cisco ASR1000 ESP200 can be installed only on Cisco ASR 1013 routers Note Hardware Compatibility The following table lists the Cisco ASR 1000 Series Routers that support and are compatible with Cisco hardware products Table 2 Cisco ASR 1000 Series Routers and Componen...

Страница 40: ... ASR 1002 PEM supported ASR1004 PEM supported ASR 1013 PEM supported ASR 1006 PEM supported ASR 1013 PEM supported ASR1000 PEMs The following is the outcome of upgrades performed using incompatible combinations of hardware components The embedded services processor card is disabled and an error message is generated in either of the following scenarios Cisco ASR1000 ESP20 Cisco ASR1000 ESP40 or Cis...

Страница 41: ... configurations In this table HH is half height and FH is full height Table 3 Cisco ASR 1000 Series Router Product Family Maximum Bandwidth Number of SIP Slots Number of RP Slots Maximum SPAs Supported Number of ESP Slots Chassis Up to 5 Gbps with software license Fixed SIP10 One built in 2 13GHz dual core Intel Xeon CPU 1 HH Built in ports 4 x 1GE SFP Built in ESP 2 5 Gbps 5 Gbps Cisco ASR 1001 U...

Страница 42: ...cards without having to remove cables For the Cisco ASR 1004 Router the cable management brackets contain three independent cable management U features to provide cable dressing for each card module slot For SIPs these brackets work in tandem with SPA product feature cable management to allow installation and removal of adjacent cards without having to remove cables For the Cisco ASR 1002 Router t...

Страница 43: ...d by other devices in the network The Cisco ASR 1000 Series Routers assign and control the MAC addresses of its shared port adapters You can identify shared port adapter slots by using software commands To display information about All shared port adapter slots use the show interfaces command A specific shared port adapter slot use the show interfaces command with the shared port adapter type and ...

Страница 44: ...s seamless to end users on the network maintains all routing information and preserves sessions All SPA OIR events are independent of one another An OIR event of a single SPA does not affect the other SPAs in that ASR1000 SIP10 or any other system function The following items describe the OIR differences between the Cisco ASR 1002 Router the Cisco ASR 1002 F Router and the Cisco ASR 1002 X Router ...

Страница 45: ...s ensure that your system is drawing cool inlet air Over temperature conditions can occur if the system is drawing in the exhaust air of other equipment Ensure adequate clearance around the sides of the chassis so that cooling air can flow through the chassis interior unimpeded and exhaust air exits the chassis and is not drawn into the inlet vent of another device Caution Environmental Monitoring...

Страница 46: ...m Power supply shutdown The power supply detected an internal out of tolerance overvoltage overcurrent or temperature condition and shut itself down All DC power remains disabled until you toggle the power switch Fan Failures When the system power is on all fans should be operational The system continues to operate if a fan fails When a fan fails the system displays the following message router 00...

Страница 47: ... 996 mV V1 12v F0 Normal 11894 mV V1 VDD F0 Normal 3261 mV V1 GP1 F0 Normal 900 mV V2 VMA F0 Normal 3286 mV V2 VMB F0 Normal 2495 mV V2 VMC F0 10 high 1796 mV V2 VMD F0 Normal 1093 mV V2 VME F0 Normal 996 mV V2 VMF F0 Normal 996 mV V2 12v F0 Normal 11850 mV V2 VDD F0 Normal 3261 mV V2 GP1 F0 10 high 898 mV Temp Inlet F0 Normal 29 Celsius Temp Asic1 F0 Normal 47 Celsius Temp Exhaust1 F0 Normal 36 C...

Страница 48: ... XE software are licensed under the GNU General Public License GPL Version 2 0 The software code licensed under GPL Version 2 0 is free software that comes with ABSOLUTELY NO WARRANTY You can redistribute and or modify such GPL code under the terms of GPL Version 2 0 For more details see the documentation or License Notice file accompanying the IOS XE software or the applicable URL provided on the...

Страница 49: ...12 2 33r XN1 R0 0706210B 12 2 33r XN1 F0 07051650 12 2 33r XN1 The show platform software status control processor command displays the average load memory usage and CPU utilization levels at which the router is running The output also specifies whether the levels of these system health parameters are within defined thresholds The following is sample output of the show platform software status con...

Страница 50: ...der 90 Free 132204 25 status healthy over 10 Committed 365840 69 status healthy under 90 Per core Statistics CPU0 CPU Utilization percentage of time spent User 1 80 System 2 50 Nice 0 00 Idle 95 59 IRQ 0 00 SIRQ 0 10 IOwait 0 00 The show diag slot R0 eeprom detail command displays the configuration hardware information including DRAM and Static RAM SRAM on line cards To display more details than t...

Страница 51: ...nt Product ID also known as product name model name product number Yes Yes PID Version ID Yes Yes VID Serial number the unique instance of the PID see xref Figure 1 1 Figure 1 2 Figure 1 3 Figure 1 4 Figure 1 5 and Figure 1 6 in the next section for location of the serial number label Yes Yes SN Type such as chassis slot or power supply No Yes Entity Name Additional product information No Yes Prod...

Страница 52: ...detailed network inventory information identifying each Cisco product in a network element through a standard interface Cisco operating systems can view and use this data allowing you to automate your electronic inventory Consistency across product layers The UDI is designed into hardware products and cannot overwritten in error Operating and management systems discover the UDI through standard in...

Страница 53: ...umber location for the Cisco ASR 1006 Router Figure 1 Cisco ASR 1006 Router Serial Number Label Location Cisco ASR 1000 Series Router Hardware Installation Guide 19 Cisco ASR 1000 Series Routers Hardware Overview Serial Number Label Location ...

Страница 54: ...er label location for the Cisco ASR 1004 Router Figure 2 Cisco ASR 1004 Router Serial Number Label Location Cisco ASR 1000 Series Router Hardware Installation Guide 20 Cisco ASR 1000 Series Routers Hardware Overview Serial Number Label Location ...

Страница 55: ...er label location for the Cisco ASR 1002 Router Figure 3 Cisco ASR 1002 Router Serial Number Label Location Cisco ASR 1000 Series Router Hardware Installation Guide 21 Cisco ASR 1000 Series Routers Hardware Overview Serial Number Label Location ...

Страница 56: ... label location for the Cisco ASR 1002 F Router Figure 4 Cisco ASR 1002 F Router Serial Number Label Location Cisco ASR 1000 Series Router Hardware Installation Guide 22 Cisco ASR 1000 Series Routers Hardware Overview Serial Number Label Location ...

Страница 57: ...the Cisco ASR 1013 Router Note that this is the bottom of the chassis Figure 5 Cisco ASR 1013 Router Serial Number Label Location Cisco ASR 1000 Series Router Hardware Installation Guide 23 Cisco ASR 1000 Series Routers Hardware Overview Serial Number Label Location ...

Страница 58: ...r Serial Number Label Location The following figure shows the serial number label location for the Cisco ASR 1002 X Router Figure 7 Cisco ASR 1002 X Router Serial Number Label Location Cisco ASR 1000 Series Router Hardware Installation Guide 24 Cisco ASR 1000 Series Routers Hardware Overview Serial Number Label Location ...

Страница 59: ... Supplies for the Cisco ASR 1006 Router page 51 Power Supplies for the Cisco ASR 1004 Router page 59 Power Supplies for the Cisco ASR 1002 Router page 66 Power Supplies for the Cisco ASR 1013 Router page 76 Power Supplies for the Cisco ASR 1001 Router page 83 Cisco ASR 1000 Series Routers Component Software Support This section lists the new hardware supported on the Cisco ASR 1000 Series routers ...

Страница 60: ...rface Processor Shared Port Adapters 1 GB USB Flash Token for Cisco ASR 1000 Series Cisco IOS XE Release 2 1 0 Cisco ASR 1000 Embedded Services Processor 10G Non Crypto Capable ASR1000 ESP10 N Cisco ASR1000 ESP20 embedded services processor Cisco IOS XE Release 2 2 1 Shared Port Adapters Cisco ASR 1000 Series Route Processor 2 Cisco ASR1000 RP2 Cisco IOS XE Release 2 3 0 Shared Port Adapters Cisco...

Страница 61: ...es Processors Chapter 4 Cisco ASR 1000 Series Router SPA Interface Processors SIPs Chapter 12 Cisco ASR 1001 Router Overview and Installation Cisco ASR1000 ESP40 and Cisco ASR1000 SIP40 support on Cisco ASR 1004 Router Cisco IOS XE 3 2S formerly Release 2 8 0 Chapter 10 Cisco ASR 1002 X Router Overview and Installation Cisco ASR1000 ESP100 support on Cisco ASR 1006 Router and Cisco ASR 1013 Router...

Страница 62: ... ports Four built in Gigabit Ethernet ports Four built in Gigabit Ethernet ports One built in 4x1 Gigabit Ethernet SPA Single or Dual ASR1000 ESP10 Single ASR1000 ESP10 Single integrated embedded services processor Single ASR1000 ESP5 Single integrated ASR1000 ESP2 5 Single integrated ASR1000 ESP2 5 ESP Single or Dual ASR1000 ESP20 Single ASR1000 ESP20 Single ASR1000 ESP10 Single or Dual ASR1000 E...

Страница 63: ...ables list the router and the route processor SIPs and power modules supported on that router The tables include the following categories Supported hardware before IOS XE Release 3 1S xref table Supported hardware from IOS XE Release 3 1S xref table Requires upgrade xref table Not compatible xref table Not supported in IOS XE Release 3 1S xref table Incompatible HA xref table When an unsupported c...

Страница 64: ...5 disabled ESP 100 disabled ESP 5 ESP 100 Cisco ASR 1004 Router ESP 5 disabled ESP 5 Cisco ASR 1006 Router RP1 disabled RP1 Cisco ASR 1013 Router NA built in Integrated embedded services processor NA built in Cisco ASR 1001 Router NA built in Integrated embedded services processor NA built in Cisco ASR 1002 X Router Incompatible ASR1000 ESP Error Message This section describes what happens when an...

Страница 65: ... is disabled and the following error message displays at the console Error message CMRP 3 INCOMPATIBLE_FRU chars in slot chars is not compatible with chars and so it is disabled rp_name RP1 rp_slot R0 R1 hw_config ASR 1013 chassis Reason The Product ID read from the FRU IDPROM is not supported in this hardware configuration Recommended action Remove the Cisco ASR1000 RP1 from the chassis Unsupport...

Страница 66: ... displays when detected and then periodically after that every 1 hour until the problem is corrected Error message CMRP 3 UNSUPPORTED_PEM chars in slot chars is not supported with chars and it needs to be replaced immediately pem_name ASR1006 PWR AC ASR1006 PWR DC ASR1013 PWR AC ASR1013 PWR DC pem_slot_num P0 P3 hw_config ASR 1006 ASR 1013 chassis Reason The Product ID read from the PEM IDPROM is ...

Страница 67: ... in this hardware configuration Recommended action Remove the Cisco ASR1000 SIP40 from the chassis Incompatible Cisco High Availability Hardware Configurations The Cisco ASR 1006 Router hardware configuration for the High Availability feature is incompatible in Cisco IOS XE Release 3 1S when you have the following hardware configuration combinations Cisco ASR100 RP1 with a Cisco ASR1000 ESP10 and ...

Страница 68: ...ction Upgrade the CPLD firmware on this FRU using the b upgrade hw programmable CPLD file pkg_file slot fru_slot b command See http www cisco com en US docs routers asr1000 cpld hw_fp_upgrade html for more details Configurations When an Upgrade of CPLD Firmware Is Required In order to use existing ASR1000 RP2 and ASR1000 SIP10 hardware components in the Cisco ASR 1013 Router you must perform a CPL...

Страница 69: ...en the system powered up before this event When the second RP is inserted no special action is taken System up with RP running older CPLD and RP with older CPLD inserted The message will be printed when the system powered up before this event When the second RP is inserted similar message for the new card will be printed Unsupported Standby ASR1000 RP2 or ASR1000 SIP10 Requires Upgrade This sectio...

Страница 70: ...g system BINOS kernel plus IOSD IOS daemon The Cisco ASR1000 RP1 and Cisco ASR1000 RP2 are responsible for Selection of the active Cisco ASR 1000 Series Route Processor and the Cisco ASR 1000 Series Embedded Services Processor and notification of the Cisco ASR 1000 Series SPA Interface Processor of these events All the control processors communicating and performing packet processing on packets pu...

Страница 71: ... selection or switchover of active versus standby cards image management and distribution logging facilities distribution of user configuration information and alarm control Provide control signals and Ethernet out of band channel EOBC for the two Cisco ASR 1000 Series Embedded Services Processors and Cisco ASR 1000 Series Route Processors Include control signals for monitoring the health of power...

Страница 72: ...s Note The Cisco ASR1000 RP1 and Cisco ASR1000 RP2 Cisco ASR1000 ESPs and power supplies can support redundancy Only one RP and one ESP are considered active at a time and no load sharing is performed However the non active RP or ESP is maintained in a warm standby state so that it can take over the active role as quickly as possible if necessary The following combinations of components are suppor...

Страница 73: ...rnal USB Flash LED 2 Internal USB bootflash LED 3 The following figure shows the Cisco route processor with faceplate connectors Figure 9 Cisco ASR1000 RP Route Processor Connectors MGMT Ethernet connector 4 CARRIER LED 1 CON connector 5 BITS connector 2 AUX connector 6 LINK LED 3 Cisco ASR 1000 Series Router Hardware Installation Guide 39 Cisco ASR 1000 Series Routers Component Overview Cisco ASR...

Страница 74: ... Red Lit when the Cisco ASR 1000 Series RP is active Green Active ACTV Lit when the Cisco ASR 1000 Series RP is the standby processor Yellow Standby STBY Critical alarm indicator or during boot process An example the ambient air temperature is above 60ºC and will begin shutdown in 5 minutes Solid Red Critical CRIT Major alarm indicator For example Ambient air temperature is beyond short term opera...

Страница 75: ...shing Green Internal USB bootflash LED DISK BF No activity Off Out of service or not configured Off LED BITS I F Mode CARRIER In frame and working properly Solid Green Fault or loop condition exists Amber Warmup Free run or Holdover Off LED DTI ModeCARRIER for Cisco ASR1000 RP2 Normal or bridging Solid Green Fast Amber Link with no activity Solid Green 10 100 1000 RJ 45 Interface LED LINK Link wit...

Страница 76: ... the AUX and or CON ports regardless of being properly configured the connection is not established and a call cannot be setup This functionality is not supported on any of the Cisco ASR 1000 Series Aggregation Services Routers or on any of the Cisco IOS XE versions Note The Cisco ASR 1000 Series Route Processor meets the following requirements Supports up to 4 GB of memory with single bit error c...

Страница 77: ...ter has begun routing or in troubleshooting scenarios when the SPA interfaces are inactive The following aspects of the Management Ethernet interface should be noted Each RP has a Management Ethernet interface but only the active RP has an accessible Management Ethernet interface the standby RP can be accessed using the console port however IPv4 IPv6 and ARP are the only routed protocols supported...

Страница 78: ...ork clock changes No second BITS clock input supported The LED order is from top to bottom on the route processor is MIN MAJ CRIT The Cisco ASR1000 RP2 is not supported on the Cisco ASR 1002 router or Cisco ASR 1002 F router The following table lists the Cisco embedded ASR1000 RP1 LEDs and behaviors Table 12 Cisco Embedded ASR1000 RP1 LEDs in the Cisco ASR 1002 Router Behavior Description Color St...

Страница 79: ...n Fault or loop condition Amber Link with no activity Green 10 100 1000 RJ 45 Interface LED LINK Link with activity Flashing Green No link Off Port is not enabled Off Built in SPA SFP port status 4 LEDs Port enabled but there is a problem with the Ethernet link Amber Port enabled valid Ethernet link Green All carrier card requirements are within specification Green Carrier card power PWR Cisco ASR...

Страница 80: ...le lists the Cisco embedded ASR1000 RP1in the Cisco ASR 1002 Router connectors and description Table 13 Cisco Embedded ASR1000 RP1 Connectors Description Type Label Indicates BITS timing references Standard E1 T1 RJ 45 connector BITS The route processor has an ENET port with a RJ 45 connector to attach a management device or network for network management One RJ 45 jack for copper Ethernet Managem...

Страница 81: ...larm If an alarm illuminates the CRIT MIN or MAJ LED on the Cisco ASR 1000 Series Route Processor RP faceplate and a visual or audible alarm is wired the alarm also activates an alarm relay in the power supply DB 25 connector on the Cisco ASR 1006 Router and Cisco ASR 1004 Router The bell rings or the light bulb flashes and alerts site personnel that a router alarm condition exists Shielded cables...

Страница 82: ...alarm you must resolve the alarm condition The clear facility alarm command does not clear an alarm LED on the RP faceplate or turn off the DC light bulb For example if a critical alarm LED is illuminated because an active SPA was removed without a graceful deactivation of the SPA the only way to resolve that alarm is to replace the SPA For alarm relay pinouts see xref table for Cisco ASR 1006 rou...

Страница 83: ... Cisco ASR 100 Cisco ASR 1013 and Cisco ASR 1001 routers operate at individual specifications The following table shows the common input ranges and circuit breaker requirements Table 14 Cisco ASR 1000 Series Router DC Power Supply System Input Requirements AWG Wire Circuit Breaker Amps System Input Rating Amps Cisco ASR 1000 Series Router DC Power Supply Maximum Minimum Maximum Minimum Always AWG ...

Страница 84: ...s not exceed 20 A Note AC and DC Power Supply Types The AC and DC power supplies for the Cisco ASR 1000 Series Routers support different types of power supply switches The following table defines which power supplies the Cisco ASR 1000 Series routers support a standby or an On Off switch Table 15 Cisco ASR 1000 Series Routers AC and DC Power Supply Switches Cisco ASR 1000 Series Router Power Suppl...

Страница 85: ...r The information in this section applies to the ASR1006 PWR DC and ASR1006 PWR AC power supplies The Cisco ASR 1006 Router also supports the ASR1013 06 PWR DC and ASR1013 06 PWR AC power supplies which are described in the Power Supplies for the Cisco ASR 1013 Router on page 76 Note The Cisco ASR 1006 Router can support up to 1200 W output AC and 48 VDC input The 1200 W power supply module consis...

Страница 86: ... ASR 1006 The information in this section applies to the ASR1006 PWR AC power supply If you are using the ASR1013 06 PWR AC power supply see the xref c_AC_Power_Supply_LEDs_and_Connector_for_Cisco_ASR_1013_1206731 xml Note The power supply module contains three fans A total of six fans are used to cool the ASR 1006 system and power supply The airflow direction is front to back Power supply modules...

Страница 87: ...connector 2 AC power supply standby switch 7 Tie wrap tab 3 AC power supply LEDs 8 AC power supply captive screw 4 Cisco ASR 1000 Series Router Hardware Installation Guide 53 Cisco ASR 1000 Series Routers Component Overview AC Power Supply LEDs and Connector for Cisco ASR 1006 ...

Страница 88: ... Connector DB 25 alarm connector 3 AC power supply LEDs 1 AC power supply fan 4 AC power supply fan 2 The following table describes the AC power supply LEDs on the Cisco ASR 1006 Router Cisco ASR 1000 Series Router Hardware Installation Guide 54 Cisco ASR 1000 Series Routers Component Overview AC Power Supply LEDs and Connector for Cisco ASR 1006 ...

Страница 89: ...s fan status FAN OK The LED illuminates red when a fan failure is detected Red LED is red and turned off to signal that the 48 VDC output voltages are within the normal operating range output voltage between the minimum and maximum limits will not create an output fail alarm and output voltages below the minimum or above the maximum will create an output fail alarm When you turn the power supply o...

Страница 90: ...re three tie wrap tabs on the power supply The terminal block accepts two double hole lugs one for 48 V input and another for 48 V RTN A plastic cover fits over the terminal block to prevent accidental contact See xref figure The studs on the terminal block are similar to the safety ground device on the side of the Cisco ASR 1006 Router For information on the safety ground lug on the side of the c...

Страница 91: ...down to 39VDC Green A bi color LED indicates presence of input voltage INPUT OK The LED illuminates amber when the input voltage falls below 39VDC and indicates that there is still a voltage present voltage on the terminal block The LED remains amber and is active to around 20 V 5 V The LED is not illuminated if the input is below 15 V Amber The LED illuminates s green when all fans are operationa...

Страница 92: ...er supply activity OUTPUT FAIL AC DC Power System Output for Cisco ASR 1006 The power supply output tolerance is defined in the following table under all combinations of line variation Total system consumption per power supply should not exceed 1200 W Table 19 Cisco ASR 1006 Router Power System Output Voltage and Current 3 3 V 12 VDC Output Voltage 3 20 VDC 11 80 VDC Minimum 3 30 VDC 12 00 VDC Nom...

Страница 93: ...t overcurrent protection Ensure that the protective device is rated not greater than AC power supplies for the Cisco Aggregation Services Routers 120 VAC 20A U S maximum DC power supplies for the Cisco ASR 1006 Router 50A U S maximum Cisco ASR 1004 Router 40A U S maximum Cisco ASR 1002 Router 30A U S maximum Statement 1005 Warning Cisco ASR 1004 AC Power Supply This section provides information ab...

Страница 94: ...co ASR 1004 Router AC Power Supply AC power supply fan 4 AC power supply standby switch standby symbol is a broken circle with a vertical line through the top of it 1 AC power inlet 5 AC power supply LEDs 2 AC power supply handle 6 DB 25 alarm connector 3 Cisco ASR 1000 Series Router Hardware Installation Guide 60 Cisco ASR 1000 Series Routers Component Overview Cisco ASR 1004 AC Power Supply LEDs...

Страница 95: ...Router AC Power Supply LEDs and Connector Description Color LED LED Label LED illuminates green to signal that the AC power supply input voltage is greater than 85 V Green Power supply activity INPUT OK If LED is not illuminated then the AC input voltage is less than 70 V or the power supply is turned off For an AC input voltage between 70 V and 85V the INPUT OK LED can be either on off or flashin...

Страница 96: ... continuously The Cisco ASR 1004 Router has two of the same type power supplies in power supply slot 0 and power supply slot 1 The power supply slot numbers are on the left side of the chassis and the power supplies are located on the floor of the chassis The 48 VDC power supply input connector is a terminal block style that will allow crimp type lugs accepting up to AWG 8 wire The terminal block ...

Страница 97: ...upply Grounding symbol 5 Terminal and plastic cover 1 Power supply On Off O switch 6 Power supply LEDs 2 Power supply handle 7 DB 25 alarm connector Power supply ground lugs and 3 Power supply fan 4 The following table describes the power supply LEDs and connectors on the rear of the chassis Cisco ASR 1000 Series Router Hardware Installation Guide 63 Cisco ASR 1000 Series Routers Component Overvie...

Страница 98: ...low 39VDC and indicates that there is still a voltage present voltage on the terminal block The LED remains amber and is active to around 20 V 5 V The LED is not illuminated if the input is below 15 V Amber The LED illuminates s green when all fans are operational Green A bi color LED indicates power supply fan status FAN OK The LED illuminates red when a fan failure is detected Red Cisco ASR 1000...

Страница 99: ...once the power supply 48 VDC input turn on threshold of 43 5 V has been reached The following table shows the common input ranges for reference only Table 22 Cisco ASR 1004 Router 48 VDC Power System Input Maximum Nominal Minimum Voltage Range VDC 56 48 40 5 Domestic 72 60 55 International AC DC Power System Output for Cisco ASR 1004 The power supply output tolerance is defined in the following ta...

Страница 100: ...it is operational The airflow direction is front to back This product relies on the building s installation for short circuit overcurrent protection Ensure that the protective device is rated not greater than AC power supplies for the Cisco Aggregation Services Routers 120 VAC 20A U S maximum DC power supplies for the Cisco ASR 1006 Router 50A U S maximum Cisco ASR 1004 Router 40A U S maximum Cisc...

Страница 101: ...Cisco ASR 1002 Router The Cisco ASR 1002 Router supports up to two power supplies Figure 16 Cisco ASR 1002 Router AC Power Supply AC power supply fan 5 Chassis ESD socket 1 AC power supply captive installation screw 6 AC power supply slot number 0 2 AC power supply slot number 1 7 AC power supply On Off O switch 3 AC power inlet 8 AC power supply LEDs 4 The following table describes the power supp...

Страница 102: ...s LED might be off or red Red Power supply activity OUTPUT FAIL AC Power System Output Voltage Alarm Range for Cisco ASR 1002 Router The AC power supply output voltage alarm occurs when the output voltage is below the low end of the minimum or above the high end of the maximum limits shown in the following table Table 25 Cisco ASR 1002 Router AC Power Supply Output Voltage Alarm Range Maximum Mini...

Страница 103: ...aps to dress the input cable wires there are two tie wrap tabs on the 48 VDC power supply The 48 VDC power supply unit is secured into the system chassis with two captive screws mounted on the faceplate Cisco ASR 1002 Router 48 VDC Power Supply LEDs and Connector The following figure shows the 48 VDC power supplies at the rear of the Cisco ASR 1002 Router The Cisco ASR 1002 Router supports up to t...

Страница 104: ...uminates red when a fan failure is detected Red When the LED is off it signals that the 48 VDC output voltage are within the normal operating range Output voltage between the minimum and maximum limits will not create an output fail alarm and output voltages below the minimum or above the maximum will create an Output Fail alarm When you turn the power supply on the red LED illuminates for two to ...

Страница 105: ...R 1002 Router 48 VDC Power System Output Voltage and Current 3 3 V 12 VDC Output Voltage 3 20 VDC 11 80 VDC Minimum 3 30 VDC 12 00 VDC Nominal 3 40 VDC 12 20 VDC Maximum Output Current 0 10 A 2 0 A Minimum 3 125 A 39 A Maximum Cisco ASR 1002 Router 24 VDC Power Supply This section provides information about the 24 VDC power supplies on the rear of the Cisco ASR 1002 Router The recommended branch c...

Страница 106: ...ve screws mounted on the faceplate Cisco ASR 1002 Router 24 VDC Power Supply LEDs and Connector The following figure shows the 24 VDC power supplies at the rear of the Cisco ASR 1002 Router The Cisco ASR 1002 Router supports two 24 VDC power supplies Figure 18 Cisco ASR 1002 Router Rear View With 24 VDC Power Supply Standby On switch 6 24 VDC terminal block 1 Captive fastener 7 Positive lead 2 Pow...

Страница 107: ... Table 29 Cisco ASR 1002 Router 24 VDC Power Supply LEDs Description Color LED LED Label When the LED is off it signals that the 24 VDC output voltage are within the normal operating range Output voltage between the minimum and maximum limits will not create an output fail alarm and output voltages below the minimum or above the maximum will create an Output Fail alarm When you turn the power supp...

Страница 108: ...ly and turn off the supply when the input voltage reaches 19 0 volts 0 5 volts Once this low voltage threshold is reached the power supply does not resume operation until the input voltage has reached 20 0 volts 0 5 volts Once the turn on threshold of 20 volts is reached then the 24 VDC power supply meets all specification requirements down to low voltage threshold of 19 volts tolerance 24 VDC Pow...

Страница 109: ...ow the low end of the maximum limits then the Red state is not activated Table 31 24 VDC Output Voltage Alarm Threshold Ranges Maximum Minimum Output 12 8 13 8V 10 0 11 2V 12V None 2 6 3 0V 3 3V Temperature If a single fan fails the power supply meets the functional requirements specified in Table 24 Above 55 C with less than two fans calculated MTBF does not apply however all component stress rem...

Страница 110: ...ntain a monitor circuit to determine the status of fan speed and operation along with LED status indicating fan errors The system temperature operation is 0 to 40C normal and 5C to 55C AC System AC power input is an IEC 320 type power inlet 20 A service connector The switch does not disconnect the AC line but enables the signal to the power supply The AC cord disconnects the power supply from the ...

Страница 111: ...raction levers are provided Guide pins located at the rear of these modules help center locate the modules and reduce stress to the midplane and module mounted connectors Four captive screws tool operated latches are provided on the modules face plate chassis rear to secure these modules into the chassis The following figure shows the AC power supply for the Cisco ASR 1013 Router The Cisco ASR 101...

Страница 112: ...m Connector DB 25 alarm connector 3 AC power supply LEDs 1 AC power supply fan 4 AC power supply fan 2 The following table describes the AC power supply LEDs on the Cisco ASR 1013 Router Cisco ASR 1000 Series Router Hardware Installation Guide 78 Cisco ASR 1000 Series Routers Component Overview AC Power Supply LEDs and Connector for Cisco ASR 1013 ...

Страница 113: ...s fan status FAN OK The LED illuminates red when a fan failure is detected Red LED is red and turned off to signal that the 48 VDC output voltages are within the normal operating range output voltage between the minimum and maximum limits will not create an output fail alarm and output voltages below the minimum or above the maximum will create an output fail alarm When you turn the power supply o...

Страница 114: ...There are three tie wrap tabs on the power supply The terminal block accepts two hole lugs one for the 48 V input and the other for the 48 V RTN A plastic cover is fitted over the terminal block to prevent accidental contact The studs on the terminal block are similar to the safety ground device on the bottom rear of the Cisco ASR 1013 Router For information on the safety ground lug on bottom rear...

Страница 115: ... 48 VDC power supply input voltage is greater than 43 5VDC at turn on and remains green down to 39VDC Green A bi color LED indicates input voltage INPUT OK The LED illuminates amber when the input voltage falls below 39VDC and indicates that there is still a voltage present voltage on the terminal block The LED remains amber and is active to around 25 V 5 V The LED is not illuminated if the input ...

Страница 116: ...is defined in the following table under all combinations of line variation Total system consumption per power supply should not exceed 1600 W The output tolerance values shown in this table apply to the ASR1013 06 PWR DC and ASR1013 06 PWR AC power supplies The Cisco ASR 1013 Router and the Cisco ASR 1006 Router support these power supplies Note Table 34 Cisco ASR 1013 Router Power System Output V...

Страница 117: ...s on the 12 V output and is used in a dual hot pluggable configuration The AC power supply consumes a maximum of 471 W of input power Cisco ASR 1001 Router DC power supply Provides 400 watt output power with two DC voltage outputs 12 V and 5 0 V The power supply operates between 40 5 and 72 VDC The DC power supply current shares on the 12 V output and is used in a dual hot pluggable configuration ...

Страница 118: ...r supplies for the Cisco ASR 1006 Router 50A U S maximum Cisco ASR 1004 Router 40A U S maximum Cisco ASR 1002 Router 30A U S maximum Cisco ASR 1001 Router 10A U S maximum Statement 1005 Warning Cisco ASR 1001 Router AC Power Supply The Cisco ASR 1001 Router has two AC power supplies in the rear of the chassis The input receptacle is an IEC60320 C14 type of filtered AC inlet The current rating on t...

Страница 119: ...tem Input Range and Voltage for Cisco ASR 1001 The power supply DC Input Range is 40 5 to 72 VDC and the AC Input Range is 85 to 264 VAC The following table describes the Cisco ASR 1001 Router power supply LED Table 35 Cisco ASR 1001 Router AC and DC Power Supply LED Description Color LED LED Label Off if output power is within specification range Red Indicates power supply status PWR OK Cisco ASR...

Страница 120: ...Cisco ASR 1000 Series Router Hardware Installation Guide 86 Cisco ASR 1000 Series Routers Component Overview Cisco ASR 1001 Router DC Power Supply ...

Страница 121: ...s system flows through the Cisco ASR 1000 Series Embedded Services Processors Are responsible for the data plane processing tasks and all network traffic flows through them Support Forwarding Engine Control Processor which provide hardware abstraction layer between the QFP based forwarding engine and other system components allowing datapath and management functions to be independent Support Cisco...

Страница 122: ...be upgraded only on redundant embedded services processor systems Cisco ASR 1006 Router and Cisco ASR 1013 Router The Cisco ASR 1002 router supports only one Cisco ASR1000 ESP5 or ASR1000 ESP10 The Cisco ASR 1006 Router and Cisco ASR 1004 Router do not support the Cisco ASR1000 ESP5 When performing upgrades the Cisco ASR1000 ESP10 Cisco ASR1000 ESP20 and any future ESPs can be upgraded Note Do not...

Страница 123: ...s the ASR1000 ESP10 but does not support encryption services Cisco ASR 1000 ESP20 Cisco ASR 1000 ESP20 supports the Cisco ASR 1006 Router and ASR 1004 Router Performance highlights of the Cisco ASR1000 ESP20 include hardware assisted policing encryption capability of 8 Gbps and special jitter and latency minimizing multicast packet replication Cisco ASR 1000 ESP20 supports 1Gb Cisco QuantumFlow Pr...

Страница 124: ...e processors a secondary embedded services processor and up to six SPA carrier cards Cisco ASR 1000 ESP100 is supported on the following routers Cisco ASR 1006 Router Cisco ASR 1013 Router Cisco ASR1000 ESP100 provides the following features 24 configurable ESI links for SPA Carrier Card and native Line Card support ESI links support with a bandwidth of up to 46 Gbps for the Cisco ASR 1013 Router ...

Страница 125: ... 1000 Series embedded services processors are based on a common highly programmable network Cisco QuantumFlow Processor packet processing The Cisco ASR 1013 Router slots are keyed using rotated guide pins so that plug in cards can only be fully inserted in slots where they are intended to operate This keying prevents cards from making midplane contact in slots the cards are not allowed Cisco ASR 1...

Страница 126: ... ASR 1000 ESP200 and their QFP 3rd Gen ASIC Mappings Egress queueing for interfaces handled by QFP 3rd Gen 1 3 Egress queueing for interfaces handled by QFP 3rd Gen 3 1 Cisco ASR 1000 Series Router Hardware Installation Guide 92 Cisco ASR 1000 Series Routers Embedded Services Processors Cisco ASR 1000 ESP200 and Third Generation Cisco QFP ...

Страница 127: ...hedules and 116000 queues per QFP 3rd Gen ASIC multiple QFP 3rd Gen ASICs should be targeted by placing the SIP and SPA in the correct order in order to achieve full system scalability for schedules and queues For example A 5xGE SPA supports more than 32000 point to point protocol PPP sessions depending on the ESP However if QoS is applied to these sessions the QFP 3rd Gen ASIC that supports the S...

Страница 128: ...sco QuantumFlow Processor 5Mb TCAM 64 MB packet buffer and 1 GB FECP DRAM Cisco ASR1000 ESP5 3 Gbps 10 Gbps 8 Mpps forwarding for the combination of the following commonly used features IPv4 forwarding IP Multicast ACL QoS Reverse Path Forwarding RPF load balancing and Sampled NetFlow 512MB Cisco QuantumFlow Processor 10Mb TCAM and 128MB packet buffer and 2 GB FECP DRAM Cisco ASR1000 ESP10 8 Gbps ...

Страница 129: ...1002 ESP F 12 9 Gb of aggregate security traffic 40 Gbps ASR1000 ESP40 performance 1 GB Cisco QuantumFlow Processor 40Mb TCAM 256MB packet buffer 4 GB FECP DRAM 8 GB of registered DDR2 SDRAM memory within two DIMM connectors 4 GB DIMMs Cisco ASR1000 ESP401 Cisco ASR 1000 Series Router Hardware Installation Guide 95 Cisco ASR 1000 Series Routers Embedded Services Processors Features of the Cisco AS...

Страница 130: ...otal packet buffer 4 GB total resource memory Single 80MB TCAM4 feature lookup memory 16 GB of 1066 MHz DDR3 SDRAM Two 8GB 2 rank registered DIMMs Cisco ASR1000 ESP100 Cisco ASR 1000 Series Router Hardware Installation Guide 96 Cisco ASR 1000 Series Routers Embedded Services Processors Features of the Cisco ASR 1000 Series Embedded Services Processors ...

Страница 131: ...ide effect of optimizations made to achieve 40 Gbps for medium to large packets For unsupported hardware component configuration combinations see xref Table 2 4 Note The embedded services processor consists of a front panel label for indicator and control functions The Cisco ASR 1000 Series Embedded Services Processor model number labeling is located next to the left card module handle The module ...

Страница 132: ...mbedded services processors Table 37 LEDs on the Embedded Services Processors Behavior Description Color LED LED Label All power requirements are within specification Solid green Power PWR The embedded services processor is not powered on Off Cisco IOS has successfully booted Solid green System status STAT ROMmon is running or when the Process Manager declares that a critical route processor proce...

Страница 133: ...d is always active because these routers do not support redundancy The Cisco ASR1000 ESP5 does not support redundancy Therefore it is always active Green Active ACTV On a redundant system the STBY LED indicates which embedded services processor is in the standby state and is waiting to take over packet forwarding in the event that the active embedded services processor experiences a failure The ST...

Страница 134: ...Cisco ASR 1000 Series Router Hardware Installation Guide 100 Cisco ASR 1000 Series Routers Embedded Services Processors Features of the Cisco ASR 1000 Series Embedded Services Processors ...

Страница 135: ...ssor and Cisco ASR 1000 Series SPA Interface Processor SIP and power supplies plug into these slots Shared port adapters plug into SIP bays Note Cisco ASR 1000 Series SPA Interface Processor page 101 SPA Interface Processor Slot Numbering page 104 Cisco ASR 1000 Series SPA Interface Processor This section describes the Cisco SPA interface processors for the Cisco ASR 1006 Cisco ASR 1004 Cisco ASR ...

Страница 136: ...1004 and Cisco ASR 1013 routers A SIP is a carrier card that inserts into a router slot like a line card It provides no network connectivity on its own A SIP contains one or more subslots which are used to house one or more SPAs The SPA provides interface ports for network connectivity During normal operation the SIP should reside in the router fully populated either with functional SPAs in all su...

Страница 137: ...s the Cisco ASR1000 SIP10 and Cisco ASR1000 SIP40 LEDs on the front panel Table 38 Cisco ASR1000 SIP LEDs Behavior Description Color LED LED Label Cisco ASR 1000 Series SIP is powered on and all power supplies are within their tolerances Solid green Power PWR Cisco ASR 1000 Series SIP is powered off Off Cisco ASR 1000 Series Router Hardware Installation Guide 103 Cisco ASR 1000 Series Router SPA I...

Страница 138: ...rocessor Slot Numbering A shared port adapter is a modular type of port adapter that inserts into a subslot of a compatible SIP to provide network connectivity and increased interface port density The Cisco ASR 1000 Series SPA Interface Processor SIP provides an aggregation function for SPAs Cisco ASR 1006 Router and Cisco ASR 1004 Router In the Cisco ASR 1006 Router and Cisco ASR 1004 Router the ...

Страница 139: ...ng for the SPAs on the Cisco ASR 1004 Router is the same as the numbering on the Cisco ASR 1006 Router Note Cisco ASR 1002 Router In the Cisco ASR 1002 Router the Cisco ASR1002 SIP10 supports Three removable half height SPAs on Bay 1 2 and 3 The fourth SPA is a built in 4xGE SPA on Bay 0 located on the Cisco ASR 1000 Series RP1 Cisco ASR 1000 Series Router Hardware Installation Guide 105 Cisco ASR...

Страница 140: ...ns Built in 4xGE SPA in bay 0 and three half height SPAs in bay 1 2 3 Built in 4xGE SPA in bay 0 one half height SPA in bay 2 and one full height SPA in bay 1 The Cisco ASR 1000 Series SPA interface processor houses SPA bay 2 and SPA bay 3 SPA bay 0 and SPA bay 1 are physically located on Cisco integrated ASR1000 RP1 A portion of the Cisco integrated ASR1000 RP1 is reserved to provide connectivity...

Страница 141: ...slot F0 1 Cisco integrated RP slot R0 2 Cisco ASR 1013 Router In the Cisco ASR 1013 Router the Cisco ASR1000 SIP40 supports Four half height Rate or full rate or combination SPAs with up to 24 ports per SPA Two full height Rate or full rate or combination SPAs with up to 48 ports per SPA Two half height and 1 full height combination that does not exceed 96 ports The Cisco ASR 1013 Router uses the ...

Страница 142: ... port adapters on the Cisco ASR 1013 Router Figure 31 Cisco ASR 1013 Router Slot Numbering Slot F0 with ASR 1000 Series ESP 40 6 ASR 1000 Series SIP slot 5 1 Cisco ASR 1000 Series Router Hardware Installation Guide 108 Cisco ASR 1000 Series Router SPA Interface Processors SIPs Cisco ASR 1013 Router ...

Страница 143: ...co Aggregation Services Router 1000 Series SIP and SPA Software Configuration Guide Cisco ASR 1001 Router In the Cisco ASR 1001 Router the Cisco ASR1000 SIP10 supports One flexible integrated daughter card I O slot One half height SPA bay Figure 32 Cisco ASR 1001 Router Slot Numbering on page 109 shows slot numbering on the Cisco ASR 1001 Router Figure 32 Cisco ASR 1001 Router Slot Numbering Slot ...

Страница 144: ...e insertion and removal However the SIP on the Cisco ASR 1002 X Router is built into the chassis and is not a field replaceable unit Note Figure 4 8 shows the slot numbering for the Cisco ASR 1002 X Router Cisco SPA subslot 1 3 6xGE Built in SPA in Subslot 0 1 Cisco SPA subslot 3 4 Cisco SPA subslot 2 2 Cisco ASR 1000 Series Router Hardware Installation Guide 110 Cisco ASR 1000 Series Router SPA I...

Страница 145: ...15 Site Planning page 118 Preventing Electrostatic Discharge Damage page 130 Electrical Safety page 131 Receiving the Cisco ASR 1000 Series Router page 132 Chassis Lifting Guidelines page 133 Tools and Equipment page 134 Checking the Shipping Container Contents page 135 Cisco ASR 1000 Series Router Installation Checklist page 136 Prerequisites and Preparation Before you perform any of the procedur...

Страница 146: ...ing container until you have determined the installation site Inspect all items for shipping damage If an item appears damaged contact a Cisco customer service representative immediately Note Safety Guidelines Before you begin the installation or replacement procedure review the safety guidelines in this section to avoid injuring yourself or damaging the equipment This section contains guidelines ...

Страница 147: ... Always unplug the power cable before installing or removing a chassis Keep the chassis area clear and dust free during and after installation Keep tools and chassis components away from walk areas Do not wear loose clothing jewelry including rings and chains or other items that could get caught in the chassis Fasten your tie or scarf and sleeves The Cisco ASR 1000 Series Routers operate safely wh...

Страница 148: ...preventive wrist strap to your wrist and to a bare metal surface To comply with the Telcordia GR 1089 NEBS standard for electromagnetic compatibility and safety for Ethernet RJ 45 ports use only shielded Ethernet cables that are grounded on both ends In a NEBS installation all Ethernet ports are limited to intrabuilding wiring Caution The intrabuilding ports of the equipment or subassembly is only...

Страница 149: ...ic This warning symbol means danger You are in a situation that could cause bodily injury Before you work on any equipment be aware of the hazards involved with electrical circuitry and be familiar with standard practices for preventing accidents Use the statement number provided at the end of each warning to locate its translation in the translated safety warnings that accompanied this device Not...

Страница 150: ... 1002 Router 120 VAC 20A U S maximum DC power supplies for the Cisco ASR 1004 Router 40A U S maximum DC power supplies for the Cisco ASR 1006 Router 50A U S maximum DC power supplies for the ASR 1002 Router 30A U S maximum Statement 1005 Warning This product requires short circuit overcurrent protection to be provided as part of the building installation Install only in accordance with national an...

Страница 151: ... I CDRH and Class 1M IEC laser products Statement 1055 Warning Invisible laser radiation may be emitted from the end of the unterminated fiber cable or connector Do not view directly with optical instruments Viewing the laser output with certain optical instruments for example eye loupes magnifiers and microscopes within a distance of 100 mm may pose an eye hazard Statement 1056 Warning There is t...

Страница 152: ...ement 1029 Warning Site Planning This section contains site planning information and will help you plan for the installation of the Cisco ASR 1000 Series Routers General Precautions Observe the following general precautions when using and working with your Cisco ASR 1000 Series Routers Keep your system components away from radiators and heat sources and do not block cooling vents Do not spill food...

Страница 153: ...operation and avoid unnecessary maintenance plan and prepare your site configuration before installation After installation make sure the site maintains the environmental characteristics as shown in the following table Table 40 Cisco ASR 1000 Series Router Environmental Tolerances Maximum Minimum Environmental Characteristic 50 degree C 50 degrees C at 10 000 feet 0 degree C Steady State Operating...

Страница 154: ...RS 310 1 71 in 43 43 mm 1RU rack mount per EIA RS 310 Height 17 25 in 438 15 mm 17 25 in 438 15 mm 17 25 in 438 15 mm 17 25 in 438 15 mm 17 3 in 439 42 mm Width 22 60 in 600 2 mm Depth includes cable management brackets card and power supply handles for mounting in a 600mm enclosed cabinet hardware platform Comment 22 50 in 571 5 mm Depth includes cable management brackets card and power supply ha...

Страница 155: ...SR 1002 X Router remain the same as those for the Cisco ASR 1002 Router The following list describes additional Cisco ASR 1000 Series chassis characteristics Cisco ASR 1001 Router Chassis height meets EIA 310 rack spacing 1RU 1 71 in 43 43 mm universal rack mount Chassis width meets EIA 310 19 in 17 3 in 439 42 mm wide with rack brackets Cable management brackets allow a bend radius of 1 5 in 38 1...

Страница 156: ...radius of 1 5 in 38 1 mm for cables Adjustable rack mount brackets allow for a front to rear rail variance distance of 15 50 394mm to 19 00 482 6mm Cisco ASR 1013 Router Chassis height meets EIA 310 rack spacing 13RU 22 8 in 579 12 mm universal rack mount Chassis width meets EIA 310 19 in 17 25 in 438 15 mm wide with rack brackets Cable management brackets allow a bend radius of 1 5 in 38 1 mm for...

Страница 157: ...e attached to a central office or other interior ground system This product requires short circuit overcurrent protection to be provided as part of the building installation Install only in accordance with national and local wiring regulations Caution The Cisco ASR 1000 Series Router installation must comply with all applicable codes and is approved for use with copper conductors only The ground b...

Страница 158: ... Cisco ASR 1002 Router DC power supply with 16 Amp input rating must use an AWG 12 gauge wire for a 20 A circuit breaker and an AWG 10 gauge wire for a 30 A circuit breaker All Cisco ASR 1000 Series Router AC power supplies require a 20 A circuit breaker Note The AC and DC power supplies for the Cisco ASR 1000 Series Routers support different types of power supply switches The following table list...

Страница 159: ...ion does not require an external transceiver The E1 ports are E1 interfaces that use 120 ohm shielded twisted pair STP cables Shielded cables must be used to connect to the DB 25 alarm connector on both the AC and DC power supplies in order to comply with FCC EN55022 CISPR22 Class A emissions requirements For information about the power supply DB 25 alarm connector and alarm LEDs see the xref How ...

Страница 160: ...rference and how to minimize its effects on the Cisco ASR 1000 Series Router system Electromagnetic Interference All equipment powered by AC current can propagate electrical energy that can cause electromagnetic interference EMI and possibly affect the operation of other equipment The typical sources of EMI are equipment power cords and power service cables from electric utility companies Strong E...

Страница 161: ...ed cabling distances or if signal wires pass between buildings you should consider the effect that a lightning strike in your vicinity might have on the Cisco ASR 1000 Series Router The electromagnetic pulse EMP generated by lightning or other high energy phenomena can couple enough energy into unshielded conductors to damage or destroy electronic equipment If you have previously experienced such ...

Страница 162: ...quipment racks Consider installing the Cisco ASR 1000 Series Router in a rack with the following features NEBS compliant 19 in 48 3 cm wide rack EIA or ETSI hole patterns in the mounting rails Required mounting hardware is shipped with the Cisco ASR 1000 Series Router If the rack that you plan to install the system in has metric threaded rails you must provide your own metric mounting hardware Per...

Страница 163: ...fect access to the routers cards The front and top of the chassis must remain unobstructed to ensure adequate airflow and prevent overheating inside the chassis Allow the following clearances for normal system maintenance At the top of the chassis At least 3 in 7 6 cm In the front of the chassis 3 to 4 ft 91 44 cm to 121 92 cm When installing the Cisco ASR 1013 chassis in a 42RU equipment rack all...

Страница 164: ... port wiring and limitations of the cabling involved according to TIA EIA 232F The Cisco ASR 1000 Series Router Ethernet cabling distances are within limitations The equipment rack in which you plan to install the Cisco ASR 1000 Series chassis complies with requirements Careful consideration has be given to safety ease of maintenance and proper airflow in selecting the location of the rack Prevent...

Страница 165: ... packaging Handle all sensitive components in a static safe area If possible use antistatic floor pads and workbench pads For safety periodically check the resistance value of the antistatic strap The measurement should be between 1 and 10 ohms Caution Always tighten the captive installation screws on all the system components when you are installing them These screws prevent accidental removal of...

Страница 166: ... in wet locations unless the jack is specifically designed for wet locations Never touch uninsulated telephone wires or terminals unless the telephone line has been disconnected at the network interface Use caution when installing or modifying telephone lines Do not work on the system or connect or disconnect cables during periods of lightning activity Statement 1006 Warning Receiving the Cisco AS...

Страница 167: ...th your legs not your back If you must bend down to lift the chassis bend at the knees not at the waist to reduce the strain on your back muscles Do not remove installed components from the chassis Always disconnect all external cables before lifting or moving the chassis General Safety Guidelines To prevent injury and equipment damage never attempt to lift or tilt the router chassis using the han...

Страница 168: ...ny shipping damage if there is damage contact your service representative 2 Unpack the Cisco ASR 1000 Series Router 3 Perform a visual inspection of the chassis 4 After you have unpacked the system verify that you have received all of the required components Using the packing list as a guide take the following steps to check the contents of the Cisco ASR 1000 Series Router shipping container 5 Che...

Страница 169: ...vices processors Cisco ASR 1000 Series SPA interface processors SIPs and power supplies you ordered are installed in the chassis Ensure that the configuration matches the packing list Checking the Shipping Container Contents Use the components list shown in the following table to check the contents of the Cisco ASR 1000 Series Router shipping container Do not discard the shipping container You nee...

Страница 170: ...r cord if an AC power supply was shipped There are none for the DC power supply units Optional Equipment Most Cisco documentation is online or on the Cisco Documentation DVD Documentation that ships with your Cisco ASR 1000 Series Router includes the Regulatory Compliance and Safety Information for the Cisco ASR 1000 Series Aggregation Services Routers document and the Documentation Roadmap for Ci...

Страница 171: ...ications verified Required passwords IP addresses device names and so on available Required tools available Network connection equipment available Cable management brackets installed optional but recommended AC power cable s connected to AC source s and router DC power cable s connected to DC source s and router Network interface cables and devices connected System power turned on System boot comp...

Страница 172: ...ters are operational Correct hardware configuration displayed after system banner appears Cisco ASR 1000 Series Router Hardware Installation Guide 138 Preparing Your Site for Installation Cisco ASR 1000 Series Router Installation Checklist ...

Страница 173: ...ching the Chassis Rack Mount Brackets page 149 Installing the Cisco ASR 1006 Router in a Rack page 153 Attaching the Cable Management Brackets page 158 Attaching a Chassis Ground Connection page 161 Connecting the Shared Port Adapter Cables page 163 Connecting the Console and Auxiliary Port Cables page 163 Connecting Power to the Cisco ASR 1006 Router page 165 Connecting a Terminal to the Cisco AS...

Страница 174: ...ASR 1000 Series Route Processors Cisco ASR1000 RP1 or Cisco ASR1000 RP2 Dual redundant AC and DC power supplies This section contains the following topics Front View The following image shows the Cisco ASR 1006 Router with modules and filler plates installed Figure 34 Cisco ASR 1006 Router Front View ASR 1000 Series SIP slot 0 5 Slot R0 with ASR 1000 Series RP 1 ASR 1000 Series SIP slot 1 6 Slot R...

Страница 175: ...upply handle 5 AC power supply fan 1 AC power inlet 6 AC power supply DB 25 alarm connector A female DB 25 sub connector which enables you to attach an external alarm monitoring facility to the router thus supporting a telco style of handling alarm conditions in the router For a description of the DB 25 alarm connector see the How Cisco ASR1000 RP Alarm Monitoring Works section on page 2 22 2 Cisc...

Страница 176: ...ry Before you work on any equipment be aware of the hazards involved with electrical circuitry and be familiar with standard practices for preventing accidents Use the statement number provided at the end of each warning to locate its translation in the translated safety warnings that accompanied this device Statement 1071 Warning Before you install operate or service the system read the Regulator...

Страница 177: ...ipment rack or two post using the rack mount brackets in the accessory kit The Cisco ASR 1006 Router usually ships fully loaded However you can remove components from the chassis to make the chassis lighter for your rack installation Note General Rack Installation Guidelines When planning your rack installation consider the following guidelines The Cisco ASR 1006 Router requires a minimum of 6 rac...

Страница 178: ... to maintain a low center of gravity to prevent the rack from falling over Install and use the cable management brackets included with the Cisco ASR 1006 Router to keep cables organized and out of the way of the cards and processors Ensure that cables from other equipment already installed in the rack do not impair access to the cards or require you to disconnect cables unnecessarily to perform eq...

Страница 179: ...ulates on the floor is drawn into the interior of the router by the cooling fans Excessive dust inside the router can cause overtemperature conditions and component failures There must be approximately 19 inches 48 3 cm of clearance at the front and rear of the chassis to install and replace FRUs or to access network cables and equipment The Cisco ASR 1006 Router needs adequate ventilation Do not ...

Страница 180: ...e side 4 Repeat Step 2 through Step 3 on the other side of the chassis Use at least 4 screws to secure the rack mount brackets to the chassis 5 Gather the two cable management brackets and screws shipped with the chassis The following image shows the cable management brackets attached on the front of the Cisco ASR 1006 Router when the chassis is placed on a table top or equipment shelf 6 Screw the...

Страница 181: ...assis after you install the chassis rack mount brackets Note Step 5 Gather the two cable management brackets and screws shipped with the chassis The following image shows the cable management brackets attached on the front of the Cisco ASR 1006 Router when the chassis is placed on a table top or equipment shelf Make certain that the cable management U feature device has the open end pointing upwar...

Страница 182: ...re the space between the vertical mounting flanges rails on your equipment rack to verify that the rack conforms to the measurements shown in the following image SUMMARY STEPS 1 Mark and measure the distance between two holes on the left and right mounting rails 2 Measure the space between the inner edges of the left front and right front mounting flanges on the equipment rack DETAILED STEPS Step ...

Страница 183: ...quipment section on page 5 23 The cable management brackets are installed on the chassis after you install the chassis rack mount brackets and mount the chassis in the rack Note Chassis Front Rack Mount Brackets Determine where in the rack you want the chassis to be mounted If you are mounting more than one chassis in the rack then start from the bottom up or the center of the rack The following i...

Страница 184: ...Use black screws to secure the rack mount brackets to the chassis 5 Install the chassis in the rack To install the Cisco ASR 1006 Router in a rack go to the Installing the Cisco ASR 1006 Router in a Rack on page 153 DETAILED STEPS Step 1 Locate the threaded holes on the side of the chassis Make certain that you hold the front rack mount bracket with the ear and holes facing outward and towards the...

Страница 185: ...t rack mount brackets on the Cisco ASR 1006 Router perform the following steps SUMMARY STEPS 1 Locate the threaded holes on the rear side of the chassis Make certain that you hold the rear t rack mount bracket with the ear and holes facing outward and towards the rear of the chassis 2 Position the rear rack mount bracket top hole with the chassis second top hole from the back See Figure 42 Attachi...

Страница 186: ...ee Figure 42 Attaching the Rear Rack Mount Brackets to the Cisco ASR 1006 Router on page 152 Step 3 Insert and tighten the screws on one side Step 4 After the bracket is secured to the side of the chassis slide the two remaining components into the side rack mount bracket Step 5 Repeat Step 1 through Step 3 on the other side of the chassis Use all the screws to secure the rear rack mount brackets ...

Страница 187: ...ovided with stabilizing devices install the stabilizers before mounting or servicing the unit in the rack Statement 1006 Warning We recommend that you allow at least 1 or 2 inches 2 54 or 5 08 cm of vertical clearance between the router and any equipment directly above and below it To install the chassis in the rack perform the following steps SUMMARY STEPS 1 On the chassis ensure that all screw f...

Страница 188: ...hese steps a Insert the bottom screw into the third hole up from the bottom of the rack mount ear and use a hand held screwdriver to tighten the screw to the rack rail In the next step insert the top screw diagonally from the bottom screw that you just attached This helps with keeping the chassis in place Tip b Insert the top screw into the third hole down from the top of the rack mount ear and ti...

Страница 189: ...rack mount bracket 1 Inner clearance the width between the inner sides of the two posts or rails must be at least 19 inches 48 26 cm The height of the chassis is 10 45 inches 26 543 cm Airflow through the chassis is from front to back Note If you are using a two post rack secure the rack to the floor surface to prevent tipping and avoid bodily injury and component damage Caution Cisco ASR 1000 Ser...

Страница 190: ...holes on the rack or mounting strip Step 4 For each bracket insert and tighten two screws to the rack on both sides Use the third hole up from the bottom of the rack mount bracket and the third hole down from the top of the rack mount bracket See Installing the Cable Management Bracket figure in the Attaching the Cable Management Brackets section for position and location of the ear holes on the r...

Страница 191: ... handling the chassis always follow proper lifting practices See the Chassis Lifting Guidelines section on page 5 23 Inner clearance the width between the inner sides of the two posts or rails must be at least 19 inches 48 26cm The height of the chassis is 10 45 inches 26 543 cm Airflow through the chassis is from front to back Note Make sure the rack is stabilized Note Cisco ASR 1000 Series Route...

Страница 192: ...e rack mount bracket See Installing the Cable Management Bracket figure in the Attaching the Cable Management Brackets section for position and location of the ear holes on the rack mount bracket Note Step 3 Hold the chassis in position against the mounting rails while the second person finger tightens a screw to the rack rails on each side of the chassis Step 4 Finger tighten 4 more screws to the...

Страница 193: ...ttom rack mount ear hole insert the screw through the cable management bracket and into the rack mount bracket DETAILED STEPS Step 1 Align the cable management bracket to the rack mount bracket on one side of the Cisco ASR 1006 Router The cable management bracket aligns to the top hole of the chassis rack mount bracket Step 2 Using a Phillips screwdriver insert the screw through the cable manageme...

Страница 194: ...ack mount bracket and ear holes 3 Cable management bracket screw location 1 Cable management bracket 2 What to Do Next This completes the procedure for installing the cable management brackets on the chassis Cisco ASR 1000 Series Router Hardware Installation Guide 160 Cisco ASR 1006 Router Overview and Installation Attaching the Cable Management Brackets ...

Страница 195: ...is ground studs and lead wire 1 Ground symbol 4 Grounding screws 2 This equipment must be grounded Never defeat the ground conductor or operate the equipment in the absence of a suitably installed ground conductor Contact the appropriate electrical inspection authority or an electrician if you are uncertain that suitable grounding is available Statement 1024 Warning Before you connect power or tur...

Страница 196: ...tor on the side of your chassis 6 Insert the two screws through the holes in the grounding lug 7 Use the Number 2 Phillips screwdriver to carefully tighten the screws until the grounding lug is held firmly to the chassis Do not overtighten the screws 8 Connect the opposite end of the grounding wire to the appropriate grounding point at your site to ensure an adequate chassis ground DETAILED STEPS ...

Страница 197: ...o ASR 1006 Router are contained in the respective configuration documents for each port adapter For example if you are connecting the optical fiber cables for the PA POS OC3 port adapter see PA POS OC3 Port Adapter Installation and Configuration at the following location http www cisco com en US partner docs interfaces_modules port_adapters install_upgrade pos pa pos oc3_install_config paposoc3 ht...

Страница 198: ...e connecting a terminal to the console port configure the terminal to match the chassis console port as follows 9600 baud 8 data bits no parity 1 stop bits 9600 8N1 Step 2 After you establish normal router operation you can disconnect the terminal Connecting the Ethernet Management Port Cable When using the Fast Ethernet Management port in the default mode speed auto and duplex auto the port opera...

Страница 199: ...e to connect AC input and DC input power to your Cisco ASR 1006 Router The DC power supply for the Cisco ASR 1006 ASR 1004 ASR 1002 and ASR 1013 routers operate at individual specifications The following table shows the common input ranges and circuit breaker requirements Table 48 Cisco ASR 1000 Series Router DC Power Supply System Input Requirements AWG Wire Circuit Breaker Amps System Input Rati...

Страница 200: ... the event that one of the fans fails the remaining fans are sufficient to cool the entire chassis However fan speed may have to be increased For power consumption specifications see the Cisco ASR 1006 Router Specifications section on page A 1 At least one power supply must be powered on before the software is started Note All Cisco ASR 1000 Series Router AC power supplies must be connected to a b...

Страница 201: ... through the hole in the handle and around the cable Note The following image shows the ASR1006 PWR AC power supply of the Cisco ASR 1006 Router Figure 47 Cisco ASR 1006 Router AC Power Supply ASR1006 PWR AC AC power supply handle 5 AC power supply fan 1 AC power inlet 6 DB 25 alarm connector 2 AC power supply Standby switch 7 Tie wrap tab 3 AC power supply LEDs 8 AC power supply captive screw 4 T...

Страница 202: ... AC power supply LEDs 9 AC power supply captive screw 4 AC power supply handle 5 What to Do Next Plug the AC power supply cable into the AC power source This completes the procedure for connecting AC input power Cisco ASR 1000 Series Router Hardware Installation Guide 168 Cisco ASR 1006 Router Overview and Installation Connecting AC Input Power to Cisco ASR 1006 Router ...

Страница 203: ...Router DC Power Supply ASR1006 PWR DC DC power supply ground lugs 6 Fans 1 DC power supply captive screws 7 DB 25 alarm connector 2 DC power supply handle 8 Tie wrap tabs 3 DC power supply On Off O switch 9 DC power supply terminal and plastic cover 4 DC power supply LEDs 10 Grounding symbol 5 Cisco ASR 1000 Series Router Hardware Installation Guide 169 Cisco ASR 1006 Router Overview and Installat...

Страница 204: ...upplies in order to comply with the FCC EN55022 CISPR22 Class A emissions requirements See the How Cisco ASR1000 RP Alarm Monitoring Works section on page 2 22 Note Before you begin the procedure to connect DC input power read these important notices The color coding of the DC input power supply leads depends on the color coding of the DC power source at your site Typically green or green yellow i...

Страница 205: ...eads When making the measurement the positive lead and the negative lead must always match the and labels on the power distribution unit Note A ground cable is required for each DC PDU We recommend that you use at least 6 AWG multistrand copper wire This wire is not available from Cisco Systems it is available from any commercial cable vendor The ground wire cable lug should be dual hole see Figur...

Страница 206: ...over and tighten the screw The plastic cover is slotted and keyed to fit correctly over the terminal block 10 Remove the tape from the circuit breaker switch handle and move the circuit breaker handle to the On position 11 Move the circuit breaker switch to the On position DETAILED STEPS Step 1 Make certain that the chassis grounding is connected before you begin installing the DC power supply Ste...

Страница 207: ...leeving wrapped around the wire and end of the grounding stud 3 Negative lug and wire with sleeving wrapped around the wire and end of lug 1 Ground lug and wire 4 Positive lug and wire with sleeving wrapped around the wire and end of lug 2 Cisco ASR 1000 Series Router Hardware Installation Guide 173 Cisco ASR 1006 Router Overview and Installation Connecting DC Input Power to Cisco ASR 1006 Router ...

Страница 208: ... Step 7 Tighten the Kepnut screw to recommended torque of 18 in lbs minimum to 22 in lbs maximum for the positive stud and wire Secure the wires coming in from the terminal block so that they cannot be disturbed by casual contact Note Step 8 Use tie wraps to secure the wires so that the wires are not pulled from the terminal block by casual contact Ti wrap studs are located below the power supply ...

Страница 209: ...uter DC Power Supply ASR1006 PWR DC Terminal Block Plastic Cover Plastic cover slotted area 3 Negative lead 1 Terminal block plastic cover 4 Positive lead 2 Cisco ASR 1000 Series Router Hardware Installation Guide 175 Cisco ASR 1006 Router Overview and Installation Connecting DC Input Power to Cisco ASR 1006 Router ...

Страница 210: ...aker switch to the On position What to Do Next This completes the procedure for connecting the DC power supply in the Cisco ASR 1006 Router Connecting a Terminal to the Cisco ASR 1000 Series RP Console Port The Cisco ASR 1006 route processor has an asynchronous serial EIA TIA 232 RJ 45 console port labeled CON on its front panel You can connect this port to most types of video terminals through us...

Страница 211: ...te SUMMARY STEPS 1 Connect one end of the RJ 45 cables to the serial RJ 45 port CON on the Cisco ASR 1000 Series Route Processor 1 see the following image 2 Run the cable up and through the cable management bracket and connect the other end of the RJ 45 cable to the RJ 45 adapter see the following image 3 Connect the adapter to your video terminal to complete the cable connection 4 Power on your v...

Страница 212: ...Step 3 Connect the adapter to your video terminal to complete the cable connection Step 4 Power on your video terminal Step 5 Configure your video terminal to match the following default console port settings 9600 baud 8 data bits No parity generation or checking 1 stop bit and No flow control Step 6 Go to the Connecting the System Cables on page 179 to continue the installation Cisco ASR 1000 Ser...

Страница 213: ...e retention bracket on AC power supply of the chassis The following shows the cable retention bracket attaching to the AC power supply Figure 57 Cable Retention Bracket Attaching to the AC Power Supply SUMMARY STEPS 1 Remove the two M3X5mm screws and discard 2 Install AC cord retainer by inserting tabs into lance features on panel 3 Secure AC cord retainer with two M3X8mm screws included in kit 4 ...

Страница 214: ...n panel Step 3 Secure AC cord retainer with two M3X8mm screws included in kit Step 4 Connect AC power cord Step 5 Secure AC cord by tightening retainer screw What to Do Next Cisco ASR 1000 Series Router Hardware Installation Guide 180 Cisco ASR 1006 Router Overview and Installation Attaching Cable Retention Bracket on AC Power Supply ...

Страница 215: ...efore you install operate or service the system read the Regulatory Compliance and Safety Information for Cisco ASR 1000 Series Aggregation Services Routers publication This document provides important safety information you should know before working with the system Statement 200 Warning Cisco ASR 1004 Router Description page 182 Installation Methods page 186 General Rack Installation Guidelines ...

Страница 216: ... ASR 1000 ESP10 Cisco ASR 1000 ESP20 or Cisco ASR1000 ESP40 One Cisco ASR 1000 Series Route Processor Cisco ASR1000 RP1 or Cisco ASR1000 RP2 Dual redundant AC and DC power supplies This section contains the following topics Front View The following image shows the Cisco ASR 1004 Router with modules and filler plates installed Figure 58 Cisco ASR 1004 Router Front and Side View SPA subslot 2 5 Slot...

Страница 217: ...o AC power supplies installed Figure 59 Cisco ASR 1004 Router Rear View with AC Power Supplies AC power supply fan 4 AC power supply Standby switch 1 AC power inlet 5 AC power supply LEDs 2 AC power supply handle 6 AC power supply DB 25 alarm connector 3 Cisco ASR 1000 Series Router Hardware Installation Guide 183 Cisco ASR 1004 Router Overview and Installation Rear View ...

Страница 218: ... maintain an acceptable operating temperature See Figure 59 Cisco ASR 1004 Router Rear View with AC Power Supplies on page 183 The fans are located at the rear of the chassis A two hole grounding lug is located on the side of the chassis Two power supplies either two AC power supplies or two 48 VDC power supplies are accessed from the rear of the router You have already unpacked your chassis and r...

Страница 219: ...tant safety information you should know before working with the system Statement 200 Warning You have already unpacked your chassis and read all the site requirements for your new equipment Proceed with the installation Note Cisco ASR 1004 Router Slot Numbering The Cisco ASR 1004 Router contains two Cisco ASR 1000 Series SPA Interface Processors SIPs and supports four subslots for the installation...

Страница 220: ...r strip does impair a rack mount installation remove the power strip before installing the chassis and then replace it after the chassis is installed Allow sufficient clearance around the rack for maintenance If the rack is mobile you can push it back near a wall or cabinet for normal operation and pull it out for maintenance installing or moving cards connecting cables or replacing or upgrading c...

Страница 221: ...23 Telco rack mount Width 50 pounds fully configured 22 6796 kg Weight Guidelines for an Equipment Shelf or Tabletop Installation The chassis should already be in the area where you will install it If you have not determined where to install your chassis see the Cisco ASR 1000 Series Routers Component Overview section on page 2 1 for information about site considerations If you are not rack mounti...

Страница 222: ...ned in the Electrical Safety section on page 5 21 when handling the chassis Equipment Shelf or Tabletop Installation At least two people are required to lift the chassis onto a tabletop or platform To prevent injury keep your back straight and lift with your legs not your back Statement 164 Note Figure 62 Lifting the Chassis The chassis in the image does not represent the Cisco ASR 1004 Router Thi...

Страница 223: ...ur screws 7 Check that all screws are securely tightened DETAILED STEPS Step 1 Attach the front rack mount brackets Locate the threaded holes in the front sides of the chassis first holes beyond the vent holes and use the package of black screws that shipped with the chassis Step 2 Align the front rack mount bracket to one side of the chassis Step 3 Insert and tighten the screws on one side Step 4...

Страница 224: ...brackets already attached to the chassis Use two screws for each cable management bracket Use the package of four screws Step 7 Check that all screws are securely tightened What to Do Next You have completed a tabletop or equipment shelf chassis installation Go to the Attaching a Chassis Ground Connection on page 201 to continue the installation Rack Mounting the Cisco ASR 1004 Router The Cisco AS...

Страница 225: ...LED STEPS Step 1 Mark and measure the distance between two holes on the left and right mounting rails The distance should measure 18 31 inches 0 06 inches 46 5 cm 0 15 cm Measure for pairs of holes near the bottom middle and top of the equipment rack to ensure that the rack posts are parallel Note Step 2 Measure the space between the inner edges of the left front and right front mounting flanges o...

Страница 226: ...ASR 1004 Router perform the following steps SUMMARY STEPS 1 Locate the threaded holes on the side of the chassis Make certain that you hold the front rack mount bracket with the ear and holes facing outward and towards the front of the chassis see Figure 65 Attaching the Front Rack Mount Brackets to the Cisco ASR 1004 Router on page 193 2 Position the front rack mount bracket top hole with the cha...

Страница 227: ...screws to secure the rack mount brackets to the chassis Step 5 Install the chassis in a rack To install the Cisco ASR 1004 Router in a rack go to the Installing the Cisco ASR 1004 Router in a Rack on page 195 What to Do Next This completes the steps for attaching the front rack mount brackets to the Cisco ASR 1004 Router Chassis Rear Rack Mount Brackets If you are rack mounting the chassis using t...

Страница 228: ... Use five screws to secure the rear rack mount brackets to the chassis DETAILED STEPS Step 1 Locate the threaded holes on the rear side of the chassis Make certain that you hold the rear rack mount bracket with the ear and holes facing outward and towards the rear of the chassis The following image shows where to attach the rear rack mount brackets to the Cisco ASR 1004 Router Figure 66 Attaching ...

Страница 229: ...installing the rack mount brackets on the chassis you mount the chassis by securing the rack mount brackets to two posts or mounting strips in the rack using the screws provided Because the rack mount brackets support the weight of the entire chassis be sure to use all screws to fasten the two rack mount brackets to the rack posts To prevent bodily injury when mounting or servicing this unit in a ...

Страница 230: ...ween the rack posts Step 5 Align the mounting bracket holes with the rack post holes and attach the chassis to the rack If you are using a shelf then raise the chassis to the level of the shelf Let the bottom of the chassis rest on the brackets but continue to support the chassis Note Step 6 Position the chassis until the rack mounting flanges are flush against the mounting rails on the rack Step ...

Страница 231: ...to you and lift it carefully into the rack To prevent injury avoid any sudden twists or moves 2 Slide the chassis into the rack pushing it back until the brackets meet the mounting strips or posts on both sides of the rack 3 Keeping the brackets flush against the posts or mounting strips align the holes in the brackets with the holes on the rack or mounting strip 4 For each bracket insert and tigh...

Страница 232: ...the rack Step 3 Keeping the brackets flush against the posts or mounting strips align the holes in the brackets with the holes on the rack or mounting strip Step 4 For each bracket insert and tighten two screws to the rack on both sides What to Do Next This completes the procedure for installing the chassis on a two post rack Proceed to the Attaching a Chassis Ground Connection on page 201 to cont...

Страница 233: ...ounting rails on the rack 3 Hold the chassis in position against the mounting rails while the second person finger tightens a screw to the rack rails on each side of the chassis The following image shows the rear rack mount brackets and the front rack mount brackets on the Cisco ASR 1004 Router 4 Finger tighten 4 more screws to the rack rails on each side of the chassis 5 Tighten all screws on eac...

Страница 234: ...acket and ear holes 2 Step 4 Finger tighten 4 more screws to the rack rails on each side of the chassis Step 5 Tighten all screws on each side to secure the chassis to the equipment rack Step 6 Use a level to verify that the tops of the two brackets are level or use a measuring tape to verify that both brackets are the same distance from the top of the rack rails What to Do Next This completes the...

Страница 235: ...u are uncertain that suitable grounding is available Statement 1024 Warning Before you connect power or turn on power to your chassis you must provide an adequate chassis ground earth connection for the chassis A chassis ground connector is provided on each Cisco ASR 1004 Router See the image on the following section Recommended Tools and Supplies There is a grounding stud on the side of the chass...

Страница 236: ...l connection 4 Attach the grounding lug with the wire on the left to avoid having the grounding wire overlapping the power supply The following image shows how to attach the grounding screws 5 Locate the chassis ground connector on the side of your chassis 6 Insert the two screws through the holes in the grounding lug as shown in Figure 70 Attaching a Grounding Lug to the Chassis Ground Connector ...

Страница 237: ...g Lug to the Chassis Ground Connector Ground symbol 2 Chassis ground connector 1 Step 5 Locate the chassis ground connector on the side of your chassis Step 6 Insert the two screws through the holes in the grounding lug as shown in Figure 70 Attaching a Grounding Lug to the Chassis Ground Connector on page 203 Step 7 Use the Number 2 Phillips screwdriver to carefully tighten the screws until the g...

Страница 238: ... Note Follow these steps to attach the cable management brackets to both sides of the Cisco ASR 1004 Router in the equipment rack SUMMARY STEPS 1 Align the cable management bracket to the rack mount bracket on one side of the Cisco ASR 1004 Router The cable management bracket aligns to the top hole of the chassis rack mount bracket 2 Using a Phillips screwdriver insert the screw through cable mana...

Страница 239: ...le Management Bracket on page 205 What to Do Next This completes the procedure for installing the cable management brackets on the chassis in a rack Connecting the Shared Port Adapter Cables The instructions for connecting the cables for the shared port adapter installed in the Cisco ASR 1004 Router are contained in the respective configuration documents for each port adapter For example if you ar...

Страница 240: ...ynchronous serial ports any devices connected to these ports must be capable of asynchronous transmission A connection will not be established when setting up an out of band connection or modem connection in the auxiliary port and the console port Note For console and auxiliary port pinouts for the RJ 45 connector see Cisco ASR 1004 Router Specifications section on page A 5 Both ports are configur...

Страница 241: ...t automatically senses a crossover or straight through cable and adapts to it However when the Fast Ethernet Management port is configured to a fixed speed 10 100 1000 Mbps through command line interface CLI commands the port is forced to MDI mode When in a fixed speed configuration and MDI mode Use a crossover cable to connect to an MDI port Use a straight through cable to connect to an MDI X por...

Страница 242: ...ovides the procedures for connecting AC input and 48 VDC input power to your Cisco ASR 1004 Router The 48 VDC power supply for the Cisco ASR 1006 ASR 1004 and ASR 1002 routers operate at individual specifications The following table shows the common input ranges and circuit breaker requirements Table 50 Cisco ASR 1000 Series Router 48 VDC Power Supply System Input Requirements AWG Wire Circuit Bre...

Страница 243: ...lacing FRUs from the Cisco ASR 1000 Series Routers Note Power Cords Supported by the Cisco ASR 1004 Router Table 51 Power Cords Supported by the Cisco ASR 1004 Router on page 209 lists the power cords that are supported by the Cisco ASR 1004 Router Table 51 Power Cords Supported by the Cisco ASR 1004 Router Description Power Cord Item Number Power Cord 110 V Right Angle CAB AC RA 10 A AC Power Cor...

Страница 244: ...Power Cord Switzerland Right Angle CAB ACS RA Power Cord UK Right Angle CAB ACU RA Power Cord Japan Right Angle CAB JPN RA Connecting AC Input Power to Cisco ASR 1004 Router Follow these steps to connect an AC input power supply to the Cisco 1004 chassis SUMMARY STEPS 1 Insert an AC power supply in power supply slot 0 or power supply slot 1 until it is fully seated 2 Tighten the captive screws 3 I...

Страница 245: ... Shielded cables must be used to connect to the DB 25 alarm connector on both the AC and 48 VDC power supplies in order to comply with FCC EN55022 CISPR22 Class A emissions requirements See the How Cisco ASR1000 RP Alarm Monitoring Works section on page 2 22 Note Step 5 Turn the power supply switch to the On position What to Do Next This completes the procedure for connecting AC input power Connec...

Страница 246: ...les for the chassis should have the same wire gauge and cable lengths should match within 10 percent of deviation Each DC input power cable is terminated at the PDU by a cable lug The cable lugs must be dual hole and have a 45 degree angle tongue They must be able to fit over 10 power terminal stud 48 VDC input power cables must be connected to the PDU terminal studs in the proper positive and neg...

Страница 247: ...ghten the screw in the terminal block to a torque of 8 in lbs 4 per and repeat the same steps for the positive stud and wire 8 Use tie wraps to secure the wires so that the wires are not pulled from the terminal block by casual contact Ti wrap studs are located below the supply terminal block 9 Replace the terminal block plastic cover which slides over the terminal block then tighten the screws ti...

Страница 248: ...ire with heavy shrink sleeving Figure 76 Cisco ASR 1004 Router 48 VDC Power Supply Cable Connection on page 214 shows the 48 VDC power supply cable connection Figure 76 Cisco ASR 1004 Router 48 VDC Power Supply Cable Connection Flat washer 4 Power supply stud and wire 1 Kepnut screw 5 Ground lug nut 2 Ground symbol 3 Step 6 For easier cable management insert the negative cable first Replace the gr...

Страница 249: ...e of the console cable kit that is included with your Cisco ASR 1004 Router The console cable kit contains One RJ 45 to RJ 45 crossover cable One RJ 45 to DB 9 female adapter A crossover cable reverses pin connections from one end to the other In other words it connects pin 1 at one end to pin 8 at the other end pin 2 to pin 7 pin 3 to pin 6 and so on You can identify a crossover cable by comparin...

Страница 250: ...hrough the cable management bracket and connect the other end of the RJ 45 cable to the RJ 45 adapter see the following image 3 Connect the adapter to your video terminal to complete the cable connection 4 Power on your video terminal 5 Configure your video terminal to match the following default console port settings 6 Go to the Connecting the Network Management and Signal System Cables on page 2...

Страница 251: ...ement bracket U feature device 2 BITS port connection 1 Step 3 Connect the adapter to your video terminal to complete the cable connection Step 4 Power on your video terminal Step 5 Configure your video terminal to match the following default console port settings 9600 baud 8 data bits No parity generation or checking 1 stop bit No flow control Step 6 Go to the Connecting the Network Management an...

Страница 252: ...ernal data network connections are made through front panel ports on several types of SPAs Keep the following guidelines in mind when connecting external cables to the Cisco ASR 1004 Router To reduce the chance of interference avoid crossing high power lines with any interface cables Verify all cabling limitations particularly distance before powering on the system Cisco ASR 1000 Series Router Har...

Страница 253: ...Chassis Rack Mount Brackets page 240 Installing the Cisco ASR 1002 Router in a Rack page 243 Attaching the Cable Management Bracket page 248 Attaching a Chassis Ground Connection page 249 Connecting the Shared Port Adapter Cables page 252 Connecting the Console and Auxiliary Port Cables page 253 Cisco ASR 1002 Router Power Supplies page 255 Connecting a Terminal to the Cisco ASR1000 RP1 Console Po...

Страница 254: ...on about the SFP transceiver modules that are compatible with Cisco ASR 1002 Built in Gigabit Ethernet Ports 4x1GE refer to the Modular Optics Compatibility section in Cisco ASR 1000 Series Aggregation Services Routers SIP and SPA Hardware Installation Guide The Cisco ASR 1002 Router supports upgradeable Cisco ASR1000 ESP5 or ASR1000 ESP10 assembly and the power supply modules as field replaceable...

Страница 255: ...d not field upgradeable Note Rear View Cisco ASR 1002 router AC power supply image shows the Cisco ASR 1002 Router AC power supply Figure 80 Cisco ASR 1002 Router AC Power Supply AC power supply fan 5 Chassis ESD socket 1 AC power supply captive installation screw 6 AC power supply slot number 0 2 AC power supply slot number 1 7 AC power supply On Off O switch 3 AC power inlet 8 AC power supply LE...

Страница 256: ...ed from the rear of the router Use only AC power supplies or DC power supplies in the Cisco ASR 1002 Router Do not mix power supply types Caution Cisco ASR 1002 Router Slot Numbering The Cisco ASR 1002 Router contains one Cisco embedded ASR1002 RP1 which is addressed as R0 and one Cisco ASR1000 ESP5 or ASR1000 ESP10 forwarding processor in slot F0 The Cisco ASR 1002 Router consists of an embedded ...

Страница 257: ...0 ESP10 embedded services processors are field replaceable units FRU AC or DC power supplies which are field replaceable units Cisco Embedded ASR1000 RP1 for Cisco ASR 1002 Router Description The Cisco ASR 1000 Series route processor embedded for the Cisco ASR 1002 Router is the central control processor and runs the network operating system The Cisco embedded ASR1000 RP1 supports management inter...

Страница 258: ...A that resides on the Cisco embedded ASR1000 RP1 The Cisco embedded ASR1000 SIP10 interface like the Cisco ASR 1006 Router and Cisco ASR 1004 Router supports all Cisco embedded ASR1000 SIP10 functions and services However the Cisco embedded ASR1000 SIP10 differs in the following areas Functions as the base board for Cisco embedded ASR1000 RP1 Only supports three removable half height SPAs on Bay 1...

Страница 259: ...Color LED LED Label No All power supplies are within operational limits Solid green Power PWR 1 Off the router is in standby mode Off The embedded services processor is green when active Green Active ACTV 2 Code has successfully downloaded and is operational Green STATUS STAT 3 BOOT ROM has successfully loaded Yellow Not booted Red Will always be off None Standby STBY 4 Cisco ASR 1000 Series Route...

Страница 260: ...t inlet is an IEC connector with AC switch and the current rating on the connector and switch is 10 Amps The AC power supply is secured into the chassis with two captive screws mounted on the faceplate The following table describes the AC power supply LEDs on the Cisco ASR 1002 Router Table 53 Cisco ASR 1002 Router AC Power Supply LEDs Description Color LED LED Label The AC input voltage is greate...

Страница 261: ... 3 AC power supply inlet 8 AC power supply LEDs 4 48 VDC Power Supply for Cisco ASR 1002 Router The 48 VDC power supply input connector is a Euro style terminal block It is compliant with safety agencies guidelines and electrical requirements of the supply The DC power supply operates within specification from 40 5VDC to 72VDC continuously once the power supply DC input turn on threshold of 43 5 V...

Страница 262: ...he Cisco ASR 1002 Router Power supply captive installation screw 6 Chassis ESD socket 1 Power supply slot 1 label 7 Power supply slot 0 label 2 Ground lead 8 Power supply switch Standby On 3 Positive lead 9 Power supply LEDs 4 Negative lead 10 Fan 5 The Cisco ASR 1002 Router 48 VDC power supply LEDs are described in the following table Cisco ASR 1000 Series Router Hardware Installation Guide 228 C...

Страница 263: ...ed Red When the LED is off it signals that the DC output voltage are within the normal operating range Output voltage between the minimum and maximum limits will not create an output fail alarm and output voltages below the minimum or above the maximum will create an Output Fail alarm Led illuminates red to indicate that the DC output is out of the specified range When you turn the power supply on...

Страница 264: ... Standby switch and is not considered a disconnect The 24 VDC power supply uses a spring loaded terminal block The input terminal block requires maximum 8AWG multi strand wiring to support input current The terminal block is compliant with safety agencies guidelines and electrical requirements of the supply Use the tie wraps to dress the input cable wires there are two tie wrap tabs on the 24 VDC ...

Страница 265: ...g off Red Power supply activity OUTPUT FAIL LED illuminates green to signal that voltage is or to 20VDC at turn on and down to 19 0VDC 0 5 V tolerance Green A bi color LED indicates presence of input voltage INPUT OK The LED illuminates amber when the input voltage is active down to 16 0VDC and indicates that there is still a voltage present voltage on the terminal block The LED remains amber and ...

Страница 266: ...rating of each power supply Two power supplies are used for redundant operation System total power consumption shall never exceed rating of one power supply to maintain redundancy Note Table 57 Cisco ASR 1002 Router 24 VDC Power System Output Voltage and Current 3 3 V 12 VDC Output Voltage 3 20 11 80 Minimum 3 30 12 00 Nominal 3 40 12 20 Maximum Output Current 0 10 A 2 0 A Minimum 3 125 A 39 A Max...

Страница 267: ...the Cisco ASR 1002 Router The following table lists the power cords that are supported by the Cisco ASR 1002 Router Table 59 Power Cords Supported by the Cisco ASR 1002 Router Description Power Cord Item Number Power Cord 110 V Right Angle CAB AC RA Plug Power Cord Australian 10 A Right Angle CAB ACA RA Power Cord Brazil Right Angle 10 A CAB ACB10A RA Power Cord China Right Angle CAB ACC RA Power ...

Страница 268: ...uirements for your new equipment Proceed with the installation Note General Rack Installation Guidelines When planning your rack installation consider the following guidelines The Cisco ASR 1002 Router requires a minimum of 3 5 inches or 8 9 cm rack units of vertical rack space Measure the proposed rack location before mounting the chassis in the rack Before using a particular rack check for obstr...

Страница 269: ... and weight information Table 60 Cisco ASR 1002 Router Dimensions and Weight Dimensions Cisco ASR 1002 22 50 in 57 15 cm including card handles cable management brackets power supply handles Depth 3 47 in 8 813 cm 2RU rack mount per EIA RS 310 Height 17 25 in 43 815 cm 19 inch rack mount Width 40 lb 18 143 k fully configured Weight Guidelines for an Equipment Shelf or Tabletop Installation The cha...

Страница 270: ...is Ground Connection on page 249 section Always follow proper lifting practices as outlined in the Electrical Safety section on page 5 21 when handling the chassis Equipment Shelf or Tabletop Installation To mount your Cisco ASR 1002 Router on an equipment shelf or tabletop follow these steps Remove any debris and dust from the tabletop or platform as well as the surrounding area Lift the chassis ...

Страница 271: ...taching a Chassis Ground Connection on page 249the to continue the installation DETAILED STEPS Step 1 Attach the front rack mount brackets Locate the threaded holes in the front sides of the chassis first holes beyond the vent holes and use the package of black screws that shipped with the chassis Step 2 Align the front rack mount bracket to one side of the chassis Step 3 Insert and tighten the sc...

Страница 272: ...g a Chassis Ground Connection on page 249the to continue the installation Rack Mounting the Cisco ASR 1002 Router The Cisco ASR 1002 Router can be installed in an existing rack with equipment or in an empty rack with no equipment The chassis can be mounted in either rack types Two post rack either 19 inch or 23 inch Inner clearance the width between the inner sides of the two posts or rails must b...

Страница 273: ...istance between two holes on the left and right mounting rails 2 Measure the space between the inner edges of the left front and right front mounting flanges on the equipment rack DETAILED STEPS Step 1 Mark and measure the distance between two holes on the left and right mounting rails The distance should measure 18 31 inches 0 06 inches 46 5 cm 0 15 cm Measure for pairs of holes near the bottom m...

Страница 274: ...ay protrude in the rack To install the front rack mount brackets on the Cisco ASR 1002 Router perform the following steps SUMMARY STEPS 1 Locate the threaded holes on the side of the chassis Make certain that you hold the front rack mount bracket with the ear and holes facing outward and towards the front of the chassis 2 Position the front rack mount bracket top hole with the chassis first top ho...

Страница 275: ... Rack on page 243 Chassis Rear Rack Mount Brackets If you are rack mounting the chassis using the rear rack mount brackets then this type of installation provides for the chassis being recessed in the rack To install the rear rack mount brackets on the Cisco ASR 1002 Router perform the following steps SUMMARY STEPS 1 Locate the threaded holes on the rear side of the chassis Make certain that you h...

Страница 276: ... Step 3 Insert and tighten the screws on one side Step 4 Repeat Step 1 through Step 3 on the other side of the chassis Use the remaining screws to secure the rear rack mount brackets to the chassis What to Do Next This completes the steps for attaching the rear rack mount brackets to the Cisco ASR 1002 Router To make installation easier before you mount the ASR 1002 Router in a rack make certain y...

Страница 277: ...ptional Install a shelf in the rack to support the Cisco ASR 1002 Router If you use a shelf this will help support the chassis while you secure it to the rack 4 With two people lift the chassis into position between the rack posts 5 Align the mounting bracket holes with the rack post holes and attach the chassis to the rack 6 Position the chassis until the rack mounting flanges are flush against t...

Страница 278: ...t rack Two Post Rack Installation The Cisco ASR 1002 Router can be installed on a two post rack either 19 inch or 23 inch Inner clearance the width between the inner sides of the two posts or rails must be at least 19 inches 48 26 cm The height of the chassis is 3 47 inches 8 8 cm Airflow through the chassis is from front to back Note If you are using a two post rack secure the rack to the floor s...

Страница 279: ...bracket insert and tighten two screws to the rack on both sides This completes the procedure for installing the chassis on a two post rack Proceed to the Attaching a Chassis Ground Connection on page 249 to continue the installation Four Post Rack Installation The Cisco ASR 1002 Router can be flush mounted in a 19 inch equipment rack using the rack mounting kit provided with your system The Cisco ...

Страница 280: ...4 Finger tighten screws to the rack rails on each side of the chassis 5 Tighten all screws on each side to secure the chassis to the equipment rack see the following image 6 Use a level to verify that the tops of the two brackets are level or use a measuring tape to verify that both brackets are the same distance from the top of the rack rails DETAILED STEPS Step 1 Optional Install a shelf in the ...

Страница 281: ...t rack mount bracket ear and holes 3 Rear rack equipment rail 1 Front rack equipment rail 4 Rear rack mount bracket ear and holes 2 Step 6 Use a level to verify that the tops of the two brackets are level or use a measuring tape to verify that both brackets are the same distance from the top of the rack rails What to Do Next This completes the procedure for installing the chassis in the rack Proce...

Страница 282: ...e rack mount bracket on one side of the Cisco ASR 1002 Router The cable management bracket aligns to the top hole of the chassis rack mount bracket 2 Using a Phillips screwdriver insert the screw through cable management bracket and into the chassis rack mount and tighten the screw 3 Using the bottom rack mount ear hole insert the screw through cable management bracket and into the chassis rack mo...

Страница 283: ...his completes the procedure for installing the cable management brackets on the chassis Attaching a Chassis Ground Connection Connecting the Cisco ASR 1002 chassis to ground is required for all DC powered installations and any AC powered installation where compliance with Telcordia grounding requirements is necessary The dual lug chassis ground stud must be installed all cards or filler plates mus...

Страница 284: ... and supplies necessary to connect the system ground to the chassis Phillips screwdriver Dual lug chassis ground component two and respective screws four shipped with the accessory kit Grounding wire The follwing image shows the location of the dual ground lug on the side of the of Cisco ASR 1002 Router Figure 95 Cisco ASR 1002 Router Chassis Ground Lug Location and Side Panel Door The eUSB panel ...

Страница 285: ... carefully tighten the screws until the grounding lug is held firmly to the chassis Do not overtighten the screws 8 Connect the opposite end of the grounding wire to the appropriate grounding point at your site to ensure an adequate chassis ground DETAILED STEPS Step 1 Use the wire stripper to strip one end of the AWG 6 wire approximately 0 75 inches 19 05 mm Step 2 Insert the AWG 6 wire into the ...

Страница 286: ... lug is held firmly to the chassis Do not overtighten the screws Step 8 Connect the opposite end of the grounding wire to the appropriate grounding point at your site to ensure an adequate chassis ground What to Do Next This completes the procedure for attaching a chassis ground connection Go to the following cabling sections for information on attaching cables Connecting the Shared Port Adapter C...

Страница 287: ... to the console port configure the terminal to match the chassis console port as follows 9600 baud 8 data bits no parity 1 stop bits 9600 8N1 2 Connect to the port using the RJ 45 to DB 9 cable 3 After you establish normal router operation you can disconnect the terminal DETAILED STEPS Step 1 Before connecting a terminal to the console port configure the terminal to match the chassis console port ...

Страница 288: ...aution To use the Management Ethernet interface on the router perform the following steps SUMMARY STEPS 1 Insert an Ethernet RJ 45 cable into the MGMT ETHERNET port see the following image 2 Insert the other end of the RJ 45 cable to your management device or network DETAILED STEPS Step 1 Insert an Ethernet RJ 45 cable into the MGMT ETHERNET port see the following image Figure 99 Cisco ASR 1002 Ro...

Страница 289: ...el should be allowed to install replace or service this equipment Statement 1030 Warning Never install an AC power module and a DC power module in the same chassis Statement 1050 Warning Installation of the equipment must comply with local and national electrical codes Statement 1074 Warning When installing or replacing the unit the ground connection must always be made first and disconnected last...

Страница 290: ...R 1000 Series Routers Note Connecting AC Input Power to Cisco ASR 1002 Router To connect AC power to the Cisco ASR 1002 Router follow these steps SUMMARY STEPS 1 At the rear of the router check that the power switch is in the Off O position 2 Insert the AC power cable into the power supply AC inlet 3 To ensure that the AC power cord does not interfere with other cables or wires dress the AC power ...

Страница 291: ...ower supply slot number 1 7 AC power supply On Off O switch 3 AC power inlet 8 AC power supply LEDs 4 Step 2 Insert the AC power cable into the power supply AC inlet Step 3 To ensure that the AC power cord does not interfere with other cables or wires dress the AC power cable in one of the following ways Cisco ASR 1000 Series Router Hardware Installation Guide 257 Cisco ASR 1002 Router Overview an...

Страница 292: ...d Cord in Slot 1 AC power cord 1 b Take the power cord and run it below the handles of the right and left power supplies Make sure the power cord is hanging loose so that it will not be disconnected from the AC power inlet as shown in the following image Figure 102 Cisco ASR 1002 Router AC Power Supply in Slot 0 and Slot 1 With Power Cord Cisco ASR 1000 Series Router Hardware Installation Guide 25...

Страница 293: ...ting an AC power supply in the Cisco ASR 1002 Router Connecting 48 VDC Input Power to Cisco ASR 1002 Router The 48 VDC power supply input connector is a Euro style terminal block A means to provide strain relief to the input wires is provided on the power supply The connection order is negative positive and GND but this is the order from left to right that the terminals appear on the power supply ...

Страница 294: ...VDC power supply slot 0 label 2 Ground lead 8 48 VDC power supply switch Standby On 3 Positive lead 9 48 VDC power supply LEDs 4 Negative lead 10 Fan 5 Table 61 Cisco ASR 1002 Router 48 VDC Power Supply LEDs on page 261 describes the LEDs on the Cisco ASR 1002 Router 48 VDC power supply Cisco ASR 1000 Series Router Hardware Installation Guide 260 Cisco ASR 1002 Router Overview and Installation Con...

Страница 295: ...ates power supply fan status FAN OK The LED illuminates red when a fan failure is detected Red When the LED is off it signals that the 48 VDC output voltage are within the normal operating range Output voltage between the minimum and maximum limits will not create an output fail alarm and output voltages below the minimum or above the maximum will create an Output Fail alarm Led illuminates red to...

Страница 296: ...en the receptacle screw using a 3 5mm flat blade screwdriver to a torque of 0 5 to 0 6Nm 5 Insert the stripped end of the positive lead all the way into the positive lead receptacle and tighten the receptacle screw using the same 3 5mm flat blade screwdriver Repeat this step for the negative lead 6 After tightening the receptacle screw for the ground positive and negative 48 VDC input leads use a ...

Страница 297: ... Insert the stripped end of the positive lead all the way into the positive lead receptacle and tighten the receptacle screw using the same 3 5mm flat blade screwdriver Repeat this step for the negative lead Make sure the entire stripped end of each lead is inserted all the way into its receptacle If any exposed wire at the stripped end of a lead is visible after inserting the lead into its recept...

Страница 298: ...2 Router 24 VDC power supply is a 40 A UL listed circuit breaker Before you begin read these important notices about the 24 VDC power supply The labeling displays 27 VDC INPUT This labeling describes the nominal voltage provided at a cell site Observe the polarity location Unlike the polarity labels of the 48 VDC power supply ground positive negative the polarity labels on the 24 VDC are ground ne...

Страница 299: ... the color coding of the 24 VDC power source at your site Typically green or green yellow is used for ground Make certain the lead color coding you choose for the 24 VDC input power supply matches lead color coding used at the 24 VDC power source Most commonly used wire color coding is red for positive lead and black for negative lead Note When you install the unit the ground connection must alway...

Страница 300: ...a service loop in the ground lead to ensure that the ground lead is the last lead to disconnect from the power supply if a great deal of strain is placed on all three leads as shown in the following image 10 After tightening the receptacle screw for the ground and leaving the extra service loop in the ground lead use a cable tie to secure the three leads to the power supply faceplate tie wrap tab ...

Страница 301: ...e you install the stripped lead wire as shown in the image Figure 108 Inserting a Screwdriver Into the 24 VDC Power Supply Terminal Block Step 5 Carefully push the screwdriver at an angle forward until you relieve the spring contact Step 6 With the screwdriver still inserted gently push the lead wire ground lead first in until the copper wire as shown in the image is no longer visible see in the f...

Страница 302: ...d into Terminal Block Copper wire 2 Lead wire insulation 1 The follwing image shows the lead wire fully inserted Figure 110 Cisco ASR 1002 Router 24 VDC Power Supply Lead Wire Fully Inserted Fully inserted lead wire 1 Cisco ASR 1000 Series Router Hardware Installation Guide 268 Cisco ASR 1002 Router Overview and Installation Connecting Cisco 24 VDC Power Supply ...

Страница 303: ... removed gently pull on the lead wire to make certain that the lead wire is securely installed The following shows a lead wire fully inserted and the screwdriver being removed while you gently pull on the lead wire Figure 111 Removing a Screwdriver from the 24 VDC Power Supply Terminal Block Gently pull on lead wire 1 Step 8 Repeat Steps 5 through Step 10 for each lead wire Cisco ASR 1000 Series R...

Страница 304: ...lead is visible after inserting the lead into its receptacle remove the lead from the receptacle use the wire stripper to cut the stripped end of the lead and then reinsert Note When securing the ground positive and negative 24 VDC input leads to the power supply faceplate leave extra service loop in the ground GND lead to ensure that the ground lead is the last lead wire to disconnect from the po...

Страница 305: ...re 3 Step 10 After tightening the receptacle screw for the ground and leaving the extra service loop in the ground lead use a cable tie to secure the three leads to the power supply faceplate tie wrap tab as shown in the above imave item 5 Step 11 Turn on the branch source breaker Step 12 Place the power supply standby switch to the On position The power supply LEDs light when power is supplied to...

Страница 306: ...ht pin of the right plug pin 8 Use the following procedure to connect a video terminal to the console port on a route processor Each Cisco ASR 1000 Series Route Processor 1 must have a console port connection typically to a terminal server if you are running a redundant configuration in the chassis Note SUMMARY STEPS 1 Connect one end of the RJ 45 cables to the serial RJ 45 port CON on the Cisco e...

Страница 307: ...3 Step 3 Connect the adapter to your video terminal to complete the cable connection Step 4 Power on your video terminal Step 5 Configure your video terminal to match the following default console port settings 9600 baud 8 data bits No parity generation or checking 1 stop bit No flow control Step 6 Go to the c_Connecting_Cables_1074149 xml to continue the installation Connecting Cables Keep the fo...

Страница 308: ...ify all cabling limitations particularly distance before powering on the system Cisco ASR 1000 Series Router Hardware Installation Guide 274 Cisco ASR 1002 Router Overview and Installation Connecting Cables ...

Страница 309: ...elf or Tabletop Installation page 288 Equipment Shelf or Tabletop Installation page 289 Rack Mounting the Cisco ASR 1002 F Router page 291 Attaching the Chassis Rack Mount Brackets page 293 Installing the Cisco ASR 1002 F Router in a Rack page 296 Attaching the Cable Management Bracket page 300 Attaching a Chassis Ground Connection page 302 Connecting the Shared Port Adapter Cables page 305 Connec...

Страница 310: ...re compatible with Cisco ASR 1002 Built in Gigabit Ethernet Ports 4x1GE refer to the Modular Optics Compatibility section in Cisco ASR 1000 Series Aggregation Services Routers SIP and SPA Hardware Installation Guide Only Cisco software release four code supports the Cisco ASR 1002 F Router Do not use earlier versions of Cisco software Note This section contains the following topics Front View Figu...

Страница 311: ...s 4 On the side of the Cisco ASR 1002 F Router there is an eUSB panel door and the grounding lug as shown in the Cisco ASR 1002 F Router Chassis Ground Lug Location and eUSB Side Panel Door figure in the Attaching a Chassis Ground Connection section This panel door must not be opened There is a Do Not Tamper label on the panel door Do not remove the label If there is a problem with the eUSB flash ...

Страница 312: ... The fans are located at the rear of the chassis A two hole ground connector lug is located on the side of the chassis Two power supplies either two AC power supplies or two DC power supplies are accessed from the rear of the router Use only AC power supplies or DC power supplies in the Cisco ASR 1002 F Router Do not mix power supply types Caution Cisco ASR 1002 F Router Slot Numbering The Cisco A...

Страница 313: ... such as the Management Ethernet port and console and auxiliary serial ports It has LED status indicators an RJ 45 plug for a BITS timing reference and one USB port that can be used with smart cards for secure key distribution or for image or configuration file updates Cisco ASR 1002 ESP F services processor does not support online insertion and removal The Cisco embedded services processor is bas...

Страница 314: ...02 ESP F LEDs PWR STAT ACTV STBY 2 Cisco RP LEDs PWR STAT MIN MAJ CRIT 1 The following image shows the Cisco ASR 1002 F Router faceplate labels for the Cisco integrated RP Figure 120 Cisco Integrated RP Faceplate Labels CON 6 Gigabit Ethernet ports 0 1 2 3 1 Cisco ASR 1000 Series Router Hardware Installation Guide 280 Cisco ASR 1002 F Router Overview and Installation Cisco Integrated RP and Cisco ...

Страница 315: ...4 Cisco ASR 1002 SIP10 F 1 Port 1 5 SPA STATUS LED 2 Port 0 6 Port 3 3 The Cisco ASR 1002 F Router SPA has three types of LEDs two LEDs for each port on the SPA and one STATUS LED as shown in the following image Figure 122 Cisco ASR 1002 F Router SPA Faceplate SPA STATUS 3 C A Carrier Alarm 1 A L Active Loopback 2 The following table describes the Cisco ASR 1002 F Router SPA LEDs Cisco ASR 1000 Se...

Страница 316: ...SPA for Cisco ASR 1002 F Router Description The Cisco ASR 1002 SIP10 F in the Cisco ASR 1002 F Router is integrated into the chassis and you cannot insert or remove it The Cisco integrated ASR 1002 SIP10 F provides the physical and electrical termination for one half height SPA The Cisco integrated ASR 1002 SIP10 F interface supports all Cisco SPA interface processor functions and services However...

Страница 317: ...switch and the current rating on the connector and switch is 10 A The AC power supply is secured into the chassis with two captive installation screws mounted on the faceplate The following table describes the LEDs on the Cisco ASR 1002 F Router Table 63 Cisco ASR 1002 F Router AC Power Supply LEDs Description Color LED LED Label The AC input voltage is greater than 85V Green Power supply activity...

Страница 318: ...and electrical requirements of the supply The DC power supply operates within specification from 40 5 VDC to 72 VDC continuously once the power supply DC input turn on threshold of 43 5 V has been reached The DC power supply input connector accepts three wires one positive polarity one negative polarity and one ground There are provisions on the front panel to use a wire tie for strain relief of t...

Страница 319: ...e power supply turns off due to low input voltage falls below 39VDC and indicates that there is still a hazard present voltage on the terminal block The LED remains amber and is active to around 20 V 5 V Amber The input is below 15V Off All fans are operational Green Power supply fan status activity FAN OK A fan failure is detected Red The DC output is out of the specified range When you turn the ...

Страница 320: ...Power Cord Brazil Right Angle 10 A CAB ACB10A RA Power Cord Brazil Right Angle 16 A CAB ACB16A RA Power Cord China Right Angle CAB ACC RA Power Cord Europe Right Angle CAB ACE RA Power Cord Italian Right Angle CAB ACI RA Power Cord Argentina Right Angle CAB ACR RA Power Cord Switzerland Right Angle CAB ACS RA Power Cord UK Right Angle CAB ACU RA Power Cord India Right Angle CAB IND RA Power Cord J...

Страница 321: ...ns such as a power strip that could impair rack mount installation If a power strip does impair a rack mount installation remove the power strip before installing the chassis and then replace it after the chassis is installed Allow sufficient clearance around the rack for maintenance If the rack is mobile you can push it back near a wall or cabinet for normal operation and pull it out for maintena...

Страница 322: ...u will install it If you have not determined where to install your chassis see the Cisco ASR 1000 Series Routers Component Overview section on page 2 1 for information about site considerations If you are not rack mounting your Cisco ASR 1000 series chassis place it on a sturdy equipment shelf or tabletop When installing the Cisco ASR 1002 F Router on an equipment shelf or tabletop ensure that the...

Страница 323: ...holes beyond the vent holes and use the package of black screws that shipped with the chassis 4 Align the front rack mount bracket to one side of the chassis 5 Insert and tighten the screws on one side 6 Repeat Step 4 through Step 5 on the other side of the chassis Use all the screws to secure the rack mount brackets to the chassis 7 Gather the two cable management brackets and screws that shipped...

Страница 324: ...ront rack mount bracket to one side of the chassis Step 5 Insert and tighten the screws on one side Step 6 Repeat Step 4 through Step 5 on the other side of the chassis Use all the screws to secure the rack mount brackets to the chassis The chassis rack mount brackets must be installed first so that you can attach the cable management brackets to the chassis rack mount brackets after the chassis i...

Страница 325: ...are securely tightened What to Do Next Go to the Attaching a Chassis Ground Connection on page 302 to continue the installation Rack Mounting the Cisco ASR 1002 F Router The Cisco ASR 1002 F Router can be installed in an existing rack with equipment or in an empty rack with no equipment The chassis can be mounted in two equipment rack types Two post rack 19 inch or 23 inch equipment rack Inner cle...

Страница 326: ...5 cm 2 Measure the space between the inner edges of the left front and right front mounting flanges on the equipment rack The space must be at least 17 7 inches 45 cm to accommodate the chassis which is 17 25 inches 43 8 cm wide and fits between the mounting posts on the rack DETAILED STEPS Step 1 Mark and measure the distance between two holes on the left and right mounting rails The distance sho...

Страница 327: ...02 F Router perform the following steps SUMMARY STEPS 1 Locate the threaded holes on the side of the chassis Make certain that you hold the front rack mount bracket with the ear and holes facing outward and towards the front of the chassis 2 Position the front rack mount bracket top hole with the chassis first top hole behind the side vent holes 3 Insert and tighten the black screws on one side 4 ...

Страница 328: ...side of the chassis Use the black screws to secure the rack mount brackets to the chassis Step 5 Install the chassis in a rack To install the Cisco ASR 1002 F Router in a rack go to the Installing the Cisco ASR 1002 F Router in a Rack What to Do Next This completes the steps for attaching the front rack mount brackets to the Cisco ASR 1002 F Router Chassis Rear Rack Mount Brackets If you are rack ...

Страница 329: ... towards the rear of the chassis The following image shows where to attach the rear rack mount brackets to the Cisco ASR 1002 F Router Figure 128 Attaching the Rear Rack Mount Brackets to the Cisco ASR 1002 F Router Rear rack mount bracket screws 3 Rear rack mount bracket ear and holes 1 Rear rack mount bracket 2 Step 2 Position the rear rack mount bracket top hole with the chassis top hole from t...

Страница 330: ...ack Statement 1006 We recommend that you allow at least 1 or 2 inches 2 54 or 5 08 cm of vertical clearance between the router and any equipment directly above and below it To install the chassis in the rack perform the following steps Step 1 On the chassis ensure that all screws on the installed components are securely tightened Step 2 Make sure that your path to the rack is unobstructed If the r...

Страница 331: ... your Cisco ASR 1002 F Router on a two post or four post rack See the Two Post Rack Installation or the Four Post Rack Installation Two Post Rack Installation The Cisco ASR 1002 F Router can be installed on a two post rack either a 19 inch or 23 inch rack Inner clearance the width between the inner sides of the two posts or rails must be at least 19 inches 48 26 cm The height of the chassis is 3 4...

Страница 332: ...k or mounting strip Step 4 For each bracket insert and tighten two screws to the rack on both sides What to Do Next This completes the procedure for installing the chassis on a two post rack Proceed to the Attaching a Chassis Ground Connection to continue the installation Four Post Rack Installation The Cisco ASR 1002 F Router can be flush mounted in a 19 inch equipment rack using the rack mountin...

Страница 333: ...ails on the rack Use the second hole up from the bottom of the rack mount bracket and the second hole down from the top of the rack mount bracket This will make it easier to attach the cable management brackets to the chassis in the equipment rack Note Step 3 Hold the chassis in position against the mounting rails while the second person finger tightens a screw to the rack rails on each side of th...

Страница 334: ...two screws for each bracket Make certain that the cable management bracket U feature is facing upwards when you attach it to the chassis Note Follow these steps to attach the cable management brackets to both sides of the Cisco ASR 1002 F Router in the rack SUMMARY STEPS 1 Align the cable management bracket to the rack mount bracket on one side of the Cisco ASR 1002 F Router The cable management b...

Страница 335: ...er Chassis front rack mount bracket 3 Cable management bracket top screw hole and bottom screw hole 1 Cable management bracket U feature 2 Step 3 Insert one screw through the bottom screw hole of the cable management bracket and into the chassis rack mount bracket and tighten the screw using a Phillips screwdriver see Figure 131 Attaching the Cable Management Brackets to the Cisco ASR 1002 F Route...

Страница 336: ...ng is available Statement 1024 Warning Before you connect power or turn on power to your router you must provide an adequate chassis ground earth connection for the Cisco ASR 1002 F Router The chassis grounding lug and the respective screws are provided in the accessory kit that ships with your Cisco ASR 1002 F Router The grounding wire is always the first to be installed or connected and the last...

Страница 337: ...nector on page 304 6 Use the Number 2 Phillips screwdriver to carefully tighten the screws until the grounding lug is held firmly to the chassis Do not overtighten the screws 7 Connect the opposite end of the ground wire to the appropriate grounding point at your site to ensure an adequate chassis ground DETAILED STEPS Step 1 Use the wire stripper to strip one end of the AWG 6 wire approximately 0...

Страница 338: ...o the Chassis Ground Connector Ground symbol 2 Chassis ground connector 1 Step 6 Use the Number 2 Phillips screwdriver to carefully tighten the screws until the grounding lug is held firmly to the chassis Do not overtighten the screws Step 7 Connect the opposite end of the ground wire to the appropriate grounding point at your site to ensure an adequate chassis ground What to Do Next This complete...

Страница 339: ...Before you can use the console interface on the router using a terminal or PC you must perform the following steps Step 1 Before connecting a terminal to the console port or auxiliary port configure the terminal to match the chassis console port as follows 9600 baud 8 data bits no parity 1 stop bits 9600 8N1 Step 2 Connect to the port using an RJ 45 cable to a DB 9 cable For information about how ...

Страница 340: ...ed RP Management Ethernet Port Connector Management Ethernet port 1 Step 2 Insert the other end of the RJ 45 cable into your management device or network Step 3 Configure the port connection to a fixed speed through the command line interface CLI Connecting Power to the Cisco ASR 1002 F Router The covers are an integral part of the safety design of the product Do not operate the unit without the c...

Страница 341: ...ommon input ranges and circuit breaker requirements Table 68 Cisco ASR 1000 Series Router DC Power Supply System Input Requirements AWG Wire Circuit Breaker Amps System Input Rating Amps Cisco ASR 1000 Series Router DC Power Supply Maximum Minimum Maximum Minimum Always AWG 6 wire Always 50 40 Cisco ASR 1006 8 10 40 30 24 Cisco ASR 1004 10 12 30 20 16 Cisco ASR 1002 and Cisco ASR 1002 F 1 1 The Ci...

Страница 342: ... unit might have more than one power supply connection All connections must be removed to de energize the unit Statement 1028 Warning This product relies on the building s installation for short circuit overcurrent protection Ensure that the protective device is rated not greater than AC power supplies 20 A and DC power supplies 30 A Statement 1005 Warning Connecting AC Input Power to the Cisco AS...

Страница 343: ...supply cable into the AC power source DETAILED STEPS Step 1 At the rear of the router check that the power switch is in the Off O position Step 2 Insert the AC power cable into the power supply AC inlet Step 3 To ensure that the AC power cord does not interfere with other cables or wires dress the AC power cable in one of the following ways a Leave a small service loop in the AC power cord from th...

Страница 344: ...he AC power cord to a power supply tab and then remove the AC power cord for some reason check for any damage to the cable after you cut off the cable tie If the AC power cord is damaged replace it immediately Note Four power supplies must be installed in the chassis at all times with a minimum of two power supplies one per zone connected to the mains in order to power on the system and ensure suf...

Страница 345: ...de strain relief to the input wires is provided on the power supply The connection order is negative positive and ground GND but this is the order from left to right that the terminals appear on the power supply not the order in which the leads should be connected during installation The order the leads should be connected is ground GND positive and negative The recommended branch circuit breaker ...

Страница 346: ...ceptacle screw using a 3 5 mm flat blade screwdriver to a torque of 0 5 to 0 6Nm 5 Insert the stripped end of the positive lead all the way into the positive lead receptacle and tighten the receptacle screw using the same 3 5 mm flat blade screwdriver Repeat this step for the negative lead 6 After tightening the receptacle screw for the ground positive and negative DC input leads use a cable tie t...

Страница 347: ...lead receptacle and tighten the receptacle screw using the same 3 5 mm flat blade screwdriver Repeat this step for the negative lead Make sure the entire stripped end of each lead is inserted all the way into its receptacle If any exposed wire at the stripped end of a lead is visible after inserting the lead into its receptacle remove the lead from the receptacle use the wire stripper to cut the s...

Страница 348: ...a DC power supply in the Cisco ASR 1002 F Router Connecting a Terminal to the Cisco Integrated RP Console Port and Auxiliary Port Cisco integrated route processor has an asynchronous serial EIA TIA 232 RJ 45 console port labeled CON on its front panel You can connect this port to most types of video terminals through use of the console cable kit that is included with your Cisco ASR 1002 F Router T...

Страница 349: ...eo terminal Step 5 Configure your video terminal to match the following default console port settings 9600 baud 8 data bits no parity generation or checking 1 stop bit and no flow control What to Do Next Go to the Connecting Cables section to continue the installation Connecting Cables Keep the following guidelines in mind when connecting external cables to the Cisco ASR 1002 F Router To reduce th...

Страница 350: ...Cisco ASR 1000 Series Router Hardware Installation Guide 316 Cisco ASR 1002 F Router Overview and Installation Connecting Cables ...

Страница 351: ...on page 332 Equipment Shelf or Tabletop Installation Procedure page 333 Rack Mounting the Cisco ASR 1002 X Router page 335 Attaching the Chassis Rack Mount Brackets page 337 Installing the Cisco ASR 1002 X Router in a Rack page 340 Attaching the Cable Management Bracket page 345 Attaching a Chassis Ground Connection page 346 Connecting the SPA Cables page 349 Connecting the Console and Auxiliary P...

Страница 352: ...with T1 E1 BITS interface SPAs or any of the six built in Gigabit Ethernet ports can be used as timing sources Console ports and auxiliary ports Ethernet 10 100 1000 Mbps network management ports Clocking which includes Stratum 3 G 813 Clocking BITS In Out and GPS input output interface as well as a ToD interface The router supports network synchronization clock prioritization Three half height SP...

Страница 353: ... the Cisco software license that you install The power supply modules of the router are field replaceable units This section contains the following topics Front View of the Cisco ASR 1002 X Router The following image shows the front view of the Cisco ASR 1002 X Router Figure 144 Cisco ASR 1002 X Router Front View SPA slot 2 4 Built in 6x1GE SPA in slot 0 1 ESP LEDs 5 SPA slot 1 2 SPA slot 3 3 The ...

Страница 354: ...ply slot number 0 2 AC power supply slot number 1 7 AC power supply On Off O switch 3 AC power inlet 8 AC power supply LEDs 4 The following imave shows the Cisco ASR 1002 X Router DC power supply Figure 146 Cisco ASR 1002 X Router DC Power Supply DC power supply captive installation screw 6 Chassis ESD socket 1 Cisco ASR 1000 Series Router Hardware Installation Guide 320 Cisco ASR 1002 X Router Ov...

Страница 355: ... X Router Do not mix power supply types Caution Cisco ASR 1002 X Router Slot Numbering The Cisco ASR 1002 X Router contains an integrated SIP that supports three half height SPAs or one half height SPA and one full height SPA The SPA bays are Bay 1 Bay 2 and Bay 3 The router provides a built in 6 Gigabit Ethernet interface and this SPA is physically located on the integrated route processor board ...

Страница 356: ...when active Green Active ACTV 2 Code has successfully downloaded and is operational Green STATUS STAT 3 Boot ROM has successfully loaded Yellow Not booted Red Will always be off None Standby STBY 4 Power Supplies in the Cisco ASR 1002 X Router The Cisco ASR 1002 X Router power supply module supports the following Cisco power supplies AC power supply operates between 85 V ac to 264 V ac 48 V DC pow...

Страница 357: ...ctivity INPUT OK If the LED is not illuminated then either the input voltage is less than 70V or the power supply is turned off If the AC input voltage is between 70V and 85V the INPUT OK LED can be on off or flashing None All fans are operational Green Power supply fan activity A bi color LED indicates fan status FAN OK A fan failure is detected Red If the INPUT OK LED is illuminated this LED is ...

Страница 358: ...elines and electrical requirements of the supply The DC power supply operates within specification from 40 5 VDC to 72 VDC continuously after the power supply DC input is turned on a threshold of 43 5 V is reached The 48 VDC power input connector accepts three wires one positive polarity one negative polarity and one ground GND wire There are provisions on the front panel to wire tie and strain re...

Страница 359: ...ket 1 Power supply slot 1 label 7 Power supply slot 0 label 2 Ground lead 8 Power supply switch Standby On 3 Positive lead 9 Power supply LEDs 4 Negative lead 10 Fan 5 The following table lists the Cisco ASR 1002 X Router 48 VDC power supply LEDs Cisco ASR 1000 Series Router Hardware Installation Guide 325 Cisco ASR 1002 X Router Overview and Installation Power Supplies in the Cisco ASR 1002 X Rou...

Страница 360: ...hen all fans are operational Green A bi color LED indicates power supply fan status FAN OK The LED turns red when a fan failure is detected Red When the LED is off it signals that the DC output voltage is within the normal operating range Output voltage between the minimum limit and maximum limit will not create an Output Fail alarm but output voltages below the minimum limit or above the maximum ...

Страница 361: ...lot 1 The power supply slot identifiers are zero 0 on the left side of the chassis rear side and one 1 on the right side of the chassis rear side The power supply switch is a Standby switch and is not considered a disconnect The 24 VDC power supply uses a spring loaded terminal block The input terminal block requires a maximum of 8 AWG multistrand wiring to support the input current The terminal b...

Страница 362: ...nds to test the LED operation before going off Red Power supply activity OUTPUT FAIL The LED turns green to signal that voltage is or to 20 VDC at turn on and the voltage reduces to 19 0VDC 0 5 V tolerance Green A bicolor LED indicates the presence of input voltage INPUT OK The LED turns to amber when the input voltage is active and is reduced to 16 0 VDC and indicates that a voltage on the termin...

Страница 363: ...pply Two power supplies are used for the redundant operation The system s total power consumption should not exceed the rating of one power supply to maintain redundancy Note Table 74 Cisco ASR 1002 X Router 24 VDC Power System Output Voltage and Current 3 3 V 12 VDC Output Voltage 3 20 V 11 80 VDC Minimum 3 30 V 12 00 VDC Nominal 3 40 V 12 20 VDC Maximum Output Current 0 10 A 2 0 A Minimum 3 125 ...

Страница 364: ...ter The following table lists the power cords that are supported by the Cisco ASR 1002 X Router Table 76 Power Cords Supported by the Cisco ASR 1002 X Router Description Power Cord Item Number Power Cord 110 V Right Angle CAB AC RA Plug Power Cord Australia 10 A Right Angle CAB ACA RA Power Cord Brazil Right Angle 10 A CAB ACB10A RA Power Cord Brazil Right Angle 16 A CAB ACB16A RA Power Cord China...

Страница 365: ... all the site requirements for your new equipment Proceed with the installation Note General Rack Installation Guidelines When planning your rack installation consider the following guidelines The Cisco ASR 1002 X Router requires a minimum of 3 5 inches 8 9 cm rack units of vertical rack space Measure the proposed rack location before mounting the chassis in the rack Before using a particular rack...

Страница 366: ...mensions and weight information Table 77 Cisco ASR 1002 X Router Dimensions and Weight Dimensions Attribute 22 50 in 57 15 cm includes card handles cable management brackets power supply handles Depth 3 47 in 8 813 cm 2RU rack mount per EIA RS 310 Height 17 25 in 43 815 cm 19 inch 48 26 cm rack mount Width 43 35 lbs 19 662 kg fully configured Weight Guidelines for an Equipment Shelf or Tabletop In...

Страница 367: ...tion on the equipment shelf or tabletop see following figure 3 Attach the front rack mount brackets Locate the threaded holes in the front sides of the chassis first holes beyond the vent holes 4 Align the front rack mount bracket to one side of the chassis 5 Insert and tighten the black screws that shipped with the chassis on one side 6 Repeat Step 2 through Step 3 on the other side of the chassi...

Страница 368: ...ith the chassis on one side Step 6 Repeat Step 2 through Step 3 on the other side of the chassis Use all the screws to secure the rack mount brackets to the chassis The chassis rack mount brackets must be installed first so that you can attach the cable management brackets to the chassis rack mount brackets after the chassis is installed in the rack Note Step 7 Gather the two cable management brac...

Страница 369: ...ting the Cisco ASR 1002 X Router The Cisco ASR 1002 X Router can be installed in an existing rack with equipment or in an empty rack with no equipment The chassis can be mounted on either of these rack types Two post rack either 19 inch or 23 inch equipment rack Inner clearance the width between the inner sides of the two posts or rails must be at least 19 inches 48 26 cm The height of the chassis...

Страница 370: ... front mounting flanges on the equipment rack DETAILED STEPS Step 1 Mark and measure the distance between the holes on the left and right mounting rails The distance should measure 18 31 inches 0 06 inches 46 5 cm 0 15 cm Measure for pairs of holes near the bottom middle and top of the equipment rack to ensure that the rack posts are parallel Note Step 2 Measure the space between the inner edges o...

Страница 371: ...trude in the rack To install the front rack mount brackets on the Cisco ASR 1002 X Router perform the following steps SUMMARY STEPS 1 Locate the threaded holes on the side of the chassis Ensure that you hold the front rack mount bracket with the ear and holes facing outward and towards the front of the chassis 2 Position the front rack mount bracket s top hole with the chassis first top hole behin...

Страница 372: ...se the black screws to secure the rack mount brackets to the chassis Step 5 Install the chassis in a rack To install the Cisco ASR 1002 X Router in a rack see the information provided in the Installing the Cisco ASR 1002 X Router in a Rack on page 340 What to Do Next This completes the steps for attaching the front rack mount brackets to the Cisco ASR 1002 X Router Chassis Rear Rack Mount Brackets...

Страница 373: ...he rear of the chassis The following image shows where to attach the rear rack mount brackets to the Cisco ASR 1002 X Router Figure 155 Attaching the Rear Rack Mount Brackets to the Cisco ASR 1002 X Router Rear rack mount bracket screws 3 Rear rack mount bracket ear and holes 1 Rear rack mount bracket 2 Step 2 Position the rear rack mount bracket top hole with the chassis top hole from the back St...

Страница 374: ...stall the stabilizers before mounting or servicing the unit in the rack Statement 1006 Warning We recommend that you allow at least 1 or 2 inches 2 54 or 5 08 cm of vertical clearance between the router and any equipment directly above and below it To install the chassis in the rack perform the following steps SUMMARY STEPS 1 On the chassis ensure that all the screw fasteners on the installed comp...

Страница 375: ... Insert the bottom screw into the second hole from the bottom of the rack mount ear and use a hand held screw driver to tighten the screw to the rack rail To make installation easier insert one screw at the bottom of the chassis and the next screw at the top of the chassis diagonally from the first screw Tip b Insert the top screw into the second hole from the top of the rack mount ear diagonally ...

Страница 376: ...vent injury avoid any sudden twists or moves Caution The following image shows where to attach the rack mount brackets to the Cisco ASR 1002 X Router Figure 156 Attaching the Rack Mount Brackets to the Cisco ASR 1002 X Router Rack mount bracket ear and holes 2 Rack equipment rail 1 Step 2 Slide the chassis into the rack pushing it back until the brackets meet the mounting strips or posts on both s...

Страница 377: ...sis rest on the brackets but continue to support the chassis Lift the chassis into the rack using the side handles and grasping underneath the power supply bays with the help of another person 2 Position the chassis until the rack mounting flanges are flush against the mounting rails on the rack 3 Hold the chassis in position against the mounting rails while the second person finger tightens a scr...

Страница 378: ... X Router on a Four Post Rack Front and Rear Rack Mounting Front rack mount bracket ear and holes 3 Rear rack equipment rail 1 Front rack equipment rail 4 Rear rack mount bracket ear and holes 2 Step 5 Use a level to verify that the tops of the two brackets are level or use a measuring tape to verify that both the brackets are the same distance from the top of the rack rails What to Do Next This c...

Страница 379: ...ter The cable management bracket aligns to the top hole of the chassis rack mount bracket 2 Using a Phillips screwdriver insert the screw through cable management bracket and into the chassis rack mount and tighten the screw Use the package of four screws shipped with the router 3 Using the bottom rack mount ear hole insert the screw through cable management bracket and into the chassis rack mount...

Страница 380: ...46 What to Do Next This completes the procedure for installing the cable management brackets on the chassis Attaching a Chassis Ground Connection Connecting the Cisco ASR 1002 X chassis to ground is required for all DC powered installations and AC powered installation where compliance with Telcordia grounding requirements is necessary The dual lug chassis ground stud must be installed and all the ...

Страница 381: ...g wire is always the first to be installed or connected and the last to be removed or disconnected Caution The following tools equipment and supplies are necessary to connect the system ground to the chassis P hillips screwdriver Dual lug chassis ground component two and respective screws four shipped with the accessory kit Grounding wire The following image shows the location of the ground lug on...

Страница 382: ...refully tighten the screws until the grounding lug is held firmly to the chassis Do not overtighten the screws 8 Connect the opposite end of the grounding wire to the appropriate grounding point at your site to ensure an adequate chassis ground DETAILED STEPS Step 1 Use the wire stripper to strip one end of the AWG 6 wire approximately 0 75 inches 1 905 cm Step 2 Insert the AWG 6 wire into the wir...

Страница 383: ... the grounding lug is held firmly to the chassis Do not overtighten the screws Step 8 Connect the opposite end of the grounding wire to the appropriate grounding point at your site to ensure an adequate chassis ground What to Do Next This completes the procedure for attaching a chassis ground connection Go to the following cabling sections for information on attaching cables Connecting the SPA Cab...

Страница 384: ...s 9600 baud 8 data bits no parity 1 stop bits 9600 8N1 2 Connect to the port using the RJ 45 to DB 9 cable 3 After you establish normal router operation disconnect the terminal if required DETAILED STEPS Step 1 Before connecting a terminal to the console port configure the terminal to match the chassis console port as follows 9600 baud 8 data bits no parity 1 stop bits 9600 8N1 Step 2 Connect to t...

Страница 385: ...ct them Read the safety warnings before you begin The covers are an integral part of the safety design of the product Do not operate the unit without the covers installed Statement 1077 Warning When you install the unit the ground connection must always be made first and disconnected last Statement 1046 Warning Before performing any of the following procedures ensure that power is removed from the...

Страница 386: ...ASR 1002 X Router This section provides the procedures for connecting AC input 48 VDC input power and the 24 VDC input power to your Cisco ASR 1002 X Router For detailed instructions for removing and replacing the Cisco ASR 1002 X Router AC and DC power supplies see Chapter 14 Removing and Replacing FRUs from the Cisco ASR 1000 Series Routers To connect AC power to the Cisco ASR 1002 X Router foll...

Страница 387: ...he AC power cord from the inlet and then secure the power cord through the AC power supply handle as shown in Figure 163 Positioning the Cisco ASR 1002 X Router AC Power Supply and Cord in Slot 1 on page 353 Figure 163 Positioning the Cisco ASR 1002 X Router AC Power Supply and Cord in Slot 1 AC power cord 1 Take the power cord and run it below the handles of the right and left power supplies Make...

Страница 388: ...ided on the power supply The connection order is negative positive and GND However this is the order from left to right in which the terminals appear on the power supply not the order in which the leads should be connected during installation The order in which the leads should be attached is GND positive and negative The recommended branch circuit breaker for the Cisco ASR 1002 X Router 48 VDC po...

Страница 389: ...f the input is below 15 V Amber The LED turns s green when all the fans are operational Green A bi color LED indicates power supply fan status FAN OK The LED turns red when a fan failure is detected Red When the LED is off it signals that the 48 VDC output voltage is within the normal operating range Output voltage between the minimum and maximum limits will not create an output fail alarm and out...

Страница 390: ...rewdriver to a torque of 0 5 to 0 6 Nm 5 Insert the stripped end of the positive lead all the way into the positive lead receptacle and tighten the receptacle screw using the same 3 5mm flat blade screwdriver 6 Repeat this step for the negative lead 7 After tightening the receptacle screw for the ground positive and negative 48 VDC input leads use a cable tie to secure the three leads to the power...

Страница 391: ...e the lead from the receptacle use the wire stripper to cut the stripped end of the lead and repeat Step 3 through Step 6 Note Step 7 After tightening the receptacle screw for the ground positive and negative 48 VDC input leads use a cable tie to secure the three leads to the power supply faceplate as shown in Figure 167 Cisco ASR 1002 X Router 48 VDC Power Supply Terminal Block Cable Connections ...

Страница 392: ...as they appear on the actual power supply unit The ground GND lead is always installed first and removed last The 24 VDC power supply uses a spring loaded terminal block therefore have the recommended screwdriver size available Review the diagrams to see how the wire is stripped and how the screwdriver is inserted at an angle into the terminal block Have the following equipment available to instal...

Страница 393: ...ver at a forward angle until you relieve the spring contact 6 With the screwdriver still inserted gently push the lead wire ground lead first in until the copper wire as shown in Figure 171 Cisco ASR 1002 X Router 24 VDC Power Supply Lead Wire Inserted into Terminal Block on page 360 is no longer visible see Figure 172 Cisco ASR 1002 X Router 24 VDC Power Supply Lead Wire Fully Inserted on page 36...

Страница 394: ...wdriver insert the screwdriver at an angle to release the spring while you install the stripped lead wire as shown in Figure 170 Inserting a Screwdriver Into the 24 VDC Power Supply Terminal Block on page 360 Figure 170 Inserting a Screwdriver Into the 24 VDC Power Supply Terminal Block Step 5 Carefully push the screwdriver at a forward angle until you relieve the spring contact Step 6 With the sc...

Страница 395: ...upply Terminal Block Gently tug the lead wire 1 Step 8 Repeat Steps 5 through Step 10 for each lead wire Figure 174 Cisco 24 VDC Power Supply Terminal Block with Lead Wires Installed on page 361 shows all the lead wires installed Figure 174 Cisco 24 VDC Power Supply Terminal Block with Lead Wires Installed Ground lead wire 3 Positive lead wire 1 Negative lead wire 2 Ensure that the stripped end of...

Страница 396: ... completes the steps for installing the 24 VDC power supply in the Cisco ASR 1002 X Router Connecting a Terminal to the Console Port The integrated route processor has an asynchronous serial EIA TIA 232 RJ 45 console port labeled CON on its front panel You can connect this port to most types of video terminals using the console cable kit that is included with your Cisco ASR 1002 X Router The conso...

Страница 397: ...Continue with the installation by referring to the procedure described in the Connecting External Cables to the Cisco ASR 1002 X Router on page 364 DETAILED STEPS Step 1 Connect one end of the RJ 45 cable to the serial RJ 45 port CON on the front panel see the following image Figure 176 Cisco ASR 1002 X Router Console Port Connection on the Route Processor AUX port connection 2 CON port connection...

Страница 398: ...isco ASR 1002 X Router Keep the following guidelines in mind when connecting external cables to the Cisco ASR 1002 X Router To reduce the chance of interference avoid crossing high power lines with any interface cables Verify all the cabling limitations particularly distance before powering on the system Cisco ASR 1000 Series Router Hardware Installation Guide 364 Cisco ASR 1002 X Router Overview ...

Страница 399: ...cket page 386 Attaching a Chassis Ground Connection page 388 Connecting the Shared Port Adapter Cables page 391 Connecting the Console and Auxiliary Port Cables page 391 Connecting Power to the Cisco ASR 1013 Router page 393 Connecting a Terminal to the Cisco ASR 1000 Series RP Console Port page 402 Connecting the System Cables page 403 Attaching Cable Retention Bracket on AC Power Supply page 404...

Страница 400: ...power supplies for power zone 1 do not mix AC and DC power supplies You must have one power supply running at all times from each power supply zone and two power supplies from each power supply zone to support redundancy For detailed power supply information about the Cisco ASR 1013 Router see the Connecting Power to the Cisco ASR 1013 Router on page 393 Note Cisco ASR 1000 Series Router Hardware ...

Страница 401: ...ows the Cisco ASR 1013 Router with modules and filler plates installed Figure 177 Cisco ASR 1013 Router Front View Cisco ASR 1000 Series Router Hardware Installation Guide 367 Cisco ASR 1013 Router Overview and Installation Front View ...

Страница 402: ...0 Series SIP slot 2 3 Slot F1 with Cisco ASR 1000 ESP40 Cisco ASR 1000 ESP100 or Cisco ASR 1000 ESP200 F1 ASR 1000 Series SIP slot 3 4 Slot R1 with ASR 1000 RP2 R1 ASR 1000 Series SIP slot 4 5 Note Slots 10 9 8 7 and 6 reside in power zone 0 and slots 5 4 3 2 and 1 reside in power zone 1 Cisco ASR 1000 Series Router Hardware Installation Guide 368 Cisco ASR 1013 Router Overview and Installation Fr...

Страница 403: ... with the AC power supplies installed Figure 178 Cisco ASR 1013 Router Rear View AC power supply in slot 2 power supply zone 1 6 Cable management brackets 1 Cisco ASR 1000 Series Router Hardware Installation Guide 369 Cisco ASR 1013 Router Overview and Installation Rear View ...

Страница 404: ...on the bottom rear of the chassis see the preceding figure callout 6 Four power supplies either AC power supplies or DC power supplies are accessed from the rear of the router The power supply bays are numbered from bottom to top 0 1 2 and 3 respectively The Cisco ASR 1013 Router has two power zones Power zone 1 top half of chassis includes slots PS1 A PS1 B Carrier card slots 3 4 and 5 RP1 FP1 Po...

Страница 405: ...ots from bottom of chassis up 0 1 2 3 4 5 respectively The Cisco ASR 1013 Router is designed with each slot numbered as shown in the Cisco ASR 1013 Router Rear View figure in the Rear View section Cisco ASR 1013 slots are keyed using rotated guide pins for the plug in card to be fully inserted in slots where they are intended to operate This keyed feature prevents cards from being inserted into th...

Страница 406: ...nts Otherwise allow 19 inches 48 3 cm of clearance to remove field replaceable units Maintain a minimum clearance of 3 inches 7 62 cm on the front top and sides of the chassis for the cooling air inlet and exhaust ports respectively Avoid placing the chassis in an overly congested rack or directly next to another equipment rack otherwise the heated exhaust air from other equipment can enter the in...

Страница 407: ...es 208 60 pounds 94 6193 kg Weight Guidelines for Equipment Rack Installation The chassis should already be in the area where you will install it If you have not determined where to install your chassis see the Cisco ASR 1000 Series Routers Component Overview section on page 2 1 for information about site considerations When installing the Cisco ASR 1013 Router consider the following items The Cis...

Страница 408: ... the rack you must install the rack mount brackets on each side of the chassis The forward rack mount brackets are already installed on the Cisco ASR 1013 chassis when it arrives at your site The parts and tools required for installing the rack mount brackets and cable management brackets are listed in the Tools and Equipment section on page 5 23 The cable management brackets are installed on the ...

Страница 409: ...th the ear and holes facing outward and towards the rear of the chassis see the following image callout number 4 Figure 180 Location of the Rear Rack Mount Brackets on the Cisco ASR 1013 Router Cisco ASR 1000 Series Router Hardware Installation Guide 375 Cisco ASR 1013 Router Overview and Installation Attaching the Rear Rack Mount Brackets ...

Страница 410: ...s are optional and are shipped in the accessory kit along with a set of front rack mount brackets The chassis rack mounting flanges must be secured directly to the chassis before you lift it into the rack This section includes the following topics Verifying Rack Dimensions Before you install the chassis measure the space between the vertical mounting flanges rails on your equipment rack to verify ...

Страница 411: ... can perform one of the following procedures to install the chassis in a rack Installing the Chassis Using the Forward Rack Mount Brackets Before you mount the ASR 1013 Router in a rack make certain you read which rack mount bracket ear holes to use when positioning the chassis in the rack As a result of using the designated ear holes on the rack mount bracket the cable management bracket installa...

Страница 412: ... 4 on the Cisco ASR 1013 Router Figure 182 Forward Rack Mount Brackets on the Cisco ASR 1013 Router Rear rack mount bracket 4 Forward rack mount bracket ear and holes 2 Cisco ASR 1000 Series Router Hardware Installation Guide 378 Cisco ASR 1013 Router Overview and Installation Installing the Cisco ASR 1013 Router in a Rack ...

Страница 413: ...he mounting rails on the rack 7 Hold the chassis in position against the mounting rails and follow these steps 8 Tighten all screws on each side to secure the chassis to the equipment rack DETAILED STEPS Step 1 On the chassis ensure that all screw fasteners on the installed components are securely tightened Step 2 Make sure that your path to the rack is unobstructed If the rack is on wheels ensure...

Страница 414: ...t the mounting rails on the rack 7 Hold the chassis in position against the mounting rails and insert all screws that were shipped in the accessory kit 8 Tighten all screws on each side to secure the chassis to the equipment rack DETAILED STEPS Step 1 On the chassis ensure that all screw fasteners on the installed components are securely tightened Step 2 Make sure that your path to the rack is uno...

Страница 415: ...allation on page 383 Two Post Rack Installation The Cisco ASR 1013 Router can be installed on a two post 19 inch equipment rack The following image shows the Cisco ASR 1013 Router installed on a two post rack Figure 183 Installing the Cisco ASR 1013 Router on a Two Post Rack Cisco ASR 1000 Series Router Hardware Installation Guide 381 Cisco ASR 1013 Router Overview and Installation Two Post Rack I...

Страница 416: ...ighten two screws to the rack on both sides DETAILED STEPS Step 1 Position the chassis so the front is closest to you and lift it carefully into the rack To prevent injury avoid any sudden twists or moves Step 2 Slide the chassis into the rack pushing it back until the brackets meet the mounting strips or posts on both sides of the rack Step 3 Keeping the brackets flush against the posts or mounti...

Страница 417: ...chassis in an existing rack with equipment Installing an empty chassis in a rack with no equipment installed Because the Cisco ASR 1013 chassis is very heavy it is recommended that the chassis be installed at the bottom of the rack if you are planning to install more than one Cisco ASR 1013 chassis in the same rack Note Cisco ASR 1000 Series Router Hardware Installation Guide 383 Cisco ASR 1013 Ro...

Страница 418: ...mount brackets 3 Four post equipment rack rear rail 1 Four post equipment rack front rail 4 Cisco ASR 1013 rear rack mount brackets 2 When handling the chassis always follow proper lifting practices See the Chassis Lifting Guidelines section Cisco ASR 1000 Series Router Hardware Installation Guide 384 Cisco ASR 1013 Router Overview and Installation Four Post Rack Installation ...

Страница 419: ...ng a shelf then raise the chassis to the level of the shelf Let the bottom of the chassis rest on the brackets but continue to support the chassis Using two people lift the chassis into the rack using the side handles and grasping underneath the power supply bays Step 2 Position the chassis until the rack mounting flanges are flush against the mounting rails on the rack Use the third hole up from ...

Страница 420: ...MMARY STEPS 1 Align the cable management bracket to the rack mount bracket on the top of each side of the Cisco ASR 1013 Router The cable management bracket aligns to the top hole of the chassis rack mount bracket 2 Using a Phillips screwdriver insert the screw through cable management bracket and into the chassis rack mount and tighten the screw 3 Using the bottom rack mount ear hole on each side...

Страница 421: ...anagement Brackets Installed on the Cisco ASR 1013 Router Chassis front rack mount bracket 3 Cable management bracket screw location 1 Cable management bracket 2 Cisco ASR 1000 Series Router Hardware Installation Guide 387 Cisco ASR 1013 Router Overview and Installation Attaching the Cable Management Bracket ...

Страница 422: ...opriate electrical inspection authority or an electrician if you are uncertain that suitable grounding is available Statement 1024 Warning Before you connect power or turn on power to your chassis you must provide an adequate chassis ground earth connection for the chassis A chassis ground connector is provided on each Cisco ASR 1013 Router There is a ground stud on the rear bottom of the chassis ...

Страница 423: ...y tighten the screws until the grounding lug is held firmly to the chassis Do not overtighten the screws 8 Connect the opposite end of the grounding wire to the appropriate grounding point at your site to ensure an adequate chassis ground DETAILED STEPS Step 1 Use the wire stripper to strip one end of the AWG 6 wire approximately 0 75 inches 19 05 mm Step 2 Insert the AWG 6 wire into the wire rece...

Страница 424: ... the Number 2 Phillips screwdriver to carefully tighten the screws until the grounding lug is held firmly to the chassis Do not overtighten the screws Step 8 Connect the opposite end of the grounding wire to the appropriate grounding point at your site to ensure an adequate chassis ground What to Do Next This completes the procedure for attaching a chassis ground connection Go to the following cab...

Страница 425: ... Router has a DCE mode console port for connecting a console terminal and an auxiliary port for additional connections to your chassis The auxiliary port can also be used for diagnostics In a fully redundant chassis each Cisco ASR1000 RP2 is separately connected to each FP and I O card slot over separate point to point connections of the system interconnect over the midplane The selection of the a...

Страница 426: ...oth ports are configured as asynchronous serial ports SUMMARY STEPS 1 Before connecting a terminal to the console port configure the terminal to match the chassis console port as follows 9600 baud 8 data bits no parity 1 stop bits 9600 8N1 2 After you establish normal router operation you can disconnect the terminal DETAILED STEPS Step 1 Before connecting a terminal to the console port configure t...

Страница 427: ...or 100 Mbps through command line interface CLI commands the port is forced to MDI mode When in a fixed speed configuration and MDI mode Use a crossover cable to connect to an MDI port Use a straight through cable to connect to an MDI X port Connecting Power to the Cisco ASR 1013 Router The covers are an integral part of the safety design of the product Do not operate the unit without the covers in...

Страница 428: ...aximum Minimum Always AWG 6 wire Always 50 40 Cisco ASR 1006 8 10 40 30 24 Cisco ASR 1004 10 12 30 20 16 Cisco ASR 1002 Always AWG 6 wire Always 50 40 Cisco ASR 1013 For example the Cisco ASR 1002 Router DC power supply with 16 Amp input rating must use an AWG 12 gauge wire for a 20 A circuit breaker and an AWG 10 gauge wire for a 30 A circuit breaker Power Cords Supported by the Cisco ASR 1013 Ro...

Страница 429: ... being used to power the active route processor If you plan to connect the four power supplies to two independent circuits for redundancy you must ensure that a power supply from each power supply zone is connected to each circuit PS0 and PS1 are in power supply zone 0 and PS2 and PS3 are in power supply zone 1 In this scenario for example PS0 and PS2 can be connected to one circuit and PS1 and PS...

Страница 430: ...DB 25 alarm connector 2 Protective shielding on both sides of the Standby switch 8 Tie wrap tab 3 AC power supply LEDs 9 AC power supply captive screw 4 AC power supply handle 5 Shielded cables must be used to connect to the DB 25 alarm connector on both the AC and DC power supplies in order to comply with FCC EN55022 CISPR22 Class A emissions requirements See the How Cisco ASR1000 RP Alarm Monito...

Страница 431: ... breaker switch 10 DC power supply terminal block and plastic cover 4 Terminal block and plastic cover slot tab 11 Ground symbol 5 Power supply LEDs 12 DC power supply ground studs 6 Shielded cables must be used to connect to the DB 25 alarm connector on both the AC and DC power supplies in order to comply with FCC EN55022 CISPR22 Class A emissions requirements Note Before you begin to install the...

Страница 432: ...must be able to fit over 1 4 inch terminal studs at 0 625 inch 15 88 mm centers DC input power cables must be connected to the PDU terminal studs in the proper positive and negative polarity In some cases the DC cable leads are labeled which is a relatively safe indication of the polarity However you must verify the polarity by measuring the voltage between the DC cable leads When making the measu...

Страница 433: ... Kepnut screw to recommended torque of 18 in lbs minimum to 22 in lbs maximum for the positive stud and wire 8 Use tie wraps to secure the wires so that the wires are not pulled from the terminal block by casual contact Ti wrap studs are located below the power supply terminal block see the Cisco ASR 1000 Series Route Processor Console Port Connectors figure in the Connecting a Terminal to the Cis...

Страница 434: ...h FCC EN55022 CISPR22 Class A emissions requirements See the How Cisco ASR1000 RP Alarm Monitoring Works section Note Step 3 Attach the other end of the cable to the site s ground connection Step 4 Remove the plastic cover from the terminal block Before you continue to install the terminal block ground wires stop and perform Step 5 To prevent any contact with metal lead on the ground wire and the ...

Страница 435: ...n lbs maximum for the positive stud and wire Secure the wires coming in from the terminal block so that they cannot be disturbed by casual contact Note Step 8 Use tie wraps to secure the wires so that the wires are not pulled from the terminal block by casual contact Ti wrap studs are located below the power supply terminal block see the Cisco ASR 1000 Series Route Processor Console Port Connector...

Страница 436: ...at the wire connected to the outside left pin of the left plug pin 1 is the same color as the wire connected to the outside right pin of the right plug pin 8 Use the following procedure to connect a video terminal to the console port on a route processor Each Cisco ASR 1000 Series Route Processor must have a console port connection typically to a terminal server if you are running a redundant conf...

Страница 437: ...e 403 to continue the installation DETAILED STEPS Step 1 Connect one end of the RJ 45 cables to the serial RJ 45 port CON on the Cisco ASR1000 RP2 route processor Step 2 Run the cable up and through the cable management bracket and connect the other end of the RJ 45 cable to the RJ 45 adapter Step 3 Connect the adapter to your video terminal to complete the cable connection Step 4 Power on your vi...

Страница 438: ... the cable retention bracket attaching to the AC power supply Figure 195 Cable Retention Bracket Attaching to the AC Power Supply SUMMARY STEPS 1 Remove the two M3X5mm screws and discard 2 Install AC cord retainer by inserting tabs into lance features on panel 3 Secure AC cord retainer with two M3X8mm screws included in kit 4 Connect AC power cord 5 Secure AC cord by tightening retainer screw Cisc...

Страница 439: ...atures on panel Step 3 Secure AC cord retainer with two M3X8mm screws included in kit Step 4 Connect AC power cord Step 5 Secure AC cord by tightening retainer screw Cisco ASR 1000 Series Router Hardware Installation Guide 405 Cisco ASR 1013 Router Overview and Installation Attaching Cable Retention Bracket on AC Power Supply ...

Страница 440: ...Cisco ASR 1000 Series Router Hardware Installation Guide 406 Cisco ASR 1013 Router Overview and Installation Attaching Cable Retention Bracket on AC Power Supply ...

Страница 441: ...s Rack Mount Brackets page 430 Installing the Cisco ASR 1001 Router in a Rack page 432 Attaching the Cable Management Bracket page 436 Attaching a Chassis Ground Connection page 438 Connecting the Shared Port Adapter Cables page 440 Connecting the Console and Auxiliary Port Cables page 441 Connecting a Terminal to the Cisco ASR1000 RP1 Console Port page 442 Connecting Cables page 443 Overview of A...

Страница 442: ...assis contains a single integrated mainboard that implements all functions of the route processor RP a SPA embedded processor SIP a forwarding processor ESP and a built in 4x1 GE SPA The SPA interface is connected to a built in 4xGE SPA a single half height HH SPA bay and one flexible integrated daughter card IDC providing additional SPA interfaces Cisco ASR 1001 Router hardware features include F...

Страница 443: ...out the MIBs that can be used to manage these IDCs Note IDC HD80G IDC HD80G can support a single 2 5 inch SATA HDD SSD see the following image Figure 196 Cisco ASR 1001 Router with IDC HD80G LINK LED Indicates MGMT Ethernet port activity 7 HDD Online LED indicates that the disk is ready and can be accessed 1 BF Internal bootflash LED that indicates activity of the EUSB device 8 HDD Activity LED in...

Страница 444: ...10 100 1000 management Ethernet port 6 IDC OC3POS IDC OC3POS can support two channels of OC3 see the following image Figure 197 Cisco ASR 1001 Router with IDC OC3POS LINK LED Indicates MGMT Ethernet port activity 8 C A Carrier AlarmLED 1 BF Internal bootflash LED that indicates activity of the EUSB device 9 A L Active Loopback LED 2 Cisco ASR 1000 Series Router Hardware Installation Guide 410 Cisc...

Страница 445: ...ort 4 STAT Status LED 12 AUX RS 232 auxiliary port 5 PWR Power LED 13 CON RS 232 console port 6 MGMT RJ 45 10 100 1000 management Ethernet port 7 IDC 4XGE IDC 4XGE can support up to four small form factor pluggable SFP transceivers each of which supports a 1 Gigabit Ethernet connection see the following image Figure 198 Cisco ASR 1001 Router with IDC 4XGE Cisco ASR 1000 Series Router Hardware Inst...

Страница 446: ...gh speed 480 Mbps port used for secure key storage VPN credentials storage or bulk flash storage of image and configuration backup This USB port is an A port 11 GigabitEthernet Port 3 This POS port is an SFP port 4 STAT Status LED 12 AUX RS 232 auxiliary port 5 PWR Power LED 13 CON RS 232 console port 6 MGMT RJ 45 10 100 1000 management Ethernet port 7 IDC CHT1 E1 Cisco ASR 1000 Series Router Hard...

Страница 447: ...SB LED 8 T1 E1 Ports Ports 4 through 7 These T1 E1 ports are RJ 45 ports 2 USB port USB high speed 480 Mbps port used for secure key storage VPN credentials storage or bulk flash storage of image and configuration backup This USB port is an A port 9 AUX RS 232 auxiliary port 3 STAT Status LED 10 CON RS 232 console port 4 PWR Power LED 11 MGMT RJ 45 10 100 1000 management Ethernet port 5 Cisco ASR ...

Страница 448: ... Indicates MGMT Ethernet port activity 8 C A Carrier AlarmLED 1 BF Internal bootflash LED that indicates activity of the EUSB device 9 A L Active Loopback LED 2 USB LED 10 T3 TX Port Transmit port 0 This T3 port uses a 1 0 2 3 RF connector with 75 ohm impedance 3 Cisco ASR 1000 Series Router Hardware Installation Guide 414 Cisco ASR 1001 Router Overview and Installation Cisco ASR 1001 Router Archi...

Страница 449: ...gement Ethernet port 7 The following figures show the front panel of the Cisco ASR 1001 Router with the various IDCs The following image shows the LEDs that are common to all configurations of the Cisco ASR 1001 Router Figure 201 Common LEDs for Cisco ASR 1001 Route Processor BF Internal bootflash LED indicates activity of the EUSB device 6 MAJ LED major alarm indicator 1 MIN LED minor alarm indic...

Страница 450: ...over For instructions see the Removing and Replacing the Cisco ASR 1001 Router DIMM Memory Modules and the Remove and Replace the eUSB Device on the Cisco ASR 1001 Router sections in the Removing and Replacing FRUs from the Cisco ASR 1000 Series Routers chapter Note Cisco ASR 1001 Router Faceplate Common Components The Cisco ASR 1001 Router RP faceplate has common components for each type of ASR 1...

Страница 451: ... 9 Integrated daughter card I O space 2 MGMT one RJ 45 10 100 1000 management Ethernet port 10 GE 2 0 and 0 0 The built in GE ports use industry standard front panel removable SFP optics and SFP copper interfaces 3 USB port 11 GE 2 1 and 0 1 4 CRIT LED critical alarm indicator MAJ LED major alarm indicator MIN LED minor alarm indicator 12 GE 2 2 and 0 2 5 STAT status LED 13 GE 2 3 and 0 3 6 Cisco ...

Страница 452: ...or two DC power supplies are accessed from the rear of the router Cisco ASR 1001 Router Slot Numbering The SPA bay numbering scheme for Cisco ASR 1001 Router is different from the Cisco ASR 1000 SIP card The SPA ordering is Built in GE ports SPA 0 SPA Bay 1 SPA 1 and I O Board SPA 2 The integrated daughter card is not necessarily a SPA it could be any I O such as a harddrive or USB When the daught...

Страница 453: ... ASR1000 ESP section provides a CPP based forwarding engine including a security coprocessor The main components of the Cisco ASR 1001 Router ASR1000 RP1 ASR1000 ESP5 and ASR1000 SIP10 are fixed in the chassis and are not upgradeable except for the power supplies and SPAs Cisco Embedded ASR1000 RP1 for Cisco ASR 1001 Router Description The Cisco ASR 1000 Series route processor embedded for the Cis...

Страница 454: ...de Off Cisco IOSD and other required processes have loaded successfully and are operating Solid green System status STAT ROMMON is running including a permanent failure of RP software or the Process Manager has declared a critical RP process including IOSD dead A user can log in to recover Yellow Occurs during system failure or power up Red Functions as a critical alarm indicator The LED is lso a ...

Страница 455: ...Table 82 Built In SPA LEDs on page 421 describes the built in SPA LEDs Table 82 Built In SPA LEDs Description Color Function Indicates that the port is enabled by software but there is a problem with the Ethernet link Amber GE SFP STATUS one per port Indicates that the port is enabled by software and there is a valid Ethernet link Green Cisco ASR 1001 Router Integrated Daughter Card Description Th...

Страница 456: ...ated performance upgrade license and then reloading the router If you want to determine the current throughput level of the ESP run the show platform hardware throughput level command The following example shows the output of this command before the performance upgrade license is applied Router show platform hardware throughput level The current throughput level is 2500000 kb s The following examp...

Страница 457: ...ts in the event of a single fan failure AC Power Supply for Cisco ASR 1001 Router The AC power supply input inlet is an IEC connector The current rating on the connector is 10 A The AC power supply is secured into the chassis with two captive screws mounted on the faceplate The following image shows the AC power supply for the Cisco ASR 1001 Router Figure 205 AC Power Supply for the Cisco ASR 1001...

Страница 458: ...arm Threshold Ranges Maximum Minimum Output 12 8 13 8V 10 0 11 2V 12V None 2 6 3 0 V 3 3V Power Cords Supported by the Cisco ASR 1001 Router The following table lists the power cords that are supported by the Cisco ASR 1001 Router Table 86 Power Cords Supported by the Cisco ASR 1001 Router Description Power Cord Item Number AC Power Cable ANSI 220VAC Right Exit 15454 M ACCBL R2 Power Cord 110 V Ri...

Страница 459: ... device Statement 1071 Warning Before you install operate or service the system read the Regulatory Compliance and Safety Information for Cisco ASR 1000 Series Aggregation Services Routers publication This document provides important safety information you should know before working with the system Statement 200 Warning You have already unpacked your chassis and read all the site requirements for ...

Страница 460: ...cards and processors Ensure that cables from other equipment already installed in the rack do not impair access to the cards or require you to disconnect cables unnecessarily to perform equipment maintenance or upgrades Install rack stabilizers if available before you mount the chassis Provide an adequate chassis ground earth connection for your router chassis In addition to the preceding guidelin...

Страница 461: ...ng the chassis Mounting the Cisco ASR 1001 Router on an Equipment Shelf or Tabletop Installation To mount your Cisco ASR 1001 Router on an equipment shelf or tabletop follow these steps SUMMARY STEPS 1 Remove any debris and dust from the tabletop or platform as well as the surrounding area 2 Lift the chassis into position on the equipment shelf or tabletop 3 Attach the front rack mount brackets Lo...

Страница 462: ...hassis rack mount brackets after the chassis is installed in the rack Note Step 7 Gather the two cable management brackets and screws shipped with your chassis The following image shows cable management brackets attached on the front of the Cisco ASR 1001 Router Make certain that the cable management U feature device has the open end pointing upwards when you attach it to the chassis Note Figure 2...

Страница 463: ...r sides of the two posts or rails must be at least 19 inches 48 26 cm The height of the chassis is 1 71 inches 43 43 mm Airflow through the chassis is from front to back When handling the chassis always follow proper lifting practices See the Chassis Lifting Guidelines section in the Preparing Your Site for Installation chapter Note The Cisco ASR 1001 Router can be installed with both front or rea...

Страница 464: ... side of the chassis The parts and tools required for installing the rack mount brackets and cable management brackets are listed in the Tools and Equipment section in the Preparing Your Site for Installation chapter The Cisco ASR 1001 Router also has a set of threaded features in the rear of the chassis to accommodate a set of rear mounting brackets should the requirement arise Note The cable man...

Страница 465: ...s the front of the chassis The following image shows where to attach the front rack mount brackets to the Cisco ASR 1001 Router Figure 209 Attaching the Front Rack Mount Brackets to the Cisco ASR 1001 Router Front rack mount bracket screws 3 Front rack mount bracket ear and holes 1 Front rack mount bracket 2 Step 2 Position the front rack mount bracket top hole with the chassis first top hole behi...

Страница 466: ... are engaged or that the rack is otherwise stabilized See the next sections on the types of racks you can use to install the chassis 3 Optional Install a shelf in the rack to support the Cisco ASR 1001 Router If you use a shelf this will help support the chassis while you secure it to the rack 4 With two people lift the chassis into position between the rack posts 5 Align the mounting bracket hole...

Страница 467: ...ar holes the cable management bracket can be easily attached to the rack mount bracket when the chassis is in the rack Tip Step 8 Tighten all screws on each side to secure the chassis to the equipment rack Two Post Rack Installation The Cisco ASR 1001 Router can be installed on a two post rack either 19 inch or 23 inch Inner clearance the width between the inner sides of the two posts or rails mus...

Страница 468: ...rack or mounting strip Step 4 For each bracket insert and tighten two screws to the rack on both sides This completes the procedure for installing the chassis on a two post rack Proceed to the Attaching a Chassis Ground Connection on page 438 to continue the installation Four Post Rack Installation The Cisco ASR 1001 Router can be flush mounted in a 19 inch equipment rack using the rack mounting k...

Страница 469: ...the equipment rack 6 Use a level to verify that the tops of the two brackets are level or use a measuring tape to verify that both brackets are the same distance from the top of the rack rails DETAILED STEPS Step 1 Optional Install a shelf in the rack to support the Cisco ASR 1001 Router If you are using a shelf then raise the chassis to the level of the shelf Let the bottom of the chassis rest on...

Страница 470: ...he Cable Management Bracket The cable management brackets mount to each rack mount bracket on the chassis to provide cable management to both sides of the chassis parallel with card orientation These brackets are screw mounted to the rack mount brackets to allow easy installation and removal of cables The cable management brackets for the Cisco ASR 1001 Router contain one independent cable managem...

Страница 471: ...he chassis rack mount bracket Step 2 Using a Phillips screwdriver insert the screw through cable management bracket and into the chassis rack mount and tighten the screw Use the package of screws that came with your chassis containing four screws Note The following image shows where to attach the front rack mount brackets to the Cisco ASR 1001 Router in a rack Figure 212 Chassis Rack Mount Bracket...

Страница 472: ...rocedure Recommended Tools and Supplies The following tools equipment and supplies necessary to connect the system ground to the chassis Phillips screwdriver 3 5 mm flat blade screwdriver Phoenix 1205053 or equivalent 3 5 mm flat blade Dual lug chassis ground component Grounding wire The following image shows how to attach the ground lugs on the Cisco ASR 1000 Series chassis The location of the gr...

Страница 473: ...ug 3 Use the crimping tool to carefully crimp the wire receptacle around the wire this step is required to ensure a proper mechanical connection as shown in the next figure 4 Attach the grounding lug with the wire so that the grounding wire does not overlap the power supply 5 Locate the chassis ground connector on the side of your chassis 6 Insert the two screws through the holes in the grounding ...

Страница 474: ...g point at your site to ensure an adequate chassis ground What to Do Next This completes the procedure for attaching a chassis ground connection Connecting the Shared Port Adapter Cables The instructions for connecting the cables for the shared port adapter installed in the Cisco ASR 1001 Router are contained in the respective configuration documents for each port adapter For example if you are co...

Страница 475: ...onsole port configure the terminal to match the chassis console port as follows 9600 baud 8 data bits no parity 1 stop bits 9600 8N1 2 Connect to the port using the RJ 45 to DB 9 cable 3 After you establish normal router operation you can disconnect the terminal DETAILED STEPS Step 1 Before connecting a terminal to the console port configure the terminal to match the chassis console port as follow...

Страница 476: ...nel You can connect this port to most types of video terminals through use of the console cable kit that is included with your Cisco ASR 1001 Router The console cable kit contains One RJ 45 to RJ 45 crossover cable One RJ 45 to DB 25 female adapter One RJ 45 to DB 9 female adapter A crossover cable reverses pin connections from one end to the other In other words it connects pin 1 at one end to pi...

Страница 477: ...e Processor in the Cisco ASR 1001 Router Faceplate Common Components section Step 2 Run the cable up and through the cable management bracket and connect the other end of the RJ 45 cable to the RJ 45 adapter see Cisco ASR 1001 Router AC Power Supply and DC Power Supply figure in the Cisco ASR 1001 Router Power Supply Installation section Step 3 Connect the adapter to your video terminal to complet...

Страница 478: ...tween 85 and 264 VAC The AC power supply current shares on the 12 V output and is used in a dual hot pluggable configuration The AC power supply consumes a maximum of 471 W of input power Cisco ASR 1001 Router DC power supply Provides 400 watt output power with two DC voltage outputs 12 V and 5 0 V The power supply operates between 40 5 and 72 VDC The DC power supply current shares on the 12 V out...

Страница 479: ... DC power supplies Table 88 Cisco ASR 1001 Router AC and DC Power Supply LED Description LED Color and State Power output is on and within the normal operating range Solid green Input power that is within the normal operating range is being supplied but the Standby switch is in the Standby position and not in the On position Blinking green at the rate of one blink per second A power supply critica...

Страница 480: ...irst and disconnected last Statement 1046 Warning Before performing any of the following procedures ensure that power is removed from the DC circuit Statement 1003 Warning Only trained and qualified personnel should be allowed to install replace or service this equipment Statement 1030 Warning Installing AC Input Power to Cisco ASR 1001 Router The Cisco ASR 1001 Router has two AC power supplies in...

Страница 481: ...r supply slot 1 first 4 Then insert the power supply cable into the power supply in slot 0 on the right 5 Make certain that the AC power cords are positioned as shown in the following image 6 Plug the AC power supply cables into the AC power source 7 Turn on the AC breaker 8 Turn the Standby switch to On on the chassis 9 The power supply LED illuminates green DETAILED STEPS Step 1 There are two po...

Страница 482: ... ASR 1001 Router AC Power Supply Standby Switch Cisco ASR 1001 Router Standby switch which does not disconnect power from the power source 1 Cisco ASR 1000 Series Router Hardware Installation Guide 448 Cisco ASR 1001 Router Overview and Installation Installing AC Input Power to Cisco ASR 1001 Router ...

Страница 483: ... Step 7 Turn on the AC breaker Step 8 Turn the Standby switch to On on the chassis Step 9 The power supply LED illuminates green What to Do Next This completes the procedure for connecting AC input power Removing AC Power Supply from the Cisco ASR 1001 Router This section describes how to remove an AC power supply from the Cisco ASR 1001 Router The Cisco ASR 1001 Router has two power supply slots ...

Страница 484: ...teps to remove the AC power supply from Slot PS0 DETAILED STEPS Step 1 Unplug the power cable from the power source Step 2 To remove the power cord from PS1 position the power supply cable in order to access the power supply fasteners Hold back the power supply cable in PS0 as shown in the following image ensuring that you do not unplug the power cable Figure 218 Positioning the AC Power Supply Ca...

Страница 485: ...emoving the AC power supply from the Cisco ASR 1001 Router Installing DC Input Power on the Cisco ASR 1001 Router The Cisco ASR 1001 Router DC input connector is compatible with a pluggable Euro style plug The input connector and plug must be UL recognized under UL 486 for field wiring The connection polarity shall be from left to right negative positive and ground See Cisco ASR 1001 Router AC Pow...

Страница 486: ...ou choose for the DC input power supply matches the lead color coding used at the DC power source Ensure that the chassis ground is connected on the chassis before you begin installing the DC power supply Follow the steps provided in the Attaching a Chassis Ground Connection on page 438 When you install a power supply unit the ground connection should always be made first and disconnected last Sta...

Страница 487: ...r Plug in Slot 0 and Without a Connector Plug in Slot 1 Two types of DC connector plugs are supported for use with the DC power supply for the Cisco ASR 1001 Router In one type of connector plug the screw holes are raised above the connector plug body In the second type the screw holes are not raised above the connector plug body The figure in step 6 shows the connector plug in which the screw hol...

Страница 488: ... and ground feed positions for the terminal block connection The recommended wiring sequence is 7 Insert the exposed wire of one of the ground wire into the terminal block plug Ensure that you cannot see any wire lead Only wires with insulation should extend from the terminal block 8 Use a ratcheting torque screwdriver to torque the terminal block plug captive screw above the installed wire lead t...

Страница 489: ...cause doing so could leave the wire exposed from the terminal block plug The following figure shows a stripped DC input power source wire Figure 222 Stripping the DC Input Power Source Wire 0 39 inch 10 mm is the recommended wire strip length for the connector plug that has raised screw holes 0 27 inch 7 mm is the recommended wire strip length for the connector plug that does not have raised screw...

Страница 490: ...erminal block plug Ensure that you cannot see any wire lead Only wires with insulation should extend from the terminal block Do not overtorque the terminal block plug captive screws The recommended maximum torque is from 0 5 Nm 4 425 lbf in to 0 6 Nm 5 310 lbf in Caution Cisco ASR 1000 Series Router Hardware Installation Guide 456 Cisco ASR 1001 Router Overview and Installation Installing DC Input...

Страница 491: ... to 0 6 Nm 5 310 lbf in 1 Step 9 Repeat Step 6 through Step 8 for the remaining two DC input power source wires the positive lead wire and the negative lead wire The following figure shows how to insert the DC power supply terminal block plug in the block header Figure 225 Inserting the DC Power Supply Terminal Block Plug in the Block Header Cisco ASR 1000 Series Router Hardware Installation Guide...

Страница 492: ...serted into terminal block header 2 Lead wires secured with a tie wrap 1 Step 11 Ensure that the terminal block plug is fully seated in the terminal block header on the DC power supply panel You will hear a snap or click when installed properly Step 12 Remove the tape if any from the circuit breaker switch handle and move the circuit breaker switch handle to the On position Step 13 At the rear of ...

Страница 493: ...supporting it with the other hand DETAILED STEPS Step 1 Turn off the circuit breaker Step 2 Pull the terminal block plug connector out of the terminal block head in the power supply Step 3 Unscrew the two power supply fasteners on the unit Step 4 Grasping the power supply handle with one hand pull the power supply out of the chassis while supporting it with the other hand What to Do Next This comp...

Страница 494: ...Cisco ASR 1000 Series Router Hardware Installation Guide 460 Cisco ASR 1001 Router Overview and Installation Removing DC Input Power from the Cisco ASR 1001 Router ...

Страница 495: ...llowing sections Checking Conditions Prior to System Startup page 461 Verifying Power Supply Operation page 462 Powering Up the Cisco ASR 1000 Series Routers page 463 Configuring the Cisco ASR 1000 Series Routers at Startup page 467 Powering Off the Cisco ASR 1000 Series Router Safely page 470 Checking Conditions Prior to System Startup Ensure that the following conditions are addressed before sta...

Страница 496: ...his output sample is from the Cisco ASR 1013 router The other Cisco ASR 1000 routers display similar type of output DETAILED STEPS Step 1 Check that the power supply LEDs are INPUT OK is green FAN OK is green OUTPUT FAILED is not illuminated Step 2 To ensure that the power supply state is OK type the show platform command This output sample is from the Cisco ASR 1013 router The other Cisco ASR 100...

Страница 497: ... 0 1r S R0 10021901 15 0 1r S R1 10021901 15 0 1r S F0 1001270D 15 0 1r S F1 1001270D 15 0 1r S MCP_CAP_13RU If the LEDs indicate a power problem or the power supply state is ps fail then contact a customer service representatives for assistance or additional instructions Powering Up the Cisco ASR 1000 Series Routers Make certain that all card slots and compartments are closed off Install blank fa...

Страница 498: ...wers up Note Step 2 Move the power switch to the ON position Listen for the fans you should immediately hear them operating Step 3 Depending on your installation some LEDs on the rear of the chassis and on installed modules also come on Do not press any keys on the keyboard until the messages stop and the SYS PWR LED is solid green Any keys pressed during this time are interpreted as the first com...

Страница 499: ...or more details see the documentation or License Notice file accompanying the IOS XE software or the applicable URL provided on the flyer accompanying the IOS XE software A summary of U S laws governing Cisco cryptographic products may be found at http www cisco com wwl export crypto tool stqrg html If you require further assistance please contact us by sending email to export cisco com cisco ASR1...

Страница 500: ... Line protocol on Interface GigabitEthernet0 0 3 changed state to down Feb 19 17 35 19 167 ASR1000_OIR 6 REMSPA SPA removed from subslot 0 0 interfaces disabled Feb 19 17 35 19 171 ASR1000_OIR 6 INSCARD Card fp inserted in slot F0 Feb 19 17 35 19 171 ASR1000_OIR 6 ONLINECARD Card fp online in slot F0 Feb 19 17 35 19 187 ASR1000_OIR 6 INSCARD Card cc inserted in slot 0 Feb 19 17 35 19 187 ASR1000_O...

Страница 501: ...o Click the link for the Software Advisor Tool Choose a product family or enter a specific product number to search for the minimum supported software needed for your hardware Configuring the Cisco ASR 1000 Series Routers at Startup This section explains how to create a basic running configuration for your Cisco ASR 1000 Series Routers You need to acquire the correct network addresses from your sy...

Страница 502: ...enter the initial configuration dialog yes no no Step 2 Then Press Return to enter user EXEC mode The following prompt appears Router Step 3 From user EXEC mode enter the enable command as shown in the following example Router enable Step 4 At the password prompt enter your system password If an enable password has not been set on your system this step may be skipped The following example shows en...

Страница 503: ...Dialog Would you like to enter the initial configuration dialog yes no yes Press RETURN to get started Step 2 The first sections of the configuration script appear only at an initial system startup On subsequent uses of the setup facility the script begins with a System Configuration Dialog as shown below When asked if you would like to enter the initial configuration dialog enter yes Example Woul...

Страница 504: ... insures that the operating system cleans up all the file systems After the reload operation is complete then the Cisco ASR 1000 Series Router can be powered off safely If you are going to power cycle a Cisco ASR 1013 Router we recommend that you first perform a graceful reload on the router Power cycling the router without first performing a graceful reload might cause a loss of data stored in th...

Страница 505: ... wait until the system bootstrap message displays before powering off the system Example System Bootstrap Version 12 2 33r XN2 RELEASE SOFTWARE fc1 Technical Support tap www cisco com techsupport Copyright c 2008 by cisco Systems Inc Current image running Boot ROM0 Last reset cause LocalSoft ASR1000 RP1 platform with 4194303 Kbytes of main memory mcp 6ru 1 rp0 rommon 1 Step 5 Remove any power cabl...

Страница 506: ...Cisco ASR 1000 Series Router Hardware Installation Guide 472 Cisco ASR 1000 Series Routers Power Up and Initial Configuration Powering Off the Cisco ASR 1000 Series Router Safely ...

Страница 507: ...uter eUSB Devices page 519 Removing and Replacing Cisco ASR 1000 Series Router 1 GB USB Flash Token Memory Stick page 527 Minimum Requirements of eUSB Devices Supported on Cisco ASR 1000 Series Routers page 529 Removing and Replacing Cisco ASR 1000 Series Embedded Service Processors page 531 Removing and Replacing Cisco ASR 1000 Series Router SPAs and SPA Interface Processors page 533 Removing and...

Страница 508: ... wear grounding wrist straps to avoid ESD damage to any card Do not directly touch the backplane with your hand or any metal tool or you could shock yourself Statement 94 Warning Removing the Cisco ASR 1000 Series Route Processor from the Cisco ASR 1006 Cisco ASR 1004 and Cisco ASR 1013 Routers To remove the Cisco ASR 1000 Series route processor RP1 or RP2 from the Cisco ASR 1006 Router Cisco ASR ...

Страница 509: ...Cisco ASR 1000 Series Route Processor in the Cisco ASR 1006 Cisco ASR 1004 and Cisco ASR 1013 Routers To replace the Cisco ASR 1000 Series route processor RP1 or RP2 in the Cisco ASR 1006 Cisco ASR 1004 and Cisco ASR 1013 Routers follow this procedure SUMMARY STEPS 1 Attach an ESD preventive wrist strap between you and an unfinished chassis surface 2 Remove the new Cisco ASR 1000 series route proc...

Страница 510: ...ws with a number 2 Phillips or a 3 16 inch flat blade screwdriver What to Do Next This completes the procedure for replacing the Cisco ASR 1000 Series route processor in a Cisco ASR 1006 and Cisco ASR 1004 Router RemovingandReplacingCiscoASR1000SeriesRouteProcessor Internal Hard Drive Cisco ASR 1000 Series Routers support the Cisco ASR1000 RP1 and the Cisco ASR1000 RP2 route processors This sectio...

Страница 511: ... RP1 Module Internal Hard Drive The Cisco ASR 1000 Series route processor RP1 contains an internal hard drive disk that provides nonvolatile storage in the form of an internal flash disk The Cisco ASR 1000 Series RP1 module can be configured with either a 40 GB or a 32 GB disk Both components are field replaceable on the Cisco ASR 1006 Router and the Cisco ASR 1004 Router there is no hard disk in ...

Страница 512: ... wrapped in to prevent them from disconnecting from the Cisco ASR 1000 Series RP1 itself If the cables are not damaged leave the cables connected to the Cisco ASR 1000 Series RP1 with the tie wrap in place Remove the old hard drive 8 If the cables are damaged DETAILED STEPS Step 1 Slip on the ESD preventive wrist strap that was included in the accessory kit Loosen the screw fasteners on the Cisco ...

Страница 513: ...drive unit Figure 227 Cisco ASR1000RP1 Module Internal Hard Drive Unit Cisco ASR 1000 Series Router Hardware Installation Guide 479 Removing and Replacing FRUs from the Cisco ASR 1000 Series Routers Removing and Replacing the Cisco ASR1000 RP1 Module Internal Hard Drive ...

Страница 514: ...t need to replace them leave the connection to the Cisco ASR 1000 Series Route Processor 1 in place and only remove the connection to the internal hard drive Step 7 Carefully disconnect the cables at the rear of the hard drive These cables are tie wrapped in to prevent them from disconnecting from the Cisco ASR 1000 Series RP1 itself If the cables are not damaged leave the cables connected to the ...

Страница 515: ...ASR 1000 Series Route Processor 1 connector and the internal hard drive connector as shown in the following figure Figure 230 Cisco ASR1000 RP1 Module Internal Hard Drive and Module Base This completes the procedure for disconnecting the Cisco ASR 1000 Series RP internal hard drive Cisco ASR 1000 Series Router Hardware Installation Guide 481 Removing and Replacing FRUs from the Cisco ASR 1000 Seri...

Страница 516: ...te by hand and then tighten with screw driver 4 Replace the cover by aligning the tabs in the slot and tightening the screw fasteners 5 With two hands grab the handles on the Cisco ASR1000 RP1 module and slide it back into its slot in the Cisco ASR 1000 Series Router and tighten the captive screw DETAILED STEPS Step 1 On the Cisco ASR1000 RP1 carefully align the new hard drive unit with its screw ...

Страница 517: ...w mate by hand and then tighten with screw driver Step 4 Replace the cover by aligning the tabs in the slot and tightening the screw fasteners Step 5 With two hands grab the handles on the Cisco ASR1000 RP1 module and slide it back into its slot in the Cisco ASR 1000 Series Router and tighten the captive screw Cisco ASR 1000 Series Router Hardware Installation Guide 483 Removing and Replacing FRUs...

Страница 518: ... disk on the standby RP2 request platform hardware filesystem stby harddisk online Mounts the hard disk on the standby RP2 If the disk is not provisioned properly this command will provision the disk The reason you would be removing an internal hard drive is that it is failing or failed so any data recovery may be lost If the drive is functioning you can back it up to a drive plugged into a USB po...

Страница 519: ...e Cisco ASR1000 RP2 unscrew the fastener screw see the following figure Figure 232 Cisco ASR1000 RP2 Front Panel Internal hard drive 2 Internal hard drive fastener screw 1 Cisco ASR 1000 Series Router Hardware Installation Guide 485 Removing and Replacing FRUs from the Cisco ASR 1000 Series Routers Removing and Replacing the Cisco ASR1000 RP2 Module Internal Hard Drive ...

Страница 520: ...le IOSXE 0 PLATFORM R0 0 udev harddisk has been removed What to Do Next You have successfully removed the Cisco ASR1000 RP2 hard drive Replacing the Cisco ASR1000 RP2 Internal Hard Drive To replace the Cisco ASR1000 RP2 internal hard drive and insert the Cisco ASR1000 RP 2 into the Cisco ASR 1000 Series Router follow these steps Cisco ASR 1000 Series Router Hardware Installation Guide 486 Removing...

Страница 521: ...ote Step 4 Verify the disk is working by running dir harddisk What to Do Next You have completed the steps required to replace the Cisco ASR1000 RP2 internal hard drive RemovingandReplacingtheHardDriveontheCiscoASR1002 X Router The Cisco ASR 1002 X Router supports an optional removable hard drive This section explains how to remove and replace this hard drive During this procedure wear grounding w...

Страница 522: ...latform hardware filesystem harddisk offline command 2 Slip on an ESD preventive wrist strap 3 From the front panel of the router unscrew the fastener screws by using a 2 Phillips screwdriver or a flat head screwdriver see xref Figure 14 6 4 Pull the hard drive out as shown in xref Figure 14 7 5 Place the hard drive in an antistatic bag if you are returning it 6 Wait until the following console me...

Страница 523: ...he fastener screws by using a 2 Phillips screwdriver or a flat head screwdriver see xref Figure 14 6 Figure 234 Cisco ASR1002 X Router Front Panel Internal hard drive 2 Internal hard drive fastener screw 1 Cisco ASR 1000 Series Router Hardware Installation Guide 489 Removing and Replacing FRUs from the Cisco ASR 1000 Series Routers Removing the Hard Drive from the Cisco ASR 1002 X Router ...

Страница 524: ...yed Example IOSXE 0 PLATFORM R0 0 udev harddisk has been removed What to Do Next You have successfully removed the hard drive from the Cisco ASR 1002 X Router Replacing the Hard Drive on the Cisco ASR 1002 X Router To insert or replace the hard drive on the Cisco ASR 1002 X Router follow this procedure Cisco ASR 1000 Series Router Hardware Installation Guide 490 Removing and Replacing FRUs from th...

Страница 525: ...rtitioned correctly Note Step 4 Verify that the hard drive is working by running the following command dir harddisk What to Do Next You have successfully replaced the hard drive on the Cisco ASR 1002 X Router Removing and Replacing the Hard Drive on the Cisco ASR 1001 Router The Cisco ASR 1001 Router supports an optional removable hard drive This section explains how to remove and replace this har...

Страница 526: ...a 2 Phillips screwdriver or a flat head screwdriver see xref Figure 14 6 4 Pull the hard drive out as shown in xref Figure 14 7 5 Place the hard drive in an antistatic bag if you are returning it 6 Wait until the following console message is displayed DETAILED STEPS Step 1 Run the request platform hardware filesystem harddisk offline command Step 2 Slip on an ESD preventive wrist strap Step 3 From...

Страница 527: ...lowing console message is displayed Example IOSXE 0 PLATFORM R0 0 udev harddisk has been removed What to Do Next You have successfully removed the hard drive from the Cisco ASR 1001 Router Replacing the Hard Drive on the Cisco ASR 1001 Router To insert or replace the hard drive on the Cisco ASR 1001 Router follow this procedure Cisco ASR 1000 Series Router Hardware Installation Guide 493 Removing ...

Страница 528: ... not get mounted automatically the disk may not be partitioned correctly Note Step 4 Verify that the hard drive is working by running the following command dir harddisk What to Do Next You have successfully replaced the hard drive on the Cisco ASR 1001 Router Removing and Replacing the Cisco ASR 1000 Series DIMM Memory Modules Cisco ASR 1000 Series Routers support the Cisco ASR1000 RP1 and the Cis...

Страница 529: ...section contains the following topics Removing and Replacing the DIMM Memory Modules on the Cisco ASR 1006 Router and the Cisco ASR 1013 Router The Cisco ASR 1006 Router and the Cisco ASR 1013 Router have redundant RPs The following is an overview of the steps to remove and replace the DIMM memory modules on these routers Cisco ASR 1000 Series Router Hardware Installation Guide 495 Removing and Re...

Страница 530: ...the procedure described in the xref Removing the Cisco ASR 1000 Series Route Processor from the Cisco ASR 1006 Cisco ASR 1004 and Cisco ASR 1013 Routers section Step 2 Remove the DIMM memory module from the standby RP by performing one of the following procedures Removing and Replacing the Cisco ASR1000 RP1 DIMM Memory Modules Removing the Cisco ASR1000 RP2 DIMMs Step 3 Insert the new DIMM memory ...

Страница 531: ...e Cisco ASR 1000 Series RP memory spares are sold as pairs For example the 2 GB memory spare M ASR1K RP1 2GB is sold as a pair of 1 GB modules and the 4 GB memory spare M ASR1K RP1 4GB is sold as a pair of 2 GB modules Memory repairs or upgrades must utilize the complete memory pairs as shipped from Cisco For example if 1 of the 2 memory modules were to fail on the Cisco ASR 1000route processor th...

Страница 532: ...ory card locate the notches and align the DIMM with the socket before inserting it 7 Make certain that both latches on the DIMM connector are open 8 Gently insert the new DIMM taking care not to damage the pins on the edge of the DIMM Using two hands place the index fingers on the edge of the DIMM and place the thumbs on the socket being careful not to touch the socket pins Press on the back of th...

Страница 533: ...latches away from the DIMM on both edges This lifts the DIMM slightly Gently lift the DIMM free from the DIMM connector taking care not to touch the pins that insert into the socket Step 5 Place the DIMM in an antistatic bag to protect the DIMM from ESD damage Forcing the DIMM into the socket can damage the DIMM Use the notches on the DIMM to align the DIMM in the DIMM socket before inserting it s...

Страница 534: ...allow the DIMM to slide into the socket smoothly with minimum force one can alternate applying force back and forth between the left hand and the right hand allowing one side to engage prior to the other Carefully and firmly press the DIMM into the connector until the spring latches lock the DIMM in place See Figure 14 12 Strong insertion force introduces excessive mechanical stress on the DIMM To...

Страница 535: ... replace the Cisco ASR1000 RP1 in the system Replace the Cisco ASR1000 RP1 All DIMMS must be replaced not just one Note What to Do Next This completes the procedure for replacing a DIMM memory module on the Cisco ASR1000 RP1 Removing and Replacing the Cisco ASR1000 RP2 DIMM Memory Modules Perform the following steps before you begin Use an ESD preventive wrist strap Cisco ASR 1000 Series Router Ha...

Страница 536: ...P2 Supported Slots for Inserting Memory DIMMs Slot 3 Slot 2 Slot 1 Slot 0 Memory PID Option 2 GB module 2 GB module 2 GB module 2 GB module M ASR1K RP2 8GB 4 GB Module 4 GB Module 4 GB Module 4 GB Module M ASR1K RP2 16GB This section describes how to remove and then replace the Cisco ASR1000 RP2 module DIMMs see the following figure Figure 242 Cisco ASR1000 RP2 Module Internal Component Location C...

Страница 537: ...xref Figure 14 16 callout 2 6 For the DIMM you want to remove pull down the lever on the DIMM socket to release the DIMM from the socket See the following figure 7 When one end of the DIMM is released from the socket grasp each end of the DIMM with your thumb and forefinger and pull the DIMM completely out of the socket Handle the edges of the DIMM only avoid touching the memory module or pins and...

Страница 538: ...lease Lever to Remove the DIMM Step 7 When one end of the DIMM is released from the socket grasp each end of the DIMM with your thumb and forefinger and pull the DIMM completely out of the socket Handle the edges of the DIMM only avoid touching the memory module or pins and the metal traces the metal fingers along the connector edge of the DIMM along the socket edge Step 8 Place the DIMM in an ant...

Страница 539: ... forth to seat it properly The following figure shows how to install the DIMM in the socket 7 When the DIMM is installed check that the release lever is flush against the side of the DIMM socket If it is not the DIMM might not be seated properly If the DIMM appears misaligned carefully remove it according to the removal procedure and then reseat it in the socket Push the DIMM firmly back into the ...

Страница 540: ... flush against the side of the DIMM socket and the DIMM edge connector is fully inserted If necessary rock the DIMM gently back and forth to seat it properly The following figure shows how to install the DIMM in the socket Figure 245 Installing the DIMM in the Socket Step 7 When the DIMM is installed check that the release lever is flush against the side of the DIMM socket If it is not the DIMM mi...

Страница 541: ...ions that might help solve the problem Note Removing and Replacing the Cisco ASR 1001 Router DIMM Memory Modules Perform the following steps before you begin Use an ESD preventive wrist strap Back up data that you want to save Remove the power supplies before you remove the chassis top cover The top cover cannot be removed until the power supplies are removed from the chassis The chassis has a saf...

Страница 542: ...how to remove the chassis cover and then remove and replace the Cisco ASR 1001 Router DIMM The following figure shows the location of the DIMM and eUSB in the Cisco ASR 1001 Router Figure 246 Cisco ASR 1001 Router Internal Component Location Cisco ASR 1001 Router eUSB location 2 Cisco ASR 1001 Router DIMM location four slots 1 Removing the Cisco ASR 1001 Router DIMMs Follow these steps to remove t...

Страница 543: ...the socket edge 7 Place the DIMM in an antistatic bag to protect it from ESD damage 8 Repeat Step 8 through Step 10 for the remaining DIMMs if required for your upgrade DETAILED STEPS Step 1 With a wrist strap on remove the power supplies from the chassis The chassis cover cannot be removed until the power supplies are removed from the chassis Note For instructions about how to remove the AC and D...

Страница 544: ... 5 Chassis cover 2 Three screws at the front of the chassis faceplate 6 Top surface perimeter screws 3 c Using both hands gently slide the cover forward and off of the chassis The cover will not come off the chassis if the power supplies are present in the chassis Note Cisco ASR 1000 Series Router Hardware Installation Guide 510 Removing and Replacing FRUs from the Cisco ASR 1000 Series Routers Re...

Страница 545: ...e DIMM completely out of the socket Handle only the edges of the DIMM avoid touching the memory module pins and the metal traces the metal fingers along the connector edge of the DIMM along the socket edge Step 7 Place the DIMM in an antistatic bag to protect it from ESD damage Step 8 Repeat Step 8 through Step 10 for the remaining DIMMs if required for your upgrade What to Do Next This completes ...

Страница 546: ...M might not be seated properly If the DIMM appears misaligned carefully remove it according to the removal procedure and then reseat it in the socket Push the DIMM firmly back into the socket until the release lever is flush against the side of the DIMM socket 7 Repeat Step 4 through Step 6 for the remaining DIMMs 8 Replace the Cisco ASR 1001 Router top cover 9 Install the power supplies into the ...

Страница 547: ...he Cisco ASR 1001 Router top cover a Slide the cover onto the chassis ensuring that the interlock hook feature fits on the chassis cover and base as shown in xref Figure 14 21 callout 4 b Tighten the top surface screws and then the three screws on the front faceplate Step 9 Install the power supplies into the chassis See xref Installing AC Input Power to Cisco ASR 1001 Router xref Installing DC In...

Страница 548: ...nufacturer and have the same part number because manufacturers may have multiple versions of a DIMM The following table shows the slots that are supported for inserting memory DIMMs in the Cisco ASR1002 X Router Table 93 Cisco ASR1002 X Router Supported Slots for Inserting Memory DIMMs Slot 3 U1D1 Slot 2 U1D0 Slot 1 U2D1 Slot 0 U2D0 Memory PID Option 2 GB module 2 GB module M ASR1002X 4GB 2 GB Mod...

Страница 549: ...ion Cisco ASR1002 X Router DIMM location 3 Internal hard drive location 1 Removing the Cisco ASR1002 X Router DIMMs Follow these steps to remove the Cisco ASR1002 X Router DIMMs Cisco ASR 1000 Series Router Hardware Installation Guide 515 Removing and Replacing FRUs from the Cisco ASR 1000 Series Routers Removing and Replacing the Cisco ASR 1002 X Router DIMM Memory Modules ...

Страница 550: ...n the two captive screws on the faceplate of the Cisco ASR 1002 X Router module Step 2 Using the handles on both sides of the module with two hands gently slide the module out of the chassis slot Step 3 Place the module on an antistatic mat or pad and ensure that you are wearing an antistatic device such as a wrist strap Step 4 Position the module so that the faceplate is toward you and the edge c...

Страница 551: ...ocket and the DIMM edge connector is fully inserted If necessary rock the DIMM gently back and forth to seat it properly The following figure shows how to install the DIMM in the socket 7 When the DIMM is installed check that the release lever is flush against the side of the DIMM socket If it is not the DIMM might not be seated properly If the DIMM appears misaligned carefully remove it according...

Страница 552: ...the DIMM socket and the DIMM edge connector is fully inserted If necessary rock the DIMM gently back and forth to seat it properly The following figure shows how to install the DIMM in the socket Figure 254 Installing the DIMM in the Socket Step 7 When the DIMM is installed check that the release lever is flush against the side of the DIMM socket If it is not the DIMM might not be seated properly ...

Страница 553: ...SR1000 RP1 supports a 1 GB eUSB flash field replaceable unit FRU and the Cisco ASR1000 RP2 supports a 2 GB eUSB on the Cisco ASR 1006 Router and the Cisco ASR 1004 Router The Cisco ASR 1001 Router has only one eUSB on the chassis It is located at the eUSB connector P26 as shown in xref figure To replace this component you must remove a screw on the mounting hole The 8 GB eUSB on the integrated rou...

Страница 554: ...e chassis slot Handle the Cisco ASR1000 RP by the carrier edges only never touch the printed circuit board components or connector pins Caution e Place the Cisco ASR1000 RP module on an antistatic surface with its printed circuit board components facing upward f Locate the eUSB device on the ASR1000 Series RP board The following figure shows the location of the eUSB component on the Cisco ASR1000 ...

Страница 555: ...e eUSB device in an antistatic bag for return What to Do Next You have removed the Cisco ASR1000 RP and eUSB component Remove and Replace the eUSB Device on the Cisco ASR 1006 and Cisco ASR 1004 Routers To replace the eUSB component follow these steps Cisco ASR 1000 Series Router Hardware Installation Guide 521 Removing and Replacing FRUs from the Cisco ASR 1000 Series Routers Remove and Replace t...

Страница 556: ...is flashing green To check if the LED flashes green from the ROMMON or IOS prompt perform a 6 To restore data after the internal hard drive replacement type DETAILED STEPS Step 1 Align the replacement eUSB device over the connector and standoff The device fits over the threaded post that sticks up off the board and accepts a screw to hold the eUSB firmly to the Cisco ASR 1000 Series RP board Step ...

Страница 557: ...e Remove and Replace the eUSB Device on the Cisco ASR 1001 Router To remove the Cisco ASR 1001 Router eUSB device follow these steps SUMMARY STEPS 1 Before you physically replace the eUSB device create a backup of the startup config and the boot image For example to backup to an external USB flash drive enter 2 Remove the power supplies from the chassis before you remove the chassis cover For inst...

Страница 558: ...he chassis as shown in xref figure callout 6 c Using both hands gently slide the cover forward and off of the chassis The cover will not come off the chassis if the power supplies are installed Note d Place the cover aside and ensure that you are wearing an antistatic device such as a wrist strap Step 4 Position the chassis so that you are facing the front Step 5 Locate the eUSB device on the ASR ...

Страница 559: ...evice with the small Phillips screw as displayed in the following figure 3 Replace the chassis cover and power supplies To replace the Cisco ASR 1001 Router top cover 4 Install the power supplies into the chassis See xref sections 5 Restore the backup copy of the startup config and the boot image to the eUSB device 6 Verify that the Cisco ASR 1001 Router is operating properly Check whether the int...

Страница 560: ...eplace the chassis cover and power supplies To replace the Cisco ASR 1001 Router top cover a Slide the cover onto the chassis while ensuring that the interlock hook feature is fitted on the chassis cover and base as shown in xref fig callout 4 b Tighten the top surface screws and then the three screws on the front faceplate Step 4 Install the power supplies into the chassis See xref sections After...

Страница 561: ...isk What to Do Next You have completed the replacement procedure for the eUSB device in the Cisco ASR 1001 Router Removing and Replacing Cisco ASR 1000 Series Router 1 GB USB Flash Token Memory Stick The Cisco ASR1000 RPs contain ports for a 1 GB flash token memory stick to store configurations or Cisco IOS XE consolidated packages The following figure shows the USB port 0 or 1 connector on the Ci...

Страница 562: ...place a Cisco USB Flash memory stick simply insert the module into the USB port 0 or 1 port as shown in the following figure The Flash memory module can be inserted only in one way and can be inserted or removed regardless of whether the router is powered up or not DETAILED STEPS Step 1 Pull the memory stick from the USB port The Cisco ASR 1002 Router has only one USB port Note Step 2 To replace a...

Страница 563: ...s has been introduced in the Cisco IOS XE Release 2 4 0S Previous Behavior Some of the Cisco ASR 1000 Series Routers were shipped with low capacity eUSB devices on the Route processor boards It is not an easy way to detect the presence of an invalid eUSB device with low capacity on the RP As the RP boards has already been shipped it is important to provide information about the presence of an inco...

Страница 564: ... as specified above then no messages are displayed at the Cisco IOS console However an informational message is displayed at the auxiliary port For example on a 6RU system at the auxiliary port the following message appears if the eUSB is valid Checking eUSB capacity information for 6RU ASR1000 RP1 1003520 KBytes OK However when an invalid eUSB device is found the following messages are displayed ...

Страница 565: ...router On these routers you cannot remove the embedded services processor For example Cisco ASR1002 ESP F is integrated on the chassis of Cisco ASR 1002 F Router Note This section contains the following topics Before you begin the procedure verify that your system meets the minimum requirements as described in xref Chapter 2 Cisco ASR 1000 Series Routers Component Overview Note Important Notes abo...

Страница 566: ...essor ESP5 ESP10 ESP20 ESP40 out of the chassis slot 3 Place the Cisco ASR1000 ESP module on an antistatic surface with its printed circuit board components facing upward or in a static shielding bag DETAILED STEPS Step 1 Slip on the ESD preventive wrist strap that was included in the accessory kit Loosen the captive screws on the Cisco ASR 1000 Series Embedded Services Processor Step 2 Using the ...

Страница 567: ...rrier edges and handle only never touch the printed circuit board components or connector pins Caution Step 4 Align the left and right edges of the Cisco ASR1000 ESP printed circuit board between the Cisco ASR1000 ESP slot guides Step 5 Gently slide the Cisco ASR1000 ESP all the way into its chassis slot until you feel the connectors seat with the router midplane Step 6 Seat the Cisco ASR1000 ESP ...

Страница 568: ...atic shielding bag If you need additional equipment contact a service representative for ordering information Electrostatic Discharge Prevention Electrostatic discharge ESD damages equipment and impairs electrical circuitry ESD occurs when printed circuit boards are improperly handled and results in complete or intermittent failures Each SPA circuit board is mounted to a metal carrier and is sensi...

Страница 569: ...Always use an ESD wrist strap or ankle strap when installing or replacing the Cisco ASR 1000 Series SPA Interface SIP and shared port adapter Ensure that the ESD strap makes contact with your skin Handle the Cisco ASR 1000 Series SPA Interface SIP or shared port adapter by its metal carrier edges and handles avoid touching the printed circuit board or any connector pins When removing an Cisco ASR ...

Страница 570: ...Cisco ASR1000 SIP10 by the card edges only never touch the printed circuit board components or connector pins Note Step 3 Place the Cisco ASR1000 SIP10 on an antistatic surface with its printed circuit board components facing upward or in a static shielding bag For detailed information about installing and removing SIPs and SPAs see Cisco ASR 1000 Series Aggregation Services Routers SIP and SPA Ha...

Страница 571: ... interface so that there is no traffic running through the shared port adapter when it is removed Removing a shared port adapter while traffic is flowing through the ports can cause system disruption Caution Refer to the following example to shut down the interface FastEthernet0 1 0 on the 8 Port Fast Ethernet Shared Port Adapter SPA 8X1FE TX V2 a At the router prompt type configure terminal and p...

Страница 572: ...d are recessed about an inch Step 2 Carefully slide the SPA all the way in the SIP until the SPA is firmly seated in the SPA interface connector When fully seated the SPA might be slightly behind the SIP faceplate Step 3 After the SPA is properly seated fasten the SPA in place with the captive installation screws on either side of the SPA Removing and Replacing the Cisco ASR 1006 Router Power Supp...

Страница 573: ...the AC power supply within five minutes DETAILED STEPS Step 1 Slip on the ESD preventive wrist strap that was included in the accessory kit Step 2 Before you turn off a power supply make certain the chassis is grounded Step 3 Turn the power supply Standby switch to the Standby position The following figure shows the power inlet and standby switch for the ASR1006 PWR DC power supply On the ASR1013 ...

Страница 574: ...talled in the chassis in order to energize the fans and maintain proper system cooling Caution Step 6 Grasping the power supply handles pull the power supply from the chassis Step 7 Replace the AC power supply within five minutes What to Do Next This completes the procedure for removing the AC power supply from the Cisco ASR 1006 chassis Replacing the AC Power Supply in Cisco ASR 1006 Router This ...

Страница 575: ...ion on page 2 20 Note Shielded cables must be used to connect to the DB 25 alarm connector on both the AC and DC power supplies in order to comply with FCC EN55022 CISPR22 Class A emissions requirements The following figure shows the ASR1013 06 PWR AC power supply of the Cisco ASR 1006 Router AC power inlet 6 AC power supply fan 1 Cisco ASR 1000 Series Router Hardware Installation Guide 541 Removi...

Страница 576: ...fully seated Step 2 Tighten the captive screws Step 3 Insert the AC power cable Step 4 Plug the power supply cable into the power source Step 5 Turn the power supply Standby switch to the On position What to Do Next This completes the procedure for installing the AC power supply in the Cisco ASR 1006 Router Removing and Replacing a DC Power Supply in Cisco ASR 1006 Router This section provides inf...

Страница 577: ...ure shows the ASR1006 PWR DC power supply and components Figure 265 Cisco ASR 1006 Router DC Power Supply ASR1006 PWR DC DC power supply ground studs 6 Fan 1 DC power supply captive screw 7 DB 25 alarm connector 2 DC power supply handle 8 Tie wrap tab 3 On Off O circuit breaker switch 9 DC power supply terminal block and plastic cover 4 Power supply LEDs 10 Ground symbol 5 Cisco ASR 1000 Series Ro...

Страница 578: ... following figure shows the ASR1013 06 PWR DC power supply and components Figure 266 Cisco ASR 1006 Router DC Power Supply ASR1013 06 PWR DC DC power supply captive screw 7 Fan 1 DC power supply handle 8 DB 25 alarm connector 2 Terminal block and plastic cover single screw 9 Tie wrap tab 3 On Off O circuit breaker switch 10 DC power supply terminal block and plastic cover 4 Cisco ASR 1000 Series R...

Страница 579: ...022 CISPR22 Class A emissions requirements Removing the DC Power Supply from Cisco ASR 1006 Router Before you can remove a DC power supply from the Cisco ASR 1006 Router you must remove power from the power supply Follow these steps to remove power and the DC power supply from the chassis Make certain that the chassis ground is connected before you begin removing and installing the power supply Fo...

Страница 580: ...and ground lug in that order 8 Loosen the four captive screws on the DC power supply 9 Grasping the power supply handles pull the power supply from the chassis 10 Replace the DC power supply within five minutes DETAILED STEPS Step 1 Before servicing the power supply switch the circuit breaker Off in your equipment area As an additional precaution tape the circuit breaker switch in the Off position...

Страница 581: ...r DC Power Supply ASR1006 PWR DC Terminal Block and Plastic Cover Plastic cover slotted area 3 Negative terminal 1 Terminal block plastic cover 4 Positive terminal 2 Cisco ASR 1000 Series Router Hardware Installation Guide 547 Removing and Replacing FRUs from the Cisco ASR 1000 Series Routers Removing and Replacing a DC Power Supply in Cisco ASR 1006 Router ...

Страница 582: ...he terminal block see xref figure a Loosen and remove the single screw on the plastic cover The plastic cover has slots that help to slide it out diagonally from the terminal block b Using a nut driver 7 16 size unsrew the positive kepnut positive cable and the flat washer in that order The terminal block houses two double hole barrel lugs c Follow Step 4b and remove the negative cable Cisco ASR 1...

Страница 583: ...co ASR 1006 Router DC Power Supply Terminal Block Cable Connections Protective sleeving around the stud and cable 3 Negative lead 1 Ground stud and cable 4 Positive lead 2 Cisco ASR 1000 Series Router Hardware Installation Guide 549 Removing and Replacing FRUs from the Cisco ASR 1000 Series Routers Removing and Replacing a DC Power Supply in Cisco ASR 1006 Router ...

Страница 584: ...nside the power supply units and must spin for cooling Because all the system fans can be powered by one power supply the second power supply unit does not have to be powered on but must be connected Note If you remove a power supply from a system that has four power supplies that are connected and powered on the system can run only for a maximum of five minutes before shutting down However becaus...

Страница 585: ...e site ground associated to the DC power supply system that you are working on 6 Remove the plastic cover from the terminal block if it is still on 7 You must wrap the positive and negative power cables with sleeving Take each wire and cover the area from the lug to the wire with heavy shrink sleeving 8 For easier cable management insert the positive cable first Replace the ground lug with cable i...

Страница 586: ...he screwdriver to tighten the ground screw to a torque of 20 2 in lbs 2 per on the power supply ground studs Step 5 Attach the other end of the ground cable to the site ground associated to the DC power supply system that you are working on Step 6 Remove the plastic cover from the terminal block if it is still on Before you continue to install the terminal block ground wires stop and perform Step ...

Страница 587: ...und Lugs Protective sleeving area 3 Negative lug and wire with sleeving wrapped around the wire and end of lug 1 Ground stud and cable 4 Positive lug and wire with sleeving wrapped around the wire and end of lug 2 Cisco ASR 1000 Series Router Hardware Installation Guide 553 Removing and Replacing FRUs from the Cisco ASR 1000 Series Routers Removing and Replacing a DC Power Supply in Cisco ASR 1006...

Страница 588: ...screw use the screwdriver to tighten the ground screw in the terminal block to a torque of 20 2 in lbs 2 per and repeat the same steps for the negative wires Secure the wires coming in from the terminal block so that they cannot be disturbed by casual contact Note Step 10 Use tie wraps to secure the wires so that the wires are not pulled from the terminal block by casual contact Ti wrap studs are ...

Страница 589: ... the circuit breaker On Off switch to the On position What to Do Next The requirement for maximum torque applied to the power or ground Kepnuts must be 8 in lb when the power or ground lug is not present Note This completes the procedure for installing the DC power supply into the Cisco ASR 1006 Router Removing and Replacing the Cisco ASR 1004 Router Power Supplies The Cisco ASR 1004 Router contai...

Страница 590: ... power supplies The Cisco ASR 1004 Router has two of the same type power supplies in power supply Slot 0 and power supply Slot 1 See the following figure Figure 274 Cisco ASR 1004 Router AC Power Supply Slot 0 and Slot 1 AC power supply fan 4 AC power supply Standby switch 1 AC power inlet 5 AC power supply LEDs 2 AC power supply handle 6 DB 25 alarm connector 3 Cisco ASR 1000 Series Router Hardwa...

Страница 591: ...m the chassis 7 Replace the AC power supply within five minutes DETAILED STEPS Step 1 Slip on the ESD preventive wrist strap that was included in the accessory kit Step 2 Before you turn off a power supply make certain the chassis is grounded Step 3 Turn the power supply Standby switch to the Standby position Step 4 Unplug the power cable from the AC inlet on the back of the power supply and the p...

Страница 592: ...talling an AC power supply in the Cisco ASR 1004 Router Never install an AC power module and a DC power module in the same chassis Statement 1050 Warning SUMMARY STEPS 1 Insert an AC power supply in power supply slot 0 or power supply slot 1 until it is fully seated 2 Tighten the captive screws 3 Insert the AC power cable 4 Plug the power supply cable into the power source 5 Turn the power supply ...

Страница 593: ...and qualified personnel should be allowed to install replace or service this equipment Statement 1030 Warning Installation of the equipment must comply with local and national electrical codes Statement 1074 Warning The following figure shows the DC power supply and components for the Cisco ASR 1004 Router Figure 275 Cisco ASR 1004 Router DC Power Supply DC power supply ground symbol 5 DC power su...

Страница 594: ... the chassis SUMMARY STEPS 1 Make certain that the chassis ground is connected before you begin removing the DC power supply 2 Switch the power supply circuit breaker switch to Off O 3 Locate the terminal block on the rear of the chassis on the power supply The following figure shows the DC power supply terminal block 4 Remove the slotted plastic cover from the terminal block 5 Locate the power su...

Страница 595: ...ive terminal 1 Terminal block plastic cover screws 4 Positive terminal 2 a Loosen and remove the two 10 screws from the plastic cover The plastic cover has slots that help to slide it out towards the right b Using a nut driver 7 16 size unscrew the positive kepnut positive cable and the flat washer in that order The terminal block houses two double hole barrel lugs c Follow Step 4b and remove the ...

Страница 596: ... first and disconnected last Warning Step 7 Loosen the captive screws on the DC power supply Four power supplies must be installed in the chassis at all times with a minimum of two power supplies one per zone connected to the mains in order to power on the system and ensure sufficient cooling The system fans are inside the power supply units and must spin for cooling Because all the system fans ca...

Страница 597: ...dure of removing a DC power supply from the Cisco ASR 1004 Router Replacing the DC Power Supply in Cisco ASR 1004 Router The color coding of the DC input power supply leads depends on the color coding of the DC power source at your site Typically green or green yellow is used for ground GND black is used for negative terminal and red is used for the positive terminal Make certain the lead color co...

Страница 598: ...11 Replace the terminal block plastic cover and tighten the screws The plastic cover slides in easily over the terminal block 12 If you taped the circuit breaker then remove the tape from the circuit breaker switch handle and move the circuit breaker handle to the on position 13 Switch the power supply circuit breaker switch to the On position DETAILED STEPS Step 1 Make certain that the chassis gr...

Страница 599: ...Step 11 Replace the terminal block plastic cover and tighten the screws The plastic cover slides in easily over the terminal block Step 12 If you taped the circuit breaker then remove the tape from the circuit breaker switch handle and move the circuit breaker handle to the on position Step 13 Switch the power supply circuit breaker switch to the On position What to Do Next This completes the proc...

Страница 600: ...02 Router AC power supply Figure 277 Cisco ASR 1002 Router AC Power Supply Fan 5 AC power supply ESD socket 1 Captive installation screw 6 AC power supply slot 0 label 2 AC power supply slot 1 label 7 AC power supply On Off O switch 3 AC power inlet 8 AC power supply LEDs 4 Removing the AC Power Supply from Cisco ASR 1002 Router To remove the AC power supply from the Cisco ASR 1002 Router follow t...

Страница 601: ... connected and powered on the system can run only for a maximum of five minutes before shutting down However because the fans and power elements are independent within the power supply the replacement power supply does not have to be energized within five minutes The only requirement is that the power supply be installed in the chassis in order to energize the fans and maintain proper system cooli...

Страница 602: ...dress the AC power cable in one of the following ways 4 Plug the AC power supply cable into the AC power source DETAILED STEPS Step 1 At the rear of the router check that the power switch is in the Off O position Turn the power switch to the On position after both power sides of the power cord are connected Note Step 2 Insert the AC power cable into the AC power inlet and then turn On Step 3 To en...

Страница 603: ...rd and run it below the handles of the power supply in slot 1and the power supply in slot 0 left Make sure the power cord is hanging loosely so that it cannot be disconnected from the AC power inlet see the following figure Figure 279 Cisco ASR 1002 Router AC Power Cord Through AC Power Supply 0 and 1 Cisco ASR 1000 Series Router Hardware Installation Guide 569 Removing and Replacing FRUs from the...

Страница 604: ...power supply from a system that are connected and powered on the system can run only for a maximum of five minutes before shutting down However because the fans and power elements are independent within the power supply the replacement power supply does not have to be energized within five minutes The only requirement is that the power supply be installed in the chassis in order to energize the fa...

Страница 605: ...el 2 Ground GND 8 Power supply switch Standby On 3 Positive lead 9 Power supply LEDs 4 Negative lead 10 Fan 5 Removing the 48 VDC Power Supply from Cisco ASR 1002 Router Before you can remove a 48 VDC power supply from the Cisco ASR 1002 Router you must remove input power going to the power supply Make certain that the chassis ground is connected before you begin removing and installing the power ...

Страница 606: ...ing the power supply handles pull the power supply from the chassis 7 Replace the 48 VDC power supply within five minutes DETAILED STEPS Step 1 Slip on the ESD preventive wrist strap that was included in the accessory kit Step 2 Place the power supply Standby switch in the Standby see the following figure position Figure 282 Cisco ASR 1002 Router 48 VDC Power Supply Terminal Block Ground terminal ...

Страница 607: ... power supply from the chassis Step 7 Replace the 48 VDC power supply within five minutes What to Do Next This completes the procedure of removing a 48 VDC power supply from the Cisco ASR 1002 Router Replacing the 48 VDC Power Supply in Cisco ASR 1002 Router The 48 VDC power supply input connector is a Euro style terminal block Features are provide for strain relieving the input wires from the ter...

Страница 608: ...e 5 Insert the stripped end of the positive lead all the way into the positive lead receptacle and tighten the receptacle screw using the same 3 5mm flat blade screwdriver Repeat this step for the negative lead 6 After tightening the receptacle screw for the ground and leaving the extra service loop in the ground lead use a cable tie to secure the three leads to the power supply faceplate tie wrap...

Страница 609: ...crew using the same 3 5mm flat blade screwdriver Repeat this step for the negative lead Make sure the entire stripped end of each lead is inserted all the way into its receptacle If any exposed wire at the stripped end of a lead is visible after inserting the lead into its receptacle remove the lead from the receptacle use the wire stripper to cut the stripped end of the lead and repeat Step 3 thr...

Страница 610: ...loaded terminal block therefore have the recommended screwdriver size available Review the diagrams to see how the wire is stripped and how the screwdriver is inserted at an angle into the terminal block Have the following equipment available to install and remove the 24 VDC power supply Phoenix Contact 3 5mm flat blade screwdriver or equivalent Wire stripping tool for stripping 8 gauge wire When ...

Страница 611: ...m Cisco ASR 1002 Router Before you can remove a 24 VDC power supply from the Cisco ASR 1002 Router you must remove input power going to the power supply Make certain that the chassis ground lead wire is connected before you begin removing and installing the power supply Caution To remove the 24 VDC power supply from the Cisco ASR 1002 Router follow these steps Cisco ASR 1000 Series Router Hardware...

Страница 612: ...uge wiring you can insert the wire into the terminal block to release the spring tension After inserting the lead wire gently pull on the wire to make certain that the wire is secured Make certain that no wire is exposed and that only wire insulation is seen Tip Step 5 Unscrew the two power supply captive screws Two power supplies must be installed in the chassis at all times with a minimum of one...

Страница 613: ...s shown in xref fig from right to left as they appear on the actual power supply unit The ground GND lead is always installed first and removed last The 24 VDC power supply uses a spring loaded terminal block therefore have the recommended screwdriver size available Review the diagrams to see how the wire is stripped and how the screwdriver is inserted at an angle into the terminal block Have the ...

Страница 614: ...the 24 VDC input power supply matches lead color coding used at the 24 VDC power source Most commonly used wire color coding is red for positive lead and black for negative lead Note When you install the unit the ground connection must always be made first and disconnected last Statement 1046 Warning To connect 24 VDC power supply in the Cisco ASR 1002 Router follow these steps Cisco ASR 1000 Seri...

Страница 615: ...0 for each lead wire The following figure shows the leads wires installed in the terminal block 11 After inserting the ground wire leave an extra service loop in the ground lead to ensure that the ground lead is the last lead to disconnect from the power supply if a great deal of strain is placed on all three leads as shown in the following figure callout 1 12 After tightening the receptacle screw...

Страница 616: ...rewdriver at an angle forward until you relieve the spring contact Step 7 With the screwdriver still inserted gently push the lead wire ground lead first in until there is no copper wire showing as shown in the following figure Check that there is no copper portion of the lead wire exposed Only wire insulation must be visible Caution Do not install wire into the terminal block that has not had its...

Страница 617: ... 1 Step 8 Make certain no copper wire is visible as shown in the following figure which shows the lead wire fully inserted Figure 289 Cisco ASR 1002 Router 24 VDC Power Supply Lead Wire Fully Inserted Fully inserted lead wire 1 Cisco ASR 1000 Series Router Hardware Installation Guide 583 Removing and Replacing FRUs from the Cisco ASR 1000 Series Routers Removing and Replacing a 24 VDC Power Supply...

Страница 618: ...n the lead wire to make certain that the lead wire is securely installed The following figure shows a lead wire fully inserted and the screwdriver removed while you gently pull on the lead to make certain it is secured in the terminal block Figure 290 Removing a Screwdriver from the 24 VDC Power Supply Terminal Block Gently pull on lead wire 1 Cisco ASR 1000 Series Router Hardware Installation Gui...

Страница 619: ...ripped end of a lead is visible after inserting the lead into its receptacle remove the lead from the receptacle use the wire stripper to cut the stripped end of the lead and then reinsert Note When securing the ground positive and negative 24 VDC input leads to the power supply faceplate leave extra service loop in the ground GND lead to ensure that the ground lead is the last lead wire to discon...

Страница 620: ...er tightening the receptacle screw for the ground and leaving the extra service loop in the ground lead use a cable tie to secure the three leads to the power supply faceplate tie wrap tab as shown in xref fig callout 5 Step 13 Turn on the branch source breaker Step 14 Place the power supply standby switch to the On position The power supply LEDs light when power is supplied to the router What to ...

Страница 621: ... 1 To remove the Cisco ASR 1013 Router AC power supply that is not operating normally and then replace the AC power supply within five minutes follow this procedure SUMMARY STEPS 1 Slip on the ESD preventive wrist strap that was included in the accessory kit 2 Before you turn off a power supply make certain the chassis is grounded 3 Turn the power supply standby switch to the Standby position See ...

Страница 622: ...r Inlet and Standby Switch AC power inlet 6 AC power supply fan 1 AC power supply standby switch A standby switch is not considered a disconnect 7 DB 25 alarm connector 2 Protective sides around the standby switch 8 Cable tie wrap tabs 3 AC power supply LEDs 9 AC power supply captive screws 4 AC power supply handle 5 Cisco ASR 1000 Series Router Hardware Installation Guide 588 Removing and Replaci...

Страница 623: ...emove a power supply the system can run for a maximum of five minutes before the system shuts down The fans and power elements are independent within the power supply Therefore it is not required that the replacement power supply be energized within five minutes The only requirement is that the power supply be installed in the chassis which energizes the fans and maintains proper system cooling Ca...

Страница 624: ...n the Cisco ASR 1013 Router Removing and Replacing a DC Power Supply in Cisco ASR 1013 Router This section provides information about removing and installing a DC power supply in the Cisco ASR 1013 Router When you install the unit the ground connection must always be made first and disconnected last Statement 1046 Warning Before performing any of the following procedures ensure that power is remov...

Страница 625: ... plastic cover slot tab 11 Ground symbol 5 Power supply LEDs 12 DC power supply ground studs 6 For information about the DB 25 alarm connector how it works and Cisco ASR 1000 route processor LEDs see the xref section Note Shielded cables must be used to connect to the DB 25 alarm connector on both the AC and DC power supplies in order to comply with FCC EN55022 CISPR22 Class A emissions requiremen...

Страница 626: ...k on the rear of the chassis on the power supply 5 Remove the slotted plastic cover from the terminal block see xref fig 6 Loosen the four captive screws on the DC power supply 7 Grasping the power supply handles pull the power supply from the chassis 8 Replace the DC power supply within five minutes DETAILED STEPS Step 1 Before servicing the power supply switch the circuit breaker Off in your equ...

Страница 627: ...over from the terminal block see xref fig a Loosen and remove the single screw on the plastic cover The plastic cover has slots that help to slide it out diagonally from the terminal block b Using a nut driver 7 16 size unsrew the positive kepnut positive cable and the flat washer in that order The terminal block houses two double hole barrel lugs Cisco ASR 1000 Series Router Hardware Installation...

Страница 628: ...ond power supply unit does not have to be powered on but must be connected Note If you remove a power supply from a system that has four power supplies that are connected and powered on the system can run only for a maximum of five minutes before shutting down However because the fans and power elements are independent within the power supply the replacement power supply does not have to be energi...

Страница 629: ...d to the DC power supply system that you are working on 6 Remove the plastic cover from the terminal block if it is still on 7 You must wrap the positive and negative power cables with sleeving Take each wire and cover the area from the lug to the wire with heavy shrink sleeving as pointed out in callout 3 see xref fig 8 For easier cable management insert the positive cable first Replace the groun...

Страница 630: ...ach the other end of the ground cable to the site ground associated to the DC power supply system that you are working on Step 6 Remove the plastic cover from the terminal block if it is still on Before you continue to install the terminal block ground wires stop and perform Step 7 This is to prevent any contact between the metal power lugs and plastic cover Caution Step 7 You must wrap the positi...

Страница 631: ...round screw in the terminal block to a torque of 20 2 in lbs 2 per and repeat the same steps for the negative wires Secure the wires coming in from the terminal block so that they cannot be disturbed by casual contact Note Step 10 Use tie wraps to secure the wires so that the wires are not pulled from the terminal block by casual contact Ti wrap studs are located below the power supply terminal bl...

Страница 632: ...ff switch if there was any Step 13 Switch the circuit breaker On Off switch to the On position What to Do Next The requirement for maximum torque applied to the power or ground Kepnuts must be 8 in lb when the power or ground lug is not present Note This completes the procedure for installing the DC power supply into the Cisco ASR 1013 Router Removing and Replacing the Cisco ASR 1001 Router Power ...

Страница 633: ...er supply inlet 2 AC and DC power supply handles 7 DC power supply negative connection 3 DC power supply positive connection 4 This section contains the following topics The covers are an integral part of the safety design of the product Do not operate the unit without the covers installed Statement 1077 Warning When you install the unit the ground connection must always be made first and disconne...

Страница 634: ...sco ASR 1001 Router follow these steps SUMMARY STEPS 1 There are two power supplies installed At the rear of the chassis check whether the power switch on the chassis is in the Standby position 2 Turn off the circuit breaker to the power supply 3 For easier installation plug the power cable into the inlet on power supply slot 1 first 4 Insert the power supply cable into the power supply in slot 0 ...

Страница 635: ...hassis Warning The following figure shows the Cisco ASR 1001 Router AC power supply standby switch Figure 301 Cisco ASR 1001 Router AC Power Supply Standby Switch Cisco ASR 1001 Router AC power supply Standby switch This switch does not disconnect power from the power source 1 Cisco ASR 1000 Series Router Hardware Installation Guide 601 Removing and Replacing FRUs from the Cisco ASR 1000 Series Ro...

Страница 636: ...supply cables into the AC power source Step 7 Turn on the AC breaker Step 8 Turn the Standby switch to On on the chassis Step 9 The power supply LEDs illuminate green What to Do Next This completes the procedure for connecting AC input power Removing AC Power Supply from the Cisco ASR 1001 Router This section describes how to remove an AC power supply from the Cisco ASR 1001 Router The Cisco ASR 1...

Страница 637: ... PS0 DETAILED STEPS Step 1 On the rear of the router turn the power switch to the Standby position Step 2 Unplug the power cable from the power source Step 3 You must remover the top cover from the chassis before you remove any power supply Step 4 To remove the power cord from PS1 you must position the power supply cable in order to access the power supply fasteners Hold back the power supply cabl...

Страница 638: ...ompletes the procedure for removing an AC power supply from the Cisco ASR 1001 Router Installing DC Power Supply into Cisco ASR 1001 Router The Cisco ASR 1001 Router DC input connector is compatible with a pluggable Euro style plug The input connector and plug must be UL recognized under UL 486 for field wiring The connection polarity shall be from left to right negative positive and ground Cisco ...

Страница 639: ...leads and input power leads to the Cisco ASR 1001 Router DC input power supply Before you begin read these important notices The color coding of the DC input power supply leads depends on the color coding of the DC power source at your site Typically green or green yellow is used for ground GND black is used for 48 V on negative terminal and red is used for RTN on the positive terminal Make certai...

Страница 640: ...e a DC power supply from the Cisco ASR 1001 Router Follow these steps SUMMARY STEPS 1 Turn off the circuit breaker 2 On the rear of the chassis place the Standby switch in the Standby position 3 Pull the terminal block plug connector out of the terminal block head in the power supply 4 Unscrew the two power supply fasteners on the unit 5 Grasping the power supply handle with one hand pull the powe...

Страница 641: ... certain the lead color coding you choose for the DC input power supply matches lead color coding used at the DC power source Note When installing or replacing the unit the ground connection must always be made first and disconnected last Statement 1046 Warning This product relies on the building s installation for short circuit overcurrent protection Ensure that the protective device is rated not...

Страница 642: ...emaining two DC input power source wires the positive lead wire and the negative lead wire see the following figure 10 Use a tie wrap to secure the wires to the rack so that the wires are not pulled from the terminal block plug by casual contact Make sure the tie wrap allows for some slack in the ground wire as shown in the following figure 11 Make certain the terminal block plug is fully seated i...

Страница 643: ...ource can conduct harmful levels of electricity Be sure that no exposed portion of the DC input power source wire extends from the terminal block plug Statement 122 Warning Step 6 Identify the positive negative and ground feed positions for the terminal block connection The recommended wiring sequence is a Ground lead wire right b Positive lead wire middle c Negative lead wire left The following f...

Страница 644: ... Nm 5 310 lbf in Caution Step 8 Use a ratcheting torque screwdriver to torque the terminal block plug captive screw above the installed wire lead to from 0 5 Nm 4 425 lbf in to 0 6 Nm 5 310 lbf in as shown in the following figure Figure 309 Torquing the DC Power Supply Terminal Block Plug Screws Torque is from 0 5 Nm 4 425 lbf in to 0 6 Nm 5 310 lbf in 1 Cisco ASR 1000 Series Router Hardware Insta...

Страница 645: ...n from the terminal block plug so that they cannot be disturbed by casual contact Caution Step 10 Use a tie wrap to secure the wires to the rack so that the wires are not pulled from the terminal block plug by casual contact Make sure the tie wrap allows for some slack in the ground wire as shown in the following figure Figure 311 Complete DC Terminal Block Plug Insertion and Secure Tie Wrap Cisco...

Страница 646: ... shipment Before you return the router or move the router to a different location follow these instructions to repack the system using the original packaging material SUMMARY STEPS 1 Place the bottom packing material section inside the bottom of the shipping container 2 Use at least two people to place the Cisco ASR 1000 Series Router inside the container Be sure that the chassis is positioned cor...

Страница 647: ...e the cutouts in the top section of the packing material Step 5 Fold the outside carton down over the top of the accessory boxes and seal with packing tape Step 6 Wrap two packaging straps tightly around the top and bottom of the package to hold the outside carton and the bottom pallet Do not use tape to hold the outside carton to the bottom pallet Packaging straps must be used Caution What to Do ...

Страница 648: ...Cisco ASR 1000 Series Router Hardware Installation Guide 614 Removing and Replacing FRUs from the Cisco ASR 1000 Series Routers Repacking the Router ...

Страница 649: ... ASR 1002 X Router Specifications page 625 Cisco ASR 1013 Router Specifications page 630 Cisco ASR 1001 Router Specifications page 635 Cisco ASR 1001 HX and Cisco ASR 1002 HX Router Specifications For information about specifications for Cisco ASR 1001 HX and Cisco ASR 1002 HX Router see Cisco ASR 1001 HX Router and Cisco ASR 1002 HX Router Hardware Installation Guide Cisco ASR 1006X and Cisco ASR...

Страница 650: ...the Cisco ASR1000 ESP40 adds 2 1 lbs to the total weight of the router Note Weight 41 to 104 F 5 to 40 C Nominal operating temperature 10 to 85 Nominal operating humidity 38 to 150 F 40 to 70 C Storage temperature Maximum DC 1700W Maximum AC 1600W Maximum Out 1275W Power consumption Cisco ASR 1006 Router Memory and Storage Options The following table lists the hardware memory and storage options s...

Страница 651: ...gory 5 UTP cables with RJ 45 connectors Cisco does not supply Category 5 UTP cables these cables are available commercially The following figure shows an RJ 45 port and connector Figure 312 RJ 45 Port and Connector for Cisco ASR 1006 Router RJ 45 connector 1 Cisco ASR 1006 Router MGMT Ethernet Port Pinouts The following table lists the RJ 45 port pinout for the front panel Management Ethernet port...

Страница 652: ...le lists the pinouts of the Building Integrated Timing Supply BITS and the DOCSIS Timing Interface DTI RJ45 port on the Cisco ASR1000 RP2 front panel Table 99 BITS RJ 45 Receptacle Pinouts for Cisco ASR1000 RP2 Description Direction Signal Pin Receive Ring Bidirectional DTI Input Bi DTI RX Ring 1 Receive TIP T1 E1 Bidirectional DTI Input Bi DTI RX TIP 2 N C 3 4 Transmit Ring Bidirectional DTI Outp...

Страница 653: ...RXD 6 Data Terminal Ready In DSR 7 Clear to Send tied to pin 1 RTS In CTS 8 Cisco ASR 1006 Router Auxiliary Port Signals and Pinouts The following table lists the pinouts of the dual RJ 45 ports for the auxiliary port signals Table 101 Auxiliary Port Pinouts for Cisco ASR 1006 Router Description Direction Signal Pin Request to Send Out RTS 1 Data Terminal Ready always On Out DTR 2 Transmit Data Ou...

Страница 654: ...onnector each alarm consists of a three pin set containing a common pin a normally open pin and a normally closed pin The connections that describe alarm activity are Alarm off Common is connected to normally closed and normally open is disconnected and Alarm on Common is connected to normally open and normally closed is disconnected The following table lists the common normally open and normally ...

Страница 655: ... supplies together in the system Midplane Height 7 in 17 8 cm 4RU rack mount per EIA RS 310 Width 17 25 in 43 815 cm 19 inch rack mount or optional 23 Telco rack mount Depth 22 50 in 57 15 cm including card handles cable management brackets and power supply handles Dimensions H x W x D Fully loaded chassis 50 pounds 22 6796 kg Only chassis 18 pounds 8 16 kg Weight 41 to 104 F 5 to 40 C Nominal ope...

Страница 656: ...pliant with 10BASET 100BASETX and 1000BASET specifications The RJ 45 port supports standard straight through and crossover Category 5 UTP cables with RJ 45 connectors Cisco does not supply Category 5 UTP cables these cables are available commercially See xref Figure A 1 to see an RJ 45 port and connector Cisco ASR 1004 Router MGMT Ethernet Port Signals and Pinouts The following table lists the RJ ...

Страница 657: ... 6 Unused Input DSR 7 Clear to Send tied to RTS Input CTS 8 Cisco ASR 1004 Router Auxiliary Port Signals and Pinouts The following table lists the pinouts of the dual RJ 45 ports for the auxiliary port signals Table 107 Auxiliary Port Pinouts for Cisco ASR 1004 Router Description Direction Signal Pin Request to Send Output RTS 1 Data Terminal Ready always On Output DTR 2 Transmit Data Output TXD 3...

Страница 658: ...Pinout Assignments for Alarm Relays The following table lists the common normally open and normally closed relay contacts accessible to an external alarm monitoring facility by means of the DB 25 connector For more information about the DB 25 alarm connector see Cisco ASR 1006 Router DB 25 Pinout Assignments for Alarm Relays on page 620 Table 109 Cisco ASR 1004 Router DB 25 Alarm Connector Pinout ...

Страница 659: ... on the Cisco ASR 1002 F Router Similarly most of the specifications for the Cisco ASR 1002 X Router are the same as the specifications for the Cisco ASR 1002 Router The differences in specifications have been called out at the relevant places in this section Some of the Cisco ASR 1002 X Router specifications that are covered in this section are for ports that are specific to that router Note The ...

Страница 660: ...J 45 Port Pinouts Unless stated otherwise the specifications for the Cisco ASR 1002 X Router are the same as the Cisco ASR 1002 Router specifications listed in this section Note The Cisco ASR 1002 Router has RJ 45 port for the 10 100 1000 Ethernet connections The RJ 45 port supports IEEE 802 3ab Gigabit Ethernet and IEEE 802 3u Fast Ethernet interfaces compliant with 10BASET 100BASETX and 1000BASE...

Страница 661: ...002 Router specifications listed in this section Note The following table lists the pinout of the dual RJ 45 ports for the front panel console port Table 112 Console Port Pinouts for Cisco ASR 1002 Router Description Direction Signal Pin Request to Send tied to CTS Output RTS 1 Data Terminal Ready always On Output DTR 2 Transmit Data Output TXD 3 Ring Indicator GND 4 GND 5 Receive Data Input RXD 6...

Страница 662: ...it Data Output TXD 3 Ring Indicator RI 4 GND 5 Receive Data Input RXD 6 Data Set Ready Data Carrier Detect Input DSR DCD 7 Clear to Send Input CTS 8 Cisco ASR 1002 Router BITS Port Signals and Pinouts The following table lists the pinout of the front panel Building Integrated Timing Supply BITS RJ45 port Table 114 BITS RJ 45 Interface Pinouts for Cisco ASR 1002 Router Description Direction Signal ...

Страница 663: ...tput TX TIP 6 N C 7 8 Cisco ASR 1002 X Router BNC GPS Ports The following table describes the BNC GPS ports on the Cisco ASR 1002 X Table 116 GPS Port Pinout 1PPS input and output 10 Mhz input and output Signal Attribute Input Pulse shape Output Pulse shape Input Sine wave Output Square wave Waveform Input 2 4 volts TTL compatible Output 2 4 volts TTL compatible Input 1 7 volt p p 8 to 10 dBm Outp...

Страница 664: ...o not use this pin Input RESERVED 6 Time of Day character Output or Input TOD_P 7 Time of Day character Output or Input TOD_N 8 Cisco ASR 1013 Router Specifications This section lists the specifications for the Cisco ASR 1013 Router The following table lists the Cisco ASR 1013 Router physical specifications Table 118 Cisco ASR 1013 Router Specifications Specification Description Connects Cisco ASR...

Страница 665: ...g Using the Cisco ASR1000 ESP100 instead of the Cisco ASR1000 ESP40 adds 2 1 lbs to the total weight of the router Note Weight 5 to 40 C Nominal operating temperature 10 to 85 Nominal operating humidity 38 to 150 F 40 to 70 C Storage temperature Maximum input DC 4 200W Maximum input AC High Line 4 000 W Maximum output DC and AC High Line 3 390 W Power consumption 2x Zones Maximum input DC 2100W Ma...

Страница 666: ...igabit Ethernet and IEEE 802 3u Fast Ethernet interfaces compliant with 10BASET 100BASETX and 1000BASET specifications The RJ 45 port supports standard straight through and crossover Category 5 UTP cables with RJ 45 connectors Cisco does not supply Category 5 UTP cables these cables are available commercially Cisco ASR 1013 Router MGMT Ethernet Port Signals and Pinouts The following table lists th...

Страница 667: ...used Input DSR 7 Clear to Send tied to RTS Input CTS 8 Cisco ASR 1013 Router Auxiliary Port Signals and Pinouts The following table lists the pinouts of the dual RJ 45 ports for the auxiliary port signals Table 122 Auxiliary Port Pinouts for Cisco ASR 1013 Router Description Direction Signal Pin Request to Send Output RTS 1 Data Terminal Ready always On Output DTR 2 Transmit Data Output TXD 3 Ring...

Страница 668: ...ut Assignments for Alarm Relays The following table lists the common normally open and normally closed relay contacts accessible to an external alarm monitoring facility by means of the DB 25 connector For more information about the DB 25 alarm connector see xref c_Cisco_ASR_1006_Router_DB 25_Pinout_Assignments_for_Alarm_Relays_1018881 xml Table 124 Cisco ASR 1013 Router DB 25 Alarm Connector Pino...

Страница 669: ...The Cisco ASR 1001 Router has the route processor embedded services processor and SIP integrated in the chassis Note Table 125 Cisco ASR 1001 Router Specifications Specification Description Height 1 71 in 43 43 mm Width 17 3 in 439 42 mm Depth 22 50 in 571 5 mm including card handles cable management brackets and power supply handles Dimensions H x W x D 23 30 lb 10 6 kg with dual AC power and int...

Страница 670: ...able 126 Memory and Storage Options for Cisco ASR 1001 Router Maximum System Support Default Memory Type 1 GB DRAM maximum 1 GB DRAM default ESP 16 GB DRAM maximum Cisco ASR 1001 Route Processor comes with 4 GB DRAM default Cisco ASR 1001 offers 8 GB Embedded USB memory EUSB support partitioned two 32 MB for nonvolatile RAM NVRAM and the rest for mass storage Route Processor 1 GB USB flash memory ...

Страница 671: ...t Specifications page 642 Cisco ASR1000 ESP200 Console Port Pinout Specifications page 643 Cisco ASR 1000 RP1 Pinout Specifications The following tables list the pinouts for the ports on the Cisco ASR1000 RP1 MGMT Ethernet Port Signals and Pinouts The following table lists the Management Ethernet 10 100 RJ 45 port pinouts Table 127 RJ 45 Management Ethernet Port Pinouts Description Direction Signa...

Страница 672: ...5 Unused TX TIP 6 N C 7 8 Console Port Signals and Pinouts The following table lists the pinouts of the dual RJ 45 ports for the front panel console port Table 129 Console Port Pinouts for Cisco ASR1000 RP1 Description Direction Signal Pin Request to Send tied to pin 8 CTS Output RTS 1 Data Terminal Ready always On Output DTR 2 Transmit Data Output TXD 3 Ring Indicator GND 4 GND 5 Cisco ASR 1000 S...

Страница 673: ...Transmit Data Output TXD 3 Ring Indicator RI 4 GND 5 Receive Data Input RXD 6 Data Set Ready Data Carrier Detect Input DSR DCD 7 Clear to Send Input CTS 8 Cisco ASR1000 RP2 Pinout Specifications The following tables list the pinouts for the ports on the Cisco ASR1000 RP2 MGMT Ethernet Port Pinouts The following table lists the RJ 45 port pinouts for the front panel Management Ethernet 10 100 1000 ...

Страница 674: ...ts The following table lists the pinouts of the front panel BITS DTI RJ45 port Table 132 BITS DTI RJ 45 Receptacle Pinouts for Cisco ASR1000 RP2 Description Direction Signal Pin Receive Ring Bidirectional DTI Input Bi DTI RX Ring 1 Receive TIP T1 E1 Bidirectional DTI Input Bi DTI RX TIP 2 N C 3 4 Transmit Ring unused for DTI Output TX Ring 5 Transmit TIP unused for DTI Output TX TIP 6 N C 7 8 Cisc...

Страница 675: ...Data Carrier detect Input DSR DCD 7 Clear to Send Input CTS 8 Auxiliary Port Signals and Pinouts The following table lists the pinouts of the dual RJ 45 ports for the auxiliary port signals Table 134 Auxiliary Port Pinouts Description Direction Signal Pin Request to Send Out RTS 1 Data Terminal Ready Always On Out DTR 2 Transmit Data Out TXD 3 Ring Indicator RI 4 GND 5 Receive Data In RXD 6 Cisco ...

Страница 676: ... DSR 2 Receive Data In RXD 3 Request to send tied to CTS In RTS 4 Transmit data Out TXD 5 Clear to Send tied to RTS Out CTS 6 Data Terminal Ready Always On Out DTR 7 Not Connected 8 Ground Ground GND 9 Cisco ASR1000 ESP100 Console Port Pinout Specifications Cisco ASR1000 ESP100 provides a debug console on an 8 pin header The following table lists the console port pinouts for Cisco ASR1000 ESP100 C...

Страница 677: ... an 8 pin header The following table lists the console port pinouts for Cisco ASR1000 ESP200 Table 137 Console Port Pinout for Cisco ASR1000 ESP200 Description Direction Signal Pin Request to send tied to CTS IN RTS 1 Unused OUT DTR 2 Transmit data OUT TXD 3 Ground Ground GND 4 Ground Ground GND 5 Receive data IN RXD 6 Unused IN DSR 7 Clear to send tied to RTS OUT CTS 8 Cisco ASR 1000 Series Route...

Страница 678: ...ASR 1000 Series Router Hardware Installation Guide 644 Cisco ASR 1000 Series Router Route Processor and Embedded Services Processor Signals and Pinouts Cisco ASR1000 ESP200 Console Port Pinout Specifications ...

Страница 679: ...is chapter For operations and maintenance information such as checking the LEDs checking status using show commands what to do when installation is not successful that is specific to the Cisco ASR 1000 Series Aggregation Services Routers see Cisco ASR 1000 Series Aggregation Services Routers Operations and Maintenance Guide Note Troubleshooting Overview page 645 Online Troubleshooting Resources pa...

Страница 680: ...Error Message Decoder Tool and Output Interpreter Tool after logging in at http www cisco com en US support tsd_most_requested_tools html General Troubleshooting Tips The following table lists general troubleshooting tips You must always have two power supplies installed on the Cisco ASR 1000 Series Routers to ensure sufficient cooling for the box The system fans are inside the power supply and mu...

Страница 681: ...ave onboard processors The RP downloads software to each board in the system over the Ethernet Out of Band Channel EOBC There is a status LED on each board RP ESP SIP that indicates the progress of loading software Note that on routers such as the Cisco ASR 1001 Router and the Cisco ASR 1002 X Router that have an integrated route processor embedded services processor and SIP there is a single stat...

Страница 682: ...ring the entire boot process and then turns green when the software has completely booted System has failed to boot System begins power on Turn the router power switch to the standby position and reseat the AC power cable at the system or at the wall outlet power source AC power cable not fully seated at system or at the wall outlet power source System does not power on Turn the router power switc...

Страница 683: ...power also turn the circuit breaker to the Off position and tape it to that position remove the cable and replace it Faulty power cable If the system still fails to come up when the power supply is connected to a different power source with a new power cable the power supply is probably faulty Contact a service representative Faulty power supply If the system is operating with only one power suppl...

Страница 684: ...pply from a system that has four power supplies that are connected and powered on the system can run only for a maximum of five minutes before shutting down However because the fans and power elements are independent within the power supply the replacement power supply does not have to be energized within five minutes The only requirement is that the power supply be installed in the chassis in ord...

Страница 685: ...uters inlet vents Contact a service representative The error message could indicate a faulty component or temperature sensor Before the system shuts down use the show env all command to display the internal chassis environment System shuts down and the following error message is displayed Queued messages ENVM 1 SHUTDOWN Environmental Monitor initiated shutdown This error message indicates that the...

Страница 686: ...ips to resolve troubleshooting errors that you may encounter during an upgrade Table 142 Upgrade Related Troubleshooting Tips Corrective Action Cause Symptom Ensure that the size of the image file that you are using is the same as the expected file size If required download the image file again and retry the upgrade There is a mismatch in the size of the image file that you are using and the expec...

Страница 687: ...oot the system and then the router switches to the rommon prompt Directory an_image bin not found Unable to locate an_image bin directory Unable to load an_image bin boot error executing boot harddisk an_image bin autoboot boot failed restarting Cisco ASR 1000 Series Router Hardware Installation Guide 653 Troubleshooting Initial Startup Problems Troubleshooting the Upgrade ...

Страница 688: ...xample rommon B O O T h a r d d i s k a s r 1 0 0 0 r p 1 i p b a s e k 9 0 3 0 5 0 1 S 1 5 2 1 S 1 b i n 1 To save the current environment variable setting run the sync command as follows rommon sync 1 Ensure that autoboot has been enabled by using the confreg 0x2102 command at the rommon prompt and then run the reset command at the same prompt If there is no valid image in either the local file ...

Страница 689: ...milar to the following example boot system b o o t f l a s h a s r 1 0 0 0 r p 1 i p b a s e k 9 0 3 0 5 0 1 S 1 5 2 1 S 1 b i n Autoboot has been enabled by using the config register 0x2102 command The following error message is displayed when the router restarts automatically no valid BOOT image found Final autoboot attempt from default boot device Located l2tp_rmcd_alg Image size 10271 inode nu...

Страница 690: ...ost Note that this is not observed when a power failure occurs because each active power supply in the two power supply zones is power cycled at the same time during a power failure If there is a chance that the router might be power cycled without a graceful reload we recommend that you use the boot config file system configuration file nvbypass command to specify a file system other than the NVR...

Страница 691: ...Enter no in response to the System Configuration Dialog prompts until the following message is displayed 10 Press Return The user EXEC prompt is displayed as follows 11 Enter the enable command to enter privileged EXEC mode Then enter the show startup config command to display the passwords in the configuration file as follows 12 Scan the configuration file display looking for the passwords the en...

Страница 692: ...s Example rommon1 confreg Step 7 Answer yes to the enable ignore system config info question and note the current configuration register settings Step 8 Initialize the router by entering the reset command as follows Example rommon2 reset The router initializes the configuration register is set to 0x142 and the router boots the system image from flash memory and enters the System Configuration Dial...

Страница 693: ...idual passwords by using the no form of the above commands For example entering the no enable secret command removes the enable secret password Step 16 You must configure all interfaces to be not administratively shut down as follows Hostname config interface gigabitethernet 0 0 Hostname config int no shutdown Enter the equivalent commands for all interfaces that were originally configured If you ...

Страница 694: ... RP 2 Reset both RPs to the ROMmon prompt See the xref t_Details_of_the_Password_Recovery_Procedure_1043916 xml for information about the procedure Do not reboot the standby RP at this point Leave it at the ROMmon prompt 1 Perform the password recovery procedure on the active RP See the xref t_Details_of_the_Password_Recovery_Procedure_1043916 xml for information about the procedure 2 After the ru...

Страница 695: ...uter with IDC HD80G CISCO ENTITY ALARM MIB CISCO ENTITY FRU CONTROL MIB CISCO ENTITY SENSOR MIB CISCO ENTITY VENDORTYPE OID MIB ENTITY MIB ENTITY SENSOR MIB ENTITY STATE MIB MIBs for the Cisco ASR 1001 Router with IDC OC3POS CISCO ENTITY ALARM MIB CISCO ENTITY FRU CONTROL MIB CISCO ENTITY SENSOR MIB CISCO ENTITY VENDORTYPE OID MIB CISCO IF EXTENSION MIB CISCO SONET MIB ENTITY MIB ENTITY SENSOR MIB...

Страница 696: ...uter with IDC CHT1 E1 CISCO ENTITY ALARM MIB CISCO ENTITY FRU CONTROL MIB CISCO ENTITY SENSOR MIB CISCO ENTITY VENDORTYPE OID MIB CISCO IF EXTENSION MIB DS1 MIB RFC 2495 ENTITY MIB ENTITY SENSOR MIB ENTITY STATE MIB IF MIB MIBs for the Cisco ASR 1001 Router with IDC 4XT3 CISCO ENTITY ALARM MIB CISCO ENTITY FRU CONTROL MIB CISCO ENTITY SENSOR MIB CISCO ENTITY VENDORTYPE OID MIB CISCO IF EXTENSION M...

Страница 697: ...R 1001 without IDCs CISCO ENTITY ALARM MIB CISCO ENTITY FRU CONTROL MIB CISCO ENTITY SENSOR MIB CISCO ENTITY VENDORTYPE OID MIB ENTITY MIB ENTITY SENSOR MIB Cisco ASR 1000 Series Router Hardware Installation Guide 663 MIBs Overview MIBs for the Cisco ASR 1001 Router ...

Страница 698: ...Cisco ASR 1000 Series Router Hardware Installation Guide 664 MIBs Overview MIBs for the Cisco ASR 1001 Router ...

Страница 699: ... 372 425 cables 163 176 205 215 252 272 305 314 362 391 402 440 442 615 617 618 622 624 626 628 629 632 634 637 638 639 640 RJ 45 pinout 617 618 622 624 626 628 629 632 634 637 638 639 640 connecting port adapter 163 205 252 305 391 440 crossover 176 215 272 314 362 402 442 specifications 615 chassis 11 115 123 129 130 145 148 153 156 161 186 187 190 195 199 201 234 235 238 243 245 249 287 288 291...

Страница 700: ...1 577 592 removing 545 560 571 577 592 dimensions and weight of ASR1002 chassis 234 331 425 dimensions and weight of ASR1004 chassis 186 dimensions and weight of ASR1006 chassis 143 372 dimensions of router 615 621 625 630 635 E electrical wiring requirements 123 electromagnetic interference shielding 130 electromagnetic pulse 125 See EMP 125 Embedded USB memory 519 EMI 115 EMI shielding 130 EMP a...

Страница 701: ...63 205 252 305 391 440 troubleshooting 651 port pinouts Gigabit Ethernet RJ 45 617 622 626 632 ports Gigabit Ethernet 84 140 142 182 185 220 276 319 367 371 446 600 power 113 125 165 208 306 393 connections 165 208 306 393 cord 113 surge suppression 125 power distribution unit 169 397 power subsystem for troubleshooting 648 power supply 11 disabled 11 shutdown 11 power supply zone 394 Power Zone 0...

Страница 702: ...627 628 629 630 632 633 634 635 636 638 639 641 console port 619 622 623 624 627 628 629 632 633 634 638 639 641 dimensions 615 621 625 630 635 Gigabit Ethernet RJ 45 port pinouts 617 622 626 632 processor and memory 616 622 632 636 startup system 463 STATUS LED 37 43 94 224 321 422 subsystems for troubleshooting power 648 superslot 371 supported platforms 28 system management functions 3 T temper...

Отзывы: