background image

Installing and Upgrading the CSC-C2FCIT FDDI Card and Appliques  9

Installation Prerequisites

Connect the equipment end of the strap to an unpainted surface of the chassis frame or another
proper grounding point or surface. We recommend that you attach it to the inside bottom of the
chassis, or to the rear panel (inside or outside), without making contact with any connectors or
appliques.

Avoid contact between equipment and clothing. The wrist strap only protects the equipment from
ESD voltages on the body; ESD voltages on clothing can still cause damage.

Handle printed circuit cards and appliques by the edges only; avoid touching the components,
traces, or any connector pins.

Place a removed card component-side-up on an antistatic surface or in a static shielding bag. If
the component will be returned to the factory, immediately place it in a static shielding bag.

Do not remove the wrist strap until the installation is complete.

Caution

 For safety, periodically check the resistance value of the antistatic strap. The

measurement should be between 1 and 10 mega ohms.

Slot Priority

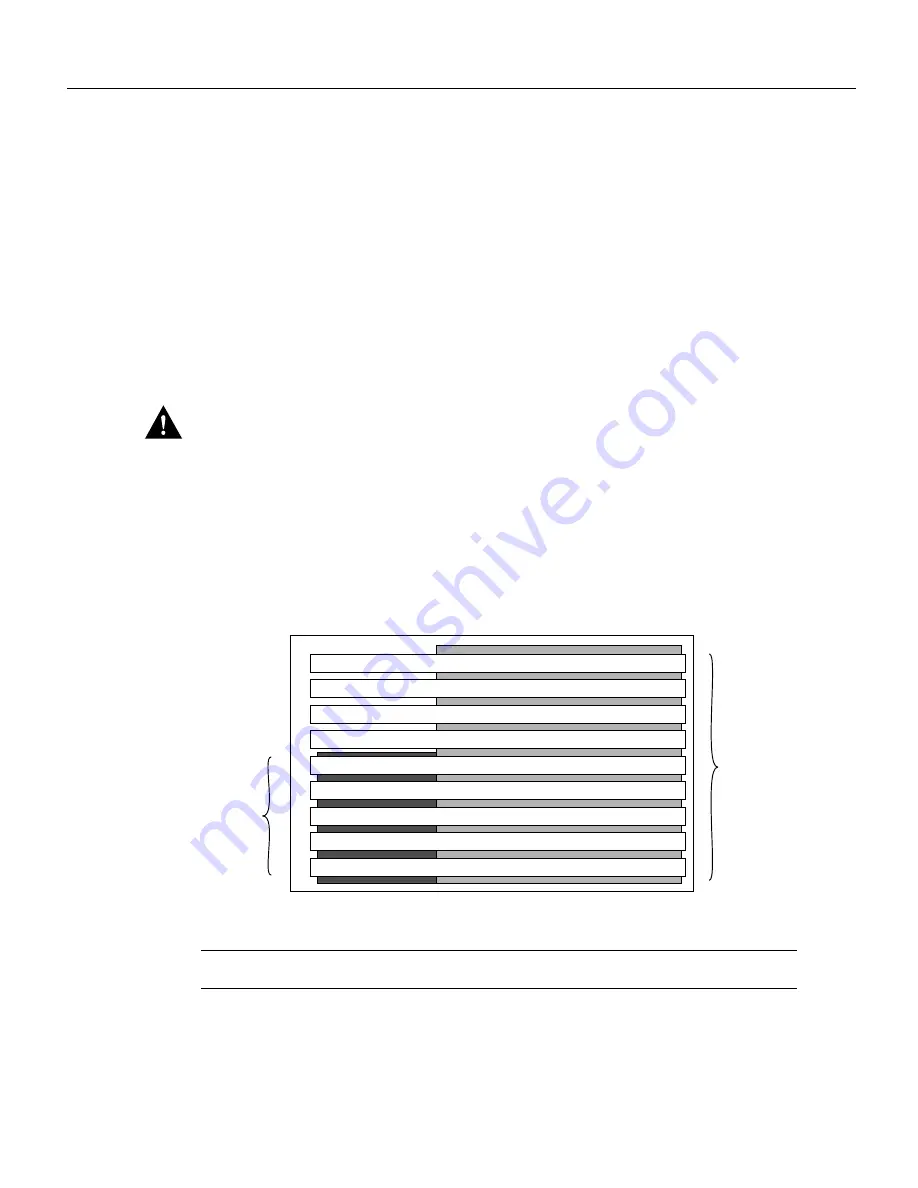
The AGS+ card cage, shown in Figure 8, has nine slots, five of which are designated ciscoBus slots.
The center ciscoBus slot is reserved for the ciscoBus card, leaving four ciscoBus slots available for
ciscoBus interface cards.

Figure 8

AGS+ Card Cage and Backplanes—Front View

Note

The ciscoBus currently supports a maximum of four C2FCIT cards.

The AGS+ uses a slot priority scheme that assigns a priority to each ciscoBus card according to the
ciscoBus slot in which the card resides. The card in ciscoBus slot 0 receives the highest ciscoBus
priority, while the card in ciscoBus slot 3 receives the lowest ciscoBus priority.

Environmental monitor card

Processor card

Multibus interface card

Multibus interface card

Multibus or ciscoBus interface card 

Multibus or ciscoBus interface card 

Multibus interface or ciscoBus controller card

Multibus or ciscoBus interface card 

Multibus or ciscoBus interface card 

ciscoBus 

slots  

1

2

3

4

5

6

7

8

9

Multibus

slots

2

0

1

3

H2675

Содержание APP-LMM

Страница 1: ... which provide single mode and or multimode network interfaces The C2FCIT card operates with the second generation ciscoBus card CSC CCTL2 This publication also includes instructions for upgrading the C2FCIT microcode when required The sections following are included in this publication FDDI Module Overview page 2 Installation Prerequisites page 7 Installing Cards and Appliques page 14 Testing the...

Страница 2: ...cards must have Microcode Version 10 0 or later The C2FCIT card must be installed in an AGS router that is running Software Release 9 1 or later and that contains a CSC 3 or CSC 4 processor card The router must also contain a ciscoBus2 CSC CCTL2 card which is indicated by C2 in the product number C2FCIT cards can be installed in any of the four available ciscoBus slots in the system card cage A ma...

Страница 3: ...mbination of single mode and or multimode FDDI interfaces Following are the four FDDI applique mode combinations PHY A multimode PHY B multimode APP LMM Figure 2 PHY A multimode PHY B single mode APP LMS Figure 3 PHY A single mode PHY B multimode APP LSM Figure 4 PHY A single mode PHY B single mode APP LSS Figure 5 Both the single mode and multimode transceivers provide a Class A dual attachment i...

Страница 4: ... also accept alternate cable sizes such as 50 85 or 100 micron multimode fiber Use care when using alternate fiber sizes to avoid violating optical power budget restrictions The multimode multimode applique also provides a DIN port for connecting an optional optical bypass switch which allows the light signal to pass directly from the receive port to the transmit port When this optical bypass is u...

Страница 5: ...Mode Multimode APP LSM ENDEC EDS ENDEC EDS PHY B LEDs H1183a D A B C Cables to FDDI controller card A B TX RX Faceplate Component side view PHY A X M T B R C V B C H A N A P4 P3 P2 P1 ENDEC EDS ENDEC EDS TX PHY B LEDs H1184a D A B C Cables to FDDI controller card A B RX Faceplate Component side view P4 P3 P2 P1 X M T A R C V A C H A N B PHY A ...

Страница 6: ...lications with the APP LSS APP LSM and APP LMS FDDI appliques Figure 6 Single Mode FDDI Network and Chassis Connector Warning Invisible laser radiation may be emitted from the aperture ports of the single mode FDDI products when no fiber cable is connected Avoid exposure and do not stare into open apertures This product meets the Class 1 Laser Emission Requirement from CDRH FDDI ENDEC EDS ENDEC ED...

Страница 7: ...rcuit always check Do not work alone when a potentially hazardous condition exists Do not perform any action that creates a potential hazard to people or makes the equipment unsafe Carefully examine your work area for possible hazards such as moist floors ungrounded wiring or power cables and missing safety grounds In addition use the guidelines that follow when working with any equipment that is ...

Страница 8: ...icrocode versions Your site must have the appropriate network interface wiring with which you will connect the router to your FDDI ring s To operate with the CCTL2 card all other ciscoBus cards in the AGS must have Microcode Version 10 0 or later C2FCI C2HSCI and C2MEC and so forth The power budget of your chassis will not be exceeded by adding more C2FCIT cards Current draw for the C2FCIT and app...

Страница 9: ... complete Caution For safety periodically check the resistance value of the antistatic strap The measurement should be between 1 and 10 mega ohms Slot Priority The AGS card cage shown in Figure 8 has nine slots five of which are designated ciscoBus slots The center ciscoBus slot is reserved for the ciscoBus card leaving four ciscoBus slots available for ciscoBus interface cards Figure 8 AGS Card C...

Страница 10: ...ugh 52 Mbps 4 CSC FCI and C2FCI 100 Mbps 5 CSC C2FCIT 100 Mbps 6 CSC HSCI and C2HSCI with an APP ULA applique UltraNet interface 125 Mbps Install CSC MEC or C2MEC cards in the lowest numbered slots beginning with slot 0 which has the highest priority followed by CSC C2CTR cards After all CSC MEC and CSC C2CTR cards are installed install CSC HSCI and C2HSCI cards with the APP LHS applique in the lo...

Страница 11: ...0 0 or later by default C2FCIT C2 FCI 1 Ports Cards C2 MEC Ports Cards C2 HSSI Ports Cards C2CTR Ports Cards 0 0 24 4 0 0 0 0 1 1 18 3 0 0 0 0 0 0 18 3 1 1 0 0 0 0 18 3 0 0 4 1 2 2 12 2 0 0 0 0 1 1 12 2 1 1 0 0 1 1 12 2 0 0 4 1 0 0 12 2 2 2 0 0 0 0 12 2 1 1 4 1 0 0 12 2 0 0 8 2 1 1 6 1 0 0 6 2 0 0 6 1 1 1 6 2 3 3 6 1 0 0 0 0 0 0 6 1 3 3 0 0 2 2 6 1 1 1 0 0 2 2 6 1 0 0 4 1 0 0 6 1 2 2 4 1 1 1 6 1 1...

Страница 12: ...Requirements Before installing new cards check the power requirements of the existing system and the new card s to avoid exceeding the power budget Calculate the power requirements of an existing system by adding the values for each card in the chassis the sum is the power requirement Determine the available power budget subtract that sum from 300W 260W for chassis shipped before 10 1 91 the resul...

Страница 13: ... 0 FDDI 1 and so forth This label should be attached to the applique when you receive it If you are upgrading the C2FCIT microcode you also need one or more replacement components For instructions proceed to the section Upgrading Microcode on page 28 Verify that you received all the parts for the interfaces you will install In general each interface card requires one applique and every two appliqu...

Страница 14: ...ibed in this section Chassis Access Procedure on page 14 Installing the C2FCIT Card on page 15 Installing the FDDI Applique on page 16 Connecting Internal and External Cables on page 20 Before proceeding ensure that your system and equipment meet the requirements listed in the section Installation Prerequisites on page 7 Chassis Access Procedure Following is the procedure for accessing the chassis...

Страница 15: ...CIT card ejector levers and position the card with the component side up and the bus edge away from you Handle the card as little as possible and when you do handle it try to make contact with only the ejector levers and card edges Step 3 Place the bus edge of the C2FCIT card into the predetermined ciscoBus slot in the system card cage For slot priority guidelines refer to the section Slot Priorit...

Страница 16: ...e laser radiation may be emitted from the aperture ports of the single mode applique when no fiber cable is connected Avoid exposure and do not stare into open apertures This product meets Class 1 Laser Emission Requirement from CDRH FDDI Installing the FDDI Applique in the Applique Card Cage Following is the procedure for installing the FDDI applique in the applique card cage Note Before the FDDI...

Страница 17: ... in the left side of the card cage sliding it down so that the front edge aligns with the faceplate on the right side of the card cage For two appliques only If you are installing a second FDDI applique in the card cage install the applique in the left side of the card cage by sliding it down so that the faceplate aligns with the faceplate of the applique on the right side of the card cage Insert ...

Страница 18: ...e FDDI Applique and Card Cage in the AGS Chassis Step 1 Remove a blank connector plate from one of the two right side connector areas by removing the six screws that secure it See Figure 11 Step 2 Place the applique card cage inside the rear of the chassis in the empty large plate area See Figure 11 Align the screw holes in the rear panel of the chassis with those in the applique card cage Step 3 ...

Страница 19: ...stalling a Short Ground Strap The ground strap which is included with all appliques grounds the applique to the chassis to prevent EMI noise on your network interface The applique card cage containing the FDDI appliques should already be installed in the chassis and secured with five screws Refer to Figure 12 while you install the short ground strap Figure 12 Short Ground Strap Installation Step 1...

Страница 20: ...traps to other appliques as necessary and proceed to the next section Connecting Internal and External Cables Connecting Internal and External Cables The four internal ribbon cables permanently attached to the FDDI applique attach to the four connectors on the front edge of the C2FCIT card The FDDI network interface cables attach to the FDDI applique and provide the external connections to your ne...

Страница 21: ...I A E I or M on the left front edge of the C2FCIT card shown in Figure 14 Step 2 Connect the applique ribbon cable P2 B F J or N the second cable from the right in Figure 15 to the 26 pin connector labeled FDDI B F J or N in Figure 14 Step 3 Connect the applique ribbon cable P1 C G K or O the far right cable in Figure 15 to the 26 pin connector labeled FDDI C G K or O in Figure 14 Step 4 Connect t...

Страница 22: ... not installing an optical bypass switch skip to step 3 Plug the male DIN connector from the optical bypass switch into the female DIN connector on the APP LMM applique then plug the fiber optic MIC cables from the bypass switch into the PHY A and PHY B connectors on the FDDI applique Step 2 Connect the FDDI cables from the network into the PHY A and PHY B connectors on the optical bypass switch U...

Страница 23: ...e front panel off until you finish testing the installation Testing the Installation After you have installed your new FDDI module verify the installation before replacing the front panel by taking the following steps Caution With the front panel removed and power on the chassis is susceptible to overheating Apply power to the chassis only long enough to go through the configuration dialog routine...

Страница 24: ...correct version of microcode It will not be on if the card is incorrectly connected or if the microcode version is wrong On power up all five LEDs are on indicating that the CCTL2 card is active Once the system is booted and the ciscoBus controller card microcode has completed its discovery phase the only red LEDs will be those on that indicate the presence of a card in a ciscoBus slot The green L...

Страница 25: ...S and MLS ILS will predominate so LED 2 will glow most brightly LED 0 will be slightly dimmer and LED 1 will be almost completely dark The X3T9 5 FDDI specification explains the meaning of these line states in detail Figure 17 FDDI Applique Faceplate Showing the LEDs APP LSS shown 0 1 2 State On On On Line State Unknown LSU On On Off Halt Line State HLS On Off On Master Line State MLS On Off Off A...

Страница 26: ...ow controller fddi command Router show controller fddi Fddi0 hardware version 7 0 microcode version 10 3 Phy A registers cr0 4 cr1 4 cr2 0 status 3 cr3 0 Phy B registers cr0 2 cr1 0 cr2 0 status 5 cr3 0 FORMAC registers irdtlb 73DF irdtneg F85E irdthtt 8473 irdmir FFFF0BDC irdtrth F85F irdtmax FBC5 irdtvxt 8585 irdstmc 0810 irdmode 6A20 irdimsk 0000 irdstat 8060 irdtpri 0000 FDDI T registers ccb 0...

Страница 27: ... up line protocol is up Hardware type is cBus Fddi hardware address is aa00 0400 0134 Internet address is 111 111 1 1 subnet mask is 255 255 255 0 MTU 4532 bytes BW 100000 Kbit DLY 100 usec rely 255 255 load 1 255 Encapsulation is SNAP loopback is not set keepalive is not set ARP type SNAP Phy A state is active neighbor is B cmt signal bits 08 20C status ILS Brk 1 Con 1 Tra 0 Nxt 11 Sig 10 Join 1 ...

Страница 28: ...s feature will be turned on This enables the main system code rather than the CMT microcode to perform the CMT function while debugging output is generated Note More information is displayed in the show commands than is required for testing the C2FCIT or microcode EPROM installation For further information about the show commands refer to the Router Products Configuration Guide and Router Products...

Страница 29: ...r damage to the system cards turn OFF power to the chassis before accessing and removing any cards Step 1 Remove the front panel according to the procedure in the section Chassis Access Procedure on page 14 Step 2 Slip on an ESD preventive wrist strap and connect it to the chassis as described in the section Preventing Electrostatic Damage on page 8 To channel ESD voltages to ground make certain t...

Страница 30: ...t then insert the new component Do not rely on the orientation of the label to correctly position the new EPROM Caution When inserting a new component be very careful not to break or bend any of the pins To straighten a bent pin use needlenose pliers If a pin breaks or if the device is installed backwards when power is turned ON contact a customer service representative to obtain a replacement bec...

Страница 31: ... the ciscoBus card will not light If this happens remove the component straighten any bent pins then reinsert it and try again To verify the microcode version for the C2FCIT card after the system boots successfully use the show controller fddi command as follows router show controller fddi Fddi0 hardware version 7 3 microcode version 10 3 Phy A registers cr0 4 cr1 0 cr2 0 status 6 cr3 0 Phy B regi...

Страница 32: ...ys WWW http www cisco com Telnet cio cisco com 198 92 32 130 Modem From North America 408 526 8070 from Europe 33 1 64 46 40 82 Use the following terminal settings VT100 emulation data bits 8 parity none stop bits 1 and baud rates up to 14 4 kbps For a copy of CIO s Frequently Asked Questions FAQ contact ciohelp cisco com For additional information contact cioteam cisco com Note If you are a netwo...

Отзывы: