Step 2
Assemble the phone, adjust phone placement, and connect the network cable.
Locates and installs the phone in the network.
See
Install Cisco Unified IP Phone, on page 48
and
Footstand Adjustment, on page 53
.
Step 3
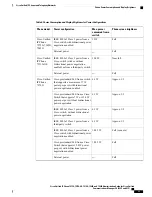
(Optional) Add a Cisco Unified IP Phone Expansion Module.
Adds the device with its default settings to the Cisco Unified Communications Manager database. Extends
functionality of a Cisco Unified IP Phone by adding 14 (Cisco Unified IP Phone Expansion Module 7914) or
24 (Cisco Unified IP Phone Expansion Modules 7915 or 7916) line appearances or speed-dial numbers.
Cisco Unified IP Phones 7971G-GE and 7970G do not support Cisco Unified IP Phone Expansion
Modules 7915 and 7916.
Note
The Cisco Unified IP Phone 7945G does not support any expansion
modules.
Note
A maximum of 56 keys for a Cisco Unified IP Phone 7975G and up to 54 keys for a Cisco Unified
IP Phone 7965G can be configured.
Note
See
Cisco Unified IP Phone Expansion Module, on page 50
.
Step 4
Monitor the phone startup process. Verifies that phone is configured properly.
See
Phone Startup Process, on page 57
.
Step 5
When you configure the network settings on the phone, for an IPv4 network you can set up an IP address for
the phone either by using DHCP or by manually entering an IP address.
With DHCP: To enable DHCP and allow the DHCP server to automatically assign an IP address to the Cisco
Unified IP Phone and direct the phone to a TFTP server, choose
Settings
>
Network Configuration
>
IPv4
Configuration
and configure the following:
•
To enable DHCP, set DHCP Enabled to
Yes
. DHCP is enabled by default.
•
To use an alternate TFTP server, set Alternate TFTP Server to
Yes
, and enter the IP address for the
TFTP Server.
Consult the network administrator if you need to assign an alternative TFTP server instead of
using the TFTP server that DHCP assigns.
Note
•
Without DHCP: You must configure the IP address, subnet mask, TFTP server, and default router locally
on the phone. To do so, choose
Settings
>
Network Configuration
>
IPv4 Configuration
.
To disable DHCP and manually set an IP address:
a) Set DHCP Enabled to
No
.
b) Enter the static IP address for phone.
c) Enter the subnet mask.
d) Enter the default router IP addresses.
e) Set Alternate TFTP Server to
Yes
, and enter the IP address for TFTP Server 1.
You must also enter the domain name where the phone resides by choosing
Settings
>
Network
Configuration
.
The Cisco Unified IP Phone supports concurrent IPv4 and IPv6 addresses. You can configure Cisco Unified
Communications Manager to support IPv4 addresses only, IPv6 addresses only, or both IPv4 and IPv6
addresses.
See
Network Settings, on page 58
and
Network Configuration Menu, on page 66
.
Step 6
If you configure the network settings on the phone for an IPv6 network, you can set up an IP address for the
phone either by using DHCPv6 or by manually entering an IP address.
Cisco Unified IP Phone 7975G, 7971G-GE, 7970G, 7965G, and 7945G Administration Guide for Cisco Unified
Communications Manager 9.0 (SCCP and SIP)
27
Cisco Unified IP Phone
Cisco Unified IP Phone Installation

