background image

25

Training instructions

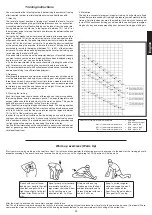
You must consider the following factors in determining the amount of training 
effort required in order to attain tangible physical and health benefits:

1. Intensity:
The level of physical exertion in training must exceed the level of normal 
exertion without reaching the point of breathlessness and / or exhaustion. 
A suitable guideline for effective training can be taken from the pulse rate. 
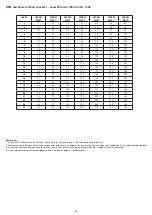
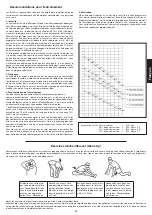
During  training  this  should  rise  to  the  region  of  between  70%  to  85%  of 
the maximum pulse rate (see the table and formular for determination and 
calculation of this).
During the first weeks, the pulse rate should remain at the lower end of this 
region, at around 70% of the maximum pulse rate. In the course of the follo-
wing weeks and months, the pulse rate should be slowly raised to the upper 
limit of 85% of the maximum pulse rate. The better the physical condition 
of the person doing the exercise, the more the level of training should be 
encreased to remain in the region of between 70% to 85% of the maximum 
pulse rate. This should be done by lengthening the time for the training and 
/ or encreasing the level of difficulty.
If the pulse rate is not shown on the computer display or if for safety reasons 
you wish to check your pulse rate, which could have been displayed wrongly 
due to error in use, etc., you can do the following:
a. Pulse rate measurement in the conventional way (feeling the pulse at the 
wrist, for example, and counting the number of beats in one minute).
b. Pulse rate measurement with a suitable specialised device (available from 
dealers specialising in health-related equipment).

2.Frequency
Most experts recommend a combination of health-conscious nutrition, which 
must be determined on the basis of your training goal, and physical training 
three times a week. A normal adult must train twice a week to maintain his 
current level of condition. At least three training sessions a week are required 
to improve one’s condition and reduce one’s weight. Of course the ideal 
frequency of training is five sessions a week.

3. Planning the training
Each training session should consist of three phases: the warm-up phase, 
the training phase, and the cool-down phase. The body temperature and 
oxygen intake should be raised slowly in the warm-up phase. This can be 
done with gymnastic exercises lasting five to ten minutes.
Then the actual training (training phase) should begin. The training exertion 
should be relatively low for the first few minutes and then raised over a period 
of 15 to 30 minutes such that the pulse rate reaches the region of between 
70% to 85% of the maximum pulse rate.
In order to support the circulation after the training phase and to prevent 
aching or strained muscles later, it is necessary to follow the training phase 
with a cool-down phase. This should be consist of stretching exercises and 
/ or light gymnastic exercises for a period of five to ten minutes.
You find further information on the subject warm-up exercises, stretch exer-
cises or general gymnastics exercises in our download area under www.
christopeit-sport.com

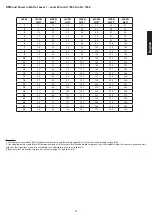
Calculation formula:  Maximum pulse rate 

=  220 - age 


(220 minus your age)


90% of the maximum pulse rate 

=  (220 - age) x 0.9


85% of the maximum pulse rate 

=  (220 - age) x 0.85


70% of the maximum pulse rate 

=  (220 - age) x 0.7

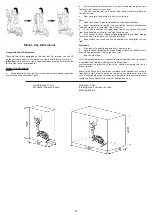
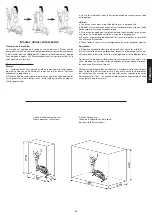
Warm up exercises (Warm Up) 

Start your warm up by walking on the spot for at least 3 minutes and then perform the following gymnastic exercises to the body for the training phase to 
prepare accordingly. The exercises do not overdo it and only as far run until a slight drag felt. This position will hold a while.

Reach with your left hand 
behind your head to the right 
shoulder and pull with the 
right hand slightly to the left 
elbow. After 20sec. switch 
arm.

Bend forward as far forward 
as possible and let your 
legs almost stretched. Show 
it with your fingers in the 
direction of toe. 2 x 20sec.

Sit down with one leg 
stretched out on the floor 
and bend forward and try 
to reach the foot with your 
hands. 2 x 20sec.

Kneel in a wide lunge for-
ward and support yourself 
with your hands on the 
floor. Press the pelvis down. 
Change after 20 sec leg.

After the warm-up exercises by some arms and legs shake loose. 
Don’t finish the exercise phase abruptly, but will cycle leisurely something without resistance from to return to the normal pulse-zone. (Cool down) We re-
commend the warm-up exercises at the end of the training be conducted and to end your workout with shaking of the extremities.

4. Motivation
The key to a successful program is regular training. You should set a fixed 
time and place for each day of training and prepare yourself mentally for the 
training. Only train when you are in the mood for it and always have your goal 
in view. With continuous training you will be able to see how you are progres-
sing day by day and are approaching your personal training goal bit by bit.

English

Содержание 1908

Страница 1: ... Bedienungsanleitung für Bestell Nr 1908 Notice de montage et d utilisation du No de commande 1908 Assembly and exercise instructions for Order No 1908 Montage en bedieningshandleiding voor Bestellnummer 1908 GB D F NL RU Инструкция по монтажу и эксплуатации заказа 1908 ...

Страница 2: ...sgesamt 60 Min tägl nicht überschreiten 11 Es sind Trainingskleidung und Schuhe zu tragen die für ein Fitness Training mit dem Gerät geeignet sind Die Kleidung muss so beschaffen sein dass diese aufgrund ihrer Form z B Länge während des Trainings nicht hängen bleiben kann Die Trainingsschuhe sollten passend zum Trainingsgerät gewählt werden grundsätzlich dem Fuss einen festen Halt geben und eine r...

Страница 3: ...egen Sie diese auf den Boden und kontrollieren grob Sie die Vollzähligkeit anhand der Mon tagebilder Dieses soll Ihnen den Zusammenbau des Gerätes erleichtern und schneller durchführbar machen Montagezeit ca 50Min Schritt 1 Montage des vorderen und hinteren Fußes 56 58 1 Führen Sie den vorderen Fuß 56 montiert mit den Fußabdec kungen mit Transportrolleneinheiten 55 an den Grundrahmen 40 und schrau...

Страница 4: ...iehen 7 Den Fußhebel 44R auf den Pedalarm 97 stecken und mit der Unterleg scheibe 8 20 49 Federring 32 Distanzstück 52 und Schraube 48 verschrauben 8 Den Fußhebel links 44L incl allen zusätzlich erforderlichen Teilen auf der linken Seite des Gerätes genauso wie in 1 7 beschrieben montieren 9 Verbinden Sie die Pulskabel 10 mit den Pulsverbindungskabeln 16 und stecken Sie die Schraubenkappen 11 auf ...

Страница 5: ...31 auf 2 Führen Sie den Haltegriff 3 zum Stützrohr 30 und schrauben Sie diesen am Stützrohr 30 miitels der Schrauben 33 fest 3 Befestigen Sie die Haltegriffabdeckung 18 mittels der Schrau be M5x15 102 über die Schraubenverbindung am Haltegriff 3 Schritt 9 Kontrolle 1 Alle Verschraubungen und Steckverbindungen auf ordnungs gemäße Montage und Funktion prüfen Die Montage ist hiermit beendet 2 Wenn al...

Страница 6: ...ch ein wetterunabhängiges Training ohne äußere Einflüsse sowie bei evtl Gruppenzwang das Risiko von Überanstrengungen oder Stürzen Die Kombination aus Radfahren Steppen und Laufen bietet ein Herz Kreislauf Training ohne Überforderung aufgrund der Möglichkeit des selbst einstellbaren Widerstandes Somit ist ein mehr oder weniger Intensives Training möglich Es trainiert die unteren und oberen Extremi...

Страница 7: ...Seite 2 angemerkt zulässig ist Deutsch STUFE 20RPM WATT 30RPM WATT 40RPM WATT 50RPM WATT 60RPM WATT 70RPM WATT 80RPM WATT 1 7 15 19 33 40 43 61 2 9 18 24 40 50 55 76 3 10 20 29 46 60 67 90 4 11 22 34 54 70 82 107 5 12 25 39 61 80 93 125 6 14 27 44 68 90 106 140 7 15 30 49 74 100 118 155 8 16 33 53 81 110 130 171 9 18 36 59 88 120 143 186 10 19 38 64 95 130 155 202 11 20 41 69 103 140 167 218 12 22...

Страница 8: ...gebenen individuellen Ziel pulses Einstellbereich Puls 60 240 Widerstandsprofil Die gewünschte Trainingsdauer kann im Bereich ZEIT voreingestellt werden Diese voreingestellte Zeit wird vom System in 10 Teilintervalle unterteilt Jeder Balken auf der Zeitachse horizontal 1 10 der vorgegebenen Zeit z B Trainingszeit 5 min jeder Balken ist 30 Sek Trainingszeit 10 min jeder Balken 1 min Jeder der 10 Ba...

Страница 9: ... Ablauf der einzelnen Programme erfolgt gemäß Darstellung des Balkendiagramms im Anzeigefeld z B Programm 5 Berg Programm 2 Tal usw dabei ist die Balkenhöhe Widerstand die Zeit wird auf die Balkenbreite verteilt Nach Programmeinstellung unbedingt START STOP Taste drücken wenn mit dem Training gestartet werden soll Grundsätzlich sind alle ermittelten und angezeigten Werte nicht für medizinische Aus...

Страница 10: ...Warnton erscheinen wenn die Verkabelung feh lerhaft angeschlossen ist oder es eine Störung in der Widerstandseinstellung gibt Überprüfen Sie alle Kabelverbindungen besonders an den Steckern Nach Behebung des Fehlers die Start Stop Taste 2 Sek gedrückt halten um das System auf 0 zurückzusetzen PULSMESSUNG 1 Handpulsmessung Im linken und rechten Lenkergriffteil ist je eine Metallkontaktplatte die Se...

Страница 11: ...ieren Sie Ihren Händler oder den Hersteller Problem Mögliche Ursache Lösung Der Computer schaltet sich durch Drücken einer Taste nicht ein Kein Netzteil ein gesteckt oder die Steckdose führt keine Spannung Überprüfen Sie ob das Netzge rät ordnungsgemäß eingesteckt wurde ggf mit einem anderen Verbraucher ob die Steckdose Spannung führt Der Computer zählt nicht und schaltet sich durch Beginn des Tra...

Страница 12: ... die Körpertemperatur und die Sauerstoffzufuhr langsam gesteigert werden Dieses ist durch gymnastische Übungen über eine Dauer von fünf bis zehn Minuten möglich Danach sollte das eigentliche Training Trainings Phase beginnen Die Trainingsbelastung sollte erst einige Minuten gering sein und dann für eine Periode von 15 bis 30 Minuten so gesteigert werden daß sich der Puls im Bereich zwischen 70 und...

Страница 13: ...3 1508 12 SI 6 Griffknauf 2 5 36 9825315 BT 7 Handgriffüberzug 2 5 36 1123 11 BT 8 Handpulssensor 2 5 36 1123 23 BT 9 Schraube M4x25 2 8 36 9111 38 BT 10 Pulskabel 2 8 16 36 1123 12 BT 11 Schraubenkappe 2 12 36 1908 06 BT 12 Sechskantschraube M8x20 2 19 39 9823 13 Netzgerät 6V DC 1A 1 39 36 9107 22 BT 14 Kabelschutz 4 5 30 36 9134 22 BT 15 Schraube M5x10 4 1 39 9903 16 Pulsverbindungskabel 2 1 10 ...

Страница 14: ...5x22x12 2 97 36 1908 16 BT 53 Fußhebelabdeckung 2 44 36 1908 11 BT 54 Schraube M5x8 2 53 39 9903 55L Fußkappe mit Transportrolle links 1 56 36 1908 08 BT 55R Fußkappe mit Transportrolle rechts 1 56 36 1908 09 BT 56 Fuß vorne 1 40 33 1908 04 SW 57 Fußkappe mit Höhenverstellung 2 58 36 1908 10 BT 58 Fuß hinten 1 40 33 1908 05 SW 59 Schlossschraube M8x45 4 40 56 58 39 9953 60 Kreuzschlitzschraube M5x...

Страница 15: ...er 2 91 93 39 9820 SW 93 Pedalarmaufnahme 2 91 33 1908 08 SI 94 Rundstopfen 2 95 36 1908 15 BT 95 Pedalarmverkleidung 2 97 36 1908 04 BT 96 Schraube M8x20 6 93 97 39 9886 CR 97 Pedalarm 2 93 33 1908 09 SI 98L Verkleidung links 1 40 98R 36 1908 01 BT 98R Verkleidung rechts 1 40 98L 36 1908 02 BT 99 Verbindungsstück 1 98 36 1508 10 BT 100 Gummiring 1 101 36 1908 12 BT 101 Stützrohrverkleidung 1 30 3...

Страница 16: ...st have non slip soles 12 WARNING If you notice a feeling of dizziness sickness chest pain or other abnormal symptoms stop training and consult a doctor 13 PNever forget that sports machines are not toys This appliance can be used by children aged from 8 years and above and persons with reduced physical sensory or mental capabilities or lack of experience and knowl edge if they have been given sup...

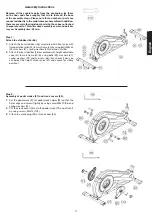
Страница 17: ...hat a number of parts are connected directly to the main frame preassembled In addition there are several other individual parts that have been attached to separate units This will makes assembly easier and quicker for you Assembly time 50 min Step 1 Attach the stabilizer 56 58 1 Attach the front stabilizer 56 assembled with front caps with transportation roller 55 to main frame 40 by using bolts ...

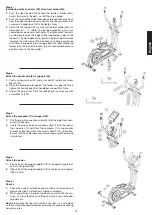
Страница 18: ...e aligned after assembly so that the upper ends are inclined outwards away from the support 30 2 Push the screws 33 through the holes and tighten the handgrip bars 5 with curved washers 31 and spring washer 32 firmly 3 Put the footrest holder 44R at the connecting tube 25R and adjust the holes in the tubes so that they are aligned 4 Push the screw M8x78 23 through the holes and tighten the footres...

Страница 19: ...ard 98 2 Please insert the plug of adaptor 13 to the jack of wall power 230V 50Hz Step 6 Attach the handle grip 3 at support 30 1 Push a spring washer 32 and a washer 31 onto each screw M8x20 33 2 Place the handle grip 3 against the holder at support 30 and tighten the handle grip 3 at handlebar support 30 firmly 3 Attach the grip cover 18 at handle grip 3 and secure with screw M5x15 102 Step 7 At...

Страница 20: ... the upper body too you can place the hands from fixed handle bar to the left and right handle grips d Then you can increase the pedaling speed gradually and adjust braking resistance levels to increase the exercise intension e Keep always your hands on fixed handle bar or hand grips left and right Dismount a Slow down the pedaling speed until it comes to rest b Keep the hands grabbing the fixed h...

Страница 21: ...VEL 20RPM WATT 30RPM WATT 40RPM WATT 50RPM WATT 60RPM WATT 70RPM WATT 80RPM WATT 1 7 15 19 33 40 43 61 2 9 18 24 40 50 55 76 3 10 20 29 46 60 67 90 4 11 22 34 54 70 82 107 5 12 25 39 61 80 93 125 6 14 27 44 68 90 106 140 7 15 30 49 74 100 118 155 8 16 33 53 81 110 130 171 9 18 36 59 88 120 143 186 10 19 38 64 95 130 155 202 11 20 41 69 103 140 167 218 12 22 43 73 110 150 180 232 13 23 46 79 117 16...

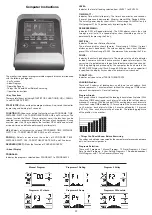
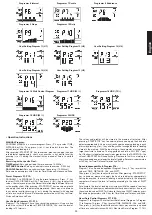
Страница 22: ...n each interval is the value of setup TIME divided by 10 For example if the time value is setup to 40 minutes each interval will be 40 minutes divided by 10 intervals 40 10 4 Then each interval will be 4 minutes The following graphs are all the profiles in the monitor Things You Should Know Before Exercising The values calculated or measured by the computer are for exercise purpose only not for me...

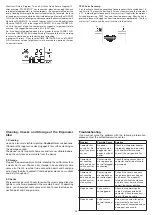
Страница 23: ...ssing or key and they will not change the level of loading stored in the memory With the input of age the computer may suggest a target heart rate to exercise The suggested heart rate is 80 220 age So if the heart rate detected equals to or greater than the TARGET H R the value of HEART RATE will keep flashing Please note that it is a warning for users to speed down or to lower the level of loadin...

Страница 24: ... surface cleaning as this damage caused The device is only for private home use and for use suitable indoors Keep the unit clean and moisture from the device 2 Storage Plug out the power supply unit while intending the unit for more than 4 weeks not to use Choose a dry storage in house and put some spray oil at front rear foot tube connection point and hand grip axle Cover the bike to protect it f...

Страница 25: ...ten minutes Then the actual training training phase should begin The training exertion should be relatively low for the first few minutes and then raised over a period of 15 to 30 minutes such that the pulse rate reaches the region of between 70 to 85 of the maximum pulse rate In order to support the circulation after the training phase and to prevent aching or strained muscles later it is necessa...

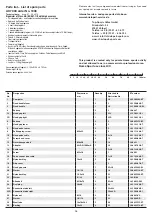
Страница 26: ...re parts AX 7000 order No 1908 Technical data Issue 01 09 2019 Ergometer of Class HA EN 957 1 9 with high accuracy 24 stepped Motor and Computer controlled magnetic resistance Approx 8 kg flywheel mass 10 stored training programs 4 heart rate programs 5 individual programs 1 manual program 1 speed independent program 30 350 Watt resistance adjustable in 10 Watt steps Hand pulse measurement at move...

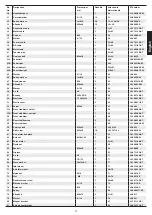
Страница 27: ...827 30 BT 52 Steel tube 17 5x22x12 2 97 36 1908 16 BT 53 Plastic cover 2 44 36 1908 11 BT 54 Screw M5x8 2 53 39 9903 55L Front stabilizer cap left 1 56 36 1908 08 BT 55R Front stabilizer cap right 1 56 36 1908 09 BT 56 Front stabilizer 1 40 33 1908 04 SW 57 Rear stabilizer cap 2 58 36 1908 10 BT 58 Rear stabilizer 1 40 33 1908 05 SW 59 Carriage bolt M8x45 4 40 56 58 39 9953 60 Drill screw M5x20 10...

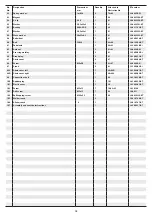
Страница 28: ...10 SI 92 Axle nut 2 91 93 39 9820 SW 93 Crossing welding 2 91 33 1908 08 SI 94 Crank plug 2 95 36 1908 15 BT 95 Circle cover 2 97 36 1908 04 BT 96 Screw M8x20 6 93 97 39 9886 CR 97 Crank 2 93 33 1908 09 SI 98L Chain cover left 1 40 98R 36 1908 01 BT 98R Chain cover right 1 40 98L 36 1908 02 BT 99 Connection shaft 1 98 36 1508 10 BT 100 Rubber plug 1 101 36 1908 12 BT 101 Plastic cover 1 30 36 1908...

Страница 29: ...s douleurs dans la poitrine ou d autres symptômes anormaux se font sentir arrêter l entraînement et consulter un médecin adapté 13 Il faut savoir que les appareils de sport ne sont pas des jouets Ce dispositif peut être utilisé par des enfants âgés de 8 ans et les personnes ayant des capacités physiques sensorielles ou mentales réduites ou manque d expérience et de connaissances si approprié surve...

Страница 30: ... à l aide des vis M8x45 59 des rondelles 37 des bague ressort 32 et écrous borgne 36 2 Dirigez le pied arrière 58 sur lequel ont été montées les capu chons de compensation de la hauteur 57 vers le cadre de base 40 et serrez le à vis à l aide des vis 59 des rondelles 37 des bague ressort 32 et écrous borgne 36 Les capuchons de compensation de la hauteur 57 servent à stabiliser l appareil en cas d i...

Страница 31: ...ns au dessus des autres Attention Après le montage des poignées 5 veillez à ce que leurs extrémités supérieures soient courbées vers l extérieur du tube de support 30 2 Introduire les vis 33 à travers les trous de forage à rondelles 31 et rondelle élastique bombée 32 et serrer à bloc 3 Placer le logement de la coque droit 44R sur le tube de communication 25R en veillant à ce que les trous de forag...

Страница 32: ... vers l intérieur en direction du cadre de base 40 Etape n 9 Contrôle 1 Vérifier si les assemblages et connexions ont été effectués cor rectement et fonctionnent Le montage est maintenant terminé 2 Si tout est en ordre se familiariser avec l appareil en effectuant de légers réglages de la résistance et effectuer les réglages individuels Remarques Veuillez à conserver soigneusement le jeu d outils ...

Страница 33: ... repose pieds c Si vous voulez également entraîner la partie supérieure du corps placez vos mains sur les poignées mobiles au lieu de la poignée fixe d Ensuite augmentez graduellement la vitesse et modifiez la résistance afin d intensifier l exercice e Tenez toujours vos mains sur la poignée fixe ou sur les poignées mobiles Descendre a Ralentissez graduellement jusqu à ce que vous vous êtes arrêté...

Страница 34: ...7 est autorisée LEVEL 20RPM WATT 30RPM WATT 40RPM WATT 50RPM WATT 60RPM WATT 70RPM WATT 80RPM WATT 1 7 15 19 33 40 43 61 2 9 18 24 40 50 55 76 3 10 20 29 46 60 67 90 4 11 22 34 54 70 82 107 5 12 25 39 61 80 93 125 6 14 27 44 68 90 106 140 7 15 30 49 74 100 118 155 8 16 33 53 81 110 130 171 9 18 36 59 88 120 143 186 10 19 38 64 95 130 155 202 11 20 41 69 103 140 167 218 12 22 43 73 110 150 180 232 ...

Страница 35: ...t de 5 minutes Il est possible de paramétrer la durée de 5 à 99 min L ordinateur doit d abord convertir les watts L ordinateur calcule exactement l effort fait pendant l entraînement Les résultats s affichent en watts L affichage de la valeur cible se fait dans le programme Il est possible de paramétrer les watts de 30 à 350 min Changement d affichage automatique de la durée et de watts Ou en perm...

Страница 36: ...isplay Le déroulement de chaque programme suit la représentation du diagramme des leviers dans la zone d affichage par exemple le pro gramme 5 montagne le programme 2 vallée dans ce cas la hauteur des leviers la résistance la durée étant répartie sur la largeur des leviers Après le paramétrage du programme il faut impérativement appuyer sur La touche Start Stop pour commencer l entraînement Les va...

Страница 37: ...ons 1 Mesure des pulsations à la poignée La poignée de maintien comportent chacune un capteur pièces de contact métalliques Connectez le câble à la prise de l ordinateur Attention veillez à ce que la paume de vos mains repose simultanément sur les capteurs avec une pression normale Dès que les pulsations sont enregistrées un cœur apparaît en surbrillance à côté de l affichage des pulsations La mes...

Страница 38: ... vous ne pouvez pas résoudre en utilisant les informations énumérées à l dysfonctionnement s il vous plaît contactez votre revendeur ou fabricant Problème Cause Possible Solution L ordinateur ne s allume pas en appuyant sur un bouton Aucun adapta teur de courant est insérée ou la prise n est pas Vérifiez que l adaptateur d alimentation est correctement branché éventuellement avec un autre consomma...

Страница 39: ...ible en effectuant de la gymnastique pendant cinq à dix minutes L entraînement proprement dit phase d entraînement devant commen cer ensuite Choisir une faible résistance pendant quelques minutes puis accroître entre 15 et 30 minutes de sorte que le pouls se situe entre 70 et 85 de son maximum Afin de faciliter la circulation après la phase d entraînement et d éviter des courbatures ou des muscles...

Страница 40: ...ge AX 7000 N de commande 1908 Caractéristiques techniques Version du 01 05 2018 Masse tournante environ 8 kg Réglage automatisé de 24 niveaux de résistance 10 programmes de résistance prévus 4 programmes de fréquence cardiaque fonctionnant par impulsion 5 programmes personnalisables 1 programme de manuellement 1 programme indépendant de la vitesse de rotation réglable de 30 à 350 watts en incrémen...

Страница 41: ... écartement 17 5x22x12 2 97 36 1908 16 BT 53 Revêtement de logement de pied 2 44 36 1908 11 BT 54 Vis M5x8 2 53 39 9903 55L Chapeaux finaux avec roulette de transport gauche 1 56 36 1908 08 BT 55R Chapeaux finaux avec roulette de transport droit 1 56 36 1908 09 BT 56 Tube du pied avant 1 40 33 1908 04 SW 57 Capuchons de tube de pied arrière 2 58 36 1908 10 BT 58 Tube du pied arrière 1 40 33 1908 0...

Страница 42: ...SI 92 Ecrou d axe 2 91 93 39 9820 SW 93 Etrier de bras de pédale 2 91 33 1908 08 SI 94 Bouchon ronde 2 95 36 1908 15 BT 95 Revêtement de bras de pédale 2 97 36 1908 04 BT 96 Vis M8x20 6 93 97 39 9886 CR 97 Bras de pédale 2 93 33 1908 09 SI 98L Revêtement gauche 1 40 98R 36 1908 01 BT 98R Revêtement droit 1 40 98L 36 1908 02 BT 99 Lien pièce 1 98 36 1508 10 BT 100 Anneau en caoutchouc 1 101 36 1908...

Страница 43: ...an blijven hangen De trainingschoenen moeten in overeenstemming met het trainingstoestel gekozen worden uw voeten in principe een vaste passing geven en een slipvrije zool hebben 12 Waarschuwing Wanneer duizeligheid misselijkheid borstpijn en an dere abnormale symptomen ondervonden worden de training vroegtijdig beëindigen en u tot een geschikte geneesheer wenden 13 Over het algemeen geldt dat spo...

Страница 44: ... en schroef hem vast door middel van de de slotschroeven M8x45 59 onderlegplaatjes 37 veerringen 32 en dop moeren 36 2 Breng de achterste voet 58 gemonteerd met voetafdekkingen met hoogtecompensatie 57 op het frame 40 en schroef hem vast door middel van de de slotschroeven 59 onderlegplaatjes 37 veerringen 32 en dop moeren 36 De voetafdekkingen met hoogtecompensatie 57 zijn voorzien om het toestel...

Страница 45: ...de openingen steken en de greepbuis 5R op de verbindingsbuis 25R vastdraaien 3 De rechter voetschaalbevestiging 44R op de verbindingsbuizen 25R steken De openingen in de delen zo uitlijnen dat ze precies boven elkaar liggen 4 De schroev M8x78 23 door de openingen steken Vanaf de andere kant een onderlegplatje 27 aanbrengen en een moer 26 insteken en vastdraaien Dit verbindingspunt moet gemakkelijk...

Страница 46: ... zo ingestelde posities moeten op beide zijden altijd gelijk zijn De posities kunnen altijd door het uitnemen van de sluitschroeven 42 en het verschuiven van de voetvlakken altijd veranderen Stap 8 Aansluiting van het nettoestel 13 1 Steek de stekker van het nettoestel 13 in de desbetreffende bus 39 op het achterste uiteinden van de bekleding 98 2 Steek daarna het nettoestel 13 in een contactdoos ...

Страница 47: ...s te verplaatsen c Als u ook het bovenlichaam wilt trainen kunt u uw handen in plaats van op het vaste stuur op de beweegbare handvaton aan de linker en rechterkant d Om de intensiteit van de training te verhogen kunt u de pedaleersnelheid verhogen of de weerstand op het apparaat verhogen e Houdt uw handen altijd ofwel op de vaste stuur ofwel op het linker en rechter handvat Afstappen a Verminder ...

Страница 48: ... 39 is toegestaan LEVEL 20RPM WATT 30RPM WATT 40RPM WATT 50RPM WATT 60RPM WATT 70RPM WATT 80RPM WATT 1 7 15 19 33 40 43 61 2 9 18 24 40 50 55 76 3 10 20 29 46 60 67 90 4 11 22 34 54 70 82 107 5 12 25 39 61 80 93 125 6 14 27 44 68 90 106 140 7 15 30 49 74 100 118 155 8 16 33 53 81 110 130 171 9 18 36 59 88 120 143 186 10 19 38 64 95 130 155 202 11 20 41 69 103 140 167 218 12 22 43 73 110 150 180 23...

Страница 49: ...en Der computer meet exact het ter gelegen heid van de training behaalde prestatievermogen De weergave gebeurt in watt In het programma 16 volgt hier de weergave van de beoogde waar de De voorafgaande invoer kan van 30 tot 350 Watt ingevoerd worden Weergave schakelt automatisch tussen tijd en watt Of permanent door op de F toets RPM SPEED Weergave van pedaalomwentelingen per minuut en snelheid in ...

Страница 50: ...ma s gebeurt in overeenstemming met de weergave van het balk diagram in het displayveld bijvoorbeeld programma 5 berg programma 2 dal enz daarbij is de balkhoogte weerstand de tijd wordt over de balkbreedte verdeeld Na programma instelling onvoorwaardelijk toets START STOP indrukken wanneer er met de training gestart wordt In principe zijn al de vastgestelde en weergegeven waarden niet ge schikt v...

Страница 51: ... de trapweerstand doet niet Controleer al de kabelverbindingen meer in het bijzonder aan de stekkers Na oplossing van de fout de toets S 2 seconden lang ingedrukt houden om het systeem terug op 000 te zetten POLSSLAGMETING 1 Handpulsmeting In het linkse en rechtse stuurgedeelte is telkens een metalen contactplaat de voelers voorzien Verbind de kabel met de computer Gelieve erop te letten dat steed...

Страница 52: ...ulp van de genoemde storing informatie kunt u contact opnemen met uw dealer of Fabrikant Probleem Mogelijke oor zaak Oplossing De computer wordt niet inge schakeld door het indrukken van een knop Geen stroom ad apter is geplaatst of de socket is niet leven Controleer of de adapter correct is aangesloten eventueel met een andere consument als het stopcontact stroom levert De computer telt niet en g...

Страница 53: ...nnen De trainingsbelasting moet de eerste minuten laag zijn en dan gedurende een periode van 15 tot 30 minuten zo toenemen dat de hartslag zich tussen de 70 en 85 van de maximale hartslag bevindt Om de bloedsomloop na de trainingsfase te ondersteunen en om spierpijn of verrekte spieren te voorkomen moet de trainingsfase door een cooling down worden gevolgd Hierbij moeten vijf tot tien minuten lang...

Страница 54: ... 01 09 2019 Crosstrainer Ergometer klasse HA EN 957 1 9 met een precieze weerga ve van de gegevens Magnetisch remsysteem ca 8 kg vliegwielmassa Motor en computer gestuurde weerstandsregeling met 24 weerstand fases 10 voorgeprogrammeerde weerstandsprogramma s 4 hartslag programma s polsgestuurd 5 individuele instelbare trainingsprogramma s 1 manueel programma 1 omwentelings onafhankelijk programma ...

Страница 55: ...203 2RS 2 44 36 1827 30 BT 52 Afstandsstuk 17 5x22x12 2 97 36 1908 16 BT 53 Voetbefestiging bekleding 2 44 36 1908 11 BT 54 Schroef M5x8 2 53 39 9903 55L Eindkappen met transportrol links 1 56 36 1908 08 BT 55R Eindkappen met transportrol rechts 1 56 36 1908 09 BT 56 Voetbuis voor 1 40 33 1908 04 SW 57 Kappen met hoogtecompensatie 2 58 36 1908 10 BT 58 Voetbuis achter 1 40 33 1908 05 SW 59 Schlots...

Страница 56: ... 93 33 1908 10 SI 92 As moer 2 91 93 39 9820 SW 93 Pedaalkruk opname 2 91 33 1908 08 SI 94 Eindkap 2 95 36 1908 15 BT 95 Pedaalkrukbekleding 2 97 36 1908 04 BT 96 Schroef M8x20 6 93 97 39 9886 CR 97 Pedaalkruk 2 93 33 1908 09 SI 98L Bekleding links 1 40 98R 36 1908 01 BT 98R Bekleding rechts 1 40 98L 36 1908 02 BT 99 verbinding stuk 1 98 36 1508 10 BT 100 Rubberen ring 1 101 36 1908 12 BT 101 Steu...

Страница 57: ... только один человек Время тренировки не должно превосходить в целом 90 Min ежедневно 11 Необходимо носить тренировочную одежду и обувь которые подходят для оздоровительной тренировки на тренажере Одежда должна быть такой чтобы по своей форме например длине она не могла зацепиться во время тренировки Следует подбирать тренировочную обувь которая подходит к тренажеру обеспечивает устойчивость для н...

Страница 58: ...нюю ножку 58 смонтированную с колпачками 57 на основную раму 40 и крепко прикрутите ее с помощью крепежных болтов 59 пружинных шайб 32 подкладных шайб 37 и колпачковые гайки 36 После того как Вы смонтировали весь тренажер правильновыставите компенсаторы 57 неровности пола Этим Вы предупредите непреднамеренные движения тренажера во время тренировки Шаг 2 Монтаж шатун педали 97 и обшивка шатун педал...

Страница 59: ...ад другом Внимание Рукоятки монтируются так чтобы верхние части расходились от опорной трубы 30 2 Вставьте болты 33 в отверстия и крепко прикрутите рукоятки 5R с помощью подкладных шайб 31 и пружинных шайб 32 3 Приложите ножной рычаг 44R на соединительную трубу 25R таким образом чтобы отверстия располагались друг над другом 4 Вставьте болты M8x78 23 в отверстия и прикрутите ножной рычаг 44R c помо...

Страница 60: ...х 1 2 Внимание Для различия правого и левого фиксатора стопы 43R 43L обратите внимание на высоту канта Высокий кант должен быть с внутреннейстороны т е ближе к основной раме Шаг 7 Монтаж компьютера 1 на опорную трубу 30 1 Возьмите компьютер 1 и вставьте соединительный кабель 34 с обратной стороны компьютера 1 2 Вставьте кабель пульса 16 в соответствующее гнездо на компьютере 1 приложите компьютер ...

Страница 61: ...е и ша гайте при одновременном переносе веса с одной педали на другуютаким образом чтобы только пятка немного приподнималась от педали и осу ществлялось равномерное движение Для одновременной тренировки верхней части тела держитесь за движущиеся поручни справа и слева С увеличением или уменьшении скорости и тормозного сопротивления можно регулировать интенсивность тренировки Постоянно держитесь за...

Страница 62: ...60RPM WATT 70RPM WATT 80RPM WATT 1 7 15 19 33 40 43 61 2 9 18 24 40 50 55 76 3 10 20 29 46 60 67 90 4 11 22 34 54 70 82 107 5 12 25 39 61 80 93 125 6 14 27 44 68 90 106 140 7 15 30 49 74 100 118 155 8 16 33 53 81 110 130 171 9 18 36 59 88 120 143 186 10 19 38 64 95 130 155 202 11 20 41 69 103 140 167 218 12 22 43 73 110 150 180 232 13 23 46 79 117 160 191 250 14 24 49 84 124 170 205 268 15 26 52 8...

Страница 63: ...ставляет 5 мин Устанавливается от 5 до 99 мин Компьютер точно измеряет роизведенную в ходе тренировки работу Индикация производится в ваттах В программе 16 производится индикация целевого значения Устанавливается от 30 до 350 ватт Автоматическое изменение отображенияTIME время и WATT ватт Или постоянно нажав клавишу F RPM ОБ мин SPEED km h СКОРОСТЬ км час Индикация оборотов педалей в минуту и скор...

Страница 64: ...ие программы показываются на дисплее графически Каждая программа протекает по указанной схеме на дисплее например программа программа 5 гора низина 2 и т д при этом высота сегмента нагрузка время распределяется по всей шкале После настройки программы обязательно перед началом тренировки нажать клавишу Start Stop Manual Program Programm 1 Rolling Program 2 Valley Programm 3 Fatburn Programm 4 Ramp ...

Страница 65: ...ку так чтобы тренировочный пульс оставался в области выбранного режима Программа 20 Целевое значение пульса THF Здесь вы можете задать оптимальный показатель частоты биения сердца THF и компьютер с учетом определенных допусков удерживает эту нагрузку в заданном вами пределе 60 240 пульса СПИСОК ВОЗМОЖНЫХ НЕИСПРАВНОСТЕЙ После каждого нового старта компьютер проводит быстрый тест на функциональность...

Страница 66: ...ижестоя щих указаний пожалуйста обратитесь в центр где вы купили тренажер Проблема Возможная причина Решение Компьютер не включается посредством нажатия на любую клавишу Не подключен блок питания или в сети нет напряжения Проверьте подключен ли блок питания надлежащим образом и есть ли напряжение в сети Компьютер не выдает информацию и не включается с началом тренировки Отсутствие импульса датчика...

Страница 67: ...тите проверить частоту пульса которая возможно показана неверно вследствие какой либо ошибки Вы можете предпринять следующее А измерить частоту пульса обычным способом подсчитать количество ударов пульса в минуту на запястье В измерить частоту пульса с помощью специального устройства которое можно купить у продавцов специализированного оборудования 2 Частота Большинство экспертов рекомендуют комби...

Страница 68: ...еристики По состоянию на 01 05 2018 24 уровня нагрузки электронная регулировка нагрузки с пульта компьютера магнитная система нагружения Иннерционная масса 8 кг 10 встроенных программ тренировки 4 пульсозависимые программы 5 индивидуальные программы 1 программа ручной установки 1 независимая от скорости вращения программа регулировка сопротивления 30 350 Вт с шагом 10 Вт Измерение пульса датчиками...

Страница 69: ...г Обшивка сзади 2 44 36 1908 11 BT 54 Болт M5x8 2 53 39 9903 55L Колпачки ножек с транспортировочными роликами слева 1 56 36 1908 08 BT 55R Колпачки ножек с транспортировочными роликами справа 1 56 36 1908 09 BT 56 Труба ножки впереди 1 40 33 1908 04 SW 57 Колпачки ножек 2 58 36 1908 10 BT 58 Труба ножки сзади 1 40 33 1908 05 SW 59 Крепежный болт M8x45 4 40 56 58 39 9953 60 Винт с внутренним шести...

Страница 70: ...ись педали 2 91 33 1908 08 SI 94 Заглушки 2 95 36 1908 15 BT 95 Обшивка шатун педали 2 97 36 1908 04 BT 96 Болт M8x20 6 93 97 39 9886 CR 97 Шатун педали 2 93 33 1908 09 SI 98L Обшивка слева 1 40 98R 36 1908 01 BT 98R Обшивка справа 1 40 98L 36 1908 02 BT 99 Сочетание штука 1 98 36 1508 10 BT 100 Резиновое кольцо 1 101 36 1908 12 BT 101 Обшивка опорной трубы 1 30 36 1908 05 BT 102 Болт M5x15 7 18 9...

Страница 71: ...71 Русский ...
Страница 72: ...enden Sie sich bitte an unsere Service Abteilung Internet Service und Ersatzteilportal www christopeit service de Service Top Sports Gilles GmbH Tel 49 0 2051 6067 0 Friedrichstrasse 55 info christopeit sport com Fax 49 0 2051 6067 44 D 42551 Velbert http www christopeit sport com by Top Sports Gilles GmbH D 42551 Velbert Germany ...

Отзывы: