background image

68

LW502/LWU502 User's Manual - Operating Guide
020-001057-01 Rev. 1 (06-2016)

SETUP menu

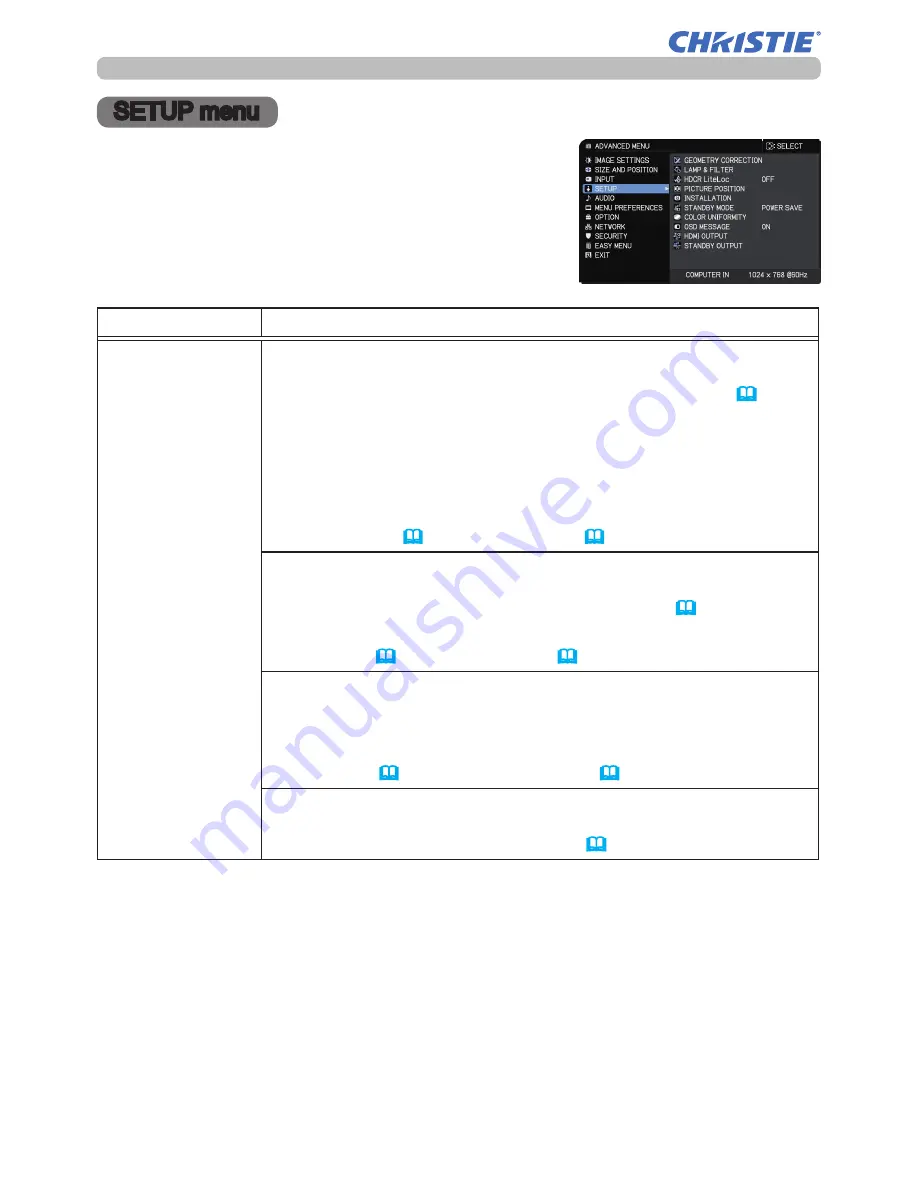
SETUP menu

Select an item from the Setup menu using the ▲/▼ 

cursor buttons, and press the ► cursor button or 

ENTER

 button to execute the item. Then perform it 

according to the following table.

Item

Description

GEOMETRY 

CORRECTION

KEYSTONE

Selecting this item displays the KEYSTONE dialog.

For details, see KEYSTONE in

 Correcting the distortion

(

38

).

• When the zoom adjustment is set to the TELE (telephoto focus), 

this function may be excessive. This function should be used when 

the zoom adjustment is set to the full WIDE (wide-angle focus).

• When the horizontal lens shift is not set to the center, this function 

may not work correctly.

• This function is unavailable when the screen is activated by  

3D KEYSTONE (

39

), and WARPING (

40

)

.

3D KEYSTONE

Selecting this item displays the 3D KEYSTONE dialog. For details, 

see 3D KEYSTONE in 

Correcting the distortion

 (

39

).

• This function is unavailable when the screen is activated by 

KEYSTONE (

38

), and WARPING (

40

)

.

WARPING

Selecting this item displays the WARPING dialog. For details, see 

Application Manual of this feature.
• This function is unavailable when the screen is activated by 

KEYSTONE (

38

) and 3D KEYSTONE (

39

).

EDGE BLENDING

Selecting this item displays the EDGE BLENDING dialog. For 

details, see EDGE BLENDING feature (

41 ~ 44

).

(continued on next page)

Содержание LW502

Страница 1: ...LW502 LWU502 User s Manual detailed Operating Guide 020 001057 01 ...

Страница 2: ......

Страница 3: ...trademarks of the Video Electronics Standard Association HDMITM the HDMI logo and High Definition Multimedia Interface are trademarks or registered trademarks of HDMI Licensing LLC in the United States and other countries Blu ray DiscTM and Blu rayTM are trademarks of Blu ray Disc Association DICOM is the registered trademark of the National Electrical Manufacturers Association for its standards p...

Страница 4: ...o 34 Adjusting the projector s elevator 35 Adjusting the zoom and focus 35 Adjusting the lens shift 36 Using the automatic adjustment feature 37 Correcting the distortion 38 Using the EDGE BLENDING features 41 Using the magnify feature 45 Temporarily freezing the screen 46 Temporarily blanking the screen 46 PbyP Picture by Picture PIP Picture in Picture 47 Using the menu function 51 Indication in ...

Страница 5: ...al communications in medicine ü The built in 16W speaker delivers sufficient sound volume in a large space like a classroom without external speakers ü Equipped with HDCR LiteLoc which maintains visibility by automatic image correction in accordance with lamp deterioration Features Keep the original packing materials for future shipment Use the original packing materials when moving the projector ...

Страница 6: ...aker 32 75 3 Filter cover 105 The air filter and intake vent are inside 4 Elevator feet x2 35 5 Elevator buttons x2 6 Remote sensor 29 89 7 Lens cover 8 Intake vents 9 Control panel 5 10 AC AC inlet 26 11 Exhaust vents 12 Ports 6 13 Security bar 25 14 Security slot 25 15 Battery cover 107 3 2 4 7 4 8 11 10 14 13 1 15 5 6 12 9 5 3 2 4 7 5 6 LWU502 LW502 ...

Страница 7: ... or pressure to this projector Remove all the attachments including the power cord and cables from the projector when carrying the projector Do not look into the lens and the openings on the projector while the lamp is on as the projection ray may cause a trouble on your eyes Keep any object away from concentrated projection light beam Blocking the beam can cause high temperatures to occur and may...

Страница 8: ...aseT port 3 LAN port 4 WIRELESS port 5 HDMI 1 port 6 HDMI 2 port 7 HDMI OUT port 8 VIDEO port 9 AUDIO IN1 port 10 AUDIO IN2 L R ports 11 AUDIO OUT port 12 MONITOR OUT port 13 REMOTE CONTROL IN port 14 REMOTE CONTROL OUT port 15 CONTROL port Introduction Part names continued 2 3 10 8 9 15 13 14 5 4 6 12 7 11 1 ...

Страница 9: ... FOCUS button 11 ZOOM button 12 VOLUME button 32 13 MAGNIFY OFF button 45 14 FOCUS button 15 ZOOM button 16 VOLUME button 32 17 PAGE UP button 18 GEOMETRY button 38 19 PICTURE button 20 MUTE button 32 21 PAGE DOWN button 22 INTERACTIVE button 23 NETWORK button 24 BLANK button 46 25 ESC button 28 26 MENU button 51 27 ENTER button 51 28 OSD MSG button 73 29 RESET button 51 30 cursor buttons 51 31 Ba...

Страница 10: ...onsult your dealer about your installation Secure a clearance of 50cm or greater between the exhaust vents and walls and a clearance of 30cm or greater between the intake vents and walls Assume that there is enough clearance in the front back and top of the projector in the figure below Secure a clearance of 30cm or greater between the intake vents and walls Assume that there is enough clearance i...

Страница 11: ...inued on next page Projector top Projector bottom Elevator feet Ⓗ Ⓥ Screen size ⓐ Projection distance Refer to tables T 1 and T 2 at the back of Setup Guide as well as the following to determine the screen size and projection distance The values shown in the table are calculated for a full size screen ...

Страница 12: ...anufacturer Read and keep the manuals of the accessories used For special installation such as ceiling mounting consult your dealer beforehand Remove all the attachments including the power cord and cables from the projector when carrying the projector Do not install the projector near thermally conductive or flammable things Such things when heated by the projector could result in a fire and burn...

Страница 13: ...cing the projector in smoky humid or dusty place Placing the projector in such places could cause a fire an electric shock and malfunction of the projector Do not place the projector near humidifiers Especially for an ultrasonic humidifier chlorine and minerals contained in tap water are atomized and could be deposited in the projector causing image degradation or other problems Do not place the p...

Страница 14: ... to the projector That may be required by EMI regulations CAUTION Plug and Play is a system composed of a computer its operating system and peripheral equipment such as display devices This projector is VESA DDC 2B compatible Plug and Play can be used by connecting this projector to a computer that is VESA DDC display data channel compatible Take advantage of this feature by connecting a computer ...

Страница 15: ...13 LW502 LWU502 User s Manual Operating Guide 020 001057 01 Rev 1 06 2016 Setting up Connecting with your devices continued HDBaseT TM Computer continued on next page Smartphone Tablet ...

Страница 16: ...rmance is achieved if the resolutions of the input signal and the projector panel are identical If you connect this projector and a notebook computer you must output the display to an external monitor or output simultaneously to the internal display and an external monitor Consult the computer s manual for the setting Depending on the input signal the automatic adjustment function of this projecto...

Страница 17: ...02 LWU502 User s Manual Operating Guide 020 001057 01 Rev 1 06 2016 Setting up Connecting with your devices continued continued on next page Computer Access point USB wireless adapter optional External device ...

Страница 18: ... wireless adapter turn off the power of the projector and disconnect the power cord Do not use any extension cable or device when connecting the adapter to the projector To connect both the LAN cable and USB wireless adapter to the projector use a LAN cable that is flat on the side where the plug s wire is visible Otherwise both of them cannot be connected correctly or the wire may break malfuncti...

Страница 19: ...17 LW502 LWU502 User s Manual Operating Guide 020 001057 01 Rev 1 06 2016 Setting up Connecting with your devices continued VCR DVD Blu ray DiscTM player continued on next page ...

Страница 20: ...ital Content Protection and therefore can display video signals from HDCP compatible DVD players The HDMI ports support the following signals For Video signals refer to User s Manual detailed Technical Audio signal Format Linear PCM Sampling frequency 48kHz 44 1kHz 32kHz This projector can be connected with another equipment that has HDMITM connector but with some equipment the projector may not w...

Страница 21: ... operation in normal standby depends on the setting of the menu 74 It is not output during saving standby When outputting HDMI signal turn on the output side connected device before inputting image signal to the projector Up to 7 devices can be connected in series for HDMI output port of this projector The number of devices that can be connected varies depending on HDCP version the restriction of ...

Страница 22: ...LWU502 User s Manual Operating Guide 020 001057 01 Rev 1 06 2016 Setting up Connecting with your devices continued Speakers with an amplifier Wired Remote control Monitor Another projector continued on next page ...

Страница 23: ... to control it from the wired remote control You can use this projector as a remote control relay with the REMOTE CONTROL IN and OUT ports To connect the wired remote control or another projector to the REMOTE CONTROL IN or OUT ports use audio cables with 3 5 mm diameter stereo mini plugs This function is useful when a wireless remote signal may not reliably reach the projector NOTE Setting up Con...

Страница 24: ...ze of 2 0 x 4 0mm or smaller Do not fasten the cables other than HDMI To fasten the cable use a supplied cable tie or plastic tie with the size of 2 0 x 4 0mm or smaller A metallic tie may cause damage to the cables and tie holder Do not bind the cables too tightly The cables or the hole might be damaged WARNING CAUTION Remove the screw located on the lower side of HDMI connector and use it to att...

Страница 25: ...the cover into the hole at the upper right of the WIRELESS port in the direction of the arrow 3 Align the screw holes on the projector and the cover Then insert the screw removed from the projector into the hole and tighten the screw Fastening the adapter cover Keep small parts away from children and pets Take care not to put in the mouth Heat may build up in the USB wireless adapter to avoid poss...

Страница 26: ... Setting up Attaching the terminal cover Insert the two claws of the terminal cover into the hole of the case and confirm hook is fitting into the case Terminal cover When detaching the terminal cover push the hook in the direction of the arrow and pull it forward Claw Hook ...

Страница 27: ...ire near the exhaust vents It may become too hot WARNING CAUTION The security bar and slot is not comprehensive theft prevention measures It is intended to be used as supplemental theft prevention measure NOTE Anti theft chain or wire security bar 19mm 11mm Security slot 15mm Setting up When using the optional suspension bracket fix the bundled hook metal and screws securely and attach the drop pr...

Страница 28: ...t distribute the power supply to multiple devices Doing so may overload the outlet and connectors loosen the connection or result in fire electric shock or other accidents Connect the ground terminal for the AC inlet of this unit to the ground terminal of the building using an appropriate power cord bundled This projector is also designed for IT power systems with a phase to phase voltage of 220 t...

Страница 29: ...Always handle the batteries with care and use them only as directed Improper use may result in battery explosion cracking or leakage which could result in fire injury and or pollution of the surrounding environment Use only the batteries specified Do not use batteries of different types at the same time Do not mix a new battery with used one Make sure the plus and minus terminals are correctly ali...

Страница 30: ...the combination of two buttons listed below simultaneously for about three seconds 1 Set to Mode 1 NORMAL VOLUME and RESET buttons 2 Set to Mode 2 HIGH MAGNIFY OFF and ESC buttons REMOTE FREQ in the SERVICE item of the OPTION menu 89 of the projector to be controlled should be set to the same mode as the remote control ASPECT BLANK ESC MENU RESET AUTO PAGE DOWN ON OFF FREEZE UP ENTER FOCUS ZOOM IN...

Страница 31: ...he OPTION menu 89 The remote control signal reflected in the screen may be available If it is difficult to send the signal to the sensor directly try to make the signal reflect The remote control uses infrared light to send signals to the projector Class 1 LED Use the remote control in an area free from obstacles that could block the remote control s signal to the projector The remote control may ...

Страница 32: ...artup Once the INITIAL SETTING Menu is set it does not appear until FACTORY RESET 94 is executed If you want to change the settings refer to the LANGUAGE 76 and ALTITUDE 88 menu 1 LANGUAGE Use the buttons to select the desired language and press the ENTER button of the remote control or the INPUT button of the projector to execute 2 ALTITUDE Use the buttons to select NORMAL for altitude below 1600...

Страница 33: ...shortly after turning it on Such operations might cause the lamp to malfunction or shorten the lifetime of some parts including the lamp Power on off A strong light is emitted when the projector s power is on Do not look into the lens of the projector or look inside of the projector through any of the projector s openings as the projection ray may cause a trouble on your eyes Keep objects away fro...

Страница 34: ...s ASPECT BLANK ESC MENU RESET AUTO PAGE DOWN ON OFF FREEZE UP ENTER FOCUS ZOOM INPUT INTERACTIVE MYBUTTON 1 2 PbyP MAGNIFY VOLUME GEOMETRY PICTURE MUTE NETWORK OSD MSG ASPECT BLANK ESC MENU RESET AUTO PAGE DOWN ON OFF FREEZE UP ENTER FOCUS ZOOM INPUT INTERACTIVE MYBUTTON 1 2 PbyP MAGNIFY VOLUME GEOMETRY PICTURE MUTE NETWORK OSD MSG VOLUME buttons NOTE Temporarily muting the sound ASPECT BLANK ESC ...

Страница 35: ... the ports cannot be selected 82 While ON is selected for AUTO SEARCH item in the OPTION menu the projector keeps checking the ports in the above order repeatedly until an input signal is detected 82 NOTE ASPECT BLANK ESC MENU RESET AUTO PAGE DOWN ON OFF FREEZE UP ENTER FOCUS ZOOM INPUT INTERACTIVE MYBUTTON 1 2 PbyP MAGNIFY VOLUME GEOMETRY PICTURE MUTE NETWORK OSD MSG INPUT button ASPECT BLANK ESC...

Страница 36: ...e for aspect ratio in sequence The ASPECT button does not work when no proper signal is input NORMAL mode keeps the original aspect ratio setting NOTE For a computer signal NORMAL 4 3 16 9 16 10 ZOOM NATIVE For a video signal 4 3 16 9 16 10 14 9 ZOOM NATIVE For an input signal from the LAN port or if there is no signal 16 10 fixed For HDMITM and HDBaseTTM signals NORMAL 4 3 16 9 16 10 14 9 ZOOM NA...

Страница 37: ...sired height 3 Release the elevator buttons in order to lock the elevator feet 4 After making sure that the elevator feet are locked put the projector down gently 5 If necessary the elevator feet can be manually twisted to make more precise adjustments Hold the projector when twisting the feet 11 To loose an elevator foot push the elevator button on the same side as it To finely adjust twist the f...

Страница 38: ...er runs idle the lens shift cannot be performed further Turn the lens adjuster to the opposite direction to adjust the lens shift When the lens adjuster is turned too quickly it may make a clicking sound by a clutch mechanism In that case turn it slowly to adjust the lens shift When adjusting the lens shift to the maximal oblique direction the periphery of the projected screen may be dark or a sha...

Страница 39: ...mponent video signal The vertical position and horizontal position are automatically set to the default The horizontal phase is automatically adjusted The automatic adjustment operation requires approximately 10 seconds Also note that it may not function correctly with some input When this function is performed for a video signal an extra line may appear outside a picture When this function is per...

Страница 40: ...KEYSTONE 3D KEYSTONE WARPING for adjustment When one is selected other items are not available KEYSTONE When KEYSTONE is pointed at pressing the or ENTER button displays the KEYSTONE dialog 1 Select the vertical or horizontal keystone with the buttons 2 Use the buttons to adjust the keystone distortion When the zoom adjustment is set to the TELE telephoto focus this function may be excessive This ...

Страница 41: ... and press the or ENTER button 2 Select one of the corners or sides to be adjusted with the buttons and press the ENTER or button 3 Adjust the selected part as below To adjust a corner use the buttons to adjust the position of the corner To adjust the upper or lower side use the buttons to adjust the distortion of the side To adjust the left or right side use the buttons to adjust the distortion o...

Страница 42: ...1 to 3 number of the memory with the buttons and press the ENTER or button The current adjusted condition is lost by loading data If you want to keep the current adjustment save it before performing a LOAD function The LOAD functions whose linked memories have no data are skipped There may be some noise and the screen may flicker for a moment when loading data This is not malfunction NOTE WARPING ...

Страница 43: ...LENDING LEVEL with buttons 1 25 can be selected with buttons Adjust the brightness of Blending Region according to the settings 3 BLENDING REGION 3 1 Specifying Blending Region Select one of the four sides with buttons and press ENTER or button Blending Region can be specified for left and right sides with buttons and for top and bottom sides with buttons Specify Blending Region for each projector...

Страница 44: ...y Cropping Menu 4 2 Setting Cropping Select MODE with buttons and select ON with buttons The input image is automatically cut out according to the settings of Blending Region 4 CROPPING When inputting the same image to each projector The cropping function enables projector to cut out a part of input image and display one image on a large screen The following patterns are supported 1 x 2 2 x 2 2 x ...

Страница 45: ...R or button Move the guide display with buttons to select the region of the screen to be cut out Press the ENTER or button and then press button to select SETUP and MODE switches to ON automatically continued on next page 4 4 Adjust Cropping Area of the other projector Set Cropping Area of the other projector with the same value as one projector The input image is automatically cut out according t...

Страница 46: ...tons to adjust the dimming level 6 WHITE BALANCE Adjusts the white balance of the whole screen 6 1 OFFSET Changes the color intensity on the whole tones 6 2 GAIN Mainly affects color intensity on the brighter tones The positional deviation of the screen may occur after installing the projector over time Perform the screen adjustment again to correct the positional deviation NOTE ...

Страница 47: ... OFF button on the remote control to exit magnification The MAGNIFY dialog automatically disappears in several seconds with no operation The dialog appears again if the MAGNIFY ON button is pressed when the dialog has automatically disappeared The magnification is automatically disabled when the displaying signal or its display condition is changed While the magnification is active the keystone di...

Страница 48: ...TE NETWORK OSD MSG ASPECT BLANK ESC MENU RESET AUTO PAGE DOWN ON OFF FREEZE UP ENTER FOCUS ZOOM INPUT INTERACTIVE MYBUTTON 1 2 PbyP MAGNIFY VOLUME GEOMETRY PICTURE MUTE NETWORK OSD MSG FREEZE button Press BLANK button on the remote control The BLANK screen is displayed instead of the screen of input signal Refer to BLANK item in MENU PREFERENCES 76 To exit from the BLANK screen and return to the i...

Страница 49: ...u that cannot be used are displayed in gray and cannot be selected NOTE Normal mode PbyP mode main area sub area continued on next page PIP mode Press the PbyP button on the remote control This activates the PbyP mode Then press the PbyP button again The projector goes into PIP mode The screen displayed before the PbyP button was pressed is displayed as the main area Most of operations are effecti...

Страница 50: ... main area sub area The setting information appears for several seconds when the PbyP PIP function is started Displays the input information for each area A frame around the main area and an audio mark indicating the audio output are also displayed The information can be redisplayed with the buttons after it has been erased Setting information main area sub area Input information Audio mark Frame ...

Страница 51: ...o the table for details on available input signal combinations Any combinations marked with X cannot be selected Changing the picture input signal Sub area Main area COMPUTER IN LAN HDMI 1 HDMI 2 HDBaseT VIDEO COMPUTER IN X X O O O X LAN X X X X X X HDMI 1 O X X O X O HDMI 2 O X O X O O HDBaseT O X X O X O VIDEO X X O O O X main area sub area The combined input signals marked with an O can be sele...

Страница 52: ... sub area PbyP Picture by Picture PIP Picture in Picture continued For some signals it may not be displayed correctly in the PbyP PIP mode even if it can be displayed properly in the normal mode PbyP PIP is unavailable when MANUAL is selected in GEOMETRY CORRECTION EDGE BLENDING MODE NOTE Press the MY BUTTON assigned the PbyP PIP SWAP 84 The position of the area is exchanged without any setting ch...

Страница 53: ...the projector works as the cursor buttons The basic operations of these menus are as follows In the EASY MENU continued on next page 1 Use the cursor buttons to select a menu To change it to the EASY MENU select the EASY MENU The items in the menu appear on the right side 2 Press the cursor button or ENTER button to move the cursor to the right side Then use the cursor buttons to select an item to...

Страница 54: ...SD menu It is the same as pressing the MENU button RETURN Returns the menu to the previous menu CANCEL or NO Cancels the operation in the present menu and returns to the previous menu OK or YES Executes the prepared function or shifts the menu to the next menu Some functions cannot be performed when a certain input port is selected or when a certain input signal is displayed To reset the operation...

Страница 55: ... RANGE COMPUTER IN FRAME LOCK RESOLUTION PbyP PIP SETUP SETUP 68 GEOMETRY CORRECTION LAMP FILTER HDCR LiteLoc PICTURE POSITION INSTALLATION STANDBY MODE COLOR UNIFORMITY OSD MESSAGE HDMI OUTPUT STANDBY OUTPUT AUDIO 75 VOLUME SPEAKER AUDIO SOURCE MENU PREFERENCES 76 LANGUAGE MENU POSITION BLANK AUTO BLANK START UP My Screen My Screen Lock SOURCE NAME TEMPLATE Closed Caption C C OPTION 82 SOURCE SKI...

Страница 56: ...odes are combinations of GAMMA and COLOR TEMP settings Choose a suitable mode according to the projected source STANDARD ó NATURAL ó CINEMA ó DYNAMIC USER 3 BOARD BLACK USER 2 BOARD GREEN USER 1 ó DICOM SIM ó DAYTIME ó WHITEBOARD Lines or other noise might appear on the screen when this function is operated but it is not a malfunction DICOM SIM is the projector s DICOM Digital Imaging and Communic...

Страница 57: ...ecting the OK using the button performs resetting FILTER HOURS The usage time of the air filter is shown in the menu Selecting this item resets the filter hours which counts usage time of the air filter A dialog is displayed for confirmation Selecting OK using the button initiates the reset See the FILTER HOURS item in SETUP menu 70 LANGUAGE Using the buttons changes the display language See the L...

Страница 58: ...er 1 or 2 applies 1 DIGITAL FORMAT item in the INPUT menu for selected port is set to VIDEO 2 DIGITAL FORMAT item in the INPUT menu for selected port is set to AUTO and the projector recognizes that it receives video signals TINT Using the buttons adjusts the tint Reddish ó Greenish This item can be selected only for a video and component video signal For HDMITM and HDBaseTTM signals this item can...

Страница 59: ...urs select OFF PICTURE QUALITY Selecting this item displays the PICTURE QUALITY menu Select an item using the buttons and press the button or the ENTER button on the remote control to execute the item PICTURE MODE STANDARD ó NATURAL ó CINEMA ó DYNAMIC USER 3 BOARD BLACK USER 2 BOARD GREEN USER 1 ó DICOM SIM ó DAYTIME ó WHITEBOARD After selecting USER 1 USER 2 USER 3 the following features are adju...

Страница 60: ...MP This feature is only available when USER 1 USER 2 USER 3 is selected Using the buttons switches the color temperature mode HIGH ó CUSTOM 1 ó MID 1 ó CUSTOM 2 CUSTOM 7 MID 2 Hi BRIGHT 3 CUSTOM 3 CUSTOM 6 LOW Hi BRIGHT 2 ó CUSTOM 5 ó Hi BRIGHT 1 ó CUSTOM 4 Selecting a mode whose name includes CUSTOM and then pressing the button or the ENTER button displays a dialog to help you in adjusting the OF...

Страница 61: ...or ENTER button performs each function LOAD 1 ó LOAD 2 ó LOAD 3 ó LOAD 4 SAVE 4 ó SAVE 3 ó SAVE 2 ó SAVE 1 LOAD 1 LOAD 2 LOAD 3 LOAD 4 Performing a LOAD function loads the data from the memory linked in the number included in the function s name and adjusts the picture automatically depending on the data The LOAD functions whose linked memory has no data are skipped Remember that the current adjus...

Страница 62: ...o the following table for selected port Item Description ASPECT Using the buttons switches the mode for aspect ratio For a computer signal NORMAL ó 4 3 ó 16 9 ó 16 10 ó ZOOM ó NATIVE For HDMITM and HDBaseT signals NORMAL ó 4 3 ó 16 9 ó 16 10 ó 14 9 ó ZOOM ó NATIVE For a video signal 4 3 ó 16 9 ó 16 10 ó 14 9 ó ZOOM ó NATIVE For an input signal from the LAN port or if there is no signal 16 10 fixed...

Страница 63: ...the default setting Pressing the RESET button when the V POSITION is selected resets the V POSITION to the default setting When this function is performed on a video signal the range of this adjustment depends on OVER SCAN above setting You cannot adjust when OVER SCAN is set to 10 This function is unavailable for a signal from the LAN HDMI 1 HDMI 2 or HDBaseT port H POSITION Using the buttons adj...

Страница 64: ...ure For a computer signal The vertical position the horizontal position and the horizontal phase are automatically adjusted Make sure that the application window is set to its maximum size prior to attempting to use this feature A dark picture may still be incorrectly adjusted Use a bright picture when adjusting For a video signal The video format best suited for the respective input signal is sel...

Страница 65: ...wn conversion system But these may cause a certain defect for example jagged line of the picture for a quick moving object If this occurs select OFF even if the screen image loses sharpness VIDEO NR Using the buttons switches the noise reduction mode HIGH ó MID ó LOW This function works only for a video signal component video signal of 480i 60 or 1080i 60 an HDMITM signal of 480i 60 or 1080i 60 an...

Страница 66: ...some signals If the picture becomes unstable for example an irregular picture lack of color select the mode according to the input signal DIGITAL FORMAT The digital format of HDMITM input signals from the HDMI 1 HDMI2 and HDBaseTTM ports can be set 1 Use the buttons to select the port to be set 2 Use the buttons to select the digital format AUTO ó VIDEO ó COMPUTER AUTO automatically sets the optim...

Страница 67: ...N The computer input signal type for COMPUTER IN port can be set Use the buttons to select the computer input signal type AUTO ó SYNC ON G OFF Selecting the AUTO mode you can input a sync on G signal or component video signal from the port In the AUTO mode the picture may be distorted with certain input signals If this occurs remove the signal connector so that no signal is received and select the...

Страница 68: ... dialog is displayed 4 To set a custom resolution use the buttons to select the CUSTOM and the RESOLUTION CUSTOM box is displayed Set the HORIZONTAL and VERTICAL resolutions using the buttons This function may not support all resolutions 5 Move the cursor to OK on the screen and press the or ENTER button The message ARE YOU SURE YOU WISH TO CHANGE RESOLUTION appears To save the setting press the b...

Страница 69: ...e control changes the position of sub area in PIP mode 50 PbyP PIP FRAME LOCK Select the screen that enables FRAME LOCK function when using PbyP or PIP LEFT PRIMARY Enables FRAME LOCK function for input on left screen of PbyP or on primary area of PIP RIGHT SECONDARY Enables FRAME LOCK function for input on right screen of PbyP or on secondary area of PIP ...

Страница 70: ...s set to the full WIDE wide angle focus When the horizontal lens shift is not set to the center this function may not work correctly This function is unavailable when the screen is activated by 3D KEYSTONE 39 and WARPING 40 3D KEYSTONE Selecting this item displays the 3D KEYSTONE dialog For details see 3D KEYSTONE in Correcting the distortion 39 This function is unavailable when the screen is acti...

Страница 71: ...he button or the ENTER button on the remote control to execute the item ECO MODE Using the buttons switches the Eco mode NORMAL ó ECO When the item other than NORMAL is selected acoustic noise and screen brightness are reduced LAMP HOURS The lamp hours is the usage time of the lamp counted after the last resetting It is shown in the LAMP FILTER menu Pressing the RESET button on the remote control ...

Страница 72: ...5000h ó 20000h ó 25000h ó 30000h ó OFF After choosing an item except OFF the message REMINDER HRS PASSED appears after the timer reaches the interval time set by this feature When the OFF is chosen the message does not appear Use this feature to keep the air filter clean setting the suitable time according to your environment of this projector Clean the filter periodically If the air filter become...

Страница 73: ... the screen NO INPUT IS DETECTED SYNC IS OUT OF RANGE INVALID SCAN FREQ The BLANK or TEMPLATE function is selected INSTALLATION Pressing the button displays the dialog for changing the INSTALLATION setting FRONT DESKTOP REAR DESKTOP REAR CEILING FRONT CEILING Use the buttons to select the required setting on the INSTALLATION dialog and press the ENTER button of the remote control or the INPUT butt...

Страница 74: ...ETWORK BRIDGE all of the RS 232C commands are disabled 90 When POWER SAVE is selected STANDBY OUTPUT is invalid When POWER SAVE is selected the HDMI Link and HDBaseT functions are disabled while the projector is in the standby mode This function is available only when OFF is selected for STACK MODE OPTION menu SERVICE COMMUNICATION STACK When POWER SAVE is selected SCHEDULE function Ex POWER ON at...

Страница 75: ...anging The indication of the PICTURE MODE displayed by changing The indication of the DYNAMIC IRIS displayed by changing The indication of the MY MEMORY displayed by changing The indication of FREEZE and II while freezing the screen by pressing the FREEZE button The indication of the TEMPLATE displayed by changing The indication of the ECO MODE displayed by changing HIDE All message functions do n...

Страница 76: ... the HDMI OUT in the normal operation STANDBY OUTPUT AUDIO OUT To select the sound output in the standby mode HDMI OUT To select the image output on the HDMI OUT in the standby mode MONITOR OUT To select the image output on the MONITOR OUT in the standby mode When the STANDBY MODE is set to POWER SAVE the STANDBY OUTPUT menu cannot be operated ...

Страница 77: ...built in speaker of this projector However the built in speaker does not work when SPEAKER is set to OFF 1 Choose a picture input port using the buttons 2 Select an audio input port or the mute icon using the buttons The icons indicate the following No 1 AUDIO IN1 port No 2 AUDIO IN2 port No 3 HDMI 1 port No 4 HDMI 2 port No 5 HDBaseT port No 6 LAN port mutes the sound Audio input from port number...

Страница 78: ...N Using the buttons adjusts the menu position To quit the operation press the MENU button on the remote control or do not perform any operation for about 10 seconds BLANK Using the buttons switches the mode for the blank screen The blank screen is a screen for the temporarily blanking feature 46 It is displayed by pressing the BLANK button on the remote control My Screen ó ORIGINAL ó BLUE ó WHITE ...

Страница 79: ...ANK screen When start up screen is displayed START UP Using the buttons switches the mode for the start up screen The start up screen is a screen displayed when no signal or an unsuitable signal is detected My Screen ó ORIGINAL ó OFF My Screen Screen can be registered by the My Screen item 78 ORIGINAL Screen preset as the standard screen OFF Plain black screen To avoid remaining as an afterimage t...

Страница 80: ...h you want to use The frame may not be able to be moved for some input signals To start registration press the ENTER button on the remote control or INPUT button on the control panel To restore the screen and return to the previous dialog press the RESET button on the remote control or press the and INPUT buttons at the same time on the control panel Registration may take several minutes When the ...

Страница 81: ...e or ENTER button The SOURCE NAME menu is displayed 2 Use the buttons on the SOURCE NAME menu to select the port to be named and press the button The SOURCE NAME dialog is displayed Right side of the menu is blank until a name is specified 3 Select an icon you want to assign to the port in the SOURCE NAME dialog The name assigned to the port is automatically switched according to your icon selecti...

Страница 82: ...hen follow the same procedure as described at the item 6 above 8 To finish entering text move the cursor to the OK on screen and press the ENTER or button To revert to the previous name without saving changes move the cursor to the CANCEL on screen and press the ENTER or button TEMPLATE Using the cursor buttons switches the mode for the template screen Press the cursor or the ENTER button to displ...

Страница 83: ... set at AUDIO SOURCE is selected ON Closed Caption is on OFF Closed Caption is off The caption is not displayed when the OSD menu is active The Closed Caption is the function to display the dialogue narration and or sound effects of a television program or other video sources The Closed Caption availability depends upon broadcaster and or content MODE Select Closed Caption MODE setting from follow...

Страница 84: ...a picture input port using the buttons 2 Using the buttons turns on off the SOURCE SKIP function NORMAL ó SKIP The port that is set to SKIP is ignored You cannot set SKIP to all ports at the same time This setting is not valid when in the PbyP PIP mode 47 AUTO SEARCH Using the buttons turns on off the automatic signal search function ON ó OFF When ON is selected detecting no signal automatically c...

Страница 85: ... below is disabled AUTO POWER OFF Using the buttons adjusts the time to count down to automatically turn the projector off Long max 99 minutes ó Short min 0 minute DISABLE When the time is set to 0 the projector is not turned off automatically When the time is set to 1 to 99 and when the passed time with no signal or an unsuitable signal reaches at the set time the projector lamp is turned off If ...

Страница 86: ...left in the PbyP mode Swaps the primary picture and the secondary picture in the PIP mode 50 PIP POSITION Toggles the PIP position eClarity Turns on off the eClarity dialog 59 HDCR Turns on off the HDCR dialog 59 INFORMATION Displays SYSTEM INFORMATION INPUT INFORMATION 94 NETWORK INFORMATION MY MEMORY Loads one of adjustment data stored 59 When more than one data are saved the adjustment changes ...

Страница 87: ...E AND TIME SPECIFIC DATE Place a checkmark in the box Checkmark in the box Date and first setup info could be seen with the checkmark Item Description DATE TIME Set the DATE Year Month Date and Time 24 hour scale SPECIFIC DATE Set specific date from 1 to 10 PROGRAM EDIT The TIME and EVENT for Program 1 to 16 can be edited Refer to the actual on screen display OSD for appropriate operation NOTE 1 2...

Страница 88: ...6 can be edited RETURN Select this to return to the top menu of the SCHEDULE SELECT Select from PROGRAM 01 to 16 to edit Each PROGRAM can be setup up to 20 settings COPY TO The selected program with the settings of TIME and EVENT can be copied to other program APPLY Select this to apply and save all adjustments and settings continued on next page Checkmark in the box Date and first setup info coul...

Страница 89: ... 3 Use the cursor buttons to adjust EVENT can be selected as listed below POWER ON STANDBY INPUT SOURCE input source channel MY IMAGE IMAGE 1 to 4 IMAGE OFF MESSENGER TEXT 1 to 12 TEXT OFF ECO MODE NORMAL ECO BLANK ON OFF 4 Press cursor button to finish the settings 5 Select APPLY to save the settings continued on next page Refer to the on screen display OSD for the appropriate operation When the ...

Страница 90: ...r when the HIGH is selected HIGH ó NORMAL AUTO IMAGE ADJUST Using the buttons to select one of the mode When the DISABLE is selected the automatic adjustment feature is disabled FINE ó FAST ó DISABLE FINE Finer tuning including H SIZE adjustment FAST Faster tuning setting H SIZE to prearranged data for the input signal Depending on conditions such as input image signal cable to the projector envir...

Страница 91: ... ó OFF REMOTE FREQ 1 Use the button to change the projector s remote sensor frequency setting 4 28 1 NORMAL ó 2 HIGH 2 Use the button to change the projector s remote sensor on or off ON ó OFF If the remote control does not function correctly disable either of them You cannot disable both options at the same time REMOTE ID This menu is displayed when selecting this item and pressing any of the ID ...

Страница 92: ...ICATION menu are invalid For the function of serial communication refer to the Network Guide COMMUNICATION TYPE Select the communication type for transmission using the CONTROL port NETWORK BRIDGE WIRELESS NETWORK BRIDGE WIRED OFF NETWORK BRIDGE Select this type if it is required to control an external device as a network terminal using this projector from the computer Select WIRELESS or WIRED as ...

Страница 93: ...N TYPE is set to OFF 90 TRANSMISSION METHOD Select the transmission method for communication by the NETWORK BRIDGE from the CONTROL port HALF DUPLEX ó FULL DUPLEX HALF DUPLEX This method lets the projector make two way communication but only one direction either transmitting or receiving data is allowed at a time FULL DUPLEX This method lets the projector make two way communication transmitting an...

Страница 94: ...s Select the time period to keep the projector waiting for response from the device that the projector sends data to While waiting a response the projector does not send out any data from the CONTROL port This menu is available only when the NETWORK BRIDGE is selected for the COMMUNICATION TYPE and the HALF DUPLEX is selected for the TRANSMISSION METHOD 91 OFF is selected as the default setting ST...

Страница 95: ...ROJECTOR When EXTERNAL DEVICE is selected the resolution of the signal input to the projector and signal output from the projector may be restricted by the maximum resolution of the connected device such as projector or monitor When PROJECTOR is selected the image from the device connected to HDMI OUT may not be displayed normally continued on next page Only the LAN or HDBaseT port can be used for...

Страница 96: ...on is working This item cannot be selected for no signal and sync out When the MY TEXT DISPLAY is set to ON the MY TEXT is displayed together with the input information in the INPUT INFORMATION box 101 FACTORY RESET Selecting OK using the button performs this function By this function all menu items are collectively returned to the initial setting Note that the items LAMP HOURS FILTER HOURS LANGUA...

Страница 97: ...16 NETWORK menu See the Network Guide for details of NETWORK operation Remember that incorrect network settings on this projector may cause trouble on the network Consult your network administrator before connecting to an existing access point on your network NETWORK menu ...

Страница 98: ...ORD box is displayed press and hold the RESET button on the remote control for approximately three seconds or press and hold the INPUT button for three seconds while pressing the button on the projector 2 The 10 digit Inquiring Code is displayed Contact your dealer with the 10 digit Inquiring Code Your password is sent after your user registration information is confirmed If there is no key input ...

Страница 99: ...he remote control or button on the projector returns to My Screen PASSWORD on off menu When a password is set for My Screen The My Screen registration function and menu is unavailable The My Screen Lock menu is unavailable The START UP setting is locked on My Screen and the menu is unavailable Turning the My Screen PASSWORD off allows normal operation of these functions Do not forget your My Scree...

Страница 100: ...x is displayed again If an incorrect PIN code is input three times the projector turns off Afterwards the projector turns off every time an incorrect PIN code is input The projector also turns off if there is no key input for approximately five minutes while the Enter PIN code box is displayed This function activates only when the projector is started after AC power is turned off Do not forget you...

Страница 101: ...o the right side of the NEW PASSWORD AGAIN box and press the button to display the NOTE NEW PASSWORD box for about 30 seconds Make note of the password Pressing the ENTER button on the remote control or the button on the projector returns to the TRANSITION DETECTOR on off menu Do not forget your TRANSITION DETECTOR password This function activates only when the projector is started after turning o...

Страница 102: ...r the same password again 1 4 Move the cursor to the right side of the NEW PASSWORD AGAIN box and press button to display the NOTE NEW PASSWORD box for about 30 seconds Make note of the password Pressing the ENTER button on the remote control or button on the projector returns to the MY TEXT PASSWORD on off menu 2 Turning off the MY TEXT PASSWORD 2 1 Follow the procedure in 1 1 to display the MY T...

Страница 103: ...ines are blank Use the buttons and the ENTER or button to select and enter characters To erase one character at one time press the RESET button or press the and button at the same time If you move the cursor to DELETE or CLEAR ALL on screen and press the ENTER or button one or all characters are erased The MY TEXT can be input up to 24 characters on each line 3 To change an already inserted charac...

Страница 104: ... this item displays the SECURITY INDICATOR dialog Use the buttons to select ON or OFF ON ó OFF When ON is selected while PIN LOCK or TRANSITION DETECTOR is ON the SECURITY indicator blinks in yellow in the standby mode 98 99 STACK LOCK Selecting this item displays the STACK LOCK dialog For more information see the Instant Stack Guide ...

Страница 105: ...the lamp out by the handles Never loosen any other screws 5 Insert the new lamp and firmly retighten the three screws of the lamp loosened in the previous step to lock it in place 6 While putting the interlocking parts of the lamp cover and the projector together slide the lamp cover back in place Firmly fasten the screw of the lamp cover 7 Turn the projector on and reset the lamp hours using the ...

Страница 106: ...le the gas or fine particles that come out from the projector s vent holes and not to get them into your eyes or mouth Before replacing the lamp turn the projector off and unplug the power cord then wait at least 45 minutes for the lamp to cool sufficiently Handling the lamp while hot can cause burns as well as damaging the lamp Never unscrew except the appointed marked by an arrow screws Do not o...

Страница 107: ...r to sufficiently cool down 2 Use a vacuum cleaner on and around the filter cover 3 Pick and pull up the filter cover knobs to take it off 4 Press up slightly on the bottom side knobs to unlock the bottom side of the filter unit Pull the center knob to take the filter unit off 5 Use a vacuum cleaner to clean the filter vent of the projector and the outer side of the filter unit 6 Use a vacuum clea...

Страница 108: ... burn or malfunction to the projector WARNING Reset the filter hours only when you have cleaned or replaced the air filter for a suitable indication about the air filter The projector may display the message such as the CHECK THE AIR FLOW or turn off the projector to prevent the internal heat level rising NOTE Cleaning and replacing the air filter continued 9 Turn the projector on and reset the fi...

Страница 109: ...e battery in under the plastic claw and push it into the holder until it clicks 6 Replace the battery cover in place then turn it in the direction indicated CLOSE using a coin WARNING Always handle the batteries with care and use them only as directed The battery may explode if mistreated Do not recharge disassemble or dispose of using fire Improper use may result in cracking or leakage which coul...

Страница 110: ...ojector or inserting liquids in the projector It could result in a fire an electric shock and or malfunction to the projector Do not put anything containing water cleaners or chemicals near the projector Do not use aerosols or sprays WARNING Incorrect care of the projector could cause not only an injury but adverse influence such as discoloration peeling paint etc Do not use cleaners or chemicals ...

Страница 111: ...gn matter and so on should occur In such cases immediately disconnect the power plug from the power outlet After making sure that the smoke or odor has stopped contact to your dealer or service company WARNING Related messages When some messages appear check and deal with it according to the following table Although these messages automatically disappear after several minutes they reappear when th...

Страница 112: ... least 20 minutes After having confirmed the following items turn the power ON again Is there blockage of the air passage aperture Is the air filter dirty Use the unit within the usage temperature parameters 0 C to 35 C or 40 C Setup Guide Is the setting for ALTITUDE appropriate Is the exhaust air hot cold from peripheral equipment blowing against the ventilation opening of projector For details o...

Страница 113: ...ning the air filter Turn the power off immediately and clean or change the air filter referring to the Cleaning and replacing the air filter section of this manual After you have cleaned or changed the air filter reset the filter timer 70 106 The button operation is not available Check the button you want to use 7 Related messages continued ...

Страница 114: ... projector to warm up The projector is in an on state Ordinary operations may be performed The projector is cooling down Wait for the projector to cool down continued on next page Regarding the indicator lamps The indicators may differ from this manual check and deal with it according to the following table The indicators are described as below Lit Steady light Blinking Off Regarding the indicator...

Страница 115: ...he power off and allow the projector to cool down at least 20 minutes After the projector has sufficiently cooled down confirm that no foreign matter has become caught in the fan and so on and then turn the power on again If the same indication is displayed after the remedy contact your dealer or service company The lamp does not light and there is a possibility that interior portion has become he...

Страница 116: ... cold from peripheral equipment blowing against the ventilation opening of projector For details on ALTITUDE refer to ALTITUDE of SERVICE in the OPTION menu If the projector is used with a wrong setting it may cause damage to the projector itself or the parts inside It is time to clean the air filter Turn the power off immediately and clean or change the air filter referring to the section Cleanin...

Страница 117: ... is displayed after the remedy contact your dealer or service company There is a possibility that the interior portion has become overcooled Use the unit within the temperature range NORMAL MODE 0 to 35 C ECO MODE 0 to 40 C AC BLACKOUT error has occurred continued on next page Regarding the indicator lamps Regarding the indicator lamps continued Yellow Red Blinking alternately Green ...

Страница 118: ...TY and NETWORK to the factory default When the interior portion has become overheated for safety purposes the projector is automatically shut down and the indicator lamps may also be turned off In such a case disconnect the power cord and wait at least 45 minutes After the projector has sufficiently cooled down confirm the attachment state of the lamp and lamp cover and turn the power on again NOT...

Страница 119: ...e has not been properly fixed Turn the power off and disconnect the power plug from the power outlet and allow the projector to cool down at least 45 minutes After the projector has sufficiently cooled down confirm the attachment state of the lamp and lamp cover and then turn the power on again 103 Neither sounds nor pictures are output The signal cables are not correctly connected Correctly conne...

Страница 120: ...is disabled If you have selected LAN remove the checkmark from the Sound checkbox in the Option menu of LiveViewer The MUTE function is working Restore the sound pressing MUTE or VOLUME button on the remote control 32 No pictures are displayed The signal cables are not correctly connected Correctly connect the connection cables 12 21 The brightness is adjusted to an extremely low level Adjust BRIG...

Страница 121: ...to AUTO RGB SMPTE240 REC709 or REC601 63 Pictures appear dark The brightness and or contrast are adjusted to an extremely low level Adjust BRIGHTNESS and or CONTRAST settings to a higher level using the menu function 56 The projector is operating in Eco mode Set ECO MODE in the LAMP FILTER menu to NORMAL 69 The lamp is approaching the end of its product lifetime Replace the lamp 103 Dimming Level ...

Страница 122: ...3 The FRAME LOCK function cannot work on the current input signal Set FRAME LOCK in the INPUT menu to OFF 65 RS 232C does not work on control terminal The POWER SAVE function is working Select NORMAL for STANDBY MODE item in the SETUP menu 72 RS 232C is set to HDBaseT Select CONTROL for RS 232C item in the OPTION menu 93 The COMMUNICATION TYPE for the CONTROL port is set to NETWORK BRIDGE Select O...

Страница 123: ...u 72 The connected equipment may not be supported by HDBaseT Refer to User s manual detailed for connection 13 IR and LAN does not work via HDBaseT Check if the IR setting is OFF under HDBaseT EASY MENU ADVANCED MENU OPTION SERVICE REMOTE RECEIV 89 Check if the LAN setting is HDBaseT EASY MENU ADVANCED MENU OPTION SERVICE CONTROL TERMINAL WIRED NETWORK LAN does not work if LAN is connected to the ...

Страница 124: ...turned off Select NETWORK BRIDGE for COMMUNICATION TYPE item in the OPTION SERVICE COMMUNICATION menu 90 Schedule function does not work The POWER SAVE function is working Select NORMAL for STANDBY MODE item in the SETUP menu 72 The internal clock has been reset Once you turn off the projector in the POWER SAVE mode or the AC power the current date and time setting is reset Check the SCHEDULE sett...

Страница 125: ...ESOLUTION Set PROJECTOR in the menu above 93 When the projector is connected to the network it powers off and on as described below Powers off POWER indicator blinks in orange a few times Goes into standby mode Disconnect the LAN cable and check that the projector is working properly If this issue occurs after connecting to the network there may be a loop between two Ethernet switching hubs within...

Страница 126: ...uide which is a book End User License Agreement for the Projector Software Software in the projector consists of the plural number of independent software modules and there exist our copyright and or third party copyrights for each of such software modules Read End User License Agreement for the Projector Software which is separated document ...

Страница 127: ......

Отзывы: