


Turbo-Cool 6” Recirculating Evaporative Cooling System Manual
11
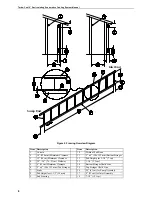
5. Tighten the lag screw to secure the Trough in place against the stringer. See
Figure 5
, Step 2. Repeat steps 4 - 5 for all Trough Supports.
6. Form a loop, using the Trough and Trough Hangers, as shown in
Figure 5
,
Step 2.
7. Use the hole in the Trough Support and Trough Hanger as a guide to drill or
punch a 5/16” (8 mm) hole in the Trough.
8. Fasten the Trough and Trough Hanger to the Trough Support using the 5/16-18
x 1/2” bolt and 5/16” hex nut. Repeat steps 6 - 8 for each Trough Support.
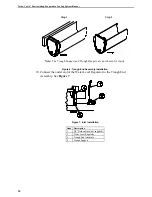
9. Wipe the inside of the Trough at the Trough End Assembly location to remove
debris that may prevent proper sealing.
Position the End Assembly against the outside of the Trough Support at the inlet
end of the Trough. See
Figures 6 & 7
.
Position the Adjustable Clamp directly over the Trough End Assembly,
orienting as shown in
Figure 6
, and tighten firmly.
Figure 5. Trough Installation (end view)
Item
Description
1
Trough Support
2
Trough
3
Insert Trough between the Trough Support and the
stringer.
4
Trough Hanger
5
5/16” x 1-1/2” Lag Screw
6
Wrap Trough and Trough Support to form loop.
7
Drill or punch a 5/16” (8 mm) hole through Trough.
Step 1
Step 2
Step 3


