Chapter
4Configuring Settings
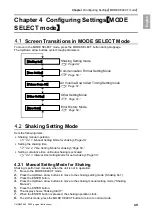
【
MODE SELECT mode
】
50
4.2.2
Time Setting Mode for Shaking
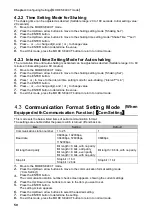
The shaking time can be adjusted as desired. (Settable range: 20 to 180 seconds. Initial setting value:
20 seconds)
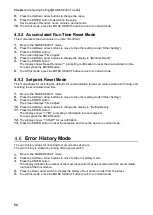
1.
Move to the MODE SELECT mode.
2.
Press the Up/Down arrow buttons to move to the shaking setting mode (“Shaking Set”).
3.
Press the ENTER button.
4.
Press the Up/Down arrow buttons to move to the shaking time setting mode
(
“Shake Time ***sec”
)
.
5.
Press the ENTER button.
6.
Press ← or → to change digit, and ↑ or ↓ to change value.
7.
Press the ENTER button to determine the value.
8.
To exit this mode, press the MODE SELECT button to return to normal mode.
4.2.3
Interval time Setting Mode for Auto-shaking
The cumulative time until auto-shaking is activated can be adjusted as desired. (Settable range: 0 to 60
minutes. Initial setting value: 60 minutes)
1.
Move to the MODE SELECT mode.
2.
Press the Up/Down arrow buttons to move to the shaking setting mode (“Shaking Set”).
3.
Press the ENTER button.
4.
Press ↑ or ↓ to move to the interval time setting mode for auto-shaking.(“Interval***min”)
5.
Press the ENTER button.
6.
Press ← or → to change digit, and ↑ or ↓ to change value.
7.
Press the ENTER button to determine the value.
8.
To exit this mode, press the MODE SELECT button to return to normal mode.
Communication Format Setting Mode
(When
Equipped with Communication Function)
【
Com Setting
】
This mode sets the below listed items of serial communication format.
The settings are enabled after the power switch is turned off and back on.
Item
Setting
Default
Communication station number
1 to 25
1
Baud rate
9600bps
、
19200bps
、
38400bps
、
57600bps
、
115200bps
9600bps
Bit length and parity
Bit length = 8 bits, with no parity
Bit length = 8 bits, odd parity
Bit length = 8 bits, even parity
Bit length = 9 bits, with no parity
Bit length = 8 bits, with no parity
Stop bit
Stop bit = 1 bit
Stop bit = 2 bits
Stop bit = 1 bit
1.
Move to the MODE SELECT mode.
2.
Press the Up/Down arrow buttons to move to the communication format setting mode
(“Com Setting”)
3.
Press the ENTER button.
The communication station number check screen appears, showing the current settings.
4.
Press the Up/ Down arrow buttons to move to the item you want to set.
5.
Press the ENTER button.
The setting screen appears
6.
Press the Up/Down arrow buttons to select the desired setting.
7.
Press the ENTER button to determine the setting.
8.
To exit this mode, press the MODE SELECT button to return to normal mode.
Содержание CBA-1500AT3-HC-DSA-V1
Страница 5: ...1 CMN023 005 Translation of the original instructions 3 1 1 1 1 2 10 60 80 1 3 0 40 80 100 1 000...
Страница 6: ...1 4 1 4 2 OFF 1 5...
Страница 7: ...1 CMN023 005 Translation of the original instructions 5 1 6...
Страница 8: ...2 6 2 2 1 200V 220 230V CE 1 1 2 1 1 HEPA 1 3m 200V 1 220 230V CE 1 1...
Страница 10: ...2 8 2 3 AT3 EL OLED No 1 7 2 4 9 4 15 1 1 1 1 OFF 3 3 3 14 ON ENTER 3 3 3 14 4 15 MODE SELECT 4 15...
Страница 12: ...2 10 2 4 3 OP kPa SP kPa DP kPa EP kPa Blower Runtime h 18 Total h Moter...
Страница 13: ...3 CMN023 005 Translation of the original instructions 11 3 3 1 3 1 1 0 40 80 RH REMOVE 1 1 1...
Страница 14: ...3 12 1 2 2 3 4 OFF ON 1 A OFF 40 50 A 2...
Страница 22: ...5 20 5 5 1 WARN2 1 5 1 1 1 1 1 2 2 1 3 1 4 2 1...
Страница 24: ...5 22 3 ACC 4 5 6 5 2 1 Littell fuse 218 250V 15A 1 2 3 ACC...
Страница 25: ...5 CMN023 005 Translation of the original instructions 23 5 3 CR2477 CR2477 1 2 3 2 4 5 6 7 5 4 1 1 1 1 5 5...
Страница 28: ...5 26 5 7 EL ON ON 5 2 22 1 2 3 4 1 4 ON OFF 30 1 2 1 2 5 1 20 5 1 20 5 1 20 5 1 20...
Страница 29: ...6 CMN023 005 Translation of the original instructions 27 6 6 1 6 1 1...
Страница 30: ...6 28 1 5V 0 2V LOW DC 1 2...
Страница 34: ...7 32 7 3 7 3 1 CBA 1500AT3 HC DSA V1...
Страница 35: ...CMN023 005 Translation of the original instructions 33 12 7 2 7 2 31...
Страница 36: ...34...
Страница 67: ...Chapter 7Appendix CMN023 005 original instructions 65 English Electrical Diagram 7 3 1 CBA 1500AT3 HC DSA V1...
Страница 69: ...MEMO...


