Models: MSP-TDKCG110 & MSP-TDKCY220
Installation Instructions
6
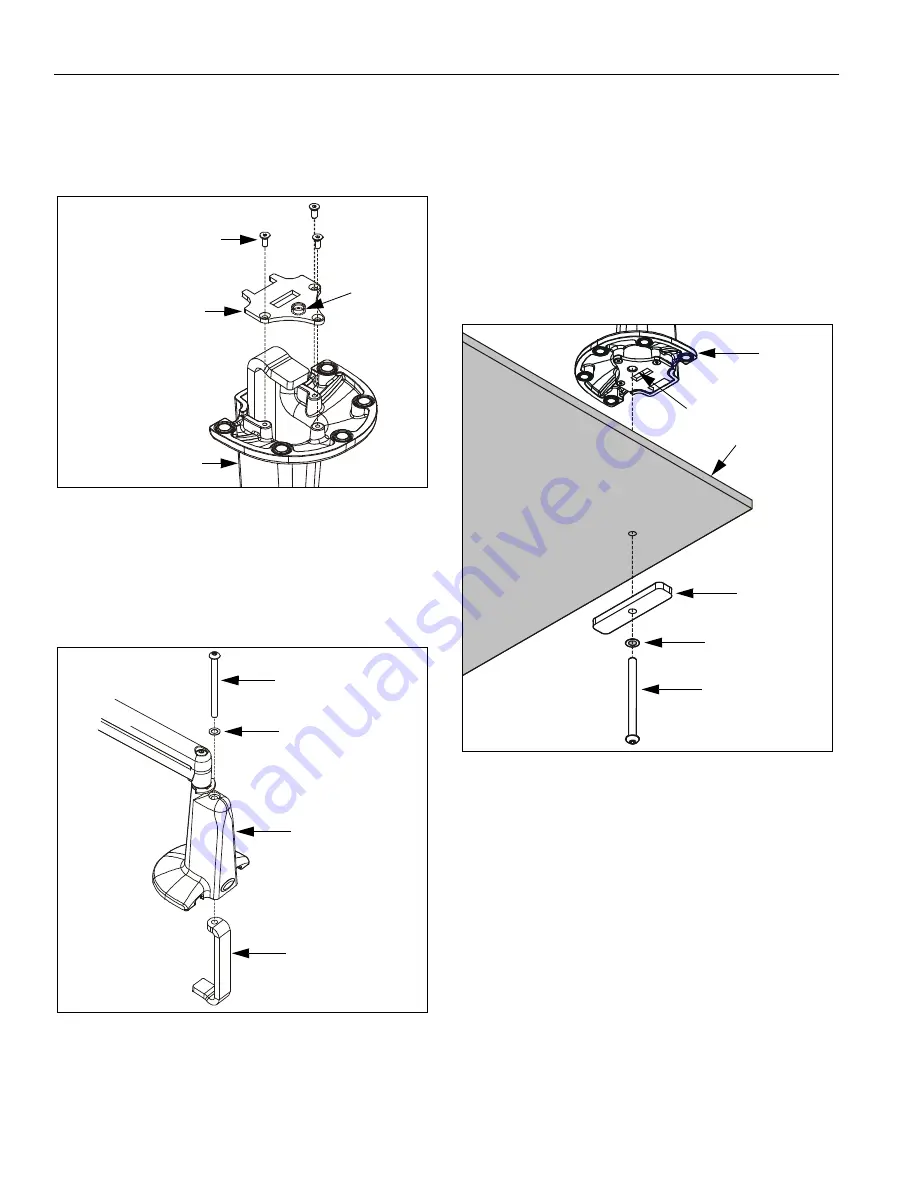
GROMMET (HOLE) INSTALLATION
1.
Using hex key (190), remove and retain baseplate
and three attach screws from bottom of mount (10 or
20, as applicable) (See Figure 4).
Figure 4: Baseplate
2.
Using hex key (210), remove clamp adjustment
screw, washer, and clamp (See Figure 5). Retain
clamp adjustment screw and washer for later use.
NOTE:
Clamp will not be used in this installation.
Figure 5: Remove Clamp
3.
Using hex key (190), re-install baseplate with three
retained attach screws. Ensure baseplate nut faces
interior
of mount (See Figure 4). Tighten securely.
IMPORTANT ! :
IF your display has a recessed mounting
hole cavity, and the Centris bracket will not fit into that
cavity (See Figure 11), THEN proceed to "DISPLAY
INSTALLATION" (See Page 9)
before continuing
with the
Grommet Installation procedure. Otherwise, continue
below.
4.
From below desk, insert retained clamp attach screw
and washer through bracket (50) and up through hole
in desk (See Figure 6). Using hex key (210), thread
screw into baseplate nut. Do not tighten screw at this
time.
Figure 6: Grommet (Hole) Installation
5.
From above desk, center mount (10 or 20, as
applicable) over hole.
6.
From below desk, using hex key (210), securely
tighten screw.
7.
Drop screw (60) into open (unused) clamp adjustment
hole on top of mount (for appearance only).
8.
Proceed to:
•
"CABLE MANAGEMENT" if you have an MSP-
TDKCG110 mount
and
your display
was
previously
installed, or to
•
"DISPLAY INSTALLATION" if you have an MSP-
TDKCG110 mount
and
your display
was not
previously installed, or to
•
"MULTI-DUAL ARM ASSEMBLY" if you have an
MSP-TDKCY220 mount.
Base Plate
Attach Screws
(3 places)
10 or 20
Baseplate
Nut
Clamp Adjustment
Washer
Clamp
10 shown;
20 similar
Screw
Desk
10 or 20
Clamp Attach
Washer
Screw
50
Nut


