background image


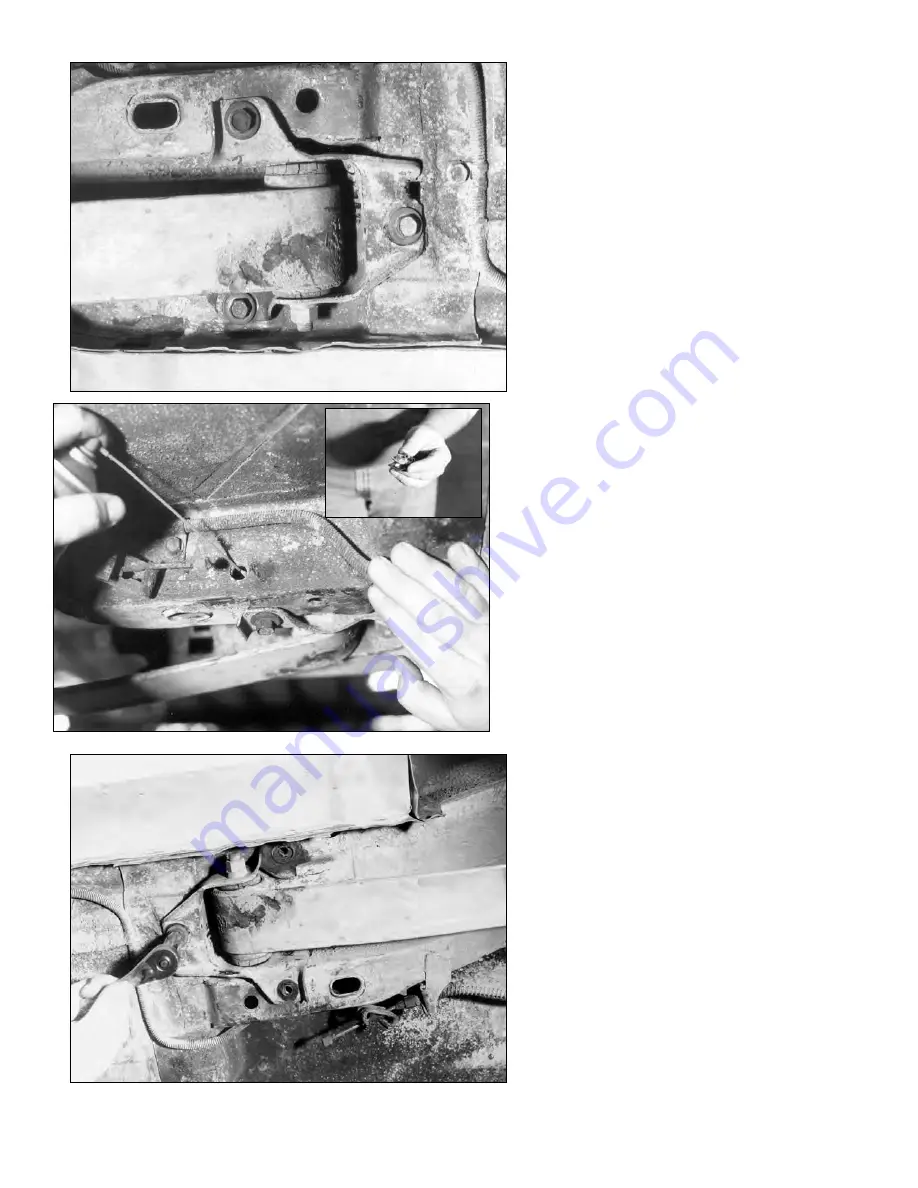
This is the driver side front leaf spring 
hanger.  You will need to loosen it in 
order to get the rear on the subframe 
connector under the inside two bolts. 


Unbolting the forward leaf spring hanger 
should never be done with an impact 
wrench. The nuts holding the bolts in 
place are just spot welded to these 
spring clips and they’re easy to break.  
 
Spray the nuts with a lubricant or 
penetrating oil before you start to loosen 
them. 


Carefully remove the three bolts that 
hold the spring hanger in place.  If the 
spring clips do break, they are available 
from both GM and the aftermarket. 
 

917704 


            Page 97 

Содержание 7704

Страница 1: ...lip body mounts upper and lower A arms spindles coil over shock and springs billet rack and pinion billet rack and pinion mounts ties rod ends disc brake kit engine mounts and transmission mount installation instructions READ ALL INSTRUCTIONS COMPLETELY AND THOROUGHLY UNDERSTAND THEM BEFORE DOING ANYTHING CALL CHASSISWORKS TECH SUPPORT 916 388 0288 IF YOU NEED ASSISTANCE ...

Страница 2: ...ks and Springs 43 Installing Brakes 53 Installing Engine Mounts and Mid Plate 58 Installing Manual Transmission 61 Removing Stock Front Clip 72 Installing Bolt On Frame 78 Installing Transmission Crossmember 79 Aligning The Frame 81 Reinstalling Factory Components 84 Installing Steering Shaft 88 Installing Fender Flaps 94 Installing Headers 96 Installing Subframe Connectors 20 6 33 61 96 94 88 78 ...

Страница 3: ...structural integrity manufactured into the original vehicle As such you need to be cognizant of potential failures Initially you must conduct a series of short tests in a safe location Test for handling steering and braking at slightly increasing speeds Once you are confident the vehicle handles and stops properly take a series of drives with slightly increasing speeds stopping to check all compon...

Страница 4: ...oor jack Jack stands quantity 4 Digital level 3 8 electric drill Torque Specification Chart DESCRIPTION TORQUE A arm pivot studs 50 lb ft Antiroll bar clamp socket head allens 3 8 16 x 2 1 2 20 lb ft Antiroll bar link eyebolt button head allen 3 8 16 x 3 4 20 lb ft Antiroll bar link eyebolt socket head allen 3 8 16 x 2 1 4 20 lb ft Balljoints 150 lb ft Balljoint studs 105 lb ft Caliper socket head...

Страница 5: ...tall and maintain the product Buyer assumes all responsibility and risk for correct installation CHRIS ALSTON S CHASSISWORKS INC accepts no responsibility for failure to read or understand the installation guidelines All products are intended for racing or off road use and may not be legal for highway use The information contained in this Installation Guide is correct to the best of our know ledge...

Страница 6: ...PTION WHERE USED 8 2052 Shim Camaro clip body mount 2 5x 63x 10 Between floor and body bushings 2 1248 Alignment pin 67 81 Camaro Aligns front clip 3 3430 Button head allen 5 16 18 x 3 4 Caps clutch pivot holes in frame 6 3454 Cup point set screw 1 2 13 x 1 2 Caps extra holes in frame horns 917704 Page 5 ...

Страница 7: ...installed several times Have your A arms painted before the balljoint is assembled to minimize this potential problem Do not plate or chrome the A arms The plating solution can leak into the tubes and cause them to rust from the inside out If you drill drain holes in the tubes the A arm will crack from the holes If you want a highly polished look purchase our stainless A arms The mild steel lower ...

Страница 8: ...he balljoint housing Work your way around the boot s edge pushing it down into the bore with your fingers You can also use a blunt tool to do this During the assembly process we are going to coat all of the threaded assemblies with an anti seize compound to prevent the threads from being damaged and aid disassembly in the future Put a thin layer of anti seize on the balljoint threads 917704 Page 7...

Страница 9: ...is fully seated against the balljoint housing The force required can be over 150 lb ft of torque Be careful not to scratch the A arm Repeat this for the passenger side lower A arm One convenient method for holding the A arm while installing the balljoint is to temporarily install the A arm on the frame The upper A arms will be assembled next Although they are very similar they are not identical Th...

Страница 10: ... upper A arm Clear any debris left in the threads Use the same procedure to assemble the upper A arm as the lower First install the balljoint boot into the balljoint housing Next apply a layer of anti seize to the balljoint threads 917704 Page 9 ...

Страница 11: ...wrench until it is seated tight against the balljoint housing Repeat this for the passenger side upper A arm Install the rod ends into the upper A arms To provide an initial alignment baseline the jam nut should be threaded until there is 1 1 16 inches of thread remaining past the jam nut Page 10 917704 ...

Страница 12: ...ts are snug against the arm itself This step must be done carefully because the upper and lower A arm mounts are threaded and welded to the frame Use the 5 8 18 tap to chase the threads on the front and backsides of both upper mounts Blow any remaining particles out of the hole with an air hose 917704 Page 11 ...

Страница 13: ...rt one of the lower A arm pivot studs and then run it in all the way to its stop it should go in easy Use the same procedure to verify all of the pivot studs will easily thread into their mounting locations The lower A arm fits tight over the mount Slide the rear of the A arm onto the mount and then use a piece of wood between the frame and the A arm to pry it over the mount A 12 piece of 1x2 work...

Страница 14: ...o move the pivot stud a small amount at a time until the threads make contact Do not put grease on the pivot bushings they are self lubricating Once the pivot studs are in place use an Allen T wrench to tighten them The pivot studs should go in easily and should be tightened until they are fully seated This will give the bushings the proper amount of crush and allow the lower A arm to move with a ...

Страница 15: ...the pivot stud counter clockwise The pivot stud will come out easily After tightening the lower A arm pivot studs check to be sure the A arm swings freely but snugly throughout its travel The lower A arm should also stay suspended when released It should take a few pounds of pressure to make it move Page 14 917704 ...

Страница 16: ...l not to get excess Loctite in the pivot stud bore The next step is to install the upper A arm and spindle During this step you are going to need the lower A arm at its ride height position Two of these shock simulators are included in the suspension kit The top hole represents full shock extension the bottom hole full compression and the middle hole at 12 inches represents the ride height of the ...

Страница 17: ...ing the lower A arm Slide the front rod end over the front mount first and then swivel the rear one into place Install the upper mount bolts just like the lower mount bolts Do not fully tighten them because they need to be moved when we adjust the front suspension settings later Repeat the installation of the upper A arm on the passenger side Page 16 917704 ...

Страница 18: ...he steering arm shown with arrow always goes toward the front of the car Place the driver side spindle over the balljoint and thread the 9 16 18 castle nut on The balljoint castle nut will not thread on easily if the threads are nicked A thread file can be used to correct the problem After filing try the castle nut again before putting the spindle on Thread files can be found at most auto parts st...

Страница 19: ...n lowered into position and secured to the spindle with another washer and castle nut Tightened both upper and lower balljoint castle nuts Insert the cotter pin through the hole in the balljoint You may need to tighten it a small amount until the slots in the castle nut align with the hole Page 18 917704 ...

Страница 20: ... One leg goes down the other over the top of the balljoint stud Repeat the procedure for the upper A arm First tightening the castle nut Install the cotter pin and fold the legs over as we did on the lower one Repeat this procedure on the passenger side of the car 917704 Page 19 ...

Страница 21: ...mounting bosses are factory welded to the frame Use the 1 2 13 x 2 socket head allen and custom 1 2 lock washer to mount the lower half of the billet rack clamp to the mounting boss Use a small amount of Loctite on the socket head allen The raised section on the back of the billet clamp matches the milled recess on the mount bosses Installing Steering Rack ...

Страница 22: ...talled on the crossmember the rack itself is set into position One of the exclusive design features of our rack and mount is the ability to rotate the rack to provide any desired angle from the steering column to the rack input shaft Here the shaft is laid almost against the crossmember 917704 Page 21 ...

Страница 23: ...inimize the u joint angle Push the rack firmly into each mount Secure the rack by installing the billet rack clamp caps Use the provided 5 16 18 x 1 stainless steel socket head allen and custom lock washer Use a small amount of Loctite on the socket head allen Tighten the cap with your T Handle Allen wrench Once you have the cap tight the next step will be aligning the front end Page 22 917704 ...

Страница 24: ... Placing a U joint on the rack makes turning it easy Turn the rack toward the passenger side of the car until it stops full lock position On the driver side measure and record the distance from the rack mount to the end of the tie rod end In our example the length is 9 7 8 inches 917704 Page 23 ...

Страница 25: ...rack centered Example Driver side length equals 15 1 8 Passenger side length equals 9 7 8 15 1 8 plus 9 7 8 equals 25 divided by 2 equals 12 1 2 Turn the rack back toward the passenger side until the length is 12 1 2 inches Check your rack do not assume our dimension is correct for your rack With the rack pinion centered you can set the spindle alignment Measure from the outside of the frame to th...

Страница 26: ...d from the steering arm and thread it onto the tie rod until it contacts the jam nut Next reinstall the tie rod end into the steering arm Verify the distance from the frame to the inside of the tie rod end this should be 8 5 8 inches as measured earlier Repeat this procedure for the passenger side The measurements are the same as the driver side 917704 Page 25 ...

Страница 27: ...pension settings Do this on the driver and passenger sides Before checking the front end alignment check to be sure the frame is still level Put a level on the frame as shown and adjust the jack stands until the car is level front to rear Readout from a digital level is preferred for accuracy when setting the front end alignment Level the crossmember and if needed adjust the height by placing shim...

Страница 28: ...r mounting pads on the spindle Record the reading Next check the caster by installing the 3 8 16 x 1 3 8 caliper mounting socket head allens supplied in your brake kit into the threaded bosses on the spindle Set the digital level against the caliper mounting bolts Record the caster reading Positive caster is when the spindle top is tipped toward the rear of the car when viewed from the side We wil...

Страница 29: ...d by the angle of the bodies rake Three degrees of positive caster with the body level will only be 1 degree of positive caster with a 2 degree body rake Adjust one rod end at a time one half turn until you have the correct setting Repeat for the passenger side before going to the next step The next step is setting the toe in Cut two pieces of 3 4 inch tubing or electrical conduit 26 inches long D...

Страница 30: ... rear this is the total amount of toe in Record the front and rear dimensions and calculate the amount of toe in by subtracting the front measurement from the rear To adjust the toe in rotate the tie rod ends to move the spindle in or out as required Make sure to rotate both the driver and passenger side the same amount One half revolution of both tie rod ends will change the toe in by approximate...

Страница 31: ... amount When turning the tie rods the rubber boot will wind up on the tie rod Once the toe in is adjusted use pliers to unwind the boot around the tie rod Gently grab onto the outer boot clamp and twist it back around until the boots are straight The jam nuts can now be tightened against the tie rod ends Verify caster camber and toe in are correct before proceeding Once the camber caster and toe i...

Страница 32: ...Start by installing the grease zerk fitting in the hole at the bottom Install the rubber boot Put the tie rod ends back into the steering arm Tighten the castle nut and install and bend the cotter pin like you did on the balljoints 917704 Page 31 ...

Страница 33: ...he rubber boot Grease the upper and lower balljoints Install the zerk fittings and inject grease with a grease gun Put only enough grease in to make the balljoint rubber boot bulge out on the side If you are installing the balljoint caps remove the zerk fitting Set the stainless steel cap over the balljoint Page 32 917704 ...

Страница 34: ...grease zerk was just removed Be sure to remove all grease from the threads in the balljoint and Loctite the countersunk allen head screw in place Use the same procedure to install the lower balljoint caps Next install the antiroll bar These are the components of the antiroll bar kit Installing Antiroll Bar 917704 Page 33 ...

Страница 35: ...surface A thin screwdriver can be used to smear it around inside the bushing Take extra care not to get this grease all over it s very sticky To open up the bushings use the handle end of the balljoint wrench that is included in the suspension kit Once the slot in the bushing is opened slide it over the antiroll bar near the 90 degree bend Page 34 917704 ...

Страница 36: ... under the car and set it in position Center the bushings on the mounting pads welded to your frame Center the antiroll bar in the frame by measuring from the side of the frame to the end of the bar on the driver and passenger sides 917704 Page 35 ...

Страница 37: ...num cap over the bushing and secure with the 3 8 16 x 2 1 2 socket head allen and locknuts provided Put the urethane bushings into the upper antiroll bar link eyebolt Coat the bushings with the silicone grease Page 36 917704 ...

Страница 38: ... internal tooth lock washer next to the head of the 3 8 16 x 3 4 button head allen and the beveled stainless steel washer Apply Loctite to the button head allen and tighten Put the star lock washer bushing washer and one urethane bushing on the 3 8 16 x 2 1 4 socket head allen This attaches the link eyebolt to the lower A arm Apply silicone grease to the bushing on all surfaces 917704 Page 37 ...

Страница 39: ...to the lower A arm mount bracket Grease the upper bushing and slide it and the other bushing washer over the bolt Apply Loctite to the bolt Push down on the antiroll bar and thread the bolt into the end of the link eyebolt Page 38 917704 ...

Страница 40: ...right and centered Everything should move without binding Because the antiroll bar makes independent installation difficult you will have to do the driver and passenger sides at the same time The front suspension kit includes the VariShock Quickset 1 externally adjustable coilover shocks with urethane bushings The knob on the bottom is used to change the ride quality and handling of the vehicle Op...

Страница 41: ...ce the desired spring height is set This upper spring seat holds the spring in place at the top of the shock The slot allows the spring seat to be inserted after the spring is in place Slide the rubber bumper down the shock shaft before installing the spring After dropping the spring over the shock slide the upper spring seat over the shaft Page 40 917704 ...

Страница 42: ...15 tire on a 6 wide 15 diameter 3 1 2 backspace wheel the tire will have 6 1 2 of thread width be 8 wide at the section have a mounted diameter of 25 and a rolling radius of 12 This will hold the bottom of the crossmember 4 1 2 off the ground The tire will hold the spindle centerline 12 off the ground If you use a larger or smaller diameter tire the crossmember clearance will change accordingly Th...

Страница 43: ...hreads Using the spindle shaft as a handle line up the top eye of the shock in the upper mount and slide the male spud in Insert the female part of the spud from the back it acts as the nut Use Loctite to secure threads With both halves in place use two Allen wrenches to tighten the spud together Tighten them until they stop the correct amount of crush is calculated into their length Page 42 91770...

Страница 44: ...ponents The billet aluminum hubs have threaded stud mounting holes for both 4 1 2 and 4 3 4 inch bolt circles Choose the bolt circle that matches your wheels and chase the threads with a 1 2 20 tap After chasing the threads it is a good idea to blow them out with an air hose making sure no debris remains in the holes Set the rotor over the backside of the billet hub The larger bearing race snout o...

Страница 45: ...Chassisworks Tighten the studs from the backside of the assembly You re ready to install the inner wheel bearing and seal The bearing races are pressed in the billet hub from the factory You must pack the wheel bearing before installing it In the photo a wheel bearing packer is shown If you do not have one available hand packing the bearing is okay If you are unsure how to pack the bearing refer t...

Страница 46: ...the hub Place the hub on a wood surface before installing the seal Using a hammer and seal installer drive the seal into the hub making sure it s fully seated With the inner bearing and seal in place slide the hub and rotor assembly onto the correct spindle remember the rotors are directional 917704 Page 45 ...

Страница 47: ...ully seat the bearings tighten the castle nut to 12 lb ft while turning the rotor assembly forward by hand This will remove any grease that could cause excessive wheel bearing play Back off the castle nut to the just loose position and then hand tighten There will be 001 to 005 inches of end play when the wheel bearings are properly adjusted Page 46 917704 ...

Страница 48: ... tighten the castle nut when aligning the cotter pin only loosen it Use the same procedure you used on the balljoints to fold the cotter pin legs Apply anti seize to the threads of the screw on dust cap Screw the dust cap onto the hub It only needs to be hand tightened the o ring inside will keep it from coming loose 917704 Page 47 ...

Страница 49: ...over the rotor and the caliper mounting pads on the spindle Use the 3 8 16 x 1 3 8 socket head allens lock washers and flat washers provided in your brake kit to mount the calipers The lock washer goes against the head of the fastener Use the T handle Allen wrench to tighten the mounting bolts Rotate the rotor assembly slowly to check for any clearance problems between the rotor and the caliper Pa...

Страница 50: ... with this suspension system Next remove the plastic plug protecting the inlet port of the Wilwood caliper to start the installation of the stainless steel brake lines Coat the 1 8 pipe threads of the 90 degree brake line adapter fitting with Loctite teflon sealing compound Thread the fitting into the caliper Be sure to start it straight so you do not cross thread it If the threads in the caliper ...

Страница 51: ...e fitting is steel Do not over tighten and strip the threads in the caliper Thread the swivel end of the stainless steel brake line onto the adapter fitting until it is finger tight Drill and tap the side of the frame for two 10 32 threaded holes These holes will position the brake line tab 2 below the top of the frame and 2 1 2 ahead of the weld at the dropped crossmember Page 50 917704 ...

Страница 52: ...tighten the jam nut Next check the brake line for clearance to all suspension parts Also be sure the brake line is not stretching or binding while the suspension goes through its full travel and its lock to lock turning radius Unbolt the driver side end of the anti roll bar remove the passenger side coil over shock and install the shock simulator in the fully compressed position Turn the spindle t...

Страница 53: ... shock simulator to the full extension setting turn the spindle to full right lock position Check the brake to be sure it is not stretched Turn the spindle to the full left lock position check the brake line for binding Repeat this procedure at the ride height setting Page 52 917704 ...

Страница 54: ...ou will need a lot of extra hands and three floor jacks to move the frame and engine assembly under the car A safety note The car will be very rear end heavy and tend to tip on the lift We show how to install our clip on jack stands because we feel it is a more popular installation method There are two types of motor mounts available motor plates and side mounts The Chassisworks motor plates are a...

Страница 55: ...llet mount to the engine block with the stainless steel 3 8 16 x 1 1 2 inch socket head allens and 3 8 inch high collar lockwashers provided It is best to start all three fasteners before final tightening the billet mount to the block Once both billet mounts are installed you can install the mid plate Bolt the automatic transmission mid plate to the back of the engine block Chassisworks manufactur...

Страница 56: ...id plates for Chevrolet and Pontiac V8 Set the engine in place lining up the billet motor mounts with the frame motor mount brackets Maneuver the engine into place carefully checking that all parts have sufficient clearance Make sure the mid plate is on the front side on the mounting bracket when setting the engine in place 917704 Page 55 ...

Страница 57: ...emale spud through the frame mount into the billet motor mount assembly from the rear Do the driver side first The passenger side frame adapter has a slot to allow for misalignment Apply a small amount of Loctite and insert the male portion of the spud through the motor mount bracket and into the billet motor mount assembly Thread the male and female spuds together and just finger tighten for now ...

Страница 58: ...and another one on before the locknut Do not final tighten these until you have the driver and passenger side button head allens installed Use an allen wrench and a 9 16 inch wrench to final tighten the mid plate button heads allens Final tighten the motor mount spuds using two allen wrenches Torque them to 20 lb ft The engine is now mounted and ready for the transmission 917704 Page 57 ...

Страница 59: ...for Chevrolet and Pontiac engines The block saver mid plate uses all the standard Lakewood hardware to attach to the engine The block saver mid plate attaches to the Chassisworks frame the same as the automatic transmission mid plate Installing Manual Transmission Clutch Linkage and Lakewood Can Page 58 917704 ...

Страница 60: ...ge as in the stock car Some blocks do not have a pivot ball hole for the other end of the torsion shaft Chassisworks has an optional bracket to solve this problem Chassisworks currently manufactures transmission crossmembers for most applications Not all automatic transmission deep pans will clear the Chassisworks crossmembers The Turbo 350 is the most varied ...

Страница 61: ...st be installed so the transmission mount surface slopes down hill to the rear of the car To determine which way the crossmember installs place a straight edge on the transmission mounting pad to determine its slope These two photos show an engine and Turbo 400 installed ...

Страница 62: ...rst step is to remove the hood engine and transmission This will make it easier to see and work in the engine compartment It is also important that the gas tank is empty so fuel cannot siphon out when the fuel line is disconnected Removing Stock Front Clip 917704 Page 61 ...

Страница 63: ... car Put two stands under the rocker panels about 4 in front of the front door Put two stands under the rear axle These stand locations will prevent the car from tilting backwards when you remove the front clip DO NOT REMOVE THE FRONT SHEETMETAL This is a view of the passenger side inner fender panel before we removed any components Page 62 917704 ...

Страница 64: ...e we removed components This is a view of the driver side inner fender panel before we removed any components Your car should look like this with the hood removed and positioned on four jack stands before you go any further 917704 Page 63 ...

Страница 65: ...n end wrench to disconnect the parking brake adjuster mechanism Use vise grip pliers to remove the spring clip from the parking brake cable adjuster Remove the parking brake cable from the frame on the driver side Page 64 917704 ...

Страница 66: ...es Use a pair of pliers to remove the cotter pin that holds the transmission linkage to the steering column lever Disconnect the transmission linkage bracket from the frame so it won t hang up on something when you slide the frame out from under the car 917704 Page 65 ...

Страница 67: ...tank needs to be empty Use a piece of string to tie the fuel line up out of the way Also disconnect the ground strap from the frame Using a brake line flare nut wrench disconnect both the driver and passenger front brake lines from the metering block under the master cylinder Page 66 917704 ...

Страница 68: ...rake line clamp by the steering box From under the floor disconnect both brake line clamps on the outside of the driver side frame rail Remove the battery tray for easier access to the front frame bolts 917704 Page 67 ...

Страница 69: ...Remove the bolts that attach the ends of the bumper to the body Remove the bolts that attach the bumper to the frame bracket Remove the bumper brackets from the frame Page 68 917704 ...

Страница 70: ...de a floor jack under the front clip and center it on the drag link this is the best balance point Raise the jack so it has slight pressure on the drag link to hold the frame up Do not lift the car up off of the jack stands Remove the rear frame mount bolts 917704 Page 69 ...

Страница 71: ...wheel well and the third person will remove the frame bolts at the firewall Remove the center frame mount bolts Do not get under the car in case the frame falls After all the frame mounts are removed the third person needs to pry the rag joint forward off of the column The frame must slide forward Page 70 917704 ...

Страница 72: ...wer valance Clearance is minimal do not bend the lower valance with the frame horn Lower the frame until the rag joint is below the steering column and then push the frame rearward about 6 to clear the valance You will have to tilt the frame up a the front while you do this to prevent bending the valance 917704 Page 71 ...

Страница 73: ...assisworks provided frame alignment pins This photo shows the passenger side frame mounting location at the firewall Notice the slotted hole beside the bolt hole for the body mount The alignment pin is used to align the front frame during installation Installing Bolt On Frame Page 72 917704 ...

Страница 74: ...e urethane bushing set for one side of the car They are laid out how they are installed with the left side toward the front on the car The eight 2 1 2 OD silver body shims may not be needed in your application Some bodies or their front sheet metal will require that the frame be shimmed to take up the gap at the front valance panel 917704 Page 73 ...

Страница 75: ...This is the correct orientation of the front urethane body bushings at the radiator core support This is the correct orientation of the middle urethane body bushings at the firewall Page 74 917704 ...

Страница 76: ...lignment pins slide up through the 5 8 hole beside the middle body mount This is the correct orientation of the urethane body bushings at the rear of the frame where it mounts under the seats 917704 Page 75 ...

Страница 77: ...art of the mid and rear urethane body mounts into their mounts before the next step Place the dropped crossmember portion of the new Chassisworks frame clip on the floor jack and slide it under the car Page 76 917704 ...

Страница 78: ...the valance Once the front of the frame is above the valance jack the frame up so it is flat against its middle and rear body mounts Lower the front of the frame just enough to install the lower half of the urethane body mount Install the upper half of the urethane body mount and screw the 1 2 bolt into the frame at least 1 2 however the bushing must be loose 917704 Page 77 ...

Страница 79: ...nt Again do not tighten it Leave the bolt loose Before we align the frame install the transmission crossmember The crossmember must be installed before tightening the frame to the body The frame can be flexed when tightening to the body so if the crossmember is not installed it may not fit later on Installing The Transmission Crossmember Page 78 917704 ...

Страница 80: ...members like the Turbo 400 model will touch the floor slightly after they are installed If this condition causes a rattle in your car use a body hammer to push the floor up where it hits the crossmember The first step in aligning the front end is to put the alignment pins in both the firewall body mounts Do not remove any of the other body bushing bolts If your front sheet metal is correctly insta...

Страница 81: ...ker lip on each side If the lip under the rocker panel is not straight use a body hammer and dolly to straighten it before measuring Try to bump the frame around so that the largest measured difference between any two of the four rocker panel lips is less than 1 4 inch After you have finished the previous step verify the distance from the rear frame gauge hole to the back of the frame The length s...

Страница 82: ...upport Some vehicles come from the factory with shims If your vehicle has shims it is probably best to reuse them If your core support will not line up after you have the clip aligned and attached to the body then you need to reinstall the front sheet metal Remember these cars are over 30 years old so there is no telling what your car has been through Sometimes you can get the core support to fit ...

Страница 83: ...tock parking brake cable Adjust the parking brake mechanism for correct operation Drill two 1 4 holes in the driver side of the frame to attach the brake line clamps Attach the clamp to the frame with the stock 5 16 self tapping screw at the firewall and rear mounts Page 82 917704 ...

Страница 84: ...e frame with it s stock 5 16 self tapping screw If you are using an automatic transmission install three 5 16 button head screws to close the holes where the clutch linkage torsion shaft bracket goes Install a self locking set screw in the spare hole in the top of the front frame horn Do this for each side 917704 Page 83 ...

Страница 85: ...hows the flanged 1 DD u joint that attaches to the stock steering column There are also two u joints shown that attach to the rack shaft They are both sized as 3 4 36 x 3 4 DD The longer u joint is a VIBRATION isolator style u joint This type of u joint will isolate some of the road vibration from the steering wheel Both u joints install the same way however we will show the isolator style u joint...

Страница 86: ...t hole Install the 5 16 and the 3 8 bolts into the flange and place the u joint up against the column A flat washer goes over each bolt against the stock column flange and is secured with a locknut Slide the larger end of the steering shaft into the u joint until it bottoms out Then just barely tighten one set screw so it won t fall out Do not tighten the set screw enough to mark the tube You will...

Страница 87: ... end of the rubber flange around the u joint The lower flange is even with the bottom of the bore in the u joint On the regular u joint make the 3 4 DD shaft even with the lower end of the 3 4 DD bore in the u joint yoke Use a hacksaw to cut the shaft to length and file a 1 32 chamfer on the end The intermediate shaft should be flush with the U joint bore If it protrudes more than the pointer show...

Страница 88: ... straight ahead Rotate the rack so the wheels point straight ahead Follow the procedure used when aligning the front end Level the steering wheel Slide the splined u joint onto the rack shaft Reinstall the rack clamps Because the rack has 36 teeth the steering wheel can only be positioned every 10 degrees If you want perfect alignment you can adjust the center position of the shaft by turning 1 ti...

Страница 89: ...ould be in park or the key mechanism won t function properly Paint the U joints and steering column shaft to prevent rusting The Chassisworks splash flaps replace the factory rubber flaps Use a flat blade screw driver and hammer to open up the staples Installing Fender Flaps Page 88 917704 ...

Страница 90: ...Use a pair of needle nose pliers to remove the staples Use a wire brush to remove any crud from the inside of the fender well Mark the center of the opening on the inner fender panel 917704 Page 89 ...

Страница 91: ...in the opening on the flat of the inner fender panel Drill a total of 10 holes in the fender panel on 2 1 2 centers Lay the splash boot on top of the upper A arm and even with the formed ledge in the fender panel Page 90 917704 ...

Страница 92: ...he boot flush while drilling Use the top row of holes for a drill guide and drill the flap to match Move the splash flap to the tire side of the fender panel Put a row of clecos in the top row of holes The clecos are installed from the wheel side 917704 Page 91 ...

Страница 93: ...tool to drill the rivet holes Make sure the flap sits flush against the fender panel Install clecos in the remaining drilled holes Remove the top center cleco and install the pop rivets from the engine side of the fender panel The pop rivet backup washers go against the rubber splash flap on the tire side of the fender panel Page 92 917704 ...

Страница 94: ...lash boot completed installation for the passenger side viewed from the engine bay Repeat the procedure for the driver side Note The Nova inner fender panel opening is shaped a little different than the Camaro The Chassisworks splash flap is designed to fit both cars The rivet positions will be slightly different however the procedures are the same 917704 Page 93 ...

Страница 95: ...as been relocated from the stock location or replaced with a different model the header fit may be affected 5 Minor dimpling or denting of the header tubes 6 Minor grinding of the header flange around the head bolts 7 Changing the cylinder head fastener style for more clearance i e 12 point bolts or nuts no washer or head studs 8 The shape of the exhaust port may require a gasket change or modific...

Страница 96: ...e and lower the engine over them Engine installation is at least a three person job One on the hoist and one on each side holding the headers After the headers and engine are installed you will have to reinstall the steering column 917704 Page 95 ...

Страница 97: ...installation we have the car on our lift You can install them with the car on jack stands under the front and rear of the rocker panels The car should be at least 14 inches off the ground So there is no tension on the leaf springs use a second pair of jack stands as support for the rear axle housing You can now remove the driver side shock absorber Installing Subframe Connectors ...

Страница 98: ...should never be done with an impact wrench The nuts holding the bolts in place are just spot welded to these spring clips and they re easy to break Spray the nuts with a lubricant or penetrating oil before you start to loosen them Carefully remove the three bolts that hold the spring hanger in place If the spring clips do break they are available from both GM and the aftermarket 917704 Page 97 ...

Страница 99: ...the unibody frame rail and floor Slide the driver side subframe connector over the back of the bosses on the front clip frame rail Once you have it started over the boss slide it as far forward as you can The slotted holes allow for any slight length difference from car to car Page 98 917704 ...

Страница 100: ...f the spring while the other person works the connector into place between the spring hanger and the car s body The connector may need to be moved slightly front to rear to allow it to slide into place Since the mounting pad for the subframe connector doesn t extend to the outer spring hanger bolt a spacer is provided to keep the spring hanger in its correct location 917704 Page 99 ...

Страница 101: ...our finger on the top of the bolt to hold it while starting the threads of the bolt The subframe connector inner mounting bracket has been positioned so that the head of the bolt winds up under the rear seat It s necessary to remove the seat and peel back the carpet to install the bolt Page 100 917704 ...

Страница 102: ...om the bottom of the car Use a 3 8 inch diameter bit to drill a hole through the floor using the hole in the subframe connector as a guide Insert the 3 8 24 x 1 hex bolt and 3 8 flat washer through the hole from inside the car under the rear seat Hold the bolt with a 9 16 wrench while tightening from under the car 917704 Page 101 ...

Страница 103: ...to the next step Slide the two clamping brackets over the subframe connector These are used to provide a firm attachment between the subframe boss and the subframe connector Install the 1 2 20 x 3 inch bolts and locknuts with the nut toward the outside of the car to keep them away from exhaust system heat Torque to 45 lb ft Page 102 917704 ...

Страница 104: ...h the shock absorber then move on to the passenger side of the car to repeat the process With the bolt on frame clip and subframe connectors installed this is what your project should look like 917704 Page 103 ...

Страница 105: ...Page 104 917704 ...

Страница 106: ...r assumes all responsibility and risk We reserve the right to change specification without notice Further Chris Alston s Chassisworks Inc makes NO GUARANTEE in reference to any specific class legality of any component ALL PRODUCTS ARE INTENDED FOR RACING AND OFF ROAD USE AND MAY NOT BE LEGALLY USED ON THE HIGHWAY The products offered for sale are true race car components and in all cases require s...

Отзывы: