Chassis Plans CPX1-241 Technical Reference
Appendix F – Network Connection
Page 61
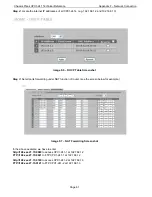
Step 2:
Locate the internal IP addresses of all CPX1-241s. (e.g. 192.168.1.2 and 192.168.1.3)
Image F-6 – DHCP Table Screenshot
Step 3:
Set all ports forwarding under NAT function of router. (see the screen below for example.)
Image F-7 – NAT Fowarding Screenshot
In the above example, we have to enter
http://148.xxx.27.15:9080
to access CPX1-241-1 at 192.168.1.2
FTP://148.xxx.27.15:9021
to FTP CPX1-241-1 at 192.168.1.2
http://148.xxx.27.15:9180
to access CPX1-241-2 at 192.168.1.3
FTP://148.xxx.27.15.9121
to FTP CPX1-241-2 at 192.168.1.3
Содержание CPX1-241
Страница 2: ...This Page Intentionally Blank ...
Страница 8: ...This Page Intentionally Blank ...
Страница 13: ...Chassis Plans CPX1 241 Technical Reference Chapter 1 Introduction Page 5 Photo 6 I O Connections ...
Страница 17: ...Chassis Plans CPX1 241 Technical Reference Chapter 1 Introduction Page 9 Figure 1 CPX1 241 Customer Drawing ...
Страница 28: ...Chassis Plans CPX1 241 Technical Reference Chapter 5 Package Contents Page 20 This Page Intentionally Blank ...
Страница 58: ...Chassis Plans CPX1 241 Technical Reference Appendix B Auto Color Gain Page 50 This Page Intentionally Blank ...
Страница 62: ...Chassis Plans CPX1 241 Technical Reference Appendix E PIP Mix Table Page 54 This Page Intentionally Blank ...
Страница 64: ...Chassis Plans CPX1 241 Technical Reference Appendix E PIP Mix Table Page 56 This Page Intentionally Blank ...
Страница 70: ...Chassis Plans CPX1 241 Technical Reference Appendix F Network Connection Page 62 This Page Intentionally Blank ...
Страница 72: ...Chassis Plans CPX1 241 Technical Reference Appendix G DVI D versus DVI I Page 64 This Page Intentionally Blank ...

