background image

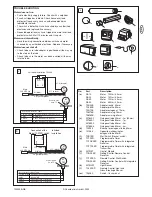
Before You Begin:

1. Carefully read all the information contained in this Owner’s

Manual before beginning installation procedures.

2. Check the shutter to be sure it is not broken or damaged,

and that it opens and closes smoothly. 

3. Determine whether the motor needs to be installed on the

left side 

(a)

or the right side, 

(b)

of the shutter – Figure     .

Install it on the side where the manual pull is located. Close
the shutter.

4. Ensure that the motor can be pushed in as far as the stop.

The limit switch is controlled by the plastic ring which
must be pushed fully on.

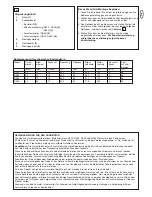
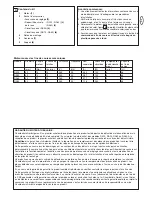
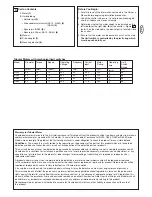
Carton Contents

1.

Motor 

(1)

2.

Hardwarebag

• Adjuster pin 

(2)

• Drive adapter safety catch(RA10 - RA30) 

(3)

(RA50) 

(4)

• Square pin (RA50) 

(5)

• Square pin 25mm (RA10 - RA30) 

(6)

(3)

Manual

(4)

Drive adapter 

(7)

(5)

Mounting bracket 

(8)

E

A

Warranty for Tubular Motor

Chamberlain GmbH warrants to the first retail purchaser of this product that the product shall be free from any defect in materials
and/or workmanship for a period of 60 full months (5 years) from the date of purchase for RA10, RA20, RA30 or RA50 Series
Models. Upon receipt of the product, the first retail purchaser is under obligation to check the product for any visible defects.

Conditions:  

The warranty is strictly limited to the reparation or replacement of the parts of this product which are found to be

defective and does not cover the costs or risks of transportation of the defective parts or products.

This warranty does not cover non-defect damage caused by unreasonable use (including use not in complete accordance with
Chamberlain’s instructions for installation, operation and care; failure to provide necessary maintenance and adjustment; or any
adaptations of or alterations to the products), labor charges for dismantling or reinstalling of a repaired or replaced unit or
replacement batteries.

A product under warranty which is determined to be defective in materials and/or workmanship will be repaired or replaced
(at Chamberlain’s option) at no cost to the owner for the repair and/or replacement parts and/or product. Defective parts will be
repaired or replaced with new or factory rebuilt parts at Chamberlain’s option.

If, during the warranty period, the product appears as though it may be defective, contact your original place of purchase.

This warranty does not affect the purchaser’s statutory rights under applicable national legislation in force nor the purchaser’s
rights against the retailer arising from their sales purchase contract. In the absence of applicable national or EC legislation, this
warranty will be the purchaser’s sole and exclusive remedy, and neither Chamberlain GmbH nor its affilliates or distributors shall
be liable for any incidental or consequential damages for any express or implied warranty relating to this product.

No representative or person is authorized to assume for Chamberlain GmbH any other liability in connection wit the sale of
this product.

GB-2

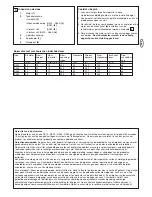
Tubular Motors with mechanical limit switches

Model

RA10

RA20

RA30

RA50

Diameter

(mm)

35

45

45

45

Torque

(Nm)

10

14

19

36

Speed

(RPM)

14

15

15

15

Operating
Voltage

(V)

230

230

230

230

Frequency

(Hz)

50

50

50

50

Current
input

(A)

0.40

0.67

0.77

1.18

Motor
Rating

(W)

100

155

175

230

Operating
time

(min)

4

4

4

4

Limit
Switch
Range
(U)

38

38

38

38

Содержание MotorLift RA30

Страница 1: ...RA10 RA20 RA30 RA50 Ouvre et ferme automatiquement les volets roulants Instructions Tubular Motor RA10 RA20 RA30 RA50 Automatically Opens and Closes Shutters Instructies Buismotor RA10 RA20 RA30 RA50...

Страница 2: ...B a b c C 8 F G 8 1 D a c b d e E a b H A RA10 RA20 RA30 6 2 Series RA10 RA20 und RA30 Series RA50 4 7 3 RA50 1 7 5 a 8...

Страница 3: ...u er Betrieb setzen Steuereinrichtungen in Sichtweite des angetriebenen Produktes in einer H he von ber 1 5m anbringen Ausreichend Abstand zwischen bewegten Teilen und benachbarten Gegenst nden sicher...

Страница 4: ...ieht sich ausschlie lich auf die Reparatur oder den Ersatz von defekten Ger teteilen und deckt nicht die Kosten oder Risiken des Transports der defekten Teile oder Produkte Diese Garantie deckt keine...

Страница 5: ...Zubeh r finden Sie in Sektion L auf Seite 4 D E H C B F G A EINSTELLUNG DER ENDPOSITIONEN Einstellverfahren f r Rolladen AUF und Rolladen ZU bei Linkseinbau siehe Abb I 1 Einstellung der Endposition f...

Страница 6: ...ter Betrieb hat wom glich den berlastungsschutz des Antriebs ausgel st 15 Minuten warten und dann erneut starten Antrieb l uft mit Unterbrechungen Eine autorisierte Elektrofachkraft Zuleitungen pr fen...

Страница 7: ...vant de proc der l installation Monter les dispositifs de commande port e de vue du produit correspondant une hauteur sup rieure 1 5 m du sol Garantir une distance suffisante entre les pi ces en mouve...

Страница 8: ...a r installation d une unit r par e ou remplac e ou les piles de rechange Un produit sous garantie qui s av re tre d fectueux en mat riau et ou en main d uvre sera r par ou remplac au choix de Chamber...

Страница 9: ...bles la section L en page 4 D E H C B F G A F 3 REGLAGE DE LIMITE Ouvert et Ferm Proc dure de r glage de limite N 1 R glage de limite pour le Volet ouvert augmentation de la course r duction de la cou...

Страница 10: ...tricien autoris de v rifier le raccordement du c blage entre l interrupteur et le moteur et de le remplacer si n cessaire Le moteur ne s arr te pas S assurer que l adaptateur de l axe est plac fond co...

Страница 11: ...RES 0908 EN60555 EN60335 1 per the provisions all amendments of EU Directives 73 23 EEC 89 336EEC Declaration of Incorporation Tubular Motor Model RA10 RA20 RA30 and RA540 when installed and maintaine...

Страница 12: ...ith Chamberlain s instructions for installation operation and care failure to provide necessary maintenance and adjustment or any adaptations of or alterations to the products labor charges for disman...

Страница 13: ...y you have chosen Have the electrical hook up done by a qualified electrician in compliance with your local electrical code Accessories can be found in section L on page 4 D E H C B F G A GB 3 SETTING...

Страница 14: ...ittently Have the wiring connection between switch and motor checked by an authorized electrician Replace if necessary Motor does not shut off Check to be sure tube adapter is positioned all the way u...

Страница 15: ...hoogte van tenminste 1 5 m Zorg voor voldoende afstand tussen bewegende delen en voorwerpen die zich in de nabijheid bevinden Nominaal koppel en inschakelduur moeten afgestemd zijn op de productspecif...

Страница 16: ...nderhoud en de nodige bijstelling aanpassingen of wijzigingen van de produkten arbeidsloon voor het demonteren of opnieuw installeren van een gerepareerd of vervangen onderdeel of vervanging van de ba...

Страница 17: ...ozen bedieningselement Laat de elektrische aansluiting doen door een erkend elektricien overeenkomstig de plaatselijk geldende elektriciteitsvoorschriften Toebehoren vindt u in sectie L op pagina 4 D...

Страница 18: ...de overbelastingsbeveiliging van de motor zijn ingeschakeld Wacht een kwartier en probeer het nogmaals De motor draait met horten en stoten Laat de aansluiting van de draden tussen de schakelaar en d...

Отзывы: