16
GB
5. Electrical connection of the pump
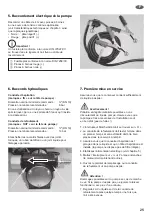
Connect a 4 m connection cable with terminal clamps to
a suitable D/C power source (see technical data, sec-
tion 3 and rating plate):
• Black: negative terminal (-)
• Red: positive terminal (+)
i
Important!
In the black holder on the connection cable is a blade
fuse compliant with DIN 72581/3C.
a
Blade fuse compliant with DIN 7258/3C
b
Terminal clamps red (+)
c
Terminal clamps black (-)
a
b
c
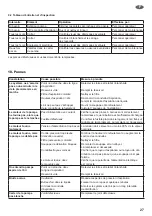
6. Hydraulic connections
Suction line
(marked “IN” on pump head):
Recommended minimum nominal diameter: ¾″ (DN 19)
Recommended nominal pressure:
6 bar
If using a hose, this must be a special vacuum hose
(e.g. with wire helix which retains its shape in a vacuum).
Delivery line
(marked “OUT” on pump head):
Recommended minimum nominal diameter: ¾″ (DN 19)
Recommended nominal pressure:
10 Bar
Seal threaded connections with O-rings,
Teflon tape or a suitable liquid thread sealant.
7. Using the equipment for the first time
Make sure that there is enough liquid in the intake
container.
Warning!
Possible environmental and material damage from
leaking delivery medium. Ensure that the pump and
accessories are in good working condition (no leaks!).
1. The ON/OFF switch must be at “O”.
2. Ensure that the delivery line is initially closed and
that the end is definitely in the container to be filled.
3. Make sure that the suction line is immersed in the
liquid and that an intake filter has been integrated.
(Pump has no integrated filter).
4. Switch on the power source (see section 5).
5. Set the switch to “I”
➔
pump ON
(motor should now be running).
6. Open the delivery nozzle
or the delivery line
➔
suction begins.
Important!
Running the pump dry may damage it. If the pump is
not sucking, under no circumstances should you leave
it running dry for more than a minute.
7. Note whether liquid starts to come out of the pressure
line after a while, which then pushes out the air.


