


Operation Guide 3070 (B)
9
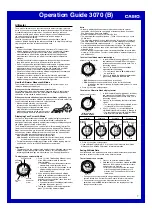
3. In the Altimeter Mode, press
E
to take an
altitude reading.
•
This causes the altitude differential value to
appear at the top of the display.
Altitude differential
Altitude
4. While monitoring the difference between the
altitude you found on the map and the altitude
differential value displayed by the watch,
advance towards your destination.
•
If you determined that the difference between
the map altitude and your current location is
+80 meters, for example, you are approaching
your destination when the displayed altitude
differential value shows +80 meters.
Altitude Data Recall
Use the Data Recall Mode to view altitude periodic records currently in
memory, as well as the current session record and the altitude historical
record. Altitude data records are created and stored in the Altimeter Mode.
Data Screens
The following explains the contents of each of the screens that appear in the
Data Recall Mode.
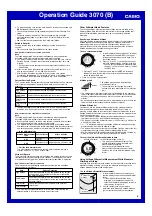
Note
•
While the periodic record, high altitude, or low altitude screen is displayed,
the bottom part of the display alternates between the measurement date
(month and day) and measurement time, at 1-second intervals.
Altitude
Measurement date
(Month – Day)
▲
▲
Alternates at
1-second intervals.
Measurement time
(Hour : Minutes)
Periodic
record
indicator
Periodic Records
Periodic records show only data for the last save session performed with the
watch. There can be up to 40 periodic records in memory.
Current Session Record Contents
The following data items show the contents of the current session record.
Data Type
High Altitude
Low Altitude
Total Ascent
Total Descent
Description
Highest altitude reached during the
recalled session.
Lowest altitude reached during the recalled
session.
Total cumulative ascent during the recalled
session.
Total cumulative descent during the
recalled session.
Screen Name
MAX
MIN
ASC
DSC
Historical Record
The historical record shows data for all save sessions performed since the
last time the historical record was cleared.
Data Type
High Altitude
Low Altitude
Total Ascent
Total Descent
Description
Highest altitude reached during all
sessions.
Lowest altitude reached during all
sessions.
Total cumulative ascent during all sessions.
Total cumulative descent during all
sessions.
Screen Name
MAX
MIN
ASC
DSC
REC
(40)
REC
(2)
REC
(1)
MAX
MIN
ASC
DSC
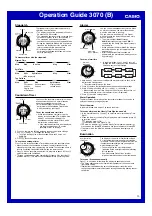
To view periodic records and current session record contents
1. Enter the Data Recall Mode.
2. Use
A
and
C
to scroll through the data and display the one you want.
•
To view the current session record contents, use
A
to scroll forward
past the last periodic record (which will display the current session
record
MAX
screen), or
C
to scroll back past the first periodic record
(to the
DSC
screen).
3. After you are finished viewing data, press
D
to exit the Data Recall Mode.
•
Dashes (
xxxx
) will be displayed if data has been deleted or if there is no
corresponding data due to error, etc. In such cases, total ascent (
ASC
)
and total descent (
DSC
) values will show zero.
Periodic
records
A
C
Current session
record
•
When the total ascent (
ASC
) or total descent (
DSC
) exceeds 99,995
meters (or 99,980 feet), the applicable value will restart from zero.
MAX
MIN
ASC
DSC
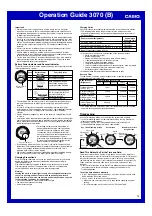
Historical record data items
A
To view historical record contents
1. Enter the Data Recall Mode.
2. Press
B
to display the historical record screen (
TTL REC
).
3. Use
A
and
C
to scroll through the historical record screens as shown
below.
4. To return to the periodic record and current session screens, press
B
again.
5. After you are finished viewing data, press
D
to exit the Data Recall Mode.
C
Clearing the Historical Record
Use the following procedure when you want to clear the contents of the
historical record and restart all values from zero.
To clear the historical record
1. In the Data Recall Mode, press
B
to display
the high altitude data (
MAX
) of the historical
record.
2. Hold down
E
.
•
CLR
will appear in the upper part of the
display.
3. Keep
E
held down for an additional two
seconds until
CLR
starts flashing.
•
The historical record high altitude screen will
reappear when data deletion is complete.
•
If you release the
E
button part way through
the above procedure, the watch will return to
the historical record high altitude screen
without deleting the data.
World Time
World Time displays the current time in 30 cities
(29 time zones) around the world.
•
If the current time shown for a city is wrong,
check your Home City time settings and make
the necessary changes.
•
For full information on city codes, see the “City
Code Table”.
•
All of the operations in this section are
performed in the World Time Mode, which you
enter by pressing
D
.
To view the time in another city
In the World Time Mode, use
A
(east) and
C
(west) to scroll through city codes (time zones).
•
When the currently selected time zone is one
that includes mostly ocean, a value indicating
the zone’s Greenwich Mean Time differential
appears in place of a city code.
Timekeeping
Mode time
Current time in the zone
of the selected city code
City code
To toggle a city code time between Standard Time and Daylight
Saving Time
1. In the World Time Mode, use
A
(east) and
C
(west) to display the city code (time zone)
whose Standard Time/Daylight Saving Time
setting you want to change.
2. Hold down
E
to toggle between Daylight
Saving Time (
DST
indicator displayed) and
Standard Time (
DST
indicator not displayed).
•
The
DST
indicator appears on the display
whenever you display a city code for which
Daylight Saving Time is turned on.
•
You cannot toggle between Daylight Saving Time and Standard Time if the
displayed city code is
GMT
.
•
Note that the DST/Standard Time setting affects only the currently
displayed city code. Other city codes are not affected.
DST indicator