


Operation Guide 3070 (B)
7
Altimeter
The watch’s altimeter uses a pressure sensor to detect current air pressure,
which is then used to estimate the current altitude based on ISA (International
Standard Atmosphere) preset values. You also can specify a reference
altitude, which the watch will use to calculate your current altitude based on
the value you specify. Altimeter functions also include storage of
measurement data in memory.
You also can measure the altitude differential (change) from a specific
reference altitude. Specifying the reference altitude is as simple as pressing a
single button to reset the reference altitude to zero.
Important!
•
This watch estimates altitude based on air pressure. This means that
altitude readings for the same location may vary if air pressure changes.
•
The semiconductor pressure sensor used by the watch for altitude
measurements is also affected by temperature. When taking altitude
measurements, make sure the watch is not subjected to temperature
changes.
•
To avoid the effect of sudden temperature changes during measurement,
keep the watch on your wrist in direct contact with your skin.
•
Do not rely upon this watch for altitude measurements or perform button
operations while sky diving, hang gliding, or paragliding, while riding a
gyrocopter, glider, or any other aircraft, or while engaging in any other
activity where there is the chance of sudden altitude changes.
•
Do not use this watch for measuring altitude in applications that demand
professional or industrial level precision.
•
Remember that the air inside of a commercial aircraft is pressurized.
Because of this, the readings produced by this watch will not match the
altitude readings announced or indicated the flight crew.
How the Altimeter Measures Altitude
The altimeter can measure altitude based on its own preset values, or a
reference altitude specified by you.
When you measure altitude based on preset values
Data produced by the watch’s barometric pressure sensor is converted to
approximate altitude based on ISA (International Standard Atmosphere)
conversion values stored in watch memory.
When you measure altitude using a reference altitude specified by you
After you specify a reference altitude, the watch uses that value to convert the
current measured barometric pressure value to altitude.
•
When mountain climbing, you can set the
reference value in accordance with a marker
along the way or altitude information from a
map. After that, the altitude readings
produced by the watch will be more accurate
than they would without a reference altitude.
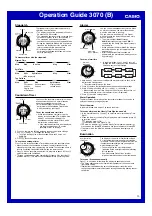
Displaying Your Current Altitude
You can use the procedure described in this section to display your current
altitude. If you leave the watch in the Altimeter Mode, it will update the
displayed altitude value regularly, and indicate reading-to-reading changes in
the altitude graph at the top of the display.
400
B
A
The Altimeter Mode gives you a choice of four different display formats. The
format you choose determines what type of data is displayed. The Altimeter
Mode screen can show any three of the following four items: altitude graph,
altitude value, altitude differential, and the current time. You also can select
either of the following two altitude measurement types.
0’05
: Readings at five-second intervals for one hour
2’00
: Readings at five-second intervals for the first three minutes followed
by two-minute intervals for approximately nine or 10 hours
•
For information about configuring settings for the altitude reading interval
and duration, see “To select the altitude measurement type”.
Important!
•
The procedure in this section simply displays values indicating your current
altitude, without storing them in watch memory. For information about
recording altitude readings in watch memory, see “Saving Altitude Data”.
To display your current altitude
1. Press
A
in the Timekeeping Mode or in any
of the other sensor modes to enter the
Altimeter Mode.
•
The watch will start altitude measurement
automatically, and display the result.
•
It can take up to four or five seconds for the
altitude reading to appear after you enter
the Altimeter Mode.
2. If you want the altitude value and altitude
graph to be updated in accordance with the
altitude measurement type (interval and
duration) you have selected, leave the watch
in the Altimeter Mode.
•
If you want to restart the altitude measurement
operation at any point, press
A
.
3. To stop the altitude measurement operation,
press
D
to exit the Altimeter Mode.
Current altitude
Altitude
graph
Current
time
Altitude
differential
pointer
Notes
•
Normally, displayed altitude values are based on the watch’s preset
conversion values. You also can specify a reference altitude, if you want.
See “Specifying a Reference Altitude”.
•
Altitude is displayed in units of 5 meters (20 feet).
•
The measurement range for altitude is –700 to 10,000 meters (–2,300 to
32,800 feet).
•
The measured altitude may be a negative value in cases where there is a
reference altitude value set or because of certain atmospheric conditions.
•
The displayed altitude value changes to
xxxx
meters (or feet) if a
measured altitude falls outside the measurement range. The altitude value
will be displayed again as soon as the measured altitude is within the
allowable range.
•
You can change the measurement unit for displayed altitude values to either
meters (m) or feet (ft). See “To select the temperature, barometric pressure,
and altitude units”.
To select the altitude measurement type
1. In the Altimeter Mode, hold down
E
for about
two seconds until either
OFF
or the current
reference altitude value starts to flash. This is
the setting screen.
2. Press
D
to display the current altitude
measurement type setting.
•
This will cause either
0’05
or
2’00
to flash
on the display.
3. Press
A
to toggle the altitude measurement
type setting between
0’05
and
2’00
.
•
0’05
:
Readings at five-second intervals for one hour
•
2’00
:
Readings at five-second intervals for the first three minutes
followed by two-minute intervals for approximately nine or 10 hours
thereafter
4. Press
E
to exit the setting screen.
l l l
l
l
l
ll
ll
ll
ll
ll
l
l
l l
l l l
Altitude measurement type
To select an Altimeter Mode display format
1. In the Altimeter Mode, hold down
E
for about
two seconds until either
OFF
or the current
reference altitude value starts to flash. This is
the setting screen.
2. Press
D
twice to display the format selection
screen.
•
The number of the currently selected format
(
1
through
4
) will flash on the display.
3. Use
A
(+) and
C
(–) to scroll through the
available display format numbers (
1
through
4
).
•
The contents of each of the Altimeter Mode
display formats are shown below.
l l l
ll
ll
ll
ll
ll
l l l
Display Format
Selection Screen
Display format number
4. Press
E
to exit the setting screen.
•
If you selected display format 3 or 4, the watch will measure the altitude
differential. See “Altitude Differential” for more information.
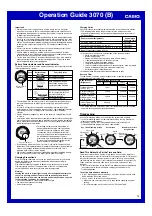
Format 1
Format 2
Format 3
Format 4
Altitude
graph
Current time
Altitude
graph
Current
time
Altitude
Altitude
differential
Altitude
Current time
Altitude
Altitude
Current
time
Altitude
differential
Saving Altitude Data
An altitude data save operation saves data in three different records: periodic
records, a current session record, and a historical record.
To start a new save session
1. Press
A
to enter the Altimeter Mode.
2. Hold down
A
for about one second until
REC
flashes on the display, which indicates that a
new session is in progress.
•
After you start a save session, the watch
starts saving periodic records every 15
minutes. See “Periodic Records” for more
information.
•
During a save session the watch also periodically updates the current
session record. See “Current Session Record” for more information.
l l l
l
l
ll
ll
ll
ll
ll
l
l
l l
l l l
•
Once you start a save session, measurement continues to be
performed, and the
REC
indicator flashes on the display, even if you
change to another mode.