


Operation Guide 3070 (B)
8
3. To stop an ongoing save session, hold down
A
for about one second until
REC
disappears from the screen.
•
The save session also will stop automatically when Periodic Record 40 is
stored.
•
The watch updates the historical record continually while an altitude
measurement operation is in progress. See “Historical Record” for more
information.
•
You can recall saved records using the Data Recall Mode.
Periodic Records
Periodic records of up to 40 altitude readings are taken during a save
session.
•
You can use the Data Recall Mode to view these records.
How periodic records are created and saved
Note
The following operation is performed simultaneously with the operation
described under “How current session record data is updated”.
a. The watch creates Periodic Record 1 when you start a new save session.
Periodic Record 1 contains the current date (month and day), time, and
altitude.
•
Each periodic record contains the current date (month and day), time,
and altitude.
b. After that, the watch takes readings and stores Periodic Records 2, 3, 4,
and so on at minute 00, 15, 30, and 45 of each hour.
c. After Periodic Record 40 is stored (or if you stop the save session
manually by holding down
A
), the watch will create a final periodic record,
which contains the current date (month and day), time, and altitude.
Current Session Record
The Current Session Record contains the data described below. The contents
of this record are updated at regular intervals while a save session is in
progress.
•
The maximum total ascent and total descent value is 99,995 meters
(or 99,980 feet). Each value reverts to zero after the maximum is reached.
How current session record data is updated
Note
The following operation is performed simultaneously with the operation
described under “How periodic records are created and saved”.
Data
High Altitude
(
MAX
)
Low Altitude
(
MIN
)
Total Ascent
(
ASC
)
Total Descent
(
DSC
)
Description
Highest altitude reached during the current session.
Lowest altitude reached during the current session.
Total cumulative ascent during the current session.
Total cumulative descent during the current session.
a. When you hold down
A
to start a save session, the watch will clear data
that is already stored in the current session record.
b. The watch will measure altitude and calculate data as described below,
and update the current session record accordingly. Note that measurement
and saves depend on whether or not the watch is in the Altimeter Mode.
•
In the Altimeter Mode
•
Outside the Altimeter Mode
The measurements are taken and session data is updated every two
minutes, and at 00, 15, 30, 45 of each hour.
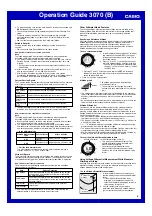
Altitude Measurement
Type
0’05
2’00
First 3 minutes
Updated every 5
seconds
Updated every 5
seconds
After 3 minutes
Updated every 5 seconds
Updated every 2 minutes, and
at 00, 15, 30, 45 of each hour
Historical Record
The Historical Record keeps track of high altitude, low altitude, total ascent, and
total descent values across multiple save sessions. The contents of this record
are updated continually while an altitude measurement operation is in progress.
How the historical record is updated
The watch performs the following operations continually while an altitude
measurement is in progress.
Data
High Altitude
Low Altitude
Total Ascent
Total Descent
Update Operation
The historical record value is compared with the current
session value, and the greater of the two is recorded in
the historical record.
The historical record value is compared with the current
session value, and the lesser of the two is recorded in the
historical record.
The current session value is added to the historical
record value.
•
See “Clearing the Historical Record” for information about clearing the
historical record, which restarts all data values from zero.
Other Altimeter Mode Features
This section explains other features and settings that are available in the
Altimeter Mode. Note that all of the information in this section applies to all
types of Altimeter Mode measurements, unless specifically indicated
otherwise.
Specifying a Reference Altitude
After you specify a reference altitude, the watch adjusts its air-pressure-to-
altitude conversion calculation accordingly. The altitude measurements
produced by this watch are subject to error caused by changes in air
pressure. Because of this, we recommend that you update the reference
altitude whenever one is available during your climb.
To set a reference altitude
1. In the Altimeter Mode, hold down
E
for about
two seconds until either
OFF
or the current
reference altitude value starts to flash. This is
the setting screen.
2. Press
A
(+) or
C
(–) to change the current
reference altitude value by 5 meters (or 20 feet).
•
You can set the reference altitude within the
range of –10,000 to 10,000 meters (–32,800
to 32,800 feet).
•
Pressing
A
and
C
at the same time returns to
OFF
(no reference
altitude), so the watch performs air pressure to altitude conversions
based on preset data only.
3. Press
E
to exit the setting screen.
l l l
l l
l
ll
ll
ll
ll
l
l
l
l l
l l l
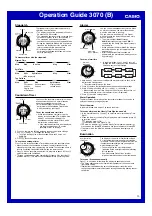
Altitude graph
The altitude graph shows Altimeter Mode
measurement results.
•
The vertical axis of the graph represents
altitude, and each dot stands for 10 meters (40
feet).
•
The horizontal axis represents time, and the flashing dot in the rightmost
column indicates the latest measurement result. For the first three minutes,
each dot represents five seconds. After that, each dot represents two
minutes.
•
An out of range measurement result or a measurement error will cause the
column of dots for that measurement to be blank (skipped).
Time
Altitude
Altitude Differential
You also can use the Altimeter Mode to measure the altitude differential
from a specific reference altitude. Specifying the point is as simple as
pressing a single button to reset the current reference altitude value to zero.
Altitude differential measurement is performed each time the watch performs
an altitude measurement.
•
You must perform altitude differential measurement whenever you select
format number 3 or 4 as the Altimeter Mode display format.
•
The range of the altitude differential value is –3,000 meters (–9,980 feet) to
3,000 meters (9,980 feet).
•
“
-- -- --
” is displayed in place of the altitude differential value whenever the
measured value is outside the allowable range.
•
The watch will assume that the reference altitude setting is zero for the first
measurement after you exit the Altimeter Mode setting screen.
•
See “Using Altitude Differential Measurement While Mountain Climbing or
Hiking” for some real-life examples of how to use this feature.
To reset the altitude differential value to zero
In the Altimeter Mode, press
E
.
•
This will start altitude measurement. The
altitude differential value will show
0
after
measurement is complete.
•
You must perform altitude differential
measurement whenever you select format
number 3 or 4 as the Altimeter Mode display
format.
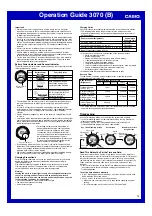
Using Altitude Differential Measurement While Mountain
Climbing or Hiking
After you zero reset the reference altitude value at a particular location while
mountain climbing or hiking, you easily can measure the change in the
altitude between that point and another point.
Altitude differential
To use altitude differential measurement
1. In the Altimeter Mode, check to make sure
that the display shows the altitude differential
value.
•
If the altitude differential value is not
displayed, use the procedure under “To
select an Altimeter Mode display format” to
select display format 3 or 4.
2. Use the contour lines on your map to
determine the difference in altitude between
your current location and your destination.
Current
location
Destination
altitude