


Operation Guide 3070 (B)
5
Precautions about bidirectional calibration
•
You can use any two opposing directions for bidirectional calibration. You
must, however, make sure that they are 180 degrees opposite each other.
Remember that if you perform the procedure incorrectly, you will get wrong
bearing sensor readings.
•
Make sure that you do not move the watch while calibration of either
direction is in progress.
•
You should perform bidirectional calibration in an environment that is the
same as that where you plan to be taking direction readings. If you plan to
take direction readings in an open field, for example, calibrate in an open
field.
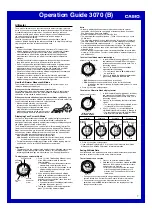
To perform bidirectional calibration
1. In the Digital Compass Mode, hold down
E
for about two seconds until the magnetic
declination angle value starts to flash. This is
the setting screen.
2. Press
D
twice to display the bidirectional
calibration screen.
•
At this time, the north pointer flashes at the
12 o’clock position to indicate that the watch
is ready to calibrate the first direction.
3. Place the watch on a level surface facing any direction you want, and
press
C
to calibrate the first direction.
•
xxx
is shown on the display while calibration is being performed. When
calibration of is successful, the display will show
O
K
and
x2x
, and the
north pointer flashes at the 6 o’clock position. This means that the watch
is ready for calibration of the second direction.
4. Rotate the watch 180 degrees.
5. Press
C
again to calibrate the second direction.
l l l
ll
ll
ll
ll
l l
l l
•
xxx
is shown on the display while calibration is being performed. When
calibration is successful, the display will show
O
K
and the Digital Compass
Mode (showing the angle value) screen.
•
If
xxx
appears and then changes to
ERR
(error) on the calibration
screen, it means that there is something wrong with the sensor. When
ERR
disappears after about one second, try performing the calibration
again. If
ERR
keeps appearing, contact your original dealer or nearest
authorized CASIO distributor to have the watch checked.
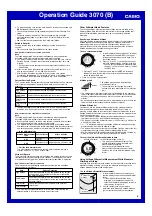
To perform northerly calibration
1. In the Digital Compass Mode, hold down
E
for about two seconds until the magnetic
declination angle value starts to flash. This is
the setting screen.
2. Press
D
three times to display the northerly
calibration screen.
•
At this time,
-N-
(north) appears on the
display.
l l l
ll
ll
ll
ll
l l
l l
3. Place the watch on a level surface, and position it so that its 12 o’clock
position points north (as measured with another compass).
4. Press
C
to start the calibration operation.
•
---
is shown on the display while calibration is being performed. When
calibration is successful, the display will show
O
K
and the Digital Compass
Mode (with
0
°
shown as the angle value).
•
If
---
appears and then changes to
ERR
(error) on the calibration
screen, it means that there is something wrong with the sensor. When
ERR
disappears after about one second, try performing the calibration
again. If
ERR
keeps appearing, contact your original dealer or nearest
authorized CASIO distributor to have the watch checked.
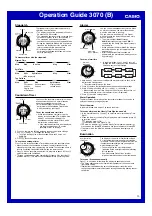
Bearing Memory
Bearing Memory lets you store a direction
reading and display that reading as you take
subsequent readings.
The Bearing Memory screen displays the
direction angle for the stored direction, along with
an indicator in the ring around the display that
also indicates the stored direction. When you take
compass readings while the Bearing Memory
screen is on the display, the direction angle for
your current bearing (as read from the 12 o’clock
position of the watch) is also shown.
To store a compass reading in Bearing
Memory
1. In the Digital Compass Mode, press
C
to
take a reading.
•
After the compass reading is complete, the
watch will continue to take direction angle
readings automatically for about 20 seconds.
12 o’clock
position
Bearing Memory indicator
Bearing Memory
direction angle
Direction angle of
current reading
Bearing Memory
Screen
2. While direction angle readings are in progress, press
E
.
•
This will cause the direction angle to flash for about one second as it is
stored in Bearing Memory, and then the Bearing Memory screen will
appear.
•
While the Bearing Memory screen is on the display, you can press
C
to
start a 20-second direction reading operation that displays the direction
angle for the direction that the 12 o’clock position of the watch is pointed.
The direction angle of the current readings will disappear from the display
after the direction reading operation is complete.
•
During the first 20 seconds after you display the Bearing Memory screen or
during the 20-second direction reading operation while the Bearing Memory
screen is on the display, the direction stored in memory is indicated by an
indicator in the ring around the display.
•
Pressing
E
while the Bearing Memory screen is displayed will clear the
direction angle currently in Bearing Memory and return to the Digital
Compass Mode.
Using the Digital Compass While Mountain Climbing or
Hiking
This section provides three practical applications for using the watch’s built-in
digital compass.
•
Setting a map and finding your current location
Having an idea of your current location is important when mountain
climbing or hiking. To do this, you need to “set the map”, which means to
align the map so the directions indicated on it are aligned with the actual
directions of your location. Basically what you are doing is aligning north on
the map with north as indicated by the watch.
•
Finding the bearing to an objective
•
Determining the direction angle to an objective on a map and heading in
that direction
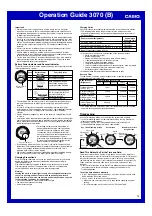
To set a map and find your current location
1. With the watch on your wrist, position it so the
face is horizontal.
2. In the Timekeeping, Digital Compass,
Barometer/Thermometer, or Altimeter Mode,
press
C
to take a compass reading.
•
The reading will appear on the display after
about two seconds.
3. Rotate the map without moving the watch so
the northerly direction indicated on the map
matches north as indicated by the watch.
•
If the watch is configured to indicate
magnetic north, align the map’s magnetic
north with the watch indication. If the watch
has been configured with a declination to
correct to true north, align the map’s true
north with the watch indication.
•
This will position the map in accordance
with your current location.
4. Determine your location as you check the
geographic contours around you.
North indicated
on the map
North indicated by
north pointer
Current
location
N
N
To find the bearing to an objective
1. Set the map so its northerly indication is
aligned with north as indicated by the watch,
and determine your current location.
•
See “To set a map and find your current
location” for information about how to
perform the above step.
2. Set the map so the direction you want to travel
on the map is pointed straight in front of you.
3. With the watch on your wrist, position it so the
face is horizontal.
4. In the Timekeeping, Digital Compass,
Barometer/Thermometer, or Altimeter Mode,
press
C
to take a compass reading.
•
The reading will appear on the display after
about two seconds.
5. Still holding the map in front of you, turn your
body until north as indicated by the watch and
the northerly direction on the map are aligned.
•
This will position the map in accordance with
your current location, so the bearing to your
objective is straight ahead of you.
12 o’clock
position
N
N
Current
location
Objective