


Operation Guide 3070 (B)
3
•
The watch receives the calibration signal for two to seven minutes everyday
when the time in the Timekeeping Mode reaches each of the calibration
times. Do not perform any button operation within seven minutes before or
after any one of the calibration times. Doing so can interfere with correct
calibration.
•
Remember that reception of the calibration signal depends on the current
time in the Timekeeping Mode. The receive operation will be performed
whenever the display shows any one of the calibration times, regardless of
whether or not the displayed time actually is the correct time.
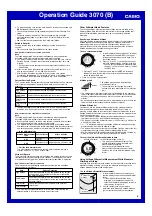
About the Receiving Indicator
The receiving indicator shows the strength of the calibration signal being
received. For best reception, be sure to keep the watch in a location where
signal strength is strongest. The receiving indicator is displayed while an auto
or manual receive operation is in progress.
•
Even in an area where signal strength is strong, it takes about 10 seconds
for signal reception to stabilize enough for the receiving indicator to indicate
signal strength.
Receiving
indicator
Weak
(Level 1)
Strong
(Level 5)
l ll
lll
ll
ll
l l
•
Use the receiving indicator as a guide for checking signal strength and for
finding the best location for the watch during signal receive operations.
•
Following reception of the time calibration signal and calibration of the
watch’s time setting, the Level 5 receiving indicator will remain on the
display in all modes. The Level 5 receiving indicator will not be displayed if
signal reception was unsuccessful or after you adjust the current time
setting manually.
•
The Level 5 receiving indicator is displayed only when the watch is able to
receive both time and date data successfully. It does not appear when only
time data is received.
•
The Level 5 receiving indicator indicates that at least one of the auto
calibration signal receive operations was successful. Note, however, that
the Level 5 receiving indicator disappears from the display each day when
the first auto receive operation of the day is performed.
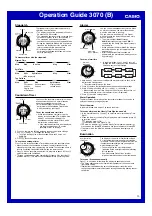
To perform manual receive
1. Enter the Receive Mode.
2. Place the watch on a stable surface so its 12
o’clock side is facing towards a window.
3. Hold down
A
for about two seconds until
RC
starts to flash on the display.
•
Time calibration signal reception takes from
two to seven minutes. Take care that you do not
perform any button operations or move the
watch during this time.
•
If the receive operation is successful, the
reception date and time appear on the display,
along with the
GET
indicator.
The watch will enter the Receive Mode if you
press
A
or if you do not perform any button
operation for about one or two minutes.
l l l
l
l
ll
ll
ll
ll
l
l l
l l
Receiving
Receive successful
•
If the current reception fails but a previous
reception was successful, the display shows
the previous reception’s date and time, and the
ERR
indicator.
indicates that none of
the reception operations were successful.
The watch will enter the Receive Mode without
changing the time setting if you press
A
or if
you do not perform any button operation for
about one or two minutes.
Note
•
To interrupt a receive operation and return to
the Receive Mode, press
A
.
Receive failed
If there was a previously
successful reception
If no reception was
successful
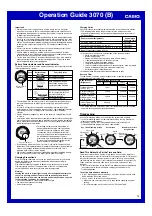
To turn auto receive on and off
1. Enter the Receive Mode.
2. In the Receive Mode, hold down
E
until the
current auto receive setting (
ON
or
OFF
)
starts to flash. This is the setting screen.
•
Note that the setting screen will not appear
if the currently selected Home City is one
that does not support time calibration
reception.
3. Press
A
to toggle auto receive on (
ON
) and
off (
OFF
).
4. Press
E
to exit the setting screen.
•
For information about city codes that support
signal receive, see “To specify your Home
City”.
l l l
l
l
ll
ll
ll
ll
l
l l
l l l
On/Off
status
To check the latest signal reception results
Enter the Receive Mode.
•
When receive is successful, the display shows
the time and date that receive was successful.
indicates that none of the reception
operations were successful.
•
To return to the Timekeeping Mode, press
D
.
Signal Reception Troubleshooting
Check the following points whenever you experience problems with signal
reception.
•
The watch is not in the Receive
Mode.
•
Your current Home City is not
one of the following:
LON
,
PAR
,
BER
,
ATH
,
TYO
,
SEL
,
NYC
,
CHI
,
DEN
, or
LAX
•
You changed the time setting
manually.
•
The DST setting was changed
manually in the World Time
Mode.
•
You pressed a button while signal
receive was in progress.
•
Even if receive is successful, the
Level 5 receiving indicator
disappears from the display
each day when the first auto
receive operation of the day is
performed.
•
Time data (hour, minutes,
seconds) only was received
during the last receive operation.
The Level 5 receiving indicator
appears only when time data
and date data (year, month, day)
are both received.
Cannot perform
manual receive.
Auto receive is
turned on, but
the Level 5
receiving
indicator does
not appear on
the display.
•
Enter the Receive Mode
and try again.
•
Select
LON
,
PAR
,
BER
,
ATH
,
TYO
,
SEL
,
NYC
,
CHI
,
DEN
, or
LAX
as
your Home City.
•
Perform manual signal
receive or wait until the
next auto signal receive
operation is performed.
•
Check to make sure the
watch is in a location
where it can receive the
signal.
What you should do
Problem
Probable Cause
•
If the time is one hour off, the
DST setting may be incorrect.
•
The Home City code setting is
not correct for the area where
you are using the watch.
•
Change the DST setting
to Auto DST.
•
Select the correct Home
City code.
Time setting is
incorrect
following signal
reception.
•
For further information, see “Important!” under “Time Calibration Signal
Reception” and “Radio-controlled Atomic Timekeeping Precautions”.
Digital Compass
A built-in bearing sensor detects magnetic north and indicates one of 16
directions on the display. Direction readings are performed in the Digital
Compass Mode.
You can store a direction reading in Bearing Memory and display that reading
as you take subsequent readings.
•
For more information about Bearing Memory, see “Bearing Memory”.
•
You can calibrate the bearing sensor if you suspect the direction reading is
incorrect.
•
See “Using the Digital Compass While Mountain Climbing or Hiking” for
some real-life examples of how to use this feature.