


Operation Guide 3070 (B)
4
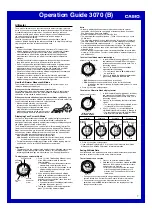
To enter and exit the Digital Compass Mode
1. While in the Timekeeping Mode or in any of
the other sensor modes, press
C
to enter the
Digital Compass Mode.
•
At this time, the watch will start a Digital
Compass operation. After about two
seconds, letters appear on the display to
indicate the direction that the 12 o’clock
position of the watch is pointing.
•
The direction reading on the display is
updated each second for up to 20 seconds,
after which measurement stops
automatically.
2. Press
D
to return to the Timekeeping Mode.
Current time
12 o’clock position
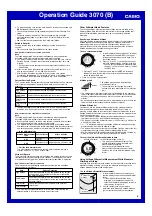
To take a direction reading
1. While the watch is in the Digital Compass
Mode, place it on a flat surface, or if you are
wearing the watch, make sure that your wrist
is horizontal (in relation to the horizon).
2. Point the 12 o’clock position of the watch in
the direction you want to measure.
3. Press
C
to start a Digital Compass
measurement operation.
•
After about two seconds, the direction that the
12 o’clock position of the watch is pointing
appears on the display.
•
Also, four pointers appear to indicate magnetic
north, south, east, and west.
•
After the first reading is obtained, the watch
continues to take direction readings
automatically each second, for up to 20
seconds.
Direction
indicator
North pointer
12 o’clock position
NW
0
°
WN
W
W
W
S
W
SW
S
S
W
S
SSE
SE
ESE
E
E
N
E
NE
N
N
E
N
NNW
90
°
180
°
270
°
Angle value (in degrees)
•
While the watch is taking compass readings, it displays a direction angle, a
direction indicator, and four direction pointers, which change dynamically
when the watch is moved. The direction angle, direction indicator and
direction pointers all disappear from the display after the compass reading
operation is complete.
Note
•
Note that taking a measurement
while the watch is not horizontal
(in relation to the horizon) can
result in large measurement error.
•
The margin of error for the angle value and the direction indicator is
±
11
degrees. If the indicated direction is northwest (
NW
) and 315 degrees, for
example, the actual direction can be anywhere from 304 to 326 degrees.
•
Any ongoing direction measurement operation is paused temporarily while
the watch is performing an alert operation (daily alarm, Hourly Time Signal,
countdown timer alarm) or while illumination is turned on (by pressing
L
).
The measurement operation resumes for its remaining duration after the
operation that caused it to pause is finished.
•
The following table shows the meanings of each of the direction
abbreviations that appear on the display.
•
See “Digital Compass Precautions” for other important information about
taking direction readings.
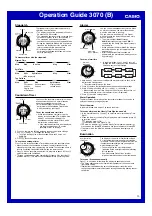
Direction Meaning
Direction
Meaning
Direction
Meaning
Direction
Meaning
NNE
ESE
SSW
WNW
NE
SE
SW
NW
North-
northeast
East-
southeast
South-
southwest
West-
northwest
Northeast
Southeast
Southwest
Northwest
East-
northeast
South-
southeast
West-
southwest
North-
northwest
ENE
SSE
WSW
NNW
North
East
South
West
N
E
S
W
Digital Compass Precautions
This watch features a built-in magnetic bearing sensor that detects terrestrial
magnetism. This means that north indicated by this watch is magnetic north,
which is somewhat different from true polar north. The magnetic north pole is
located in northern Canada, while the magnetic south pole is in southern
Australia. Note that the difference between magnetic north and true north as
measured with all magnetic compasses tends to be greater as one gets
closer to either of the magnetic poles. You should also remember that some
maps indicate true north (instead of magnetic north), and so you should make
allowances when using such maps with this watch.
Location
•
Taking a direction reading when you are near a source of strong magnetism
can cause large errors in readings. Because of this, you should avoid taking
direction readings while in the vicinity of the following types of objects:
permanent magnets (magnetic necklaces, etc.), concentrations of metal
(metal doors, lockers, etc.), high tension wires, aerial wires, household
appliances (TVs, personal computers, washing machines, freezers, etc.)
•
Accurate direction readings are impossible while in a train, boat, air plane,
etc.
•
Accurate readings are also impossible indoors, especially inside ferro-
concrete structures. This is because the metal framework of such structures
picks up magnetism from appliances, etc.
Storage
•
The precision of the bearing sensor may deteriorate if the watch becomes
magnetized. Because of this, you should be sure to store the watch away
from magnets or any other sources of strong magnetism, including:
permanent magnets (magnetic necklaces, etc.) and household appliances
(TVs, personal computers, washing machines, freezers, etc.)
•
Whenever you suspect that the watch may have become magnetized,
perform one of the calibration procedures under “Calibrating the Bearing
Sensor”.
Calibrating the Bearing Sensor
You should calibrate the bearing sensor whenever you feel that the direction
readings being produced by the watch are off. There are three different
calibration methods available: magnetic declination correction, bidirectional
calibration, and northerly calibration.
•
Magnetic Declination Correction
With magnetic declination correction, you input a magnetic declination
angle (difference between magnetic north and true north), which allows the
watch to indicate true north.
You can perform this procedure when the magnetic declination angle is
indicated on the map you are using.
Note that you can input the declination angle in degree units only, so you
may need to round off the value specified on the map. If your map indicates
the declination angle as 7.4
°
, you should input 7
°
. In the case of 7.6
°
input
8
°
, for 7.5
°
you can input 7
°
or 8
°
.
•
Bidirectional Calibration and Northerly Calibration
Bidirectional calibration and northerly calibration calibrate the accuracy of
the direction sensor in relation to magnetic north.
Use bidirectional calibration when you want to take readings within an area
exposed to magnetic force. This type of calibration should be used if the
watch becomes magnetized for any reason. With northerly calibration, you
“teach” the watch which way is north (which you have to determine with
another compass or some other means).
Important!
•
If you want to perform both bidirectional and northerly calibration, be sure
to perform bidirectional calibration first, and then perform northerly
calibration. This is necessary because bidirectional calibration cancels any
existing northerly calibration setting.
•
The more correctly you perform bidirectional calibration, the better the
accuracy of the bearing sensor readouts. You should perform bidirectional
calibration whenever you change environments where you use the bearing
sensor, and whenever you feel that the bearing sensor is producing
incorrect readings.
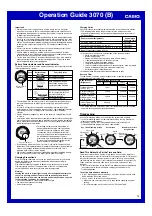
To perform magnetic declination correction
1. In the Digital Compass Mode, hold down
E
for about two seconds until the magnetic
declination angle value starts to flash. This is
the setting screen.
2. Use
A
(+) and
C
(–) to change the magnetic
declination angle value.
3. Press
D
to move the flashing to the magnetic
declination correction direction setting (
OFF,
E, W
).
•
This will cause the magnetic declination
angle direction setting to flash.
4. Use
A
to cycle the direction setting between
the following options.
•
OFF
: No magnetic declination correction
•
E
: When magnetic north is to the east (east
declination)
•
W
: When magnetic north is to the west
(west declination)
l l l
ll
ll
ll
ll
ll
l l l
Magnetic declination
angle direction
Magnetic
declination
angle value
•
The illustration above, for example, shows the value you should input
and the direction setting you should select when the map shows a
magnetic declination of 1
°
West.
5. When the setting is the way you want, press
E
to exit the setting screen.
•
Selecting
OFF
for the magnetic declination angle direction causes the
watch’s magnetic declination angle value to change to
xx
.