Cary Audio Design CINEMA 6 Скачать руководство пользователя страница 18

The next step is to adjust the output level of each channel so that they are properly matched. This must be done to insure a correct

presentation of multi-channel sound sources.The adjustment must be as precise as possible, and is almost impossible to accomplish

by ear. Therefore, we recommend that you use a Sound Level Meter. This device insures that all loudspeaker levels are precisely

matched and set accurately. (The Radio Shack Analog Sound level Meter is inexpensive and suitable for this task.)

NOTE: If for any reason you are not sure that you can accomplish this calibration task or have any doubts as to how it should

be done, please contact Cary Audio' technical support BEFORE attempting this process.
Set the meter to Slow response and "C" weighting. Set it to the 70 dB sensitivity scale. Position the meter at the approximate

center of your listening area, at average ear height [approximately 40-46 inches (102-117cm)] with its microphone positioned

vertically (pointing at the ceiling). Don't aim the microphone at the speakers, as this will produce inaccurate results.

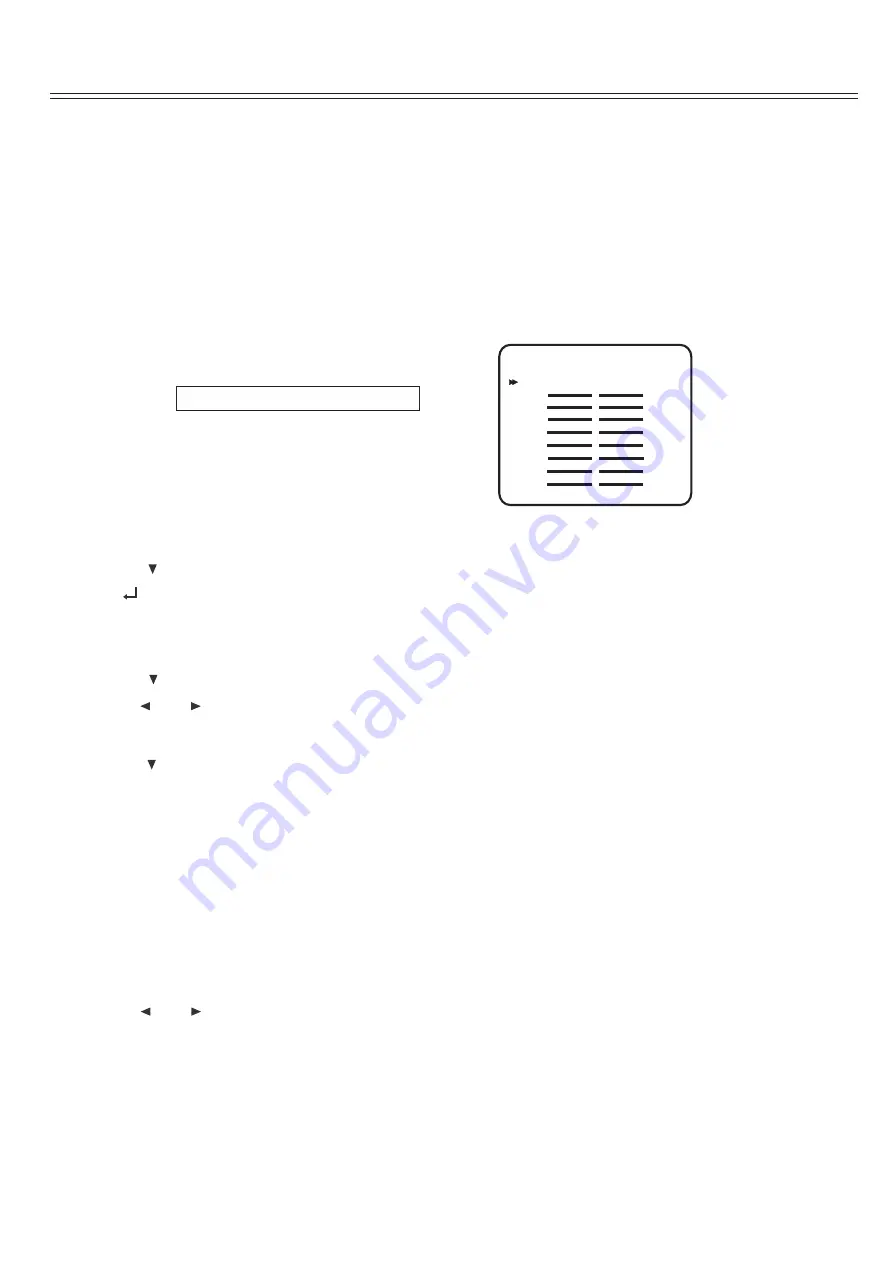
To proceed with the adjustments, you will access the Channel Calibration menu shown below. Set all channels to 75 dB level.

.

NOTE: The following selected menus appear on the Cinema 6 Display and the OSD (On Screen Display)

To set the channel levels for your system:

1.Press the MENU button to enter the Main Menu.

The Main Menu appears and the cursor should be pointing to INPUT SETUP.

2.

4.

Press the

Press the

button until BALANCE SETUP is selected.

button until FL (FRONT LEFT) is selected.

3.

5.

Press

(SEL/PLAY) to enter the BALANCE SETUP menu.

The BALANCE SETUP menu appears and the cursor should be pointing to TEST MODE.

A special test tone will be generated allowing you to measure the output of the speaker that's playing.

NOTE:

Use the

and

buttons to adjust the speaker level.

You can adjust the selected channel level in 0.5dB steps across a range of -15dB to + 15dB. The recommended calibration level is

75dB/SPL as displayed on the meter.

Press the

button when you have finished making the FRONT LEFT level adjustment.

Repeat steps 4 and 5 until you have completed setting the level for each speaker in your system. Set all the levels to 75dB.

When you have finished adjusting the level for all the speakers in your system, press the MENU button to return to Main Menu.

Press the MENU button to return to the Main Menu, or press the EXIT button to exit.

You can also perform this calibration at any time by pressing the TEST button on the remote control.

1.Press the TEST button on the remote.

When you select this function, the Cinema 6's Test tone automatically cycle every few seconds through all the speakers connected.

The unit cycles through the speakers in the following sequence:

2.Use the

and

buttons to adjust the speaker level.

You can adjust the selected channel level in 0.5dB steps across a range of -15dB to +15dB.

The unit will then resume cycling the Test Tone from speaker to speaker, until you touch the TEST button again.
NOTE: Speakers that you selected "None" for in the SPEAKER SETUP menu will not appear.

3.Press the TEST button on the remote control again to exit the TEST TONE function.

System Setup

B a l a n c e

S e t u p

T e s t

m o d e

F L

A u t o

BALANCE SETUP

TEST MODE

FL

AUTO

FL

CEN

+
+
+
+
+
+
+
+

0.0dB
0.0dB
0.0dB
0.0dB
0.0dB
0.0dB
0.0dB
0.0dB

FR

SR

SBR
SBL

SL
SW

For TEST MODE you can select AUTO, MANUAL or OFF.

6.

7.

8.

Balance Setup

To Set Channel Levels Using The Test Tone Function:

FRONT LEFT> CENTER> FRONT RIGHT> SURROUND RIGHT> SURROUND BACK RIGHT>

SURROUND BACK LEFT> SURROUND LEFT> SUBWOOFER

(18)

Содержание CINEMA 6

Страница 1: ...No 5 479 168 5 638 074 5 640 161 5 808 574 669 114 CINEMA 6 192 kHz 24 Bit Surround Sound Processor Preamplifier NOTE Before installing your new surround sound processor please read this manual caref...

Страница 2: ...ystem is grounded so as to provide some protection against voltage surges and built up static charges Article 810 of the National Electrical Code ANSI NFPA70 provides information regarding proper grou...

Страница 3: ...installer s attention to article 820 40 of the NEC ANSI NFPA 70 which provides guidelines for proper grounding and in particular specifies that the cable ground shall be connected to the grounding sys...

Страница 4: ...25 typical 22 kHz bandwidth Input Sensitivity 200 mV rms 2 Vrms for maximum output level at 0dB input gain Input Impedance 100 k ohm in parallel with 150 pFd Output Level 150 mV rms typical 10 Vrms ma...

Страница 5: ...al DTS ES Discrete 6 1 Matrix6 1 Neo 96 24 DTS 96 24 Dolby Pro LogicII Movie Music Matrix Emulation Virtual Dolby Pro Logic IIx Movie Music Matrix Emulation Virtual 192 kHz 24 bit Crystal DAC for all...

Страница 6: ...DTS brings you premium quality discrete multichannel digital sound to both movies and music DTS is a multichannel sound system designed to create full range digital sound reproduction The no compromi...

Страница 7: ...0 2 0 2 0 2 0 2 0 2 0 2 0 2 0 5 1 5 1 5 1 5 1 5 1 5 1 DOLBY PL II Emulation DOLBY PL II Virtual DOLBY PL II Music DOLBY PL II Movie DOLBY PL II DOLBY PL IIx Emulation DOLBY PL IIx Virtual DOLBY PL II...

Страница 8: ...s this button to select the Pro Logic II decoding or Pro Logic IIx decoding 9 SUR MODE button Press this button to select the surround sound mode 10 CES 7 1 button Press this button to select either D...

Страница 9: ...audio outputs to an extenal audio amplifier used to power the speakers in the remote zone 4 ANALOG 7 1 INPUT A By connecting a DVD audio player SACD multichannel player or other component that has a m...

Страница 10: ...Cinema 6 Display or OSD Use the SEL PLAY button to confirm selections made in menus 7 ANALOG Button Press the button to switch the source of Analog input 8 DIGITAL Button Press the button to switch t...

Страница 11: ...ns to and from the components to insure that all signals can be employed by the preamp processor When using the TOSLINK optical input or output jacks remove the protective cap and keep it in a safe pl...

Страница 12: ...harmful interference and 2 this device must accept any interference received including interference that may cause undesired operation Power Cinema 6 Surround Sound Processor CARY AUDIO DESIGN INC VI...

Страница 13: ...video jack used on the rear of the Cinema 6 Digital Audio If your satellite tuner or television has a digital output jack connect it to one of the coaxial TV Coaxial or optical TV Toslink input jacks...

Страница 14: ...e recommend that this jack be used to turn on a power amplifier such as the Cary Audio Cinema 5 or Cinema 7 but it may also be used to activate compatible products such as projection screens dim light...

Страница 15: ...topic NOTE The following selected menus appear on the Cinema 6 Display and the OSD On Screen Display 1 Press the MENU button to display the Main Menu 2 Press or to select a Setup menu Then press SEL...

Страница 16: ...s so that their height is approximately 3 feet 1 meter higher than that of the listener s ears if feasible Surround back left and right speakers These speakers are required for Surround EX DTS ES DTS...

Страница 17: ...sure about your speaker s real world capabilities and you are using a subwoofer choose Small since this will insure that all the appropriate low frequency information is directed to the subwoofer whe...

Страница 18: ...A special test tone will be generated allowing you to measure the output of the speaker that s playing NOTE Use the and buttons to adjust the speaker level You can adjust the selected channel level i...

Страница 19: ...tton to return to the Main Menu or Press the MENU button to return to the Main Menu or press the EXIT button to exit press the EXIT button to exit NOTE The following selected menus appear on the Cinem...

Страница 20: ...Input When you select a source from the Cinema 6 s remote the input selected is automatically used as the source input To select a source input type 1 Press the DVD button on the remote control The ne...

Страница 21: ...o the source in pure two channel stereo 1 Press the ANALOG button on the remote or the AUDIO DIRECT button on the front panel The source signal will be passed through without any digital processing If...

Страница 22: ...evel adjustment If necessary repeat steps 4 and 5 until you have completed setting the level for each speaker in your system The sequence is as follows 6 Press the MENU button when you have finished m...

Страница 23: ...sing the 8 channel direct mode Examples of a 5 1 channel source would be a DVD A or SACD multi channel player To enter 8 Channel Direct mode 1 The Cinema 6 is set to Bypass mode circumventing any inte...

Страница 24: ...is break in period is true with most HIGH PERFORMANCE audio and video equipments The housing and front of the Cinema 6 may be cleaned with a soft cloth and windex or a window cleaner The frequency of...

Страница 25: ...ance from this product Therefore carefully read the Operating Manual This warranty does not apply to any defect that Cary Audio Design Inc in its sole discretion determines is due to 1 Improper mainte...

Страница 26: ...CARY AUDIO DESIGN INC 1020 GOODWORTH DRIVE APEX N C 27539 U S A TEL 919 355 0010 FAX 919 355 0013 www caryaudio com...

Отзывы: