Zur Stabilisierung der Betriebsspannung für die
Endstufe und der damit verbundenen Leistungsstei-
gerung sowie Klangverbesserung wird ein Power-
Kondensator empfohlen (z. B. CAP-…*). Den Kon-
densator mit den Anschlüssen EXTERNAL CAP
(20) verbinden. Dabei unbedingt auf die richtige
Polung des Kondensators achten.
6.1.2 Masseanschluss
Den Masseanschluss GND (21) über ein Kabel mit
einem Querschnitt von mindestens 10 mm
2
(z. B.
CPC-100/SW*) mit der Masse des Autos oder bes-
ser direkt mit der Minusklemme der Autobatterie ver-
binden. Hinweise:
1. Bei Verwendung der Karosserie als Massean-
schluss muss die verwendete Stelle einen guten
elektrischen Kontakt zur Hauptkarosserie aufwei-
sen (z. B. durch ausreichend viele Schweiß-
punkte). Eventueller Lack am Kontaktpunkt muss
vollständig entfernt werden.
2. Zur Vermeidung von Masseschleifen muss die
Masse des Autoradios an die Stelle gelegt wer-
den, an der auch die Endstufe an Masse liegt.
6.1.3 Steuerspannung zum Einschalten
Die Car-HiFi-Endstufe wird durch eine Steuerspan-
nung von +12 V am Anschluss REM (22) ein- und
ausgeschaltet. Den Anschluss REM mit dem 12-V-
Schaltausgang vom Autoradio verbinden (Anschluss
für eine Motorantenne, eventuell mit der Motoran-
tenne parallel schalten).
6.2 Eingänge
Die Endstufe wird über Cinch-Kabel mit den Line-
Ausgängen am Autoradio verbunden. Sind am Auto-
radio jedoch keine Line-Ausgänge vorhanden, kön-
nen die Lautsprecherausgänge des Autoradios über
einen entsprechenden Übertrager (z. B. FGA-22HQ*)
mit den Line-Eingängen der Endstufe verbunden
werden. Der Anschluss richtet sich nach der ge-
wünschten Betriebsart der Endstufe:
6.2.1 4-Kanalbetrieb
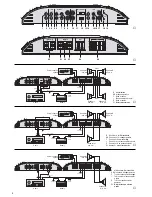
(Abb. 3)
Die Ausgänge des Autoradios wie folgt mit den Ein-
gängen INPUT (10 und 17) verbinden:
Front links
auf Kanal 1 = weiße Buchse L (10)
Front rechts
auf Kanal 2 = rote Buchse R (10)
Rear links
auf Kanal 3 = weiße Buchse L (17)
Rear rechts
auf Kanal 4 = rote Buchse R (17)
Sind am Autoradio keine Ausgänge für die hinteren
Kanäle (Rear) vorhanden, den Ausgang des linken
Kanals über ein Y-Kabel (z. B. CBA-25/SW*) mit
den weißen Eingangsbuchsen der Kanäle 1 und 3
verbinden und den Ausgang des rechten Kanals
über ein weiteres Y-Kabel mit den roten Eingangs-
buchsen der Kanälen 2 und 4.
6.2.2 Brückenbetrieb
Sollen die Kanäle 1 und 2 in Brückenschaltung den
linken Lautsprecher antreiben sowie die Kanäle 3
und 4 in Brückenschaltung den rechten Lautspre-
cher (siehe auch Abb. 5), den Ausgang des linken
Kanals am Autoradio über ein Y-Kabel (z. B. CBA-
25/SW*) mit den Eingängen INPUT 1 + 2 (10) ver-
binden und den Ausgang des rechten Kanals über
ein weiteres Y-Kabel mit den Eingängen INPUT
3 + 4 (17).
Soll jedoch im Brückenbetrieb ein Mono-Sub-
woofer angetrieben werden, eine der folgenden An-
schlussmöglichkeiten nutzen:
1. Sind am Autoradio Ausgänge für einen Sub-
woofer-Verstärker vorhanden, diese Ausgänge
an den linken und rechten Kanal der Eingänge
INPUT 1 + 2 oder INPUT 3 + 4 anschließen.
2. Die Line-Ausgänge am Autoradio für den linken
und rechten Kanal an den linken und rechten
Kanal der Eingänge INPUT 1 + 2 oder INPUT
3 + 4 anschließen.
3. Wird der Subwoofer über die Kanäle 3 und 4 be-
trieben, kann das Eingangssignal auch von den
Buchsen LINE OUT (9) abgenommen werden,
wenn der obere Schalter AMP/FILTER MODE
(11) in die Position CH 1 + 2 HP/ LINE OUT LP
gestellt wurde – siehe Abb. 4.
6.3 Line-Ausgänge
An die Ausgänge LINE OUT (9) lassen sich die Ein-
gänge INPUT 3 + 4 (17) oder die Eingänge eines
zweiten Verstärkers anschließen, um z. B. ein
2-Wege-Aktivsystem mit Mittelhochtönern und Kick-
basslautsprechern oder einem Subwoofer zu reali-
sieren (Bi-Amping). Das Ausgangssignal an den
Buchsen LINE OUT entspricht dem Eingangssignal
der Buchsen INPUT 1 + 2 (10), durchläuft jedoch
das mit dem oberen Betriebsartenschalter AMP/
FILTER MODE (11) gewählte Filter. Die folgenden
Schalterstellungen beziehen sich auf die Beschrif-
tung
unter
dem Schalter:
BP
Bandpass für die Ausgänge LINE OUT einge-
schaltet: zum Anschluss eines Verstärkers für
Kickbasslautsprecher
HP
Hochpass für die Ausgänge eingeschaltet:
zum Anschluss eines Verstärkers für Mittel-
hochtöner
LP
Tiefpass für die Ausgänge eingeschaltet: zum
Anschluss eines Verstärkers für Basslaut-
sprecher oder eines Subwoofer-Verstärkers
FULL kein Filter eingeschaltet: zum Anschluss eines
Verstärkers für Full-Range-Lautsprecher
Die Kanäle 1 und 2 können z. B. die Mittelhochtöner
antreiben und die Line-Ausgänge liefern die Bässe
für die Kanäle 3 und 4 oder für einen weiteren Ver-
stärker, um die Basslautsprecher bzw. einen Sub-
woofer anzutreiben (Schalterstellung CH 1 + 2 HP/
LINE OUT LP).
6.4 Lautsprecher
Es lassen sich Full-Range-Lautsprecher (2- oder 3-
Wege-Systeme), Mittelhochtöner, Basslautsprecher
oder ein Subwoofer betreiben.
Wichtig!
Alle Lautsprecher müssen 2-polig angeschlossen
werden, d. h. ohne gemeinsamen Masseanschluss.
Bei der Auswahl geeigneter Lautsprecher unbedingt
deren mechanische und elektrische Belastbarkeit
im Zusammenhang mit der genutzten Endstufen-
To stabilize the operating voltage for the power
amplifier and thus the resulting power increase and
sound improvement, a power capacitor is recom-
mended (e. g. CAP-...*). Connect the capacitor to
the connections EXTERNAL CAP (20). Observe in
any case the correct polarity of the capacitor.
6.1.2 Ground connection
Connect the ground terminal GND (21) via a cable
with a minimum cross section of 10 mm
2
(e. g. CPC-
100/SW*) to the ground of the car or better directly
to the negative terminal of the car battery. Notes:
1. When using the chassis as a ground connection,
the place used must have a good electrical con-
tact to the main chassis (e. g. by a sufficient num-
ber of welding points). Any lacquer at the point of
contact must completely be removed.
2. To avoid ground loops, the ground of the car
radio must be applied at the place where also the
power amplifier is grounded.
6.1.3 Control voltage for switching-on
The car HiFi power amplifier is switched on and off
by a control voltage of +12 V at the terminal REM
(22). Connect the terminal REM to the 12 V control
output of the car radio (connection for a motor
antenna, if necessary, to be connected in parallel to
the motor antenna).
6.2 Inputs
The power amplifier is connected via cables with
phono connectors to the line outputs at the car radio.
However, if the car radio is not equipped with line
outputs, the speaker outputs of the car radio can be
connected via a corresponding transformer (e. g.
FGA-22HQ*) to the line inputs of the power ampli-
fier. The connection depends on the desired operat-
ing mode of the power amplifier:
6.2.1 4-channel operation
(fig. 3)
Connect the outputs of the car radio to the INPUTs
(10 and 17) as follows:
front left
to channel 1 = white jack L (10)
front right
to channel 2 = red jack R (10)
rear left
to channel 3 = white jack L (17)
rear right
to channel 4 = red jack R (17)
If the car radio is not equipped with outputs for the
rear channels, connect the output of the left channel
via a Y cable (e. g. CBA-25/SW*) to the white input
jacks of the channels 1 and 3 and the output of the
right channel via another Y cable to the red input
jacks of the channels 2 and 4.
6.2.2 Bridge operation
If the channels 1 and 2 in bridge operation are to
drive the left speaker and the channels 3 and 4 in
bridge operation the right speaker (also see fig. 5),
connect the output of the left channel at the car radio
via a Y cable (e. g. CBA-25/SW*) to the INPUTs
1 + 2 (10) and the output of the right channel via an-
other Y cable to the INPUTs 3 + 4 (17).
However, if in bridge operation a mono subwoof-
er is to be driven, use one of the following connec-
tion possibilities:
1. If the car radio is equipped with outputs for a sub-
woofer amplifier, connect these outputs to the left
and right channels of the INPUTs 1 + 2 or INPUTs
3 + 4.
2. Connect the line outputs at the car radio for the
left and right channels to the left and right chan-
nels of the INPUTs 1 + 2 or INPUTs 3 + 4.
3. If the subwoofer is operated via the channels 3
and 4, the input signal can also be picked up from
the jacks LINE OUT (9) if the upper switch
AMP/FILTER MODE (11) has been set to posi-
tion CH 1 + 2 HP/LINE OUT LP – see fig. 4.
6.3 Line outputs
The outputs LINE OUT (9) allow connection of the
INPUTs 3 + 4 (17) or of the inputs of a second ampli-
fier to realize e. g. an active 2-way system with mid-
high range speakers and kick bass speakers or a
subwoofer (bi-amping). The output signal at the
jacks LINE OUT corresponds to the input signal of
the jacks INPUT 1 + 2 (10), however, it passes the fil-
ter selected with the upper operating mode switch
AMP/FILTER MODE (11). The following switch posi-
tions refer to the lettering
below
the switch.
BP
band pass for the outputs LINE OUT switched
on: for connection of an amplifier for kick bass
speakers
HP
high pass for the outputs switched on: for
connection of an amplifier for mid-high range
speakers
LP
low pass for the outputs switched on: for
connection of an amplifier for bass speakers
or a subwoofer amplifier
FULL no filter switched on: for connection of an
amplifier for full range speakers
The channels 1 and 2 can e. g. drive the mid-high
range speakers and the line outputs supply the bass
frequencies for the channels 3 and 4 or for another
amplifier to drive the bass speakers or a subwoofer
(switch position CH 1 + 2 HP/LINE OUT LP).
6.4 Speakers
It is possible to use full range speakers (2-way or
3-way systems), mid-high range speakers, bass
speakers, or a subwoofer.
Important!
All speakers must be connected with 2 poles, i.e.
without common ground connection. When choos-
ing suitable speakers, pay in any case attention to
their mechanical and electrical capability in con-
nection with the power used of the power amplifier
(also see specifications of the power amplifier on
page 9).
6
GB
D
A
CH
* von CARPOWER
* by CARPOWER


