background image

CH 3 L+ = Pluspol

Lautsprecher links hinten

CH 3 L- = Minuspol Lautsprecher links hinten
CH 4 R+ = Pluspol

Lautsprecher rechts hinten

CH 4 R- = Minuspol Lautsprecher rechts hinten

6.4.2 Aktiver 2-Wegebetrieb

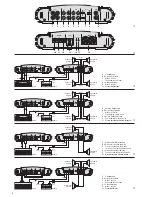
Siehe auch Abb. 4.

CH 1 L+ = Pluspol

linker Basslautsprecher

CH 1 L- = Minuspol linker Basslautsprecher
CH 2 R+ = Pluspol

rechter Basslautsprecher

CH 2 R- = Minuspol rechter Basslautsprecher

CH 3 L+ = Pluspol

linker Mittelhochtöner

CH 3 L- = Minuspol linker Mittelhochtöner
CH 4 R+ = Pluspol

rechter Mittelhochtöner

CH 4 R- = Minuspol rechter Mittelhochtöner

6.4.3 Brückenbetrieb

Beim Anschluss die Beschriftung „BRIDGE“ beach-
ten, siehe auch Abb. 5.

CH 1 L+ = Pluspol

linker Lautsprecher

CH 1 L- = bleibt frei
CH 2  R+ = bleibt frei
CH 2  R- = Minuspol linker Lautsprecher

CH 3 L+ = Pluspol

rechter Lautsprecher

CH 3 L- = bleibt frei
CH 4 R+ = bleibt frei
CH 4 R- = Minuspol rechter Lautsprecher

6.4.4 3-Kanalbetrieb

Siehe auch Abb. 6.

CH 1 L+ = Pluspol

linker Lautsprecher

CH 1 L- = Minuspol linker Lautsprecher
CH 2 R+ = Pluspol

rechter Lautsprecher

CH 2 R- = Minuspol rechter Lautsprecher

CH 3 L+ = Pluspol

Subwoofer

CH 3 L- = bleibt frei
CH 4 R+ = bleibt frei
CH 4 R- = Minuspol Subwoofer

7

Inbetriebnahme

7.1 Filter auswählen und Trennfrequenzen

einstellen

Je nach angeschlossenen Lautsprechertypen mit den
Schaltern CROSSOVER (7) die Filter auswählen.
Der obere Schalter und die oberen Regler sind zum
Einstellen der Kanäle 1 und 2, der untere Schalter
und die unteren Regler für die Kanäle 3 und 4.

Für 

Full-Range-Lautsprecher

den Schalter ganz

nach links in die Position FULL schieben. Die
zugehörigen Kanäle geben den gesamten Fre-
quenzbereich wieder.

Für 

Basslautsprecher

oder einen 

Subwoofer

den

Schalter in die Position LP schieben. In den zu ge -
hörigen Kanälen ist der Tiefpass eingeschaltet und
die mittleren sowie hohen Frequenzen werden
unterdrückt. Die Trennfrequenz mit dem Regler LP
(6) zu nächst grob einstellen.*

Für 

Mittelhochtöner

den Schalter in die Position

HP schieben. In den zu ge hörigen Kanälen ist der
Hochpass eingeschaltet und die tiefen Frequenzen
werden damit unterdrückt. Die Trennfrequenz mit
dem Regler HP (5) zunächst grob einstellen.*

7.2 Pegel und Bassanhebung einstellen

1) Die beiden Regler LEVEL (3) ganz nach links in

die Position MIN drehen.

2) Die Car-HiFi-Anlage komplett einschalten. Die

grüne Betriebsanzeige POWER (14) leuchtet.
Die Endstufe bleibt jedoch noch für ca. 3 Sekun-
den stumm geschaltet (Einschaltverzögerung).

3) Die Signalquelle, z. B. das Autoradio, auf maxi-

male, nicht verzerrende Lautstärke einstellen.

4) Die Regler LEVEL maximal so weit aufdrehen,

dass keine Verzerrungen auftreten. (Die oberen
Regler sind zum Einstellen der Kanäle 1 und 2
und die unteren für die Kanäle 3 und 4.)

Beim 4-Kanalbetrieb lässt sich mit den Reg-

lern auch die Balance zwischen den vorderen
und hinteren Lautsprechern einstellen, falls am
Autoradio dafür kein Regler vorhanden ist.

Beim aktiven 2-Wegebetrieb und beim 3-Kanal -

betrieb mit den Reglern einen natürlichen Klang
einstellen: Sind die Bässe zu leise, die Kanäle für
die Mittelhochtöner im Pegel reduzieren. Bei
einem zu kräftigen Bass die Lautstärke der Bass -
kanäle bzw. des Subwoofer-Kanals verringern.

5) Bei Bedarf lassen sich die Bässe mit dem ent-

sprechenden Regler BASS EQ (4) anheben
(max. 12 dB/50 Hz).

6) Sind in der Car-HiFi-Anlage weitere Endstufen

eingesetzt, zur Anpassung der Lautstärke aller
Kanäle untereinander die jeweils zu lauten
Kanäle im  Pegel reduzieren.

Tipp

Um Störeinstrahlungen durch die Autoelek-
trik so gering wie möglich zu halten, sollte
der Ausgangspegel der Signalquelle min.
1,5 V betragen.

Wichtig!

Vor dem ersten Einschalten die Filter mit den
Schaltern CROSSOVER (7) auswählen und die
Trennfrequenz grob einstellen (Kap. 7.1), da mit die
Lautsprecher nicht durch  

einen eventuell zu

großen Frequenz bereich überlastet werden. Auch
sollte die komplette Verdrahtung der  

Car-HiFi-

Endstufe noch einmal auf Richtigkeit überprüft
werden. Erst danach die  Minusklemme der Auto-
batterie wieder an schließen.

6.4.2 Active 2-way operation

Also see fig. 4

CH 1 L+ = positive pole

left bass speaker

CH 1 L- = negative pole left bass speaker
CH 2 R+ = positive pole

right bass speaker

CH 2 R- = negative pole right bass speaker

CH 3 L+ = positive pole

left mid-high range 
speaker

CH 3 L- = negative pole left mid-high range

speaker

CH 4 R+ = positive pole

right mid-high range
speaker

CH 4 R- = negative pole right mid-high range

speaker

6.4.3 Bridge operation

While connecting, pay attention to the lettering
“BRIDGE”, also see fig. 5.

CH 1 L+ = positive pole

left speaker

CH 1 L- = remains unconnected
CH 2 R+ = remains unconnected
CH 2 R- = negative pole left speaker

CH 3 L+ = positive pole

right speaker

CH 3 L- = remains unconnected
CH 4 R+ = remains unconnected
CH 4 R- = negative pole right speaker

6.4.4 3-channel operation

Also see fig. 6

CH 1 L+ = positive pole

left speaker

CH 1 L- = negative pole left speaker
CH 2 R+ = positive pole

right speaker

CH 2 R- = negative pole right speaker

CH 3 L+ = positive pole

subwoofer

CH 3 L- = remains unconnected
CH 4 R+ = remains unconnected
CH 4 R- = negative pole subwoofer

7

Setting into Operation

7.1 Selecting the filters and adjusting the

crossover frequencies

Depending on the speaker types connected, select
the filters with the switches CROSSOVER (7). The
upper switch and the upper controls are intended to
adjust the channels 1 and 2, the lower switch and
the lower controls for the channels 3 and 4.

For 

full range speakers

set the switch to the left

stop to position FULL. The corresponding channels
reproduce the entire frequency range.

For 

bass speakers

or a 

subwoofer

set the switch

to position LP. The low pass is switched on in the
corresponding channels and the medium and high
frequencies are suppressed. For the time being,
coarsely adjust the crossover frequency with the
control LP (6).*

For 

mid-high range speakers 

set the switch to

position HP. The high pass is switched on in the cor-
responding channels and thus the low frequencies
are suppressed. For the time being, coarsely adjust
the crossover frequency with the control HP (5).*

7.2 Adjusting the level and the bass boosting

1) Turn both controls LEVEL (3) to the left stop to

position MIN.

2) Switch on the car HiFi system completely. The

green POWER LED (14) lights up. However, the
power amplifier is still muted for approx. 3 sec -
onds (switch-on delay).

3) Adjust the signal source, e. g. the car radio, to the

maximum, non-distorting volume.

4) Turn up the controls LEVEL so far as a maximum

that no distortions occur. (The upper controls are
intended to adjust the channels 1 and 2 and the
lower controls for the channels 3 and 4.)

For 4-channel operation it is also possible to

adjust the balance between the front and rear
speakers if the car radio is not equipped with a
corresponding control.

For active 2-way operation and 3-channel

operation adjust a natural sound with the con-
trols: if the volume of the low frequencies is too
low, reduce the levels of the channels for the mid-
high range speakers. If the volume of the bass
frequencies is too high, reduce the volume of the
bass channels or of the subwoofer channel.

5) If required, the bass frequencies can be boosted

with the corresponding control BASS EQ (4)
[max. 12 dB/50 Hz].

6) If further power amplifiers are used in the car HiFi

system, reduce in each case the levels of the
channels which are too high to match the vol-
 umes of all channels with each other.

Hint

To keep the interference by the electric sys-
tem of the car as low as possible, the output
level of the signal source should be 1.5 V as a
minimum.

Important!

Prior to the first switching-on, select the filters with
the switches CROSSOVER (7) and coarsely adjust
the crossover frequency (chapter 7.1) so that the
speakers will not be overloaded by a frequency
range that might be too wide. It is also recommend -
ed to check the entire wiring of the car HiFi power
amplifier once again for correctness before con-
 necting the negative terminal of the car battery
again.

7

GB

D

A

CH

* Zur Orientierung den Frequenzbereich der eingesetzten

Lautsprecher beachten. Die Feineinstellung erfolgt nach
der Pegeleinstellung mit entsprechenden Messgeräten.

* For a guidance, observe the frequency range of the

speakers used. The fine adjustment is made with corre-
sponding meters after the level adjustment.

Содержание HPB-604

Страница 1: ...zioni per il montaggio Montage instructie Manual de instrucciones Instrukcja montazowa Sikkerhedsoplysninger Säkerhetsföreskrifter Turvallisuudesta 4 Kanal Car HiFi Endstufe 4 Channel Car HiFi Power Amplifier Amplificateur Hi Fi embarquée 4 canaux Finale di potenza hifi a 4 canali per auto ...

Страница 2: ...sługi będą Państwo w stanie poznać wszystkie funkcje urządzenia Stosując się do instrukcji unikną państwo błędów i ewentualnego uszko dzenia urządzenia na skutek nieprawidłowego użytko wania Prosimy zachować instrukcję Tekst polski zaczyna się na stronie 20 Antes del montaje Tenemos de agradercerle el haber acquirido un equipo CARPOWER y le deseamos un agradable a montar este equipo fácilmente Por...

Страница 3: ... 2 CHANNEL 3 Radio Speaker R min 4Ω Battery Fuse 50A Chassis Chassis On 12V R 1 2 3 4 5 6 7 8 TP Bass Tre EJECT CD RADIO AM FM CD Menu L Speaker L min 4Ω POWER IN 12V GND REM FUSES 1 2 POWER PROT SPEAKER BRIDGE L R CH 1 CH 3 CH 2 CH 4 INPUT MIN MAX LEVEL MIN MAX BASS EQ 0 dB 12 dB HP 40 Hz 500 Hz FILTER LP 40 Hz 300 Hz CH3 CH4 CH1 CH2 0 dB 12 dB 40 Hz 500 Hz 40 Hz 300 Hz CROSSOVER FULL HP LP MODE ...

Страница 4: ... 16 ein Kurzschluss aufgetreten ist 2 wenn die Endstufe überhitzt ist 16 Lautsprecheranschlüsse SPEAKER All operating elements and connections de scribed can be found on the fold out page 3 Contents 1 Operating Elements and Connections 4 1 1 Front panel 4 1 2 Rear panel 4 2 Safety Notes 5 3 Caution Case of High Volumes 5 4 Applications 5 5 Mounting 5 6 Connection of the Power Amplifier 5 6 1 Power...

Страница 5: ... genommen werden übergeben Sie es zur umweltgerechten Entsorgung einem örtli chen Recyclingbetrieb 2 Safety Notes The power amplifier corresponds to the directive for automobiles The test number is indicated in the specifications G When connecting the car HiFi power amplifier to the car battery be especially careful In case of short circuits there may be dangerously high cur rents Therefore prior ...

Страница 6: ...leistung berücksichtigen siehe auch technische Daten der Endstufe auf Seite 8 number of welding points Any lacquer at the point of contact must completely be removed 2 To prevent ground loops the ground of the car radio must be applied at the place where also the power amplifier is grounded 6 1 3 Control voltage for switching on The car HiFi power amplifier is switched on and off by a control volt...

Страница 7: ...tive pole left bass speaker CH 1 L negative pole left bass speaker CH 2 R positive pole right bass speaker CH 2 R negative pole right bass speaker CH 3 L positive pole left mid high range speaker CH 3 L negative pole left mid high range speaker CH 4 R positive pole right mid high range speaker CH 4 R negative pole right mid high range speaker 6 4 3 Bridge operation While connecting pay attention t...

Страница 8: ...iFi system locate the fault more precisely by means of the two LEDs POWER 14 and PROT 15 The LED POWER does not light up 1 Check the fuses 13 of the car HiFi amplifier 2 25 A and the additional fuse 50 A at the car battery Replace defective fuses Only use fuses with the indicated values Do not insert a fuse of a higher value in any case The power amplifier may be damaged and the guarantee expires ...

Страница 9: ...2 Si lʼamplificateur est en surchauffe 16 Bornes haut parleurs SPEAKER A pagina 3 se aperta completamente vedrete sempre gli elementi di comando e i collegamenti descritti Indice 1 Elementi di comando e collegamenti 9 1 1 Pannello frontale 9 1 2 Pannello posteriore 9 2 Avvertenze di sicurezza 10 3 Attenzione col volume alto 10 4 Possibilità dʼimpiego 10 5 Montaggio 10 6 Collegare il finale 10 6 1 ...

Страница 10: ...lʼappareil est définitivement retiré du circuit de distribution vous devez le déposer dans une usine de recyclage adaptée pour contribuer à son élimination non polluante 2 Avvertenze di sicurezza Il finale di potenza è conforme alla direttiva per auto vetture Il numero di omologazione è indicato fra i dati tecnici G Usare particolare cura nel collegare il finale di potenza hifi con la batteria del...

Страница 11: ...e lʼamplificateur Voir caractéristiques tech niques de lʼamplificateur page 13 numero sufficiente di punti di saldatura La ver nice eventualmente presente deve essere tolta completamente 2 Per evitare lʼeffetto di anelli di terra la massa del lʼautoradio deve essere collegata allo stesso punto in cui è collegata la massa del finale 6 1 3 Tensione di comando per lʼaccensione Il finale di potenza hi...

Страница 12: ...o woofer sinistro CH 1 L negativo woofer sinistro CH 2 R positivo woofer destro CH 2 R negativo woofer destro CH 3 L positivo midrange tweeter sinistro CH 3 L negativo midrange tweeter sinistro CH 4 R positivo midrange tweeter destro CH 4 R negativo midrange tweeter destro 6 4 3 Funzionamento a ponte Nella connessione osservare la scritta BRIDGE vedi anche fig 5 CH 1 L positivo altoparlante sinist...

Страница 13: ...e haut 40 500 Hz 6 dB oct Augmentation graves 0 12 dB 50 Hz Alimentation 10 16 V 50 A Température fonc 0 40 C Dimensions 252 62 400 mm Poids 3 3 kg Numéro test e24 021069 Tout droit de modification réservé 8 Eliminazione di difetti Se dopo lʼaccensione dellʼimpianto audio dellʼauto mobile non si sente niente si può localizzare il difetto osservando i due LED POWER 14 e PROT 15 Il LED POWER non si ...

Страница 14: ...eer de uitgangsversterker oververhit is 16 Luidsprekeraansluitingen SPEAKER Puede encontrar todos los elementos de funcio namiento y las conexiones que se describen en la página 3 desplegable Contenido 1 Elementos operativos y conexiones 14 1 1 Panel frontal 14 1 2 Panel trasero 14 2 Consejos de utilización y de seguridad 15 3 Atención en caso de volúmenes elevados 15 4 Aplicaciones 15 5 Montaje 1...

Страница 15: ...het apparaat definitief uit bedrijf wordt genomen bezorg het dan voor milieuvriendelijke verwerking aan een plaatselijk recyclagebedrijf 2 Consejos de utilización y de seguridad El amplificador cumple la norma de automóviles El número del test está indicado en las especifica ciones G Cuando se conecta el amplificador a la batería del coche se debe ser muy prudente en caso de corto circuito pueden ...

Страница 16: ...gsversterker zie ook technische gegevens van de uitgangsver sterker op pagina 18 mejor directamente al terminal negativo de la bate ría del coche Notas 1 Cuando se utiliza el chasis como conexión de masa el lugar utilizado debe tener un buen con tacto eléctrico al chasis principal ej con suficien tes puntos de soldadura Debe eliminar comple tamente la laca posible al punto de contacto 2 Para preve...

Страница 17: ... negativo altavoz frontal izquierdo CH 2 R polo positivo altavoz frontal derecho CH 2 R polo negativo altavoz frontal derecho CH 3 L polo positivo altavoz trasero izquierdo CH 3 L polo negativo altavoz trasero izquierdo CH 4 R polo positivo altavoz trasero derecho CH 4 R polo negativo altavoz trasero derecho 6 4 2 Funcionamiento activo de 2 vías Ver también fig 4 CH 1 L polo positivo altavoz de ba...

Страница 18: ...jas frecuencias es demasiado bajo reducir los niveles de los canales para los altavoces de medios altos Si el volumen de las bajas frecuen cias es demasiado alto reducir el volumen de los canales de bajos o del canal del subwoofer 5 Si es necesario las bajas frecuencias pueden ser aumentadas con el potenciómetro BASS EQ 4 max 12 dB 50 Hz 6 Si se utilizan más amplificadores en el sistema de car aud...

Страница 19: ...19 ...

Страница 20: ...e wolno w pobliżu wzmacniacza umieszczać żadnych przedmiotów wrażliwych na temperaturę ani go dotykać w trak cie pracy G Do czyszczenia należy używać jedynie suchej miękkiej ściereczki bez dodatków wody lub środ ków chemicznych G Nie ponosi się odpowiedzialności za wynikłe uszkodzenia sprzętu lub obrażenia użytkownika w przypadku gdy urządzenie jest wykorzystywane w innych celach niż to się przewi...

Страница 21: ...należy podłączać wykorzystując ich dwa styki tj bez podłączania do wspólnej masy Przy wyborze głośników należy zwrócić uwagę na ich parametry techniczne i ich zdolność współ pracy ze wzmacniaczem mocy zob dane tech niczne wzmacniacza na str 22 6 4 2 Praca w układzie dwudrożnym aktywnym Zobaczyć rys 4 CH 1 L styk dodatni głośnik lewy niskotonowy CH 1 L styk ujemny głośnik lewy niskotonowy CH 2 P st...

Страница 22: ...y źródło jest sprawne 4 Sprawdzić kable głośnikowe 5 Sprawdzić głośniki Wskaźnik PROT świeci Wzmacniacz posiada układ zabezpieczający przed zwarciem na wyjściach głośnikowych oraz przed przegrzaniem Zapalony wskaźnik PROT 15 świadczy o włączeniu się układu zabezpieczają cego W przypadku przegrzania wzmacniacz sam automatycznie się włączy po schłodzeniu W przy padku zwarcia na wyjściach głośnikowyc...

Страница 23: ...23 ...

Страница 24: ...adigelse ved en eventuel korts lutning G Placér de nødvendige kabler på en sådan måde at deres isolering ikke kan blive beskadiget Den komplette tilslutning er vist på figur 3 6 side 3 Hvis enheden skal tages ud af drift for bestandigt skal den bringes til en lokal genbrugsstation for bortskaffelse HPB 604 Innan enheten tas i bruk läs först igenom säkerhets föreskrifterna Om ytterligare informatio...

Страница 25: ... ei enää tunnu niin voi makkaalta Sen tähden älä lisää äänenvoimak kuutta enää siitä mitä kerran olet alkanut käyttää G Ajon aikana äänen voimakkuus ei saa estää kuulemasta esim ambulanssin hälytysääntä G Auton moottorin ollessa pois käynnistä älä kuun tele äänentoistolaitteistoa suurella voimakkuu della kovin pitkää aikaa koska akku tällöin pur kautuu nopeasti eikä siitä mahdollisesti riitä energ...

Страница 26: ... MONACOR INTERNATIONAL GmbH Co KG Zum Falsch 36 28307 Bremen Germany Copyright by MONACOR INTERNATIONAL All rights reserved A 0278 99 03 05 2011 ...

Отзывы: