background image


When unpacking, check that no parts are damaged. If any damage is found, contact Care of Sweden or your local distributor 

before using the product. 


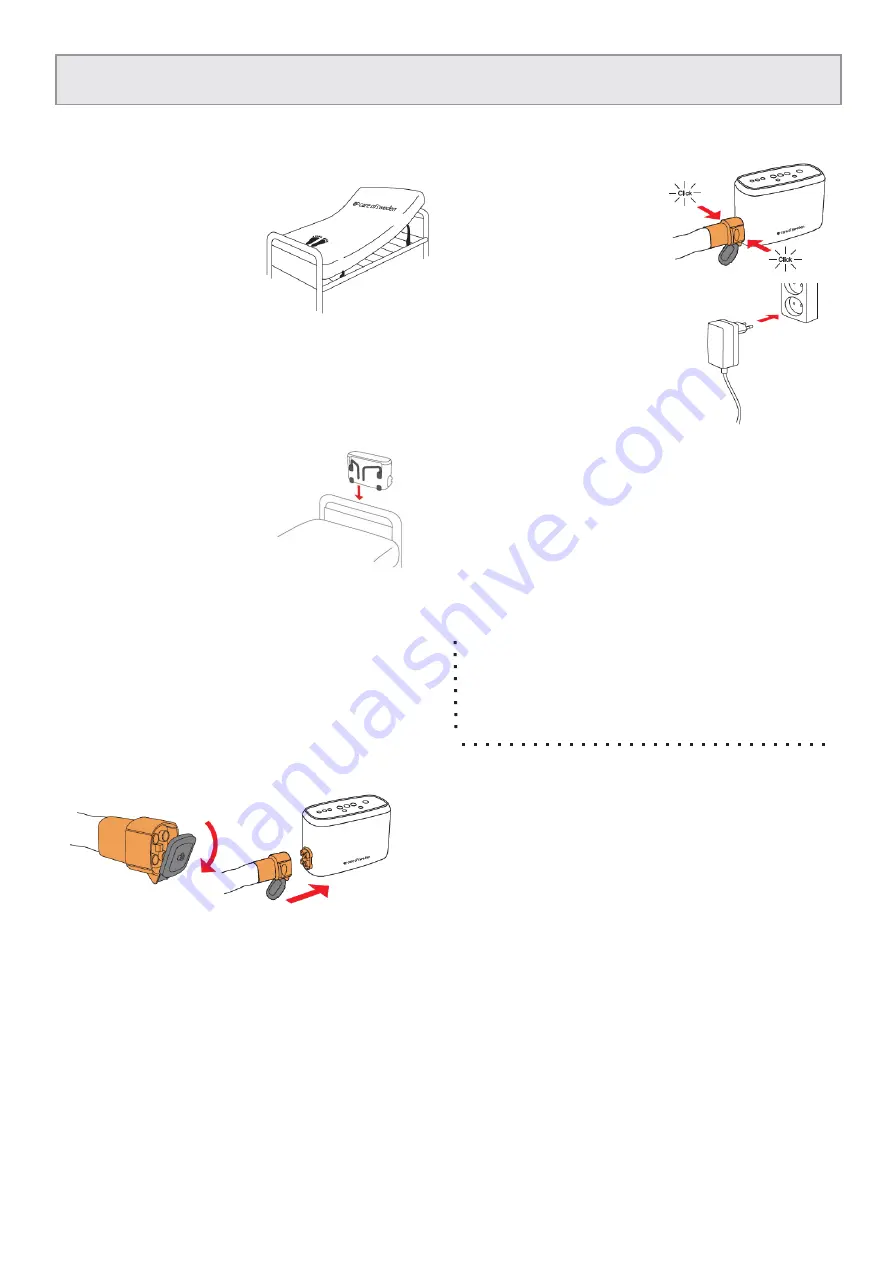
1. Place the mattress on the bed 

base. Secure the mattress to 

the bed using the fastening 

straps on the underside of the 

mattress. 

Note: 


Make sure that the mattress is the correct size for the 

bed. 


Make the bed with sheets for added comfort. 


If an adjustable bed is used the mattress should be fixed 

only to the moving parts of the bed. 


Check the cells and press studs to ensure they are 

correctly assembled. 


2. Hang the control unit on the 

foot end of the bed or place it 

on a level, steady surface. 


3. Place the power cable in the 

cable holder by opening the 

press studs, placing the cable 

in the gap and closing the press studs again. If the cable 

holder is not used: place the power cable so there is no risk 

of stumbling over it, running over it with the bed wheels, or 

getting it jammed when raising or lowering the bed. 


4. Open the lid on the air tube  

connector (marked ‘CPR’) and 

connect it to the side of the control unit. 


5. A click is heard and felt 

when correctly connected. 

Secure that both sides of 

the connection are closed.


6. Check that the switch on 

the side of the control unit 

is set to ’0’ (off). Plug the 

power supply into an approved 

electrical socket (100– 240 V). 
7. Check that the power cable 

has been correctly connected 

to the control unit and that the 

correct power supply has been 

used. (See section 9.1 Technical 

specification). 

The correct P/N must be shown on the label on the power 

supply. The power supply is part of the equipment and may 

not be replaced. 


If the control unit  has been stored in its minimum or 

maximum storage temperature (-25°C to 70°C), wait at least 

1 hour before starting it. This time is based on an ambient 

temperature of 20°C. 


2. Assembly/installation


.


NOTE:


.


Do not hold the 12 V plug on the power supply while touch-


ing the user.


Plug the power supply into an easily accessible socket if


there will be a need to unplug the power supply and com-


pletely cut the power to the control unit.


Содержание CuroCell IQ Cirrus

Страница 1: ...Instructions for use 2020 08 14 CuroCell IQ Cirrus Automatic active airflow controlled mattress system Instructions for use item number 95 001450 EN0000 ...

Страница 2: ...4 2 Assembly installation 6 3 Operation 7 4 Product description 12 5 Reuse cleaning and reconditioning 14 6 Storage 14 7 Maintenance 15 8 Troubleshooting 16 9 Technical description 17 10 Spare parts 21 11 Options and accessories 22 12 Warranty 22 13 Other information 23 ...

Страница 3: ... other area where there is a risk of the control unit coming into contact with water or other liquids Except for specified cleaning never handle a product that has come into contact with water liquid Pull the plug out of the electrical socket immediately and send the product to an authorized service technician for servicing 12 Do not use close to or in contact with fire sources hot surfaces such a...

Страница 4: ...ponsible personnel depending on the user s status diagnosis and general condition The mattress should only be used lying in the lengthwise direction on the mat tress with the feet at the end marked with the feet symbol No training or special skills are required for the use of CuroCell IQ Cirrus It is designed to be easy to handle and understand reading the quick guide and the instructions for use ...

Страница 5: ...head in the bed when pulling down Pulling in the stairs Start with pulling an empty mattress down the stairs in order to practice the technique When training with a person on the mattress a string or rope can be fasten in the handles at the head end Another person can then walk behind the mattress and help out if problems should occur It is advisable to practice in the same stairs where an evacuat...

Страница 6: ...mmed when raising or lowering the bed 4 Open the lid on the air tube connector marked CPR and connect it to the side of the control unit 5 A click is heard and felt when correctly connected Secure that both sides of the connection are closed 6 Check that the switch on the side of the control unit is set to 0 off Plug the power supply into an approved electrical socket 100 240 V 7 Check that the po...

Страница 7: ...nflated 3 The diode over the checkmark will blink during the inflation Depending on its size it takes approximately 20 30 minutes for the mattress to inflate fully 4 When the green diode over the checkmark is constant the system has adapted the settings to the user s individual needs and the system can be taken into use This takes approximately 20 30 minutes 3 Operation NOTE During the automatic s...

Страница 8: ...ons Button Function Mute the information signal Pack Go Automatic deflation of the system Maximum pressure caring mode Information signal Incorrect connection of the air connector CPR System is ready to use Notification diodes ...

Страница 9: ...roperly This must be performed regularly we recommend once per shift or every eight hours Open the cover and insert a hand between the upper cells beneath the user s sacrum center of the mattress Check to ensure that there is a gap to the underlying surface so that the user does not bottom out If you can feel the user s sacrum resting in the palm of your hand the gap is too small Make a new automa...

Страница 10: ...ot be reduced to the desired value within the time limit Contact the support 8 The automatic setting has been restarted too many times during the automatic setting period Contact the support 9 The mattress control parameters have not been read Connect the CPR or contact the support 10 The mattress control parameters have been changed during the use Restart the system If the problem remains contact...

Страница 11: ...nutes The control unit gives an audio signal once deflation is complete Carefully fold the mattress together place the control unit between the folds of the mattress and place the system in a transportation bag accessory or equivalent for protective storage Ensure that the power supply is packed complete 3 9 Restart If a restart is required set the On Off switch on the side of the control unit to ...

Страница 12: ...nd hygiene The hygiene cover is vapour permeable i e the vapour is transported away thus reducing the risk of skin maceration The following covers are available for the CuroCell Cirrus mattress Cover Stone Evac A removable cover with a drip proof zip fasterner and welded seams Divisible top and bottom part The Evac cover is equipped with three handles on the head and foot end On the sides there ar...

Страница 13: ...13 CuroCell IQ Cirrus 1 Mattress 2 Tube connection CPR quick deflation 3 Control unit 1 2 3 CuroCell IQ Cirrus with cover Stone Hygiene cover Cells Foam core Inner cover Tubing set Bottom part ...

Страница 14: ...1 or hydrogen peroxide max 1 5 5 2 Reconditioning CONTROL UNIT See section 5 1 for instructions MATTRESS 1 Disconnect the tube connector from the control unit and remove the air from the mattress 2 Remove the covers For more information of cleaning the covers see section 5 1 3 Move the mattress to a clean area that is suitable for cleaning 4 Wipe off the cells all tubes and the CPR module with a m...

Страница 15: ...be submitted to Care of Sweden be fore the product is returned After the product is used check that 1 The power cable and power supply are undamaged 2 The connecting tubes marked CPR on the side of the control unit are positioned correctly and not leaking 3 The hygiene cover is intact and the cover and cells are correctly assembled 4 No tubes or connectors are damaged or jammed Contact Care of Swe...

Страница 16: ...raps underneath two at the head end and two on each of the long sides Some cells have less air This is normal with a Pulsating or Alternating mode as the air supply switches between alternating cells for a predetermined cycle period one cycle 10 minutes The control unit makes a noise vibrations can be felt Check how the control unit is hung on the bed Resonance can occur vibrations are felt in par...

Страница 17: ... foot end Environmental Temperature Operation 5 to 40 C Storage 25 to 70 C Transport 25 to 70 C Humidity Operation 15 93 non condensing Storage 93 non condensing Atmospheric 700 hPa 1060 hPa Electrical classification Class II Type BF IP classification IP42 Degree of safety in presence of inflammable anesthetics The device is not intended for use with flammable anesthetic gases Applied part Mattres...

Страница 18: ...nit is marked as shown below example For an explanation see section 9 4 Explanation of symbols POWER SUPPLY The power supply is part of the control unit and is marked as shown below example For an explanation see section 9 4 Explanation of symbols ...

Страница 19: ...19 THE MATTRESS The mattress cover and inner cover are marked as shown below example For an explanation see section 9 4 Explanation of symbols ...

Страница 20: ...n Place on top of existing mattress Do not machine wash Machine wash at 70 C Machine wash at 95 C Chlorine Tumble dry Do not tumble dry Drip dry Do not iron Do not dry clean Wipe clean Do not rotate Do not turn around Fire requirements Minimum length Serial number Class II equipment Dou ble insulated Indicated on the power supply IP class Enclosure class The mattress should be Distributed by Medic...

Страница 21: ...0 100x200 cm CT150 100200 EN0000 CB150 100200 EN0000 CC150 100200 EN0000 100x210 cm CT150 100210 EN0000 CB150 100210 EN0000 CC150 100210 EN0000 100x220 cm CT150 100220 EN0000 CB150 100220 EN0000 CC150 100220 EN0000 105x200 cm CT150 105200 EN0000 CB150 105200 EN0000 CC150 105200 EN0000 105x210 cm CT150 105210 EN0000 CB150 105210 EN0000 CC150 105210 EN0000 105x220 cm CT150 105220 EN0000 CB150 105220...

Страница 22: ...10 EN0000 120x210 cm CI101 120220 EN0000 120x220 cm Sturdy transportation bag Item no Model and size 58 900905 Transport bag 100 120 cm 58 900906 Transport bag extra high 80 90 cm 58 900911 Transport bag extra high 100 120 cm 11 3 Other accessories To ensure the best level of comfort we recommend use of accessories from Care of Sweden since our products are designed to work well together If you re...

Страница 23: ...r parts of the control unit must not be disassembled and are sorted as electronic waste Mattress A used CuroCell mattress should be taken to a recycling center The product is sorted as combustible waste Care of Sweden complies with its manufacturer responsibility by being affiliated to the Swedish Packaging and Newspaper Collection Service FTI and the electrical and electronic product recycling se...

Страница 24: ...rnet www careofsweden com Address Care of Sweden AB P O Box 146 SE 514 23 Tranemo SWEDEN Address for visitors Fabriksgatan 5A SE 514 33 Tranemo SWEDEN Cargo address Byns väg 4A SE 514 33 Tranemo SWEDEN Distributed by Care of Sweden and CuroCell are trademarks of Care of Sweden AB Care of Sweden AB 2020 ...

Отзывы: