137
Appendix
Remote Control ID setting
Remote Control ID setting
Remote Control ID setting
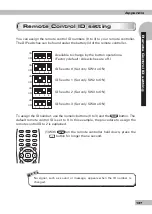
You can assign the remote control ID numbers (0 to 3) to your remote controller.
The DIP switches can be found under the battery lid of the remote controller.
ON
1
2
3
4
OFF
Available to change by the button operations.
(Factory default: All switches are off.)
ON
1
2
3
4
OFF
ID fixed to 0 (Set only SW1 to ON)
ON
1
2
3
4
OFF
ID fixed to 1 (Set only SW2 to ON)
ON
1
2
3
4
OFF
ID fixed to 2 (Set only SW3 to ON)
ON
1
2
3
4
OFF
ID fixed to 3 (Set only SW4 to ON)
To assign the ID number, use the numeric buttons (0 to 3) and the
button. The
default remote control ID is set to 0. In this example, the procedure to assign the
remote control ID to 2 is explained.
(1) With
on the remote controller held down, press the
button for longer than a second.
N o
t e
No signal, such as sound or message, appears when the ID number is
changed.
Содержание HDMA-4000
Страница 1: ...HDMA 4000 User Guide Engineered by Canopus Co Ltd...
Страница 16: ...Chapter 1 16...
Страница 32: ...Chapter 3 32 6 Click X Uninstallation is completed...
Страница 39: ...39 Chapter 3 Using HDMA Scheduler Help menu Help menu 1 1 About Scheduler Displays the HDMA Scheduler version...
Страница 51: ...HDMA 4000 Contents update Contents update Reference 1 Reference 1...
Страница 71: ...HDMA 4000 Serial control Serial control Reference 3 Reference 3...
Страница 88: ...Reference 3 88...
Страница 106: ...Reference 4 106 Status Status The Internal status and the operation log of the HDMA 4000 are displayed...
Страница 124: ...Reference 4 124...
Страница 125: ...HDMA 4000 Sync playback using the HDMA 4000Sync Sync playback using the HDMA 4000Sync Reference 5 Reference 5...
Страница 130: ...Reference 5 130...
Страница 131: ...HDMA 4000 Appendix Appendix...


