background image

Important

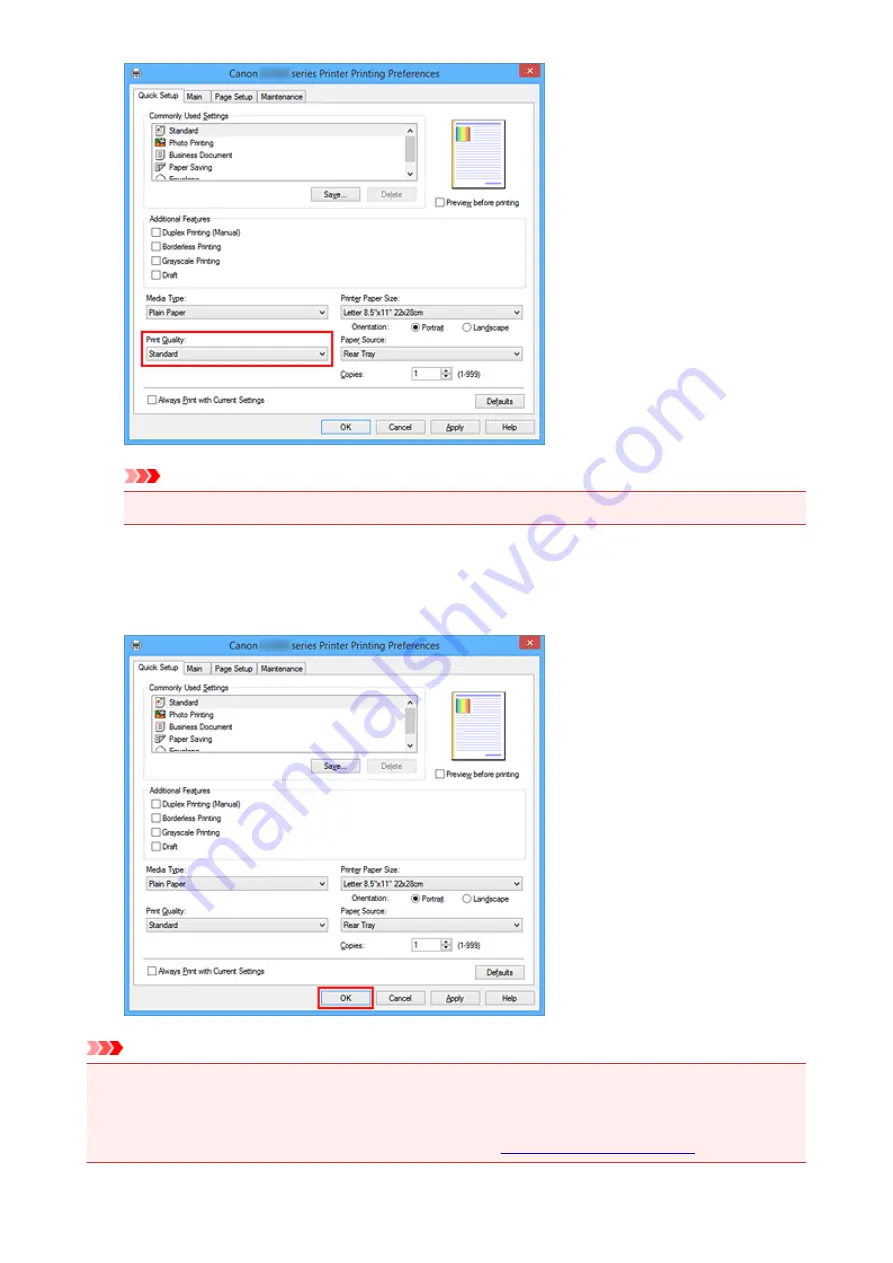
• The print quality settings that can be selected may differ depending on a printing profile.

6. Complete the setup

Click 

OK

.

When you execute print, the document is printed with settings that match your purpose.

Important

• When you select the 

Always Print with Current Settings

 check box, all settings specified on the

Quick Setup

Main

, and 

Page Setup

 tabs are saved, and you can print with the same settings from the

next time as well.

• In the 

Commonly Used Settings

 window, click 

Save...

 to 

register the specified settings

.

134

Содержание Pixma G1000 series

Страница 1: ...G1000 series Online Manual Printer Functions Overview Printing Troubleshooting English ...

Страница 2: ...king Ink Status 43 Maintenance 44 If Printing Is Faint or Uneven 45 Maintenance Procedure 46 Printing the Nozzle Check Pattern 48 Examining the Nozzle Check Pattern 49 Cleaning the Print Head 50 Performing Maintenance Functions from Your Computer Windows 51 Cleaning the Print Heads 52 Cleaning the Paper Feed Rollers 55 Aligning the Print Head Position 56 Printing a Nozzle Check Pattern 59 Cleaning...

Страница 3: ...requently Used Printing Profile 93 Changing the remaining ink level notification setting 95 Managing the Printer Power 96 Reducing the Printer Noise 98 Changing the Printer Operation Mode 100 Initializing Printer Settings 101 Ensuring Optimal Printing Results 102 Ink Tips 103 Printing Tips 104 Be Sure to Make Paper Settings after Loading Paper 105 Canceling a Print Job 106 Printer Handling Precaut...

Страница 4: ...and Printing Order 138 Setting the Stapling Margin 140 Execute Borderless Printing 142 Fit to Page Printing 145 Scaled Printing 147 Page Layout Printing 150 Tiling Poster Printing 152 Booklet Printing 155 Duplex Printing 157 Stamp Background Printing 159 Registering a Stamp 162 Registering Image Data to be Used as a Background 165 Setting Up Envelope Printing 168 Displaying the Print Results befor...

Страница 5: ...Job 209 Instructions for Use Printer Driver 210 Printer Driver Description 212 Quick Setup tab Description 213 Main tab Description 219 Page Setup tab Description 225 Maintenance tab Description 237 Canon IJ Preview Description 245 Canon IJ XPS Preview Description 248 Canon IJ Status Monitor Description 256 Updating the Printer Driver 258 Obtaining the Latest Printer Driver 259 Deleting the Unnece...

Страница 6: ...per Does Not Feed Properly No Paper Error 295 Printing Stops 297 Mechanical Problems 298 Power Does Not Come On 299 Power Shuts Off By Itself 300 Cannot Connect to Computer Properly 301 Printer Status Monitor Not Displayed Windows 302 Installation and Download Problems 303 Cannot Install Printer Driver 304 Easy WebPrint EX Does Not Start or Easy WebPrint EX Menu Does Not Appear Windows 306 Errors ...

Страница 7: ...6 1475 337 1476 338 1640 339 1700 340 1701 341 1890 342 5100 343 5200 344 5400 345 5700 346 5B00 347 5B01 348 6000 349 6800 350 6801 351 6930 352 6931 353 6932 354 6933 355 6936 356 6937 357 6938 358 6940 359 6941 360 6942 361 6943 362 6944 363 6945 364 ...

Страница 8: ...6946 365 B202 366 B203 367 B204 368 B205 369 ...

Страница 9: ...se must be observed for safe operation Important Instructions including important information To avoid damage and injury or improper use of the product be sure to read these indications Note Instructions including notes for operation and additional explanations Basics Instructions explaining basic operations of your product Note Icons may vary depending on your product Touch enabled Device Users W...

Страница 10: ...Redistribution and use in source and binary forms with or without modification are permitted provided that the following conditions are met 1 Redistributions of source code must retain the above copyright notice this list of conditions and the following disclaimer 2 Redistributions in binary form must reproduce the above copyright notice this list of conditions and the following disclaimer in the ...

Страница 11: ...rivative Works thereof Contribution shall mean any work of authorship including the original version of the Work and any modifications or additions to that Work or Derivative Works thereof that is intentionally submitted to Licensor for inclusion in the Work by the copyright owner or by an individual or Legal Entity authorized to submit on behalf of the copyright owner For the purposes of this def...

Страница 12: ...al or different license terms and conditions for use reproduction or distribution of Your modifications or for any such Derivative Works as a whole provided Your use reproduction and distribution of the Work otherwise complies with the conditions stated in this License 5 Submission of Contributions Unless You explicitly state otherwise any Contribution intentionally submitted for inclusion in the ...

Страница 13: ... SHALL CMU OR THE REGENTS OF THE UNIVERSITY OF CALIFORNIA BE LIABLE FOR ANY SPECIAL INDIRECT OR CONSEQUENTIAL DAMAGES OR ANY DAMAGES WHATSOEVER RESULTING FROM THE LOSS OF USE DATA OR PROFITS WHETHER IN AN ACTION OF CONTRACT NEGLIGENCE OR OTHER TORTIOUS ACTION ARISING OUT OF OR IN CONNECTION WITH THE USE OR PERFORMANCE OF THIS SOFTWARE Part 2 Networks Associates Technology Inc copyright notice BSD ...

Страница 14: ... WHETHER IN CONTRACT STRICT LIABILITY OR TORT INCLUDING NEGLIGENCE OR OTHERWISE ARISING IN ANY WAY OUT OF THE USE OF THIS SOFTWARE EVEN IF ADVISED OF THE POSSIBILITY OF SUCH DAMAGE Part 4 Sun Microsystems Inc copyright notice BSD Copyright c 2003 Sun Microsystems Inc 4150 Network Circle Santa Clara California 95054 U S A All rights reserved Use is subject to license terms below This distribution m...

Страница 15: ...ECIAL EXEMPLARY OR CONSEQUENTIAL DAMAGES INCLUDING BUT NOT LIMITED TO PROCUREMENT OF SUBSTITUTE GOODS OR SERVICES LOSS OF USE DATA OR PROFITS OR BUSINESS INTERRUPTION HOWEVER CAUSED AND ON ANY THEORY OF LIABILITY WHETHER IN CONTRACT STRICT LIABILITY OR TORT INCLUDING NEGLIGENCE OR OTHERWISE ARISING IN ANY WAY OUT OF THE USE OF THIS SOFTWARE EVEN IF ADVISED OF THE POSSIBILITY OF SUCH DAMAGE Part 6 ...

Страница 16: ...T INDIRECT INCIDENTAL SPECIAL EXEMPLARY OR CONSEQUENTIAL DAMAGES INCLUDING BUT NOT LIMITED TO PROCUREMENT OF SUBSTITUTE GOODS OR SERVICES LOSS OF USE DATA OR PROFITS OR BUSINESS INTERRUPTION HOWEVER CAUSED AND ON ANY THEORY OF LIABILITY WHETHER IN CONTRACT STRICT LIABILITY OR TORT INCLUDING NEGLIGENCE OR OTHERWISE ARISING IN ANY WAY OUT OF THE USE OF THIS SOFTWARE EVEN IF ADVISED OF THE POSSIBILIT...

Страница 17: ...D ON ANY THEORY OF LIABILITY WHETHER IN CONTRACT STRICT LIABILITY OR TORT INCLUDING NEGLIGENCE OR OTHERWISE ARISING IN ANY WAY OUT OF THE USE OF THIS SOFTWARE EVEN IF ADVISED OF THE POSSIBILITY OF SUCH DAMAGE 17 ...

Страница 18: ...me all products supported by this guide will be considered for the search If you want to narrow down the search results add your product s model name or your application s name to the keywords Searching for Functions Enter your product s model name and a keyword for the function you want to learn about Example When you want to learn how to load paper Enter your product s model name load paper in t...

Страница 19: ...he search window and perform a search Searching for Reference Pages Enter your model name and a reference page title You can find reference pages more easily by entering the function name as well Example When you want to browse the page referred to by the following sentence on a scanning procedure page Refer to Color Settings Tab for your model from Home of the Online Manual for details Enter your...

Страница 20: ...Using the Printer Printing Photos from a Computer 20 ...

Страница 21: ... operating system hereinafter referred to as Windows 8 1 is used 1 Open the paper support A 2 Pull out the paper output tray B then open the output tray extension C 3 Load paper vertically WITH THE PRINT SIDE FACING YOU 4 Align the paper guides D with the paper width 5 Click the My Image Garden icon E in Quick Menu The Guide Menu screen is displayed 21 ...

Страница 22: ...ations 6 Click the Photo Print icon F 7 Click the folder G with photos you want to print 8 Click the photos H you want to print For Windows To select two or more photos at a time click photos while pressing the Ctrl key For Mac OS To select two or more photos at a time click photos while pressing the command key 9 Click Print I 22 ...

Страница 23: ...Click Print K For Mac OS Click OK when the confirmation message appears then click Print Note My Image Garden lets you use images on your computer such as photos taken with a digital camera in a number of ways My Image Garden Guide Windows My Image Garden Guide Mac OS 23 ...

Страница 24: ...Printer Functions Print Photos Easily Using My Image Garden 24 ...

Страница 25: ...hotos easily when you search for them later on Calendar View People View Display Recommended Items in Slide Shows Based on the information registered to photos Quick Menu automatically selects the photos on your computer and creates recommended items such as collages and cards The created items appear in slide shows If there is an item you like you can easily print it in just two steps 1 In Image ...

Страница 26: ... the selected photos are placed automatically according to the theme Other Various Functions My Image Garden has many other useful functions Refer to the following for details What You Can Do with My Image Garden Windows What You Can Do with My Image Garden Mac OS 26 ...

Страница 27: ...Handling Paper Ink Tanks etc Loading Paper Loading Plain Paper Photo Paper Loading Envelopes Refilling Ink Tanks Refilling Ink Tanks Checking Ink Status 27 ...

Страница 28: ...Loading Paper Loading Plain Paper Photo Paper Loading Envelopes 28 ...

Страница 29: ...ign the edges of paper If paper is curled flatten it Note Align the edges of paper neatly before loading Loading paper without aligning the edges may cause paper jams If paper is curled hold the curled corners and gently bend them in the opposite direction until the paper becomes completely flat For details on how to flatten curled paper see Load the paper after correcting its curl in Paper Is Smu...

Страница 30: ...uides D to align them with both sides of the paper stack Do not slide the paper guides too hard against the paper The paper may not be fed properly Important Always load paper in the portrait orientation E Loading paper in the landscape orientation F can cause paper jams Note Do not load sheets of paper higher than the load limit mark G 30 ...

Страница 31: ...Note When printing select the size and type of the loaded paper on the print settings screen of the printer driver 31 ...

Страница 32: ...e envelopes Press down on all four corners and edges of the envelopes to flatten them If the envelopes are curled hold the opposite corners and gently twist them in the opposite direction If the corner of the envelope flap is folded flatten it Use a pen to press the leading edge in the inserting direction flat and sharpen the crease The figures above show a side view of the leading edge of the env...

Страница 33: ...e envelope will be faced down on the left side Up to 10 envelopes can be loaded at a time 5 Slide the paper guides D to align them with both sides of envelopes Do not slide the paper guides too hard against the envelopes The envelopes may not be fed properly E Rear side F Address side Note Do not load envelopes higher than the load limit mark G 33 ...

Страница 34: ...Note When printing select the size and type of the loaded envelopes on the print settings screen of the printer driver 34 ...

Страница 35: ...Refilling Ink Tanks Refilling Ink Tanks Checking Ink Status 35 ...

Страница 36: ...g Windows Changing the remaining ink level notification setting Mac OS If print results become faint or white streaks appear despite sufficient ink levels see Maintenance Procedure For precautionary notes on handling ink bottles see Notes on ink bottles Refilling Procedure When you need to refill an ink tank follow the steps below Important Please ensure the printer remains flat after initial setu...

Страница 37: ...r to malfunction Do not touch tubes or other parts inside the printer 3 Open ink tank cover To refill the black ink tank open the left ink tank cover C To refill color ink tanks open the right ink tank cover D 4 Grab and remove the tank cap E of the ink tank to be refilled Place the removed tank cap on the upper tank cap holder F 37 ...

Страница 38: ...ully remove the tank cap of the ink tank Ink on the inside of the tank cap may spatter when removing it 5 Take a new ink bottle out of its package 6 Hold the ink bottle upright and twist the bottle cap G to remove 38 ...

Страница 39: ...inlet I Next stand the ink bottle upside down and squeeze the sides of the ink bottle to refill the ink tank Important Make sure that each color of ink tanks is filled with corresponding color of ink bottles When refilling ink tanks do not squeeze the bottle sides too hard Ink may spatter Do not fill the ink tank above the ink tank s upper limit line J Ink above this line may spill over causing ma...

Страница 40: ... be closed 10 Lift the top cover once and then close it gently Note If the remaining ink level notification function is enabled the Alarm lamp is lit when ink runs out This setting is enabled by default If the lamp is lit perform the following To continue enabling the remaining ink level notification function Hold down the RESUME CANCEL button for at least 5 seconds The Alarm lamp goes off and the...

Страница 41: ...ficient care to prevent ink from spattering onto surroundings Ink may stain clothes or other belongings permanently Washing may not remove ink stains Do not use ink bottles and ink contained therein except to refill tanks of printers specified by Canon Do not leave ink bottles in areas exposed to high temperature such as near fire or a heater or in a car Bottles may warp and cause ink leakage or i...

Страница 42: ...Ink Tips 42 ...

Страница 43: ...Changing the remaining ink level notification setting Mac OS If a remaining ink error occurs the Alarm lamp will flash to inform you of the error Count the number of flashes and take appropriate action An Error Occurs The remaining ink level notification function works from initial printing to the time when one of the inks reaches the lower limit line shown on the ink tank For the remaining ink le...

Страница 44: ...Maintenance If Printing Is Faint or Uneven Performing Maintenance Functions from Your Computer Windows Performing Maintenance Functions from Your Computer Mac OS Cleaning 44 ...

Страница 45: ...If Printing Is Faint or Uneven Maintenance Procedure Printing the Nozzle Check Pattern Examining the Nozzle Check Pattern Cleaning the Print Head 45 ...

Страница 46: ...ng Image Data Windows Changing the Print Quality and Correcting Image Data Mac OS When the Print Results Are Blurred or Uneven Step1 Print the nozzle check pattern From the printer Printing the Nozzle Check Pattern From the computer Printing a Nozzle Check Pattern Windows Printing a Nozzle Check Pattern Mac OS Step2 Examine the nozzle check pattern If there are missing lines or horizontal white st...

Страница 47: ...ng from a computer Cleaning the Print Heads Windows Cleaning the Print Heads Mac OS If the problem is still not resolved the print head may be damaged Contact the service center When the Print Results Are Not Even such as the Ruled Lines Are Misaligned Step Align the print head From the computer Aligning the Print Head Position Windows Aligning the Print Head Position Mac OS 47 ...

Страница 48: ... of A4 or Letter sized plain paper 1 Make sure that the power is turned on 2 Load a single sheet of A4 or Letter sized plain paper in the rear tray 3 Pull out the paper output tray then open the output tray extension 4 Hold down the RESUME CANCEL button until the POWER lamp flashes twice then release it immediately The nozzle check pattern will be printed Do not perform any other operations until ...

Страница 49: ...re are missing lines in pattern A or horizontal white streaks in pattern B If there are missing lines in pattern A Cleaning the print head is required C Good D Bad lines are missing If there are horizontal white streaks in pattern B Cleaning the print head is required E Good F Bad horizontal white streaks are present 49 ...

Страница 50: ...ton until the POWER lamp flashes once then release it immediately The printer starts cleaning the print head The cleaning will be complete when the POWER lamp lights after flashing Do not perform any other operations until the printer completes the cleaning of the print head This takes about 1 minute 3 Check the print head condition To check the print head condition print the nozzle check pattern ...

Страница 51: ...rming Maintenance Functions from Your Computer Windows Cleaning the Print Heads Cleaning the Paper Feed Rollers Aligning the Print Head Position Printing a Nozzle Check Pattern Cleaning Inside the Printer 51 ...

Страница 52: ... performing cleaning 3 Execute cleaning Make sure that the printer is on and then click Execute Print head cleaning starts 4 Complete cleaning The Nozzle Check dialog box opens after the confirmation message 5 Check the results To check whether the print quality has improved click Print Check Pattern To cancel the check process click Cancel If cleaning the head once does not resolve the print head...

Страница 53: ... the print head frequently will rapidly deplete your printer s ink supply Consequently perform cleaning only when necessary System Cleaning Execute System Cleaning if the status does not improve even after Deep Cleaning is performed 1 Open the printer driver setup window 2 Click System Cleaning on the Maintenance tab When the System Cleaning dialog box opens select the ink group for which system c...

Страница 54: ...cute system cleaning only when necessary If System Cleaning is run when the remaining ink level is insufficient it may cause a failure Note If there is no sign of improvement after System Cleaning turn off the printer wait 24 hours and then perform Deep Cleaning again If there is still no sign of improvement the ink may have run out or the print head may be worn For details on the remedial action ...

Страница 55: ...s of paper from the rear tray 2 Open the printer driver setup window 3 Click Roller Cleaning on the Maintenance tab The confirmation message appears 4 Execute paper feed roller cleaning Make sure that the printer is on and then click OK Paper feed roller cleaning starts 5 Complete paper feed roller cleaning After the rollers have stopped follow the instruction in the message load three sheets of p...

Страница 56: ... Maintenance tab The Start Print Head Alignment dialog box opens 3 Load paper in the printer Load two sheets of A4 size or Letter size plain paper into the rear tray 4 Execute head alignment Make sure that the printer is on and click Align Print Head Follow the instruction in the message Important Do not open the top cover while printing is in progress 5 Check the printed pattern Enter the numbers...

Страница 57: ...rtical streaks 6 Confirm the displayed message and click OK The second pattern is printed Important Do not open the top cover while printing is in progress 7 Check the printed pattern Enter the numbers of the patterns with the least noticeable stripes in the associated boxes Even if the patterns with the least noticeable stripes are clicked in the preview window their numbers are automatically ent...

Страница 58: ... the best pattern pick the setting that produces the least noticeable horizontal stripes A Least noticeable horizontal stripes B Most noticeable horizontal stripes Note To print and check the current setting open the Start Print Head Alignment dialog box and click Print Alignment Value 58 ...

Страница 59: ...k Items to display the items that you need to check before printing the nozzle check pattern 3 Load paper in the printer Load one sheet of A4 size or Letter size plain paper into the rear tray 4 Print a nozzle check pattern Make sure that the printer is on and click Print Check Pattern Printing of the nozzle check pattern begins Click OK when the confirmation message appears The Pattern Check dial...

Страница 60: ...tom Plate Cleaning 1 Open the printer driver setup window 2 Click Bottom Plate Cleaning on the Maintenance tab The Bottom Plate Cleaning dialog box opens 3 Load paper in the printer As instructed in the dialog box fold the A4 size or Letter size plain paper in half horizontally and then unfold the sheet Load the paper into the rear tray in the portrait orientation with the crest of the crease faci...

Страница 61: ...he Exterior of the Printer Cleaning the Inside of the Printer Bottom Plate Cleaning You can clean the paper feed roller from your computer Cleaning the Paper Feed Rollers Windows Cleaning the Paper Feed Rollers Mac OS 61 ...

Страница 62: ... before cleaning the printer Do not use tissue paper paper towels rough textured cloth or similar materials for cleaning so as not to scratch the surface Paper tissue powder or fine threads may remain inside the printer and cause problems such as print head blockage and poor printing results Never use volatile liquids such as thinners benzene acetone or any other chemical cleaner to clean the prin...

Страница 63: ...ith the open side facing you 4 Pull out the paper output tray then open the output tray extension 5 Hold down the RESUME CANCEL button until the POWER lamp flashes five times then release it immediately The paper cleans the inside of the printer as it feeds through the printer Check the folded parts of the ejected paper If they are smudged with ink perform Bottom Plate Cleaning again Note When per...

Страница 64: ...64 ...

Страница 65: ...Windows Changing Printer Settings from Your Computer Mac OS Initializing the Printer Settings Ensuring Optimal Printing Results Ink Tips Printing Tips Be Sure to Make Paper Settings after Loading Paper Canceling a Print Job Printer Handling Precautions Keeping Print Quality High Transporting Your Printer Legal Limitations on Use of Your Product and Use of Images Specifications 65 ...

Страница 66: ...Safety Safety Precautions Regulatory Information 66 ...

Страница 67: ...nded to have two people lifting the printer Accidental dropping of the printer may cause injury For the printer s weight refer to the Specification Do not place any object on the printer Especially do not place metal objects paper clips staples etc or containers of flammable solvents alcohol thinners etc on top of the printer Do not transport or use the printer on a slant vertically or upside down...

Страница 68: ...arf Dieses Produkt muss bei einer dafür vorgesehenen Sammelstelle abgegeben werden Dies kann z B durch Rückgabe beim Kauf eines ähnlichen Produkts oder durch Abgabe bei einer autorisierten Sammelstelle für die Wiederaufbereitung von Elektro und Elektronik Altgeräten geschehen Der unsachgemäße Umgang mit Altgeräten kann aufgrund potentiell gefährlicher Stoffe die generell mit Elektro und Elektronik...

Страница 69: ...oor meer informatie over waar u uw afgedankte apparatuur kunt inleveren voor recycling kunt u contact opnemen met het gemeentehuis in uw woonplaats de reinigingsdienst of het afvalverwerkingsbedrijf U kunt ook het schema voor de afvoer van afgedankte elektrische en elektronische apparatuur AEEA raadplegen Ga voor meer informatie over het inzamelen en recyclen van afgedankte elektrische en elektron...

Страница 70: ...ntro di raccolta differenziata un distributore autorizzato che applichi il principio dell uno contro uno ovvero del ritiro della vecchia apparecchiatura elettrica al momento dell acquisto di una nuova o un impianto autorizzato al riciclaggio dei rifiuti di apparecchiature elettriche ed elettroniche La gestione impropria di questo tipo di rifiuti può avere un impatto negativo sull ambiente e sulla ...

Страница 71: ...r du hos de kommunale renovationsmyndigheder Yderligere oplysninger om returnering og genanvendelse af affald af elektrisk og elektronisk udstyr får du ved at besøge www canon europe com weee Μόνο για την Ευρωπαϊκή Ένωση και τον ΕΟΧ Νορβηγία Ισλανδία και Λιχτενστάιν Αυτό το σύμβολο υποδηλώνει ότι αυτό το προϊόν δεν πρέπει να απορρίπτεται μαζί με τα οικιακά απορρίμματα σύμφωνα με την Οδηγία σχετικά...

Страница 72: ...ä koska laitteet saattavat sisältää ympäristölle ja terveydelle haitallisia aineita Lisäksi tuotteen asianmukainen hävittäminen säästää luonnonvaroja Lisätietoja sähkö ja elektroniikkalaiteromun keräyspisteistä saat kaupunkien ja kuntien tiedotuksesta jätehuoltoviranomaisilta sähkö ja elektroniikkalaiteromun kierrätysjärjestelmän ylläpitäjältä ja jätehuoltoyhtiöltä Lisätietoja sähkö ja elektroniik...

Страница 73: ...gészségére Továbbá a termékből származó hulladék megfelelő kezelésével hozzájárulhat a természetes nyersanyagok hatékonyabb hasznosításához A berendezésekből származó újrahasznosítható hulladékok elhelyezésére vonatkozó további tudnivalókért forduljon a helyi önkormányzathoz a közterület fenntartó vállalathoz a háztartási hulladék begyűjtését végző vállalathoz illetve a hivatalos WEEE képviselethe...

Страница 74: ...stu vahetama kui ostate uue sarnase toote või elektri ja elektroonikaseadmete jäätmete ümbertöötlemiseks mõeldud kogumispunkti Täiendava teabe saamiseks elektri ja elektroonikaseadmetest tekkinud jäätmete tagastamise ja ümbertöötlemise kohta võtke ühendust kohaliku omavalitsusega asjakohase valitsusasutusega asjakohase tootjavastutusorganisatsiooniga või olmejäätmete käitlejaga Lisateavet leitate ...

Страница 75: ...trične in elektronske opreme Neprimerno ravnanje s takšnimi odpadki lahko negativno vpliva na okolje in človekovo zdravje zaradi nevarnih snovi ki so povezane z električno in elektronsko opremo S pravilno odstranitvijo izdelka hkrati prispevate tudi k učinkoviti porabi naravnih virov Če želite več informacij o tem kje lahko odložite odpadno opremo za recikliranje pokličite občinski urad komunalno ...

Страница 76: ...selor DEEE vizitaţi www canon europe com weee Samo za Europsku uniju i EEZ Norveška Island i Lihtenštajn Ovaj simbol pokazuje da se ovaj proizvod ne smije odlagati s kućnim otpadom sukladno WEEE Direktivi 2012 19 EC i vašem nacionalnom zakonu Ovaj proizvod je potrebno predati na posebno mjesto za sakupljanje otpada npr na ovlašteno mjesto gdje možete zamijeniti staro za novo ukoliko kupujete novi ...

Страница 77: ... After the last print it switches to Ready Mode In this mode it can print again immediately if required If the product is not used for a time the device switches to its Sleep Mode The devices consume less power Watt in these modes Energy Star The Energy Star programme is a voluntary scheme to promote the development and purchase of energy efficient models which help to minimise environmental impac...

Страница 78: ...Main Components and Their Use Main Components Power Supply 78 ...

Страница 79: ...Main Components Front View Rear View Inside View 79 ...

Страница 80: ...Two or more sheets of the same size and type of paper can be loaded at the same time and fed automatically one sheet at a time Loading Plain Paper Photo Paper Loading Envelopes 5 paper output tray Printed paper is ejected Open before printing 6 output tray extension Open to support ejected paper All lamps are shown lit in the figure above for explanatory purposes 7 POWER lamp Lights after flashing...

Страница 81: ...d and the printer is not ready to print POWER lamp flashes and Alarm lamp flashes alternately An error that requires contacting the service center may have occurred An Error Occurs 8 Alarm lamp Lights or flashes when an error occurs 9 RESUME CANCEL button Cancels a print job in progress You can press this button to release from printer error status and resume printing after the printer problem is ...

Страница 82: ...port Plug in the USB cable to connect the printer with a computer Important Do not touch the metal casing Do not plug in or unplug the USB cable while printing 2 power cord connector Plug in the supplied power cord 82 ...

Страница 83: ...anks The black ink tank is on the right and the color ink tanks cyan magenta and yellow are on the left If any ink levels are low refill the low tanks 3 cartridge holder Install the cartridge here Note For details on refilling ink tanks see Refilling Ink Tanks 83 ...

Страница 84: ...Power Supply Confirming that the Power Is On Turning the Printer On and Off Notice for the Power Plug Power Cord Notice for Unplugging the Power Cord 84 ...

Страница 85: ...Confirming that the Power Is On The POWER lamp is lit when the printer is turned on Note It may take a while for the printer to start printing immediately after you turn on the printer 85 ...

Страница 86: ...rint operation is performed from a computer This feature is set to off by default Managing the Printer Power Windows Managing the Printer Power Mac OS Turning off the printer 1 Press the ON button to turn off the printer When the POWER lamp stops flashing the printer is turned off Important When you unplug the power cord after turning off the printer be sure to confirm that the POWER lamp is off N...

Страница 87: ...Managing the Printer Power Mac OS 87 ...

Страница 88: ...wer cord is hot The power plug power cord is rusty The power plug power cord is bent The power plug power cord is worn The power plug power cord is split Caution If you find anything unusual with the power plug power cord described above unplug the power cord and call for service Using the printer with one of the unusual conditions above may cause a fire or an electric shock 88 ...

Страница 89: ...at the POWER lamp is off Unplugging the power cord while the POWER lamp is lit or flashing may cause drying or clogging of the print head and print quality may be reduced 1 Press the ON button to turn the printer off 2 Confirm that the POWER lamp is off 3 Unplug the power cord The specification of the power cord differs depending on the country or region of use 89 ...

Страница 90: ...Changing Settings Changing Printer Settings from Your Computer Windows Changing Printer Settings from Your Computer Mac OS Initializing the Printer Settings 90 ...

Страница 91: ...Computer Windows Changing the Print Options Registering a Frequently Used Printing Profile Changing the remaining ink level notification setting Managing the Printer Power Reducing the Printer Noise Changing the Printer Operation Mode 91 ...

Страница 92: ...ta being cut off The procedure for changing the print options is as follows 1 Open the printer driver setup window 2 Click Print Options on the Page Setup tab The Print Options dialog box opens Note When you use the XPS printer driver the functions available to you are different 3 Change the individual settings If necessary change the setting of each item and then click OK The Page Setup tab is di...

Страница 93: ...om Commonly Used Settings on the Quick Setup tab select the printing profile to be used and if necessary change the settings after Additional Features You can also register necessary items on the Main and Page Setup tabs 3 Click Save The Save Commonly Used Settings dialog box opens 4 Save the settings Enter a name in the Name field If necessary click Options set the items and then click OK In the ...

Страница 94: ...not be saved and preserved If a profile is deleted register the print settings again Deleting Unnecessary Printing Profile 1 Select the printing profile to be deleted Select the printing profile you want to delete from the Commonly Used Settings list on the Quick Setup tab 2 Delete the printing profile Click Delete When the confirmation message appears click OK The selected printing profile is del...

Страница 95: ...the error message from being displayed Then click Set to apply the selected setting Important Before enabling Function for Notifying the Remaining Ink Level replenish all inks to the upper limit line and reset the remaining ink level count by running Resets the Remaining Ink Level Count However if you reset the count by operating the operation panel of the printer the setting in the printer driver...

Страница 96: ... there are no operations from the printer driver or the printer for a specified period of time 1 Open the printer driver setup window 2 Make sure that the printer is on and then click Auto Power on the Maintenance tab The Auto Power Settings dialog box opens Note If the printer is off or if communication between the printer and the computer is disabled an error message may appear because the compu...

Страница 97: ...from the list according to the same procedure Note When the printer is turned off the Canon IJ Status Monitor message varies depending on the Auto Power On setting When the setting is Enable Printer is standing by is displayed When the setting is Disable Printer is offline is displayed 97 ...

Страница 98: ...lume of normal operating noise Always use quiet mode Select this option when you wish to reduce the operating noise of the printer Use quiet mode during specified hours Select this option when you wish to reduce the operating noise of the printer during a specified period of time Set the Start time and the End time of the quiet mode you wish to be activated If both are set to the same time the qui...

Страница 99: ...Note The effects of the quiet mode may be less depending on the print quality settings 99 ...

Страница 100: ... paper abrasion Rotate 90 degrees left when orientation is Landscape On the Page Setup tab you can change the rotation direction of the Landscape in the Orientation To rotate the print data 90 degrees to the left during printing select this item To rotate the print data 90 degrees to the right during printing clear this item Important Do not change this setting while the print job is displayed in ...

Страница 101: ...release it when the POWER lamp flashes 15 times All the printer settings are initialized After initializing the printer perform setup again as necessary Note You cannot set the following setting items back to the default Current position of the print head Setting to enable disable remaining ink level notification Remaining ink level count status 101 ...

Страница 102: ...g Optimal Printing Results Ink Tips Printing Tips Be Sure to Make Paper Settings after Loading Paper Canceling a Print Job Printer Handling Precautions Keeping Print Quality High Transporting Your Printer 102 ...

Страница 103: ...ts condition When the printer performs cleaning a small amount of ink is consumed In this case all colors of ink may be consumed Cleaning function The cleaning function helps the printer to suck air bubbles or ink itself from the nozzle and thus prevents print quality degradation or nozzle clogging Does black and white printing use color ink Black and white printing may use ink other than black in...

Страница 104: ...per or performing borderless printing the area where papers go through may get smeared with ink Clean the inside of your printer with Bottom Plate Cleaning Check how to load the paper correctly Is the paper loaded in the correct orientation To load paper in the rear tray load paper WITH THE PRINTING SIDE FACING YOU Loading Paper Is the paper curled The curled paper causes paper jam Flatten the cur...

Страница 105: ...lts Are Unsatisfactory There are various types of paper paper with special coating on the surface for printing photos with optimal quality and paper suitable for documents Each media type has specific preset settings such as how ink is used and sprayed distance from nozzles etc so that you can print on that type with optimal image quality This allows you to print with the settings best suited for ...

Страница 106: ...ss the ON button If you press the ON button while printing is in progress the print data sent from the computer queues in the printer and you may not be able to continue to print Press the RESUME CANCEL button to cancel printing 106 ...

Страница 107: ...t place any object on the top cover Do not place any object on the top cover It will fall into the rear tray when the top cover is opened and cause the printer to malfunction Also place the printer where objects will not fall on it 107 ...

Страница 108: ...ss the ON button to turn off the power the printer caps the print head nozzles automatically to prevent from drying If you unplug the power cord from the wall outlet before the POWER lamp is turned off the print head will not be capped properly and this will cause drying or clogging When unplugging the power cord make sure that the POWER lamp is not lit Print periodically Just as the tip of a felt...

Страница 109: ... may leak When transporting the printer we recommend packing the printer in a plastic bag so that ink does not leak When a shipping agent is handling transport of the printer have its box marked THIS SIDE UP to keep the printer with its bottom facing down Mark also with FRAGILE or HANDLE WITH CARE 1 Make sure the printer is on 2 Hold down the RESUME CANCEL button until the Alarm lamp flashes eight...

Страница 110: ...pe to secure all the covers on the printer to keep them from opening during transportation Then pack the printer in the plastic bag 7 Attach the protective material to the printer when packing the printer in the box 110 ...

Страница 111: ...stage stamps canceled or uncanceled Identifying badges or insignias Selective service or draft papers Checks or drafts issued by governmental agencies Motor vehicle licenses and certificates of title Traveler s checks Food stamps Passports Immigration papers Internal revenue stamps canceled or uncanceled Bonds or other certificates of indebtedness Stock certificates Copyrighted works works of art ...

Страница 112: ...86 F 15 to 30 C Humidity 10 to 80 RH no condensation For the temperature and humidity conditions of papers such as photo paper refer to the paper s packaging or the supplied instructions Storage environment Temperature 32 to 104 F 0 to 40 C Humidity 5 to 95 RH no condensation Power supply AC 100 240 V 50 60 Hz Power consumption Printing Approx 12 W Standby minimum Approx 0 8 W 1 2 OFF Approx 0 4 W...

Страница 113: ...th the iOS Android and Windows RT An internet connection is required to use Easy WebPrint EX and all the Online Manual Windows Operation can only be guaranteed on a computer with Windows 10 Windows 8 1 Windows 8 Windows 7 or Windows Vista pre installed Windows A CD ROM Drive or internet connection is required during software installation Windows Internet Explorer 8 9 10 or 11 is required to instal...

Страница 114: ...Information about Paper Media Types You Can Use Paper Load Limit Media Types You Cannot Use Printing Area Printing Area Other Sizes than Letter Legal Envelopes Letter Legal Envelopes 114 ...

Страница 115: ...r access our website Note You may not be able to purchase some Canon genuine papers depending on the country or region of purchase Paper is not sold in the US by Model Number Purchase paper by name Paper for printing documents Canon Red Label Superior WOP111 Canon Océ Office Colour Paper SAT213 Paper for printing photos Glossy Photo Paper Everyday Use GP 501 GP 601 Photo Paper Glossy GP 601 Photo ...

Страница 116: ...e 17 to 28 lb 64 to 105 g m2 plain paper except for Canon genuine paper Do not use heavier or lighter paper except for Canon genuine paper as it could jam in the printer Notes on Storing Paper Take out only the necessary number of paper from the package just before printing To avoid curling when you do not print put unused paper back into the package and keep it on a level surface And also store i...

Страница 117: ...0 sheets Approx 50 sheets Canon Océ Office Colour Paper SAT213 Approx 80 sheets Approx 50 sheets Paper for printing photos Media Name Model No Rear Tray Glossy Photo Paper Everyday Use GP 501 GP 601 3 10 sheets A4 Letter 20 sheets 4 x 6 10 x 15 cm Photo Paper Glossy GP 601 3 10 sheets A4 Letter 20 sheets 4 x 6 10 x 15 cm Photo Paper Plus Glossy II PP 201 3 10 sheets A4 Letter 5 x 7 13 x 18 cm 8 x ...

Страница 118: ...uch cases reduce the number of paper you load at a time to less than half 2 We recommend that you remove the previously printed paper or envelope from the paper output tray before continuously printing to avoid blurs and discoloration 3 When loading paper in stacks the print side may become marked as it is fed or paper may not feed properly In this case load one sheet at a time 118 ...

Страница 119: ...er weighing more than 28 lb 105 g m2 except for Canon genuine paper Plain paper or notepad paper cut to a small size when printing on paper smaller than A5 Picture postcards Postcards affixed with photos or stickers Envelopes with a double flap Envelopes with an embossed or treated surface Envelopes whose gummed flaps are already moistened and adhesive Any type of paper with holes Paper that is no...

Страница 120: ...Printing Area Printing Area Other Sizes than Letter Legal Envelopes Letter Legal Envelopes 120 ...

Страница 121: ...to fill the whole page For Borderless Printing use the following paper Glossy Photo Paper Everyday Use GP 501 GP 601 Photo Paper Glossy GP 601 Photo Paper Plus Glossy II PP 201 Photo Paper Pro Luster LU 101 Photo Paper Plus Semi gloss SG 201 Matte Photo Paper MP 101 Performing Borderless Printing on any other type of paper may substantially reduce printing quality and or result in printouts with a...

Страница 122: ...6 90 x 9 80 inches 175 2 x 249 0 mm 4 x 6 10 x 15 cm 3 73 x 5 69 inches 94 8 x 144 4 mm 5 x 7 13 x 18 cm 4 73 x 6 69 inches 120 2 x 169 8 mm 8 x 10 20 x 25 cm 7 73 x 9 69 inches 196 4 x 246 0 mm Recommended printing area A 1 23 inches 31 2 mm B 1 28 inches 32 5 mm Printable area C 0 12 inch 3 0 mm D 0 20 inch 5 0 mm E 0 13 inch 3 4 mm F 0 13 inch 3 4 mm 122 ...

Страница 123: ...etter 8 00 x 10 69 inches 203 2 x 271 4 mm Legal 8 00 x 13 69 inches 203 2 x 347 6 mm Recommended printing area A 1 23 inches 31 2 mm B 1 28 inches 32 5 mm Printable area C 0 12 inch 3 0 mm D 0 20 inch 5 0 mm E 0 25 inch 6 4 mm F 0 25 inch 6 3 mm 123 ...

Страница 124: ...ting Area width x height Envelope DL 4 06 x 7 20 inches 103 2 x 183 0 mm Envelope Com 10 3 85 x 8 04 inches 97 9 x 204 3 mm Recommended printing area C 0 31 inch 8 0 mm D 1 14 inches 29 0 mm E 0 13 inch 3 4 mm F 0 13 inch 3 4 mm 124 ...

Страница 125: ...haracters Model whose serial number is used as the administrator password For the models other than the above the printer serial number is used as the administrator password Where Serial Number Is Located The following character restrictions apply to the password that you change Set the password by using 4 to 32 characters The allowed characters are single byte alphanumeric characters For security...

Страница 126: ...ding on the printer you are using For security reasons we recommend you change the password Note Use an OS or web browser below to use Remote UI iOS devices OS iOS 6 1 or later Browser Default browser of iOS device Mobile Safari Android devices OS Android 2 3 3 or later Browser Default browser of Android device browser or Chrome Mac OS devices OS Mac OS X v 10 6 or later Browser Safari 5 1 or late...

Страница 127: ...rs four alphabets followed by five numbers Example Note The printer serial number is written on the warranty Depending on the printer you are using you can check the serial number by printing out the network setting information of the printer For more on printing search for NR044 on your printer s Online Manual and see the instructions shown 127 ...

Страница 128: ...ies MG series Model name Using the card slot via a network MG7700 series MG7500 series MG7100 series MG6900 series MG6800 series MG6700 series MG6600 series MG6500 series MG6400 series MG5700 series No card slot MG5600 series No card slot MG5500 series No card slot MG3600 series No card slot MG3500 series No card slot MG2900 series No card slot MG2500 series No card slot MG2400 series No card slot...

Страница 129: ...O series G series Model name Using the card slot via a network MX series No card slot MB series No card slot E series No card slot P series No card slot iP series No card slot iX series No card slot iB series No card slot PRO series No card slot G series No card slot 129 ...

Страница 130: ...Printing Printing from Computer 130 ...

Страница 131: ...Printing from Computer Printing from Application Software Windows Printer Driver Printing from Application Software Mac OS Printer Driver Printing Using Canon Application Software 131 ...

Страница 132: ...rinter Driver Printing with Easy Setup Basic Various Printing Methods Changing the Print Quality and Correcting Image Data Overview of the Printer Driver Printer Driver Description Updating the Printer Driver Sharing the Printer on a Network 132 ...

Страница 133: ...Open the printer driver setup window 4 Select a frequently used profile In Commonly Used Settings on the Quick Setup tab select a printing profile suited for the purpose When you select a printing profile the Additional Features Media Type and Printer Paper Size settings are automatically switched to the values that were preset 5 Select the print quality For Print Quality select High Standard or D...

Страница 134: ...cument is printed with settings that match your purpose Important When you select the Always Print with Current Settings check box all settings specified on the Quick Setup Main and Page Setup tabs are saved and you can print with the same settings from the next time as well In the Commonly Used Settings window click Save to register the specified settings 134 ...

Страница 135: ...e Model No Media Type in the printer driver Photo Paper Plus Glossy II PP 201 Photo Paper Plus Glossy II Photo Paper Pro Luster LU 101 Photo Paper Pro Luster Photo Paper Plus Semi gloss SG 201 Photo Paper Plus Semi gloss Photo Paper Glossy GP 501 GP 601 Glossy Photo Paper Matte Photo Paper MP 101 Matte Photo Paper Canon genuine papers Business Letter Printing Media name Model No Media Type in the ...

Страница 136: ... Printing Scaled Printing Page Layout Printing Tiling Poster Printing Booklet Printing Duplex Printing Stamp Background Printing Registering a Stamp Registering Image Data to be Used as a Background Setting Up Envelope Printing Displaying the Print Results before Printing Setting Paper Dimensions Custom Size Editing the Print Document or Reprinting from the Print History 136 ...

Страница 137: ... the printer driver setup window 2 Select the paper size Select a page size from the Page Size list on the Page Setup tab 3 Set Orientation Select Portrait or Landscape for Orientation Check Rotate 180 degrees check box when you want to perform printing with the original being rotated 180 degrees 4 Complete the setup Click OK When you execute print the document will be printed with the selected pa...

Страница 138: ...r of copies to be printed 3 Specify the print order Check the Print from Last Page check box when you want to print from the last page in order and uncheck the check box when you want to print from the first page Check the Collate check box when you are printing multiple copies of a document and want to print out all pages in each copy together Uncheck this check box when you want to print all pag...

Страница 139: ...and this printer driver the number of copies may be multiplied numbers of the two settings or the specified printing order may not be enabled Print from Last Page appears grayed out and is unavailable when Tiling Poster is selected for Page Layout When Booklet is selected for Page Layout Print from Last Page and Collate appear grayed out and cannot be set When Duplex Printing Manual is selected Pr...

Страница 140: ...be stapled Check the position of the stapling margin from Stapling Side on the Page Setup tab The printer analyzes the Orientation and Page Layout settings and automatically selects the best staple position When you want to change the setting select from the list 3 Set the margin width If necessary click Specify Margin and set the margin width and then click OK 140 ...

Страница 141: ...ou execute print the data is printed with the specified staple side and margin width Important Stapling Side and Specify Margin appear grayed out and are unavailable when Borderless Tiling Poster or Booklet is selected for Page Layout Scaled is selected for Page Layout When Duplex Printing Manual is also selected only Stapling Side can be specified 141 ...

Страница 142: ...without providing any margin around it set borderless printing The procedure for performing borderless printing is as follows You can also set borderless printing in Additional Features on the Quick Setup tab Setting Borderless Printing 1 Open the printer driver setup window 2 Set borderless printing Select Borderless from the Page Layout list on the Page Setup tab Click OK when the confirmation m...

Страница 143: ...t and are unavailable When Envelope or High Resolution Paper is selected from the Media Type list on the Main tab you cannot perform borderless printing Depending on the type of the media used during borderless printing the print quality may deteriorate at the top and bottom of the sheet or stains may form When the ratio of the height to the width differs from the image data a portion of the image...

Страница 144: ... on the print depending on the size of the paper Note When the Amount of Extension slider is set to the leftmost position image data will be printed in the full size When Preview before printing is checked on the Main tab you can confirm whether there will be no margin before printing 144 ...

Страница 145: ...er size of the document Using Page Size select the page size that is set with your application software 4 Select the print paper size Select the size of the paper loaded in the printer from the Printer Paper Size list When the Printer Paper Size is smaller than the Page Size the page image will be reduced When the Printer Paper Size is larger than the Page Size the page image will be enlarged The ...

Страница 146: ...5 Complete the setup Click OK When you execute print the document will be enlarged or reduced to fit to the page size 146 ...

Страница 147: ...e Page Setup tab 3 Select the paper size of the document Using Page Size select the page size that is set with your application software 4 Set the scaling rate by using one of the following methods Select a Printer Paper Size When the printer paper size is smaller than the Page Size the page image will be reduced When the printer paper size is larger than the Page Size the page image will be enlar...

Страница 148: ...printer driver 5 Complete the setup Click OK When you execute print the document will be printed with the specified scale Important When the application software which you used to create the original has the scaled printing function configure the settings on your application software You do not need to configure the same setting in the printer driver 148 ...

Страница 149: ...Note Selecting Scaled changes the printable area of the document 149 ...

Страница 150: ...ect Page Layout from the Page Layout list on the Page Setup tab The current settings are displayed in the settings preview on the left side of the printer driver 3 Select the print paper size Select the size of the paper loaded in the printer from the Printer Paper Size list 4 Set the number of pages to be printed on one sheet and the page order If necessary click Specify specify the following set...

Страница 151: ...To change the page arrangement order select a placement method from the list Page Border To print a page border around each document page check this check box 5 Complete the setup Click OK on the Page Setup tab When you execute print the specified number of pages will be arranged on each sheet of paper in the specified order 151 ...

Страница 152: ...ing poster printing is as follows Setting Tiling Poster Printing 1 Open the printer driver setup window 2 Set tiling poster printing Select Tiling Poster from the Page Layout list on the Page Setup tab The current settings are displayed in the settings preview on the left side of the printer driver 3 Select the print paper size Select the size of the paper loaded in the printer from the Printer Pa...

Страница 153: ...pecifies the printing range Select All under normal circumstances To reprint only a specific page select Pages and enter the page number you want to print To specify multiple pages enter the page numbers by separating them with commas or by entering a hyphen between the page numbers Note You can also specify the print range by clicking the pages in the settings preview 5 Complete the setup Click O...

Страница 154: ... select Print all pages or Delete all pages 2 Complete the setup After completing the page selection click OK When you execute print only specified pages will be printed Important Since tiling poster printing enlarges the document when printing it the print results may become coarse 154 ...

Страница 155: ...let printing is as follows 1 Open the printer driver setup window 2 Set booklet printing Select Booklet from the Page Layout list on the Page Setup tab The current settings are displayed in the settings preview on the left side of the window 3 Select the print paper size Select the size of the paper loaded in the printer from the Printer Paper Size list 4 Set the margin for stapling and the margin...

Страница 156: ...ox 5 Complete the setup Click OK on the Page Setup tab When you execute print the document will be printed on one side of a sheet of paper When the printing of one side is complete set the paper correctly by following the message and click OK When the printing of the other side is complete fold the paper at the center of the margin and make a booklet Important Booklet cannot be selected when a med...

Страница 157: ...ting Manual check box on the Page Setup tab 3 Select the layout Select Normal size Fit to Page Scaled or Page Layout from the Page Layout list 4 Specify the side to be stapled The best Stapling Side is selected automatically from the Orientation and Page Layout settings To change the setting select another stapling side from the list 5 Set the margin width If necessary click Specify Margin and set...

Страница 158: ...n Plain Paper is selected from Media Type on the Main tab Duplex Printing Manual appears grayed out and is unavailable When Borderless Tiling Poster or Booklet is selected from the Page Layout list Duplex Printing Manual and Stapling Side appear grayed out and are unavailable Note If the back side of the paper becomes smudged during duplex printing perform Bottom Plate Cleaning in the Maintenance ...

Страница 159: ... you to print a light illustration behind the document data The procedure for performing stamp background printing is as follows Printing a Stamp CONFIDENTIAL IMPORTANT and other stamps that are used often in companies are pre registered 1 Open the printer driver setup window 2 Click Stamp Background Stamp on the Page Setup tab The Stamp Background Stamp dialog box opens Note With the XPS printer ...

Страница 160: ... the XPS printer driver is used When the XPS printer driver is used the stamp is normally printed in the foreground of the document Print semitransparent stamp Check this check box to print a semi transparent stamp on the document This function is available only when the XPS printer driver is used Stamp first page only To print the stamp only on the first page check this check box 5 Complete the s...

Страница 161: ...lick OK on the Page Setup tab When you execute print the data is printed with the specified background Important When Borderless is selected the Stamp Background Stamp button appears grayed out and is unavailable Note The stamp and background are not printed on blank sheets inserted with the Insert blank page function of booklet printing Related Topics Registering a Stamp Registering Image Data to...

Страница 162: ...ary stamps can be deleted at any time The procedure for registering a new stamp is as follows Registering a New Stamp 1 Open the printer driver setup window 2 Click Stamp Background Stamp on the Page Setup tab The Stamp Background Stamp dialog box opens Note With the XPS printer driver the Stamp Background button has become the Stamp button and only the stamp function can be used 3 Click Define St...

Страница 163: ...eType Font Style Size and Outline You can select the color of the stamp by clicking Select Color Important Stamp Text appears grayed out and is unavailable when Date Time User Name is selected Placement tab Select the stamp position from the Position list You can also select Custom from the Position list and specify coordinates for X Position and Y Position You can also change the stamp position b...

Страница 164: ...overwrite on the Save settings tab When you want to save the stamp with a different title type a new title in the Title box and click Save Click OK when the confirmation message appears 5 Complete the setup Click OK The Stamp Background Stamp dialog box opens again The registered title appears in the Stamp list Deleting an Unnecessary Stamp 1 Click Define Stamp in the Stamp Background Stamp dialog...

Страница 165: ...sting background An unnecessary background can be deleted The procedure for registering image data to be used as a background is as follows Registering New Background 1 Open the printer driver setup window 2 Click Stamp Background on the Page Setup tab The Stamp Background dialog box opens Note With the XPS printer driver the Stamp Background button has become the Stamp button and Background canno...

Страница 166: ...tens the background To print the background at the original bitmap intensity move the slider to the rightmost position 6 Save the background Click the Save settings tab and enter a title in the Title box and then click Save Click OK when the confirmation message appears Note Spaces tabs and returns cannot be entered at the beginning or end of a title 7 Complete the setup Click OK then it returns t...

Страница 167: ...K then it returns to Stamp Background dialog box The registered title appears in the Background list Deleting an Unnecessary Background 1 Click Select Background in the Stamp Background dialog box The Background Settings dialog box opens 2 Select the background to be deleted Select the title of the background you want to delete from the Backgrounds list on the Save settings tab and then click Dele...

Страница 168: ...Quick Setup tab 4 Select the paper size When the Envelope Size Setting dialog box is displayed select Envelope Com 10 or Envelope DL and then click OK 5 Set the orientation To print the addressee horizontally select Landscape for Orientation 6 Select the print quality Select High or Standard that matches your purpose for Print Quality 7 Complete the setup Click OK When you execute print the inform...

Страница 169: ...guide messages check the Do not show this message again check box To show the guide again click the View Printer Status button on the Maintenance tab and start the Canon IJ Status Monitor Then click Envelope Printing from Display Guide Message of the Option menu to enable the setting 169 ...

Страница 170: ...ults display on the Quick Setup tab 1 Open the printer driver setup window 2 Set the preview Check the Preview before printing check box on the Main tab 3 Complete the setup Click OK When you execute print the Canon IJ Preview opens and displays the print results Important In the Manual Color Adjustment dialog box the Color Adjustment tab contains the Print a pattern for color adjustment check box...

Страница 171: ...a custom size in Printer Paper Size on the Quick Setup tab 1 Open the printer driver setup window 2 Select the paper size Select Custom for Page Size on the Page Setup tab The Custom Paper Size dialog box opens 3 Set the custom paper size Specify Units and enter the Width and Height of the paper to be used Then click OK 4 Complete the setup Click OK on the Page Setup tab When you execute print the...

Страница 172: ...he values If the application software does not have such a function or if the document does not print correctly perform the above procedure from the printer driver to set the values Printing may be disabled depending on the size of the specified user defined media For information about printable sizes for user defined media see Media Types You Can Use 172 ...

Страница 173: ...ieve the document print history to print the document The procedure for using the Canon IJ XPS Preview is as follows Print Combine Documents Delete Document Reset Documents View Thumbnails Move Document Undo Move Page Delete Page Note By clicking View Thumbnails you can display or hide thumbnails of the print documents selected in the Document Name list Clicking Undo reverses the change that just ...

Страница 174: ...ed document is added to the list Changing the sequence of print documents or print pages To change the sequence of the print documents go to the Document Name list and select the print document to be moved Next on the Edit menu select Move Document from Documents and select the appropriate item You can also click and drag a print document to change the print sequence To change the sequence of the ...

Страница 175: ... preview Note You can rename Document Name to any name 5 Executing print Click Print When you execute print the printer uses the specified settings to print the data Reprinting from the Print History When you click Save Print History on the File menu to enable the setting the document printed from the preview is saved and you can reprint the document with the same settings 1 Displaying the print h...

Страница 176: ...ing Color Correction Optimal Photo Printing of Image Data Adjusting Colors with the Printer Driver Printing with ICC Profiles Adjusting Color Balance Adjusting Color Balance Using Sample Patterns Printer Driver Adjusting Brightness Adjusting Intensity Adjusting Contrast Adjusting Intensity Contrast Using Sample Patterns Printer Driver 176 ...

Страница 177: ...ustom for Print Quality and click Set The Custom dialog box opens 3 Setting the print quality level Drag the slider bar to select the print quality level and click OK 4 Complete the setup Click OK on the Main tab When you execute print the image data is printed with the selected print quality level Important Certain print quality levels cannot be selected depending on the settings of Media Type Re...

Страница 178: ...Adjusting Color Balance Adjusting Brightness Adjusting Intensity Adjusting Contrast 178 ...

Страница 179: ... Click OK When you execute print the document is converted to grayscale data It allows you to print the color document in monochrome Important When the Grayscale Printing check box is checked the printer driver processes image data as sRGB data In this case actual colors printed may differ from those in the original image data When using the grayscale printing function to print Adobe RGB data conv...

Страница 180: ...e an application software to specify a printing ICC profile select None The procedure for specifying color correction is as follows You can also set color correction on the Quick Setup tab by choosing Photo Printing under Commonly Used Settings and then choosing Color Intensity Manual Adjustment under Additional Features 1 Open the printer driver setup window 2 Select the manual color adjustment O...

Страница 181: ... an application software to print data 4 Complete the setup Click OK on the Main tab When you execute print the document data is printed with the specified color correction Important When ICM is disabled in the application software ICM is unavailable for Color Correction and the printer may not be able to print the image data properly When the Grayscale Printing check box on the Main tab is checke...

Страница 182: ...tion software to be used There are two typical printing methods Check the color space sRGB of the image data and the application software to be used and then select the printing method suited to your purpose Adjusting Colors with the Printer Driver Describes the procedure for printing sRGB data by using the color correction function of the printer driver To print using Canon Digital Photo Color Th...

Страница 183: ...er driver setup window 2 Select the manual color adjustment On the Main tab select Manual for Color Intensity and click Set The Manual Color Adjustment dialog box opens 3 Select color correction Click Matching tab and select Driver Matching for Color Correction 4 Set the other items If necessary click Color Adjustment tab and adjust the color balance Cyan Magenta Yellow and adjust Brightness Inten...

Страница 184: ...Adjusting Intensity Adjusting Contrast 184 ...

Страница 185: ... application software to select color management items and specify an input ICC profile and a printing ICC profile in the image data Even if you print using a printing ICC profile that you created yourself from your application software be sure to select color management items from your application software For instructions refer to the manual of the application software you are using 1 Open the p...

Страница 186: ...ndow 2 Select the manual color adjustment On the Main tab select Manual for Color Intensity and click Set The Manual Color Adjustment dialog box opens 3 Select color correction Click Matching tab and select ICM ICC Profile Matching for Color Correction 4 For Input Profile select Standard Important When the application software specifies an input profile the input profile setting of the printer dri...

Страница 187: ... execute print the printer uses the color space of the image data Related Topics Setting the Print Quality Level Custom Specifying Color Correction Adjusting Color Balance Adjusting Brightness Adjusting Intensity Adjusting Contrast 187 ...

Страница 188: ...he case when color balance is used to intensify cyan and to diminish yellow so that the overall colors are more uniform No adjustment Adjust color balance The procedure for adjusting color balance is as follows You can also set color balance on the Quick Setup tab by choosing Photo Printing under Commonly Used Settings and then choosing Color Intensity Manual Adjustment under Additional Features 1...

Страница 189: ...view on the left side of the printer driver After adjusting each color click OK 4 Complete the setup Click OK on the Main tab When you execute print the document is printed with the adjusted color balance Important When the Grayscale Printing check box on the Main tab is checked the color balance Cyan Magenta Yellow appear grayed out and are unavailable Related Topics Setting the Print Quality Lev...

Страница 190: ...a list together with the adjustment values Described below is the procedure for adjusting the color balance while looking at the pattern 1 Open the printer driver setup window 2 Select the manual color adjustment On the Main tab select Manual for Color Intensity and click Set The Manual Color Adjustment dialog box opens 3 Selecting pattern print On the Color Adjustment tab select the Print a patte...

Страница 191: ...ble Printer Paper Size Select the paper size to be used for pattern printing Note Depending on the paper size selected on the Page Setup tab there may be sizes that cannot be selected Amount of Pattern Instances Select Largest Large or Small to set the number of patterns to be printed Note Largest and Large cannot be selected when certain paper sizes or output paper sizes are selected Color Variat...

Страница 192: ...lect OK and then execute printing The printer then prints a pattern in which the color balance that you set is the center value 6 Adjusting the color balance Look at the print results and select the image that you like best Then enter the color balance numbers indicated at the bottom of that image into the Cyan Magenta and Yellow fields on the Color Adjustment tab Clear the Print a pattern for col...

Страница 193: ...ollowing items are grayed out and cannot be set Preview before printing on the Main tab Stapling Side and Specify Margin on the Page Setup tab When Duplex Printing Manual is set only Stapling Side can be set You can print a pattern only if the Page Layout setting on the Page Setup tab is Normal size or Borderless When the Grayscale Printing check box on the Main tab is checked Cyan Magenta and Yel...

Страница 194: ...ghtness is as follows You can also set brightness on the Quick Setup tab by choosing Photo Printing under Commonly Used Settings and then choosing Color Intensity Manual Adjustment under Additional Features 1 Open the printer driver setup window 2 Select the manual color adjustment On the Main tab select Manual for Color Intensity and click Set The Manual Color Adjustment dialog box opens 3 Specif...

Страница 195: ... the Main tab When you execute print the data is printed at the specified brightness Related Topics Setting the Print Quality Level Custom Specifying Color Correction Adjusting Color Balance Adjusting Intensity Adjusting Contrast 195 ...

Страница 196: ... then choosing Color Intensity Manual Adjustment under Additional Features 1 Open the printer driver setup window 2 Select the manual color adjustment On the Main tab select Manual for Color Intensity and click Set The Manual Color Adjustment dialog box opens 3 Adjust intensity Moving the Intensity slider to the right intensifies darkens the colors and moving the slider to the left dilutes brighte...

Страница 197: ... the adjusted intensity Related Topics Setting the Print Quality Level Custom Specifying Color Correction Adjusting Color Balance Adjusting Color Balance Using Sample Patterns Printer Driver Adjusting Brightness Adjusting Contrast Adjusting Intensity Contrast Using Sample Patterns Printer Driver 197 ...

Страница 198: ... choosing Photo Printing under Commonly Used Settings and then choosing Color Intensity Manual Adjustment under Additional Features 1 Open the printer driver setup window 2 Select the manual color adjustment On the Main tab select Manual for Color Intensity and click Set The Manual Color Adjustment dialog box opens 3 Adjust the contrast Moving the Contrast slider to the right increases the contras...

Страница 199: ... is printed with the adjusted contrast Related Topics Setting the Print Quality Level Custom Specifying Color Correction Adjusting Color Balance Adjusting Color Balance Using Sample Patterns Printer Driver Adjusting Brightness Adjusting Intensity Adjusting Intensity Contrast Using Sample Patterns Printer Driver 199 ...

Страница 200: ...n a list together with the adjustment values Described below is the procedure for adjusting the intensity contrast while looking at the pattern 1 Open the printer driver setup window 2 Select the manual color adjustment On the Main tab select Manual for Color Intensity and click Set The Manual Color Adjustment dialog box opens 3 Selecting pattern print On the Color Adjustment tab select the Print ...

Страница 201: ...p tab there may be sizes that cannot be selected Amount of Pattern Instances Select Largest Large or Small to set the number of patterns to be printed Note Largest and Large cannot be selected when certain paper sizes or output paper sizes are selected Color Variation Between Instances Set the amount of color change between neighboring patterns Note Large is about double the size of Medium and Sma...

Страница 202: ...ch the intensity contrast that you set is the center value 6 Adjusting the intensity contrast Look at the print results and select the image that you like best Then enter the intensity contrast numbers indicated at the bottom of that image into the Intensity and Contrast fields on the Color Adjustment tab Clear the Print a pattern for color adjustment check box and click OK 202 ...

Страница 203: ...tern for color adjustment is selected on the Color Adjustment tab the following items are grayed out and cannot be set Preview before printing on the Main tab Stapling Side and Specify Margin on the Page Setup tab When Duplex Printing Manual is set only Stapling Side can be set You can print a pattern only if the Page Layout setting on the Page Setup tab is Normal size or Borderless Depending on y...

Страница 204: ...iew of the Printer Driver Canon IJ Printer Driver How to Open the Printer Driver Setup Window Canon IJ Status Monitor Canon IJ Preview Deleting the Undesired Print Job Instructions for Use Printer Driver 204 ...

Страница 205: ...use the XPS printer driver the standard printer driver must already be installed on your computer Installing the Printer Driver To install the regular printer driver load the Setup CD ROM that comes with the printer and then install the driver from Start Setup Again To install the XPS printer driver load the Setup CD ROM that comes with the printer and then select XPS Driver from Add Software Spec...

Страница 206: ...ead cleaning or to configure a printing profile that is common to all application software 1 Select as described below If you are using Windows 8 1 or Windows 8 from the Desktop charms select Settings Control Panel Hardware and Sound Devices and Printers If you are using Windows 7 select the Start menu Devices and Printers If you are using Windows Vista select the Start menu Control Panel Hardware...

Страница 207: ...ask bar Click the button of the status monitor displayed on the task bar The Canon IJ Status Monitor appears Note To open the Canon IJ Status Monitor when the printer is not printing open the printer driver setup window and click View Printer Status on the Maintenance tab The information displayed on the Canon IJ Status Monitor may differ depending on the country or region where you are using your...

Страница 208: ...der and number of pages You can also change the media type settings When you want to display a preview before printing open the printer driver setup window click the Main tab and check the Preview before printing check box When you do not want to display a preview before printing uncheck the check box Important If you are using the XPS printer driver see Editing the Print Document or Reprinting fr...

Страница 209: ...r displayed on the task bar The Canon IJ Status Monitor appears 2 Display the print jobs Click Display Print Queue The print queue window opens 3 Delete the print jobs Select Cancel All Documents from the Printer menu When the confirmation message appears click Yes The deletion of the print job is complete Important Users who have not been granted access permission for printer management cannot de...

Страница 210: ...tab in the Manual Color Adjustment dialog box Since the resolution in the preview display differs from the printing resolution text and lines in the preview display may appear different from the actual print result With some applications the printing is divided into multiple print jobs To cancel printing delete all divided print jobs If image data is not printed correctly display the Print Options...

Страница 211: ...g box 5 Open Word s Print dialog box again 6 Open the printer driver setup window and click OK 7 Start printing If bitmap printing is enabled in Adobe Illustrator Adobe Systems Incorporated printing may take time or some data may not be printed Print after unchecking the Bitmap Printing check box in the Print dialog box 211 ...

Страница 212: ...Description Quick Setup tab Description Main tab Description Page Setup tab Description Maintenance tab Description Canon IJ Preview Description Canon IJ XPS Preview Description Canon IJ Status Monitor Description 212 ...

Страница 213: ...holding down the Ctrl key and pressing the up or down arrow keys Standard These are the factory settings If Page Size Orientation and Copies were set from the application software those settings have priority Photo Printing If you select this setting when printing a photo the photo paper and photo size generally used are set The Borderless Printing check box is checked automatically If Orientation...

Страница 214: ...of paper You can check an overall image of the layout Preview before printing Shows what the print result will look like before you actually print the data Check this check box to display a preview before printing Uncheck this check box if you do not want to display a preview Important To use the Canon IJ XPS Preview you must have Microsoft NET Framework 4 Client Profile installed on your computer...

Страница 215: ...ion software will be reversed vertically and horizontally Color Intensity Manual Adjustment Select when you set the Color Correction method and individual settings such as Cyan Magenta Yellow Brightness Intensity and Contrast etc Media Type Selects a type of printing paper Select a media type that matches the paper that is loaded in the printer This ensures that printing is carried out properly fo...

Страница 216: ...r Tray Paper is always supplied from the rear tray Copies Specifies the number of copies you want to print You can specify a value from 1 to 999 Important When the application software that you used to create the document has the same function specify the settings on the printer driver However if the print results are not acceptable specify the function settings on the application software Always ...

Страница 217: ...aper size setting is not applied when the printing profile is selected Instead the printer prints with the paper size specified with the application software Save the orientation setting Saves the Orientation to the printing profile in Commonly Used Settings To apply the saved print orientation when the printing profile is selected check this check box If this check box is unchecked the print orie...

Страница 218: ...ying the Print Results before Printing Setting Paper Dimensions Custom Size Printing a Color Document in Monochrome Specifying Color Correction Adjusting Color Balance Adjusting Color Balance Using Sample Patterns Printer Driver Adjusting Brightness Adjusting Intensity Adjusting Contrast Adjusting Intensity Contrast Using Sample Patterns Printer Driver Registering a Frequently Used Printing Profil...

Страница 219: ...res that printing is carried out properly for the specified paper Paper Source Shows the source from which paper is supplied Rear Tray Paper is always supplied from the rear tray Print Quality Selects your desired printing quality Select one of the following to set the print quality level that is appropriate for the purpose Important Depending on the Media Type settings the same print results may ...

Страница 220: ...ome data when printing your document Check this check box to print a color document in monochrome Preview before printing Shows what the print result will look like before you actually print the data Check this check box to display a preview before printing Important To use the Canon IJ XPS Preview you must have Microsoft NET Framework 4 Client Profile installed on your computer Defaults Restores ...

Страница 221: ...ker You can also directly enter a value linked to the slider Enter a value in the range from 50 to 50 This adjustment changes the relative amount of ink of each color used which alters the total color balance of the document Use your application if you want to change the total color balance significantly Use the printer driver only if you want to adjust the color balance slightly Important When Gr...

Страница 222: ...is checked on the Main tab Cyan Magenta Yellow appear grayed out and are unavailable Intensity Contrast Prints a pattern that allows you to check the intensity contrast balance Printer Paper Size Selects the paper size to be used for pattern printing This setting is linked to Printer Paper Size on the Page Setup tab Note Depending on the paper size selected on the Page Setup tab there may be sizes...

Страница 223: ...most people prefer ICM ICC Profile Matching Adjusts the colors by using an ICC profile when printing Specify the input profile to be used Important If the application software is set so that ICM is disabled ICM ICC Profile Matching is unavailable for Color Correction and the printer may not be able to print the image data properly None Disables color adjustment with the printer driver Input Profil...

Страница 224: ...Specifying Color Correction Adjusting Colors with the Printer Driver Printing with ICC Profiles Printing a Color Document in Monochrome Displaying the Print Results before Printing 224 ...

Страница 225: ...ws you to specify any vertical and horizontal dimensions for the paper size Orientation Selects the printing orientation If the application used to create your document has a similar function select the same orientation that you selected in that application Portrait Prints the document so that its top and bottom positions are unchanged relative to the paper feed direction This is the default setti...

Страница 226: ...t prints the document Check this check box to reduce the size when printing the document Borderless Chooses whether you are printing on a full page without any page margins or printing with page margins In borderless printing originals are enlarged to extend slightly off the paper Thus printing can be performed without any margins border Use Amount of Extension to adjust how much of the document e...

Страница 227: ...g margin position Check Stapling Side and select from the list to change it Specify Margin Opens the Specify Margin dialog box You can specify the width of the margin Copies Specifies the number of copies you want to print You can specify a value from 1 to 999 Important If the application used to create your document has a similar function specify the number of copies with the application without ...

Страница 228: ... shown according to the units specified in Units Page Layout Printing dialog box This dialog box allows you to select the number of document pages to be placed on one sheet of paper the page order and whether a page border line is to be printed around each document page The settings specified in this dialog box can be confirmed in the settings preview on the printer driver Preview Icon Shows the s...

Страница 229: ... All under normal circumstances Select Pages to specify a specific page or range Note If some of the pages have not been printed well specify the pages that do not need to be printed by clicking them in the settings preview of the Page Setup tab Only the pages shown on the screen will be printed this time Booklet Printing dialog box This dialog box allows you to set how to bind the document as a b...

Страница 230: ...may resolve the problems Important Uncheck this check box under normal circumstances This function does not work when ICM is selected for Color Correction on the Matching tab of the Manual Color Adjustment dialog box Note Disable ICM required from the application software tab cannot be used with the XPS printer driver Disable the color profile setting of the application software Checking this chec...

Страница 231: ... to enlarge or reduce the image If the image data in a printed document is not printed clearly selecting this check box may improve the results Important Uncheck this check box under normal circumstances Note Scale images using nearest neighbor interpolation can be used only with the XPS printer driver Prevention of Print Data Loss You can reduce the size of the print data that was created with th...

Страница 232: ...ata will not be hidden behind the stamp However the sections of the stamp that are overlapped by the document may be hidden Print semitransparent stamp Sets how the stamp is to be printed over the document Check the Stamp check box to enable this Check this check box to print a semi transparent stamp over the printed document page Uncheck this check box to print the stamp over the document data Th...

Страница 233: ...ecifies the stamp text string Up to 64 characters can be entered For Date Time User Name the creation date time and user name of the printed object are displayed in Stamp Text Important Stamp Text appears grayed out and is unavailable if Date Time User Name is selected TrueType Font Selects the font for the stamp text string Style Selects the font style for the stamp text string Size Selects the f...

Страница 234: ... page Selecting Custom from the list allows you to enter values for the X Position and Y Position coordinates directly Orientation Specifies the angle of rotation for the stamp The angle can be set by entering the number of degrees Negative values rotate the stamp clockwise Note Orientation is enabled only when Text or Date Time User Name is selected for Stamp Type on the Stamp tab Note Click Defa...

Страница 235: ...kground Moving the slider to the right increases the intensity and moving the slider to the left decreases the intensity To print the background at the original bitmap intensity move the slider to the rightmost position Note Depending on the type of printer driver you are using and the environment this function may not be available Click Defaults to set File to blank Layout Method to Fill page and...

Страница 236: ...Delete Deletes an unnecessary background Specify the title of an unnecessary background from the Backgrounds list and then click this button 236 ...

Страница 237: ...rint head problem Note Deep Cleaning consumes a larger amount of ink than Cleaning Cleaning the print heads frequently will rapidly deplete your printer s ink supply Therefore perform cleaning only when necessary Ink Group When you click Cleaning or Deep Cleaning the Ink Group window is displayed Selects the ink group that you want to clean the print head for Click Initial Check Items to display t...

Страница 238: ...eck pattern Perform this function if printing becomes faint or a specific color fails to print Print a nozzle check pattern and check whether the print head is working properly If the print result for a specific color is fainted or if there are any unprinted sections click Cleaning to clean the print head To display a list of items that you should check before printing the nozzle check pattern cli...

Страница 239: ...button POWER button on the printer to turn the printer on again after clicking this button When you use this function you will not be able to turn the printer on from the printer driver Auto Power Opens the Auto Power Settings dialog box Specify settings for operating the printer power automatically Perform this function if you want to change the auto power settings Note If the printer is off or i...

Страница 240: ...notice can be checked In addition the language to be used can be switched Initial Check Items Cleaning Deep Cleaning Before running Cleaning or Deep Cleaning check that the printer power is on Then check the following item Is there ink remaining Initial Check Items System Cleaning Before running System Cleaning check that the printer power is on Then check the following items When you ran Nozzle C...

Страница 241: ...e for the print head position Print Head Alignment dialog box To adjust the print head position click Align Print Head in the Start Print Head Alignment dialog box and perform the operations instructed in the messages The Print Head Alignment dialog box is then displayed This dialog box allows you to check the printed pattern and adjust the print head position Preview Window Displays the pattern o...

Страница 242: ...ou must replenish all inks to the upper limit line Auto Power Settings dialog box When you click Auto Power the Auto Power Settings dialog box is displayed This dialog box allows you to manage the printer power from the printer driver Auto Power On Selects the auto power on setting Specify Disable to prevent the printer from turning on automatically when print data is sent to it Make sure the prin...

Страница 243: ...he paper during high density printing to prevent paper abrasion Check this check box to enable this function Rotate 90 degrees left when orientation is Landscape On the Page Setup tab you can change the rotation direction of the Landscape in the Orientation To rotate the document 90 degrees to the left when printing select the check box Ink Drying Wait Time The printer can pause before printing a ...

Страница 244: ...int Head Position Printing a Nozzle Check Pattern Changing the remaining ink level notification setting Cleaning Inside the Printer Cleaning the Paper Feed Rollers Managing the Printer Power Reducing the Printer Noise Changing the Printer Operation Mode 244 ...

Страница 245: ...at is displayed on the preview screen This command has the same function as the Start Printing on the toolbar Cancel Printing Ends the Canon IJ Preview and cancels the printing of the document that is displayed on the preview screen This command has the same function as the Cancel Printing on the toolbar Exit Ends the Canon IJ Preview Page Menu This menu includes the following commands to select p...

Страница 246: ...ialog box This command allows you to specify the page number of the page to be displayed Zoom Menu Selects the ratio of the actual size printed on the paper to the preview display size You can also select the ratio from the drop down list box located on the toolbar Whole Displays the entire page of data as one page 50 Reduces the displayed data to 50 of the actual size to be printed 100 Displays t...

Страница 247: ...nt setup information for each page at the left side of the preview screen This screen also allows you to change the media type and paper source settings Important If the media type and paper source are set from the application software those settings have priority and the changed settings may become ineffective Printer Paper Size Displays the paper size of the document to be printed Media Type You...

Страница 248: ...portant To use the Canon IJ XPS Preview you must have Microsoft NET Framework 4 Client Profile installed on your computer File Menu Selects print operation and print history settings Print Prints the documents selected in the document list The printed documents are deleted from the list and when all documents are printed the Canon IJ XPS Preview closes This command has the same function as Print o...

Страница 249: ...s on the toolbar Reset Documents Returns the document selected in the document list to their status before they were added to the Canon IJ XPS Preview The combined documents are separated and the original documents are restored This command has the same function as the Reset Documents on the toolbar Move Document Use the following command to change the order of the documents selected in the docume...

Страница 250: ...elete Page Deletes the currently selected page If page layout printing is set the pages enclosed with red frame will be deleted This command has the same function as the Delete Page on the toolbar Restore Page Restores pages that were deleted with the Delete Page function To restore pages you must select the View Deleted Pages check box on the Option menu and display the deleted pages as thumbnail...

Страница 251: ... in the document list If the currently selected document is the last document this command is grayed out and cannot be selected Pages Use the following command to select the page to be displayed Note If the Page Layout setting in the printer driver is specified to Tiling Poster or Booklet the number of pages is the number of sheets to be used for printing and not the number of pages in the origina...

Страница 252: ... the same function as the View Thumbnails on the toolbar View Document List Displays the print document list at the top of the preview window View Print Settings Area Displays the print settings area at the right side of the preview window View Deleted Pages When the thumbnails are displayed this function displays pages that were deleted with the Delete Page function To check deleted pages you mus...

Страница 253: ...ove Up One Moves the selected print document one up from its current position If the currently selected document is the first document this command is grayed out and cannot be selected Move Down One Moves the selected print document one down from its current position If the currently selected document is the last document this command is grayed out and cannot be selected Move to Last Moves the sel...

Страница 254: ...ted Paper Source Allows you to select the paper source of the document to be printed Page Layout Displays the page layout of the document to be printed Layout tab You can specify settings for page layout printing To apply the specified settings click Apply If the page layout print settings cannot be changed for the print document the individual items are grayed out and cannot be selected Manual Co...

Страница 255: ...s button restores all the settings on this tab to their default values factory settings Grayscale Printing Allows you to change the monochrome print settings Duplex Printing Manual Select whether to print the document to both sides of the paper manually or to one side of the paper If the duplex print settings cannot be changed for the print document this item is grayed out and is unavailable Impor...

Страница 256: ... check the information on the printing document and the printing progress during printing When a printer error occurs it shows the cause and solution Follow the instruction in the message Printer Canon IJ Status Monitor shows an icon when a warning or error occurs to the printer Indicates that a warning operator call error has occurred or the printer is working There has been an error which requir...

Страница 257: ...or during printing Always Display on Top Displays the Canon IJ Status Monitor in front of other windows Start when Windows is Started Starts the Canon IJ Status Monitor automatically when you start Windows Ink Details Menu Select this menu to check information such as the ink tank types for your printer Help Menu When you select this menu item the Help window for Canon IJ Status Monitor is display...

Страница 258: ...Updating the Printer Driver Obtaining the Latest Printer Driver Deleting the Unnecessary Printer Driver Before Installing the Printer Driver Installing the Printer Driver 258 ...

Страница 259: ...e About button on the Maintenance tab You can access our website and download the latest printer driver for your model Important You can download the printer driver for free but any Internet access charges incurred are your responsibility Before installing the latest printer driver delete the previously installed version Related Topics Before Installing the Printer Driver Installing the Printer Dr...

Страница 260: ...l Add or Remove Programs From the program list select XXX Printer Driver where XXX is your model name and then click Remove The confirmation window for uninstalling the model appears Important In Windows 8 1 Windows 8 Windows 7 or Windows Vista a confirmation warning dialog box may appear when starting installing or uninstalling software This dialog box appears when administrative rights are requi...

Страница 261: ...Status Confirm that the USB port of this printer and the computer are firmly connected with the USB cable Turn off the printer Checking the Personal Computer Settings Terminate all running applications Log on as a user who has the administrator account Important Before installing the latest printer driver delete the previously installed version Related Topics Obtaining the Latest Printer Driver In...

Страница 262: ...use this printer on a network you must manually select the connection destination from the client To manually select a connection destination click Cancel in the Connect Cable window When the confirmation message appears click Yes In the Installation Incomplete window select the Select printer port check box click Manual Selection and then select the appropriate port 4 Complete the installation Cl...

Страница 263: ...on Client PC This section describes the procedure for setting a computer that uses this printer though a network When you execute print the data is sent to the printer through the print server system Important In case an error occurred when a document is printed by the client system to a shared printer the error message of Canon IJ Status Monitor will be displayed both on the client system and the...

Страница 264: ... key on your keyboard and then select Printer properties Sharing tab from the displayed File menu If you are using Windows Vista press the Alt key on your keyboard and then select Run as administrator Sharing from the displayed File menu If you are using Windows XP select Sharing from the File menu Important In Windows 8 1 Windows 8 Windows 7 or Windows Vista a confirmation warning dialog box may ...

Страница 265: ...s Vista select the Start menu Network Add Printer The Add Printer window appears 3 Add a printer If you are using Windows 8 1 or Windows 8 click the icon for the printer that you have configured on the print server system to be shared and then click Next If you are using Windows 7 or Windows Vista select Add a network wireless or Bluetooth printer and click the icon for the printer that you have c...

Страница 266: ...xes Add a printer When Welcome to the Add Printer Wizard screen appears click Next 3 Add a printer Select A network printer or a printer attached to another computer then click Next On the Specify a Printer window click Next and then search for the print server system Click the icon for the printer that you have configured on the print server system to be shared and then click Next Note If the ico...

Страница 267: ...k Show informational notifications for network printers on the Advanced tab and then restart the computer If you are using Windows XP Open Server Properties from the File menu of the Printers and Faxes window on the print server system Uncheck Notify when remote documents are printed on the Advanced tab and then restart the computer The bi directional communication function is disabled and the cor...

Страница 268: ...Printing Using Canon Application Software My Image Garden Guide 268 ...

Страница 269: ...rectly Cannot Connect to Computer Properly Cannot Install Printer Driver Easy WebPrint EX Does Not Start or Easy WebPrint EX Menu Does Not Appear Windows Print Results Are Unsatisfactory Printing Does Not Start Printing Stops Print Results Are Unsatisfactory No Ink Comes Out Paper Jams Paper Does Not Feed Properly No Paper Error Error or Message Appears An Error Occurs Message Appears List of Supp...

Страница 270: ...Printing Problems Printing Does Not Start Paper Jams Print Results Are Unsatisfactory No Ink Comes Out Paper Does Not Feed Properly No Paper Error Printing Stops 270 ...

Страница 271: ...ly there is a problem with the relay device Contact the vendor of the relay device There could also be a problem with the USB cable Replace the USB cable and retry the printing Check3 If printing from a computer delete unnecessary print jobs For Windows Deleting the Undesired Print Job For Mac OS Deleting the Undesired Print Job Check4 Is your printer s printer driver is selected when printing The...

Страница 272: ...ver from the Setup CD ROM or the Canon website If printing does not start even though the printer is connected to the computer using a USB cable and the port named USBnnn is selected In Windows 8 1 or Windows 8 select My Printer on Start screen to start My Printer If My Printer is not displayed on Start screen select Search charm and then search for My Printer Set the correct printer port on Diagn...

Страница 273: ...automatically Take the appropriate action described in the message For Windows For Mac OS The screen differs depending on the OS you are using To remove the jammed paper see List of Support Code for Error Paper Jams Note You can also search for details on resolving the errors indicated by the support code shown Search 273 ...

Страница 274: ...ttings differs depending on what you are using your printer for Check the page size and media type settings using the printer driver For Windows Printing with Easy Setup For Mac OS Printing with Easy Setup Check2 Make sure appropriate print quality is selected using printer driver Select a print quality suited to the paper and to what you are printing If you notice blurs or uneven colors increase ...

Страница 275: ...Ink Blots Paper Curl Paper Is Smudged Printed Surface Is Scratched Back of Paper Is Smudged Vertical Line Next to Image Uneven or Streaked Colors 275 ...

Страница 276: ...inter driver Select Do not allow application software to compress print data check box and click OK Clear the check box once printing is complete Check2 Is print data extremely large Windows Click Print Options on Page Setup sheet of the printer driver Then set Prevention of Print Data Loss to On in the dialog that appears This may reduce print quality Check3 Your hard disk may not have sufficient...

Страница 277: ...Paper Is Blank Printing Is Blurry Colors Are Wrong White Streaks Appear Paper Is Blank Printing Is Blurry Colors Are Wrong 277 ...

Страница 278: ...ck pattern and examine the pattern If problem is not resolved after performing print head cleaning twice Perform print head deep cleaning If problem is not resolved after performing print head deep cleaning Perform system cleaning For Windows Cleaning the Print Heads For Mac OS Cleaning the Print Heads If the problem is not resolved yet the print head may be damaged Contact your nearest Canon serv...

Страница 279: ...ing paper with one printable surface make sure paper is loaded with printable side facing up Printing on the wrong side of such paper may cause unclear prints or prints with reduced quality Load paper with the printable side facing up Refer to the instruction manual supplied with the paper for detailed information on the printable side 279 ...

Страница 280: ...ng If problem is not resolved after performing print head deep cleaning Perform system cleaning For Windows Cleaning the Print Heads For Mac OS Cleaning the Print Heads If the problem is not resolved yet the print head may be damaged Contact your nearest Canon service center to request a repair Important Do not tilt the printer when moving it since the ink may leak out When transporting the printe...

Страница 281: ...s due to basic differences in the methods used to produce colors Color control settings and environmental differences can also affect how colors appear on the screen Therefore colors of printing results may be different from those on the screen 281 ...

Страница 282: ...If printed lines are misaligned or print results are otherwise unsatisfactory adjust the print head position For Windows Aligning the Print Head Position For Mac OS Aligning the Print Head Position Check3 Increase print quality and try printing again Increasing the print quality using the printer driver may improve the print result 282 ...

Страница 283: ...ut Printing or Binding margin function is in use thin lines may not be printed Try thickening the lines in the document Check2 Is print data extremely large Click Print Options on Page Setup sheet of the printer driver Then set Prevention of Print Data Loss to On in the dialog that appears This may reduce print quality 283 ...

Страница 284: ...ay be improved Click Print Options on Page Setup sheet of the printer driver Select Do not allow application software to compress print data check box and click OK Clear the check box once printing is complete Check2 Is print data extremely large Click Print Options on Page Setup sheet of the printer driver Then set Prevention of Print Data Loss to On in the dialog that appears This may reduce pri...

Страница 285: ...etting on plain paper the paper may absorb too much ink and become wavy causing paper abrasion Check the intensity setting in the printer driver For Windows Adjusting Intensity For Mac OS Adjusting Intensity Check3 Use Photo Paper to print photos To print data with high color saturation such as photographs or images with dark colors we recommend that you use Photo Paper Plus Glossy II or other Can...

Страница 286: ...t quality may be reduced at the top and bottom edges of the paper Printing Area Check3 Correct curl before loading paper When using Photo Paper Plus Semi gloss even if the sheet is curled load one sheet at a time as it is Rolling this paper in the opposite direction to flatten it may crack the paper surface and reduce the print quality We recommend putting unused paper back into the package and st...

Страница 287: ...t printer to prevent paper abrasion Adjusting the setting to prevent paper abrasion will widen the clearance between the print head and the paper If you notice abrasion even with the media type set correctly to match the paper set the printer to prevent paper abrasion on the computer This may reduce the print speed Once you have finished printing undo this setting Otherwise it will apply to subseq...

Страница 288: ... Feed Rollers For Mac OS Cleaning the Paper Feed Rollers Note Cleaning the paper feed roller abrades it so do this only when necessary Check8 Is inside of printer dirty During duplex printing ink may stain the inside of the printer smudging the printout Perform the bottom plate cleaning to clean the inside of the printer Cleaning the Inside of the Printer Bottom Plate Cleaning Note To prevent stai...

Страница 289: ... turned on 2 Open Canon IJ Printer Utility Opening the Canon IJ Printer Utility 3 Select Custom Settings in pop up menu 4 Drag Ink Drying Wait Time slide bar to set wait time and click Apply 5 Check message and click OK 289 ...

Страница 290: ...ity settings Print Results Are Unsatisfactory Check2 Perform bottom plate cleaning to clean inside of printer Cleaning the Inside of the Printer Bottom Plate Cleaning Note During duplex printing or too much printing ink may stain the inside of the printer 290 ...

Страница 291: ...er size to match the loaded paper Print Results Are Unsatisfactory Note The direction of the vertical line pattern may vary depending on the image data or the print setting This printer performs automatic cleaning when necessary to keep printouts clean Although the ink is normally ejected onto the ink absorber at the outer edge of the paper it may get onto the paper if the loaded paper is larger t...

Страница 292: ... ink ejects properly from the print head nozzles For details on printing the nozzle check pattern print head cleaning and print head deep cleaning see If Printing Is Faint or Uneven If nozzle check pattern is not printed correctly After performing the print head cleaning print the nozzle check pattern and examine the pattern If problem is not resolved after performing print head cleaning twice Per...

Страница 293: ... be damaged Contact your nearest Canon service center to request a repair Important Do not tilt the printer when moving it since the ink may leak out When transporting the printer for repairing it see Repairing Your Printer Check3 Perform print head alignment For Windows Aligning the Print Head Position For Mac OS Aligning the Print Head Position 293 ...

Страница 294: ...int head cleaning print the nozzle check pattern and examine the pattern If problem is not resolved after performing print head cleaning twice Perform print head deep cleaning If problem is not resolved after performing print head deep cleaning Perform system cleaning For Windows Cleaning the Print Heads For Mac OS Cleaning the Print Heads If the problem is not resolved yet the print head may be d...

Страница 295: ... load limit Always load the paper in portrait orientation regardless of the printing orientation When you load the paper place the print side facing UP and slide the paper guides to align with both sides of the paper Loading Paper Check3 Is paper too thick or curled Media Types You Cannot Use Check4 When loading envelopes consider the following When printing on envelopes see Loading Paper and prep...

Страница 296: ...eed roller For Windows Cleaning the Paper Feed Rollers For Mac OS Cleaning the Paper Feed Rollers Note Cleaning the paper feed roller abrades it so do this only when necessary If the measures above do not solve the problem contact your nearest Canon service center to request a repair Important Do not tilt the printer when moving it since the ink may leak out When transporting the printer for repai...

Страница 297: ...mplete Note If you are printing a document with a large printing area or printing several copies printing may pause to allow the ink to dry Check3 Has printer been printing continuously for a long period If the printer has been printing continuously for a long time the print head or other parts around it may overheat The printer may stop printing at a line break for a period of time and then resum...

Страница 298: ...Mechanical Problems Power Does Not Come On Power Shuts Off By Itself Cannot Connect to Computer Properly Printer Status Monitor Not Displayed Windows 298 ...

Страница 299: ...nplug printer leave it for at least 2 minutes and then plug it back in and turn it on again If this does not solve the problem contact your nearest Canon service center to request a repair Important Do not tilt the printer when moving it since the ink may leak out When transporting the printer for repairing it see Repairing Your Printer 299 ...

Страница 300: ...hat time has elapsed If you are using a Windows and if you do not want the printer to turn off automatically Open the printer driver setup window and in Auto Power in Maintenance sheet select Disable for Auto Power Off If you are using a Mac OS and if you do not want the printer to turn off automatically Open Canon IJ Printer Utility select Power Settings in the pop up menu and then select Disable...

Страница 301: ... Speed USB connection Does the USB port on your computer support Hi Speed USB connection Does the USB cable or the USB hub support Hi Speed USB connection Be sure to use a certified Hi Speed USB cable We recommend that the USB cable be no longer than 10 feet 3 meters or so Does the operating system of your computer support Hi Speed USB connection Install the latest update for your computer Is the ...

Страница 302: ...e sure Enable Status Monitor is selected on the Option menu of the printer status monitor 1 Open printer driver setup window How to Open the Printer Driver Setup Window 2 On Maintenance sheet click View Printer Status 3 Select Enable Status Monitor on Option menu if it is not selected 302 ...

Страница 303: ...Installation and Download Problems Cannot Install Printer Driver Easy WebPrint EX Does Not Start or Easy WebPrint EX Menu Does Not Appear Windows 303 ...

Страница 304: ... In Windows XP click Start and then click My Computer 2 Double click CD ROM icon in the window that appears If the contents of the CD ROM appear double click MSETUP4 EXE If you cannot install the printer driver with the Setup CD ROM install them from the Canon website Note If the CD ROM icon does not appear try the following Remove the CD ROM from your computer and reinsert it Restart your compute...

Страница 305: ...nd then reinstall the printer driver Deleting the Unnecessary Printer Driver Reinstall the printer driver with the Setup CD ROM or install them from the Canon website Note If the installer was stopped due to a Windows error Windows operation may be unstable and you may not be able to install the drivers Restart your computer and then reinstall the drivers For Mac OS Download the driver from the su...

Страница 306: ...ll it may appear in the notification area on the desktop Click the message and follow the instructions to install Easy WebPrint EX Internet access is required to install or download Easy WebPrint EX Check2 Is Canon Easy WebPrint EX selected on Toolbars menu in Internet Explorer s View menu If Canon Easy WebPrint EX is not selected Easy WebPrint EX is disabled Select Canon Easy WebPrint EX to enabl...

Страница 307: ...Errors and Messages An Error Occurs Message Appears 307 ...

Страница 308: ...Support Code 2 flashes Printer is out of paper or paper does not feed 1000 3 flashes Paper is jammed in paper output slot or in rear tray 1300 4 flashes Cartridge is not installed properly 1470 5 flashes Print head may be damaged 1403 Cartridge cannot be recognized 1471 Appropriate cartridge is not installed 1476 7 flashes Cartridge is not installed in correct position 1474 More than one cartridge...

Страница 309: ...or has occurred 5B00 5B01 10 flashes An error requiring a repair has occurred B202 B203 B204 B205 Other cases than above Printer error has occurred 5200 5400 5700 6800 6801 6930 6931 6932 6933 6936 6937 6938 6940 6941 6942 6943 6944 6945 6946 When a Support Code and a Message Are Displayed on Computer Screen For Windows For Mac OS 309 ...

Страница 310: ...ffers depending on the OS you are using Note You can also search for details on resolving the errors indicated by the support code shown Search To resolve errors that do not have support codes see Message Appears 310 ...

Страница 311: ... click OK The printer starts printing See Notice for Unplugging the Power Cord for unplugging the power cord Writing Error Output Error Communication Error Windows Check1 If POWER lamp is off make sure printer is plugged in and turn it on The POWER lamp flashes while the printer is initializing Wait until the POWER lamp stops flashing and remains lit Check2 Make sure correct printer port is set in...

Страница 312: ...ur printer s name If the problem is not resolved reinstall the printer driver from the Setup CD ROM or the Canon website Check3 Make sure USB cable is securely plugged in to printer and computer When the printer is connected to your computer with a USB cable check the following If you are using a relay device such as a USB hub disconnect it connect the printer directly to the computer and retry th...

Страница 313: ... insufficient memory Close other applications to increase the available memory If you still cannot print restart your computer and retry the printing Printer driver could not be found Uninstall the printer driver following the procedure described in Deleting the Unnecessary Printer Driver and reinstall them from the Setup CD ROM or the Canon website Could not print Application name File name Try p...

Страница 314: ...e of the next survey To send the information automatically see Changing confirmation screen setting If you do not agree to participate in survey program Click Do not agree The confirmation screen closes and the survey is skipped The confirmation screen will reappear one month later To uninstall Inkjet Printer Scanner Fax Extended Survey Program To uninstall the Inkjet Printer Scanner Fax Extended ...

Страница 315: ...appear at the time of the next survey If you select No the information will be sent automatically Note If you select Uninstall or Remove in Windows XP the Inkjet Printer Scanner Fax Extended Survey Program is uninstalled Follow the on screen instructions Inkjet Printer Scanner Fax Extended Survey Program Icon Appears Mac OS If the Inkjet Printer Scanner Fax Extended Survey Program is installed the...

Страница 316: ... next survey If you do not agree to participate in survey program Click Do not agree The confirmation screen closes and the survey is skipped The confirmation screen will reappear one month later To stop sending information Click Turn off This stops the Inkjet Printer Scanner Fax Extended Survey Program and information is not sent To resume the survey see Changing setting To uninstall Inkjet Print...

Страница 317: ...r Fax Extended Survey Program icon Do not display the confirmation screen when information is sent If the check box is selected the information will be sent automatically If the check box is not selected Inkjet Printer Scanner Fax Extended Survey Program icon will appear in the Dock at the time of the next survey Click the icon and follow the on screen instructions Turn off Turn on button Click th...

Страница 318: ...ound smoke or odor turn it off immediately Unplug the printer and contact the seller you bought it from or your nearest Canon service center Never attempt to repair or disassemble the printer yourself If you attempt to repair or take apart the printer your warranty will be invalidated even if it has not expired Before contacting the service center note the following Product name Your printer s nam...

Страница 319: ...that ink does not leak When a shipping agent is handling transport of the printer have its box marked THIS SIDE UP to keep the printer with its bottom facing down Mark also with FRAGILE or HANDLE WITH CARE 1 Make sure printer is turned on If the printer cannot be turned on unplug it and go to step 4 2 If an error has occurred press printer s RESUME CANCEL button After the Alarm lamp is turned off ...

Страница 320: ...nplug the printer cable from the computer and from the printer then unplug the power cord from the printer 8 Use adhesive tape to secure all the covers on the printer to keep them from opening during transportation Then pack the printer in the plastic bag 9 Attach the protective material to the printer when packing the printer in the box 320 ...

Страница 321: ...r screen and take the appropriate action in response Support Code Appears on Computer Screen 1000 to 1ZZZ 1000 1200 1300 1403 1470 1471 1472 1473 1474 1475 1476 1640 1700 1701 1890 5000 to 5ZZZ 5100 5200 5400 5700 5B00 5B01 6000 to 6ZZZ 6000 6800 6801 6930 6931 6932 6933 6936 6937 6938 6940 6941 6942 6943 6944 6945 6946 A000 to ZZZZ B202 B203 B204 B205 For paper jam support codes see also List of ...

Страница 322: ...e appropriate procedure as shown below If you can see the jammed paper at the paper output slot or the rear tray 1300 If the paper tears and you cannot remove it from the paper output slot or from the rear tray Paper Is Jammed inside Printer Cases other than above Other Cases 322 ...

Страница 323: ...rinting before you turn off the printer If the paper tears and you cannot remove the jammed paper from the paper output slot or the rear tray remove the paper from inside the printer Paper Is Jammed inside Printer 2 Reload paper and press printer s RESUME CANCEL button The printer resumes printing Reprint the page you were printing if it was not printed properly due to the paper jam If you turned ...

Страница 324: ...er to remove it press the RESUME CANCEL button to stop the printing before you turn off the printer 1 Turn off printer and unplug it 2 Open top cover Important Do not touch clear film A white belt B or tubes C 3 Check if jammed paper is under cartridge holder If the jammed paper is under the cartridge holder move the cartridge holder to the far right or left whichever makes it easier to remove the...

Страница 325: ...4 Hold jammed paper firmly in both hands If the paper is rolled up pull out it 5 Slowly pull out paper so as not to tear it 325 ...

Страница 326: ...he printer 7 Close top cover All jobs in the print queue are canceled Redo the printing Note When reloading the paper make sure you are using suitable paper and loading it correctly If a paper jam message appears on your computer screen when you resume printing after removing all the jammed paper there may be some paper still inside the printer Check the printer again for any remaining bits of pap...

Страница 327: ...Important Do not tilt the printer when moving it since the ink may leak out When transporting the printer for repairing it see Repairing Your Printer 327 ...

Страница 328: ...gn objects in rear tray If there are any foreign objects in the rear tray be sure to turn off the printer unplug it and then remove the foreign object Important Do not tilt the printer or do not it upside down Doing so may cause the ink to leak Check3 Is paper curled Correct curl before loading paper 328 ...

Страница 329: ... rear tray Paper is not loaded properly What to Do Take the corresponding actions below Load paper in the rear tray Align the paper guides with the both edges of the paper when you load paper After carrying out the above measures press the printer s RESUME CANCEL button 329 ...

Страница 330: ...1200 Cause Top cover is open What to Do Close the top cover and wait for a while Do not close it while you are refilling an ink tank 330 ...

Страница 331: ...maged What to Do Contact your nearest Canon service center to request a repair Important Do not tilt the printer when moving it since the ink may leak out When transporting the printer for repairing it see Repairing Your Printer 331 ...

Страница 332: ...at to Do Open the top cover and then push the cartridge locking cover to make sure the cartridges are installed properly Alternatively push the joint button Important Remove the labels of the cartridge to install it After that close the top cover 332 ...

Страница 333: ...What to Do Printing cannot be executed because the cartridge may not be installed properly or may not be compatible with this printer Install the appropriate cartridge If you want to cancel printing press the printer s RESUME CANCEL button 333 ...

Страница 334: ...What to Do Printing cannot be executed because the cartridge may not be installed properly or may not be compatible with this printer Install the appropriate cartridge If you want to cancel printing press the printer s RESUME CANCEL button 334 ...

Страница 335: ...What to Do Printing cannot be executed because the cartridge may not be installed properly or may not be compatible with this printer Install the appropriate cartridge If you want to cancel printing press the printer s RESUME CANCEL button 335 ...

Страница 336: ...ot installed in correct position What to Do Make sure each cartridge is installed in the correct position If printing is in progress press the printer s RESUME CANCEL button to cancel printing and then install the cartridge 336 ...

Страница 337: ...1475 Cause More than one cartridge of the same color is installed What to Do Install the cartridge in the correct position 337 ...

Страница 338: ...ridge is not installed What to Do Printing cannot be executed because the cartridge is not compatible with this printer Install the appropriate cartridge If you want to cancel printing press the printer s RESUME CANCEL button 338 ...

Страница 339: ...nk level is below the lower limit line the printer may consume a certain amount of ink to return to printable status and may also become damaged To continue printing press the printer s RESUME button After this operation the remaining ink level notification function will not operate To reuse this function refill each color of ink to the upper limit line shown on the ink tank and press the printer ...

Страница 340: ...nter s RESUME CANCEL button to continue printing Contact your nearest Canon service center to request a repair Important Do not tilt the printer when moving it since the ink may leak out When transporting the printer for repairing it see Repairing Your Printer 340 ...

Страница 341: ...nter s RESUME CANCEL button to continue printing Contact your nearest Canon service center to request a repair Important Do not tilt the printer when moving it since the ink may leak out When transporting the printer for repairing it see Repairing Your Printer 341 ...

Страница 342: ... removed from the cartridge holder If the protective material or tape is still there remove it and close the top cover If this does not solve the problem contact your nearest Canon service center to request a repair Important Do not tilt the printer when moving it since the ink may leak out When transporting the printer for repairing it see Repairing Your Printer 342 ...

Страница 343: ... cartridges are properly installed Turn the printer back on If this does not solve the problem contact your nearest Canon service center to request a repair Important When clearing an impediment to cartridge holder motion be careful not to touch clear film A white belt B or tubes C Do not tilt the printer when moving it since the ink may leak out When transporting the printer for repairing it see ...

Страница 344: ... it back on If the ink tank is refilled because it runs out of ink perform system cleaning For Windows Cleaning the Print Heads For Mac OS Cleaning the Print Heads If this does not solve the problem contact your nearest Canon service center to request a repair Important Do not tilt the printer when moving it since the ink may leak out When transporting the printer for repairing it see Repairing Yo...

Страница 345: ...in the printer again and turn it back on If this does not solve the problem contact your nearest Canon service center to request a repair Important Do not tilt the printer when moving it since the ink may leak out When transporting the printer for repairing it see Repairing Your Printer 345 ...

Страница 346: ...in the printer again and turn it back on If this does not solve the problem contact your nearest Canon service center to request a repair Important Do not tilt the printer when moving it since the ink may leak out When transporting the printer for repairing it see Repairing Your Printer 346 ...

Страница 347: ...curred What to Do Contact your nearest Canon service center to request a repair Important Do not tilt the printer when moving it since the ink may leak out When transporting the printer for repairing it see Repairing Your Printer 347 ...

Страница 348: ...curred What to Do Contact your nearest Canon service center to request a repair Important Do not tilt the printer when moving it since the ink may leak out When transporting the printer for repairing it see Repairing Your Printer 348 ...

Страница 349: ...in the printer again and turn it back on If this does not solve the problem contact your nearest Canon service center to request a repair Important Do not tilt the printer when moving it since the ink may leak out When transporting the printer for repairing it see Repairing Your Printer 349 ...

Страница 350: ...in the printer again and turn it back on If this does not solve the problem contact your nearest Canon service center to request a repair Important Do not tilt the printer when moving it since the ink may leak out When transporting the printer for repairing it see Repairing Your Printer 350 ...

Страница 351: ...in the printer again and turn it back on If this does not solve the problem contact your nearest Canon service center to request a repair Important Do not tilt the printer when moving it since the ink may leak out When transporting the printer for repairing it see Repairing Your Printer 351 ...

Страница 352: ...in the printer again and turn it back on If this does not solve the problem contact your nearest Canon service center to request a repair Important Do not tilt the printer when moving it since the ink may leak out When transporting the printer for repairing it see Repairing Your Printer 352 ...

Страница 353: ...in the printer again and turn it back on If this does not solve the problem contact your nearest Canon service center to request a repair Important Do not tilt the printer when moving it since the ink may leak out When transporting the printer for repairing it see Repairing Your Printer 353 ...

Страница 354: ...in the printer again and turn it back on If this does not solve the problem contact your nearest Canon service center to request a repair Important Do not tilt the printer when moving it since the ink may leak out When transporting the printer for repairing it see Repairing Your Printer 354 ...

Страница 355: ...in the printer again and turn it back on If this does not solve the problem contact your nearest Canon service center to request a repair Important Do not tilt the printer when moving it since the ink may leak out When transporting the printer for repairing it see Repairing Your Printer 355 ...

Страница 356: ...in the printer again and turn it back on If this does not solve the problem contact your nearest Canon service center to request a repair Important Do not tilt the printer when moving it since the ink may leak out When transporting the printer for repairing it see Repairing Your Printer 356 ...

Страница 357: ...in the printer again and turn it back on If this does not solve the problem contact your nearest Canon service center to request a repair Important Do not tilt the printer when moving it since the ink may leak out When transporting the printer for repairing it see Repairing Your Printer 357 ...

Страница 358: ...in the printer again and turn it back on If this does not solve the problem contact your nearest Canon service center to request a repair Important Do not tilt the printer when moving it since the ink may leak out When transporting the printer for repairing it see Repairing Your Printer 358 ...

Страница 359: ...in the printer again and turn it back on If this does not solve the problem contact your nearest Canon service center to request a repair Important Do not tilt the printer when moving it since the ink may leak out When transporting the printer for repairing it see Repairing Your Printer 359 ...

Страница 360: ...in the printer again and turn it back on If this does not solve the problem contact your nearest Canon service center to request a repair Important Do not tilt the printer when moving it since the ink may leak out When transporting the printer for repairing it see Repairing Your Printer 360 ...

Страница 361: ...in the printer again and turn it back on If this does not solve the problem contact your nearest Canon service center to request a repair Important Do not tilt the printer when moving it since the ink may leak out When transporting the printer for repairing it see Repairing Your Printer 361 ...

Страница 362: ...in the printer again and turn it back on If this does not solve the problem contact your nearest Canon service center to request a repair Important Do not tilt the printer when moving it since the ink may leak out When transporting the printer for repairing it see Repairing Your Printer 362 ...

Страница 363: ...in the printer again and turn it back on If this does not solve the problem contact your nearest Canon service center to request a repair Important Do not tilt the printer when moving it since the ink may leak out When transporting the printer for repairing it see Repairing Your Printer 363 ...

Страница 364: ...in the printer again and turn it back on If this does not solve the problem contact your nearest Canon service center to request a repair Important Do not tilt the printer when moving it since the ink may leak out When transporting the printer for repairing it see Repairing Your Printer 364 ...

Страница 365: ...in the printer again and turn it back on If this does not solve the problem contact your nearest Canon service center to request a repair Important Do not tilt the printer when moving it since the ink may leak out When transporting the printer for repairing it see Repairing Your Printer 365 ...

Страница 366: ... to Do Turn off the printer and unplug it Contact your nearest Canon service center to request a repair Important Do not tilt the printer when moving it since the ink may leak out When transporting the printer for repairing it see Repairing Your Printer 366 ...

Страница 367: ... to Do Turn off the printer and unplug it Contact your nearest Canon service center to request a repair Important Do not tilt the printer when moving it since the ink may leak out When transporting the printer for repairing it see Repairing Your Printer 367 ...

Страница 368: ... to Do Turn off the printer and unplug it Contact your nearest Canon service center to request a repair Important Do not tilt the printer when moving it since the ink may leak out When transporting the printer for repairing it see Repairing Your Printer 368 ...

Страница 369: ... to Do Turn off the printer and unplug it Contact your nearest Canon service center to request a repair Important Do not tilt the printer when moving it since the ink may leak out When transporting the printer for repairing it see Repairing Your Printer 369 ...

Отзывы: