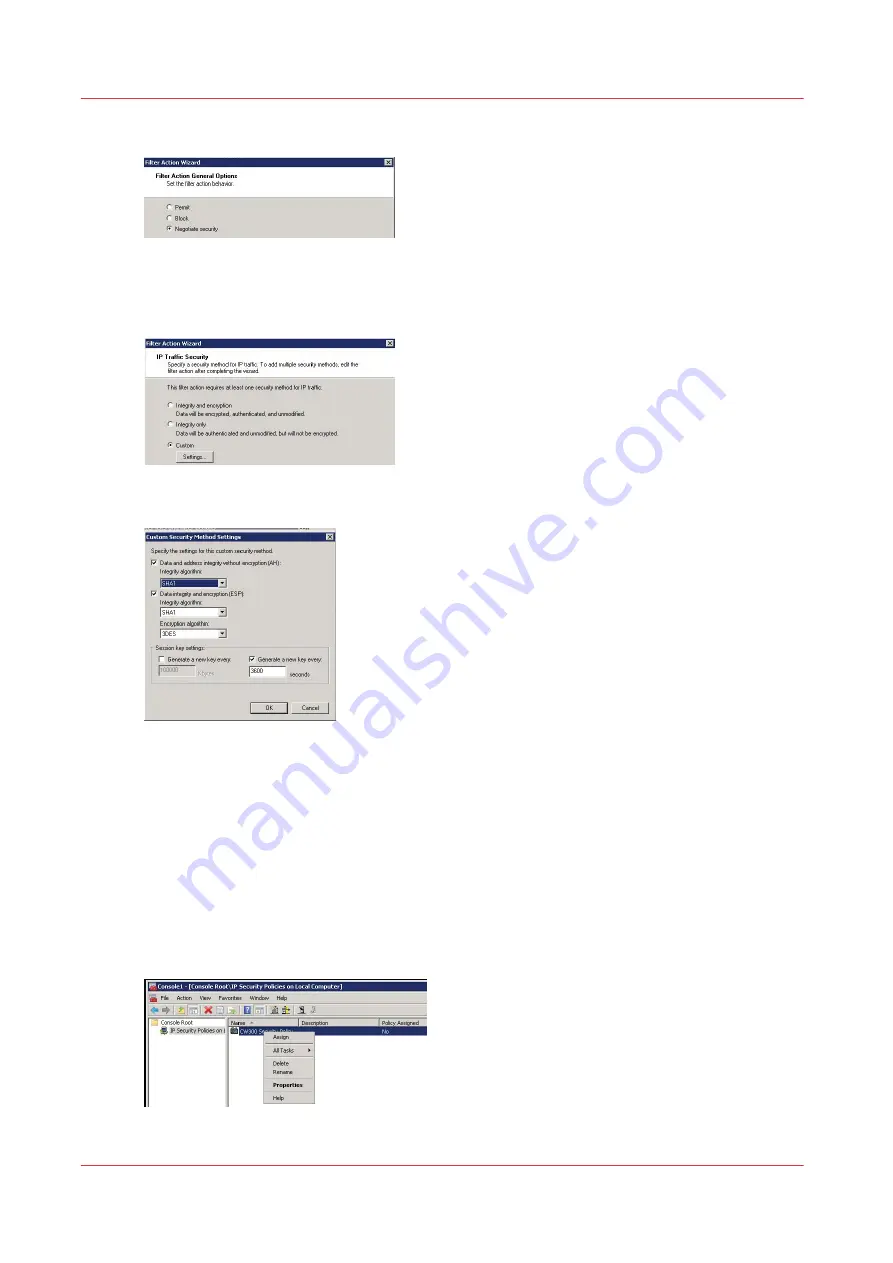
4.
Select 'Negotiate security' and click 'Next'
5.
Select 'Allow unsecured communication if a secure connection cannot be established' or 'Fall
back to unsecured communication' (depending on the Operating System) and click 'Next'
6.
Select 'Custom' and click on the 'Settings...' button
7.
Configure the settings as below
'Data and address integrity without encryption (AH)' setting is not mandatory.
8.
Click 'OK' and 'Next', then 'Finish'
Define the security rule
Procedure
1.
In the console, right click on the IP security policy just created and select 'Properties' to open the
wizard
(On Windows 7, a new window opens: check that "Use Add Wizard" is checked, then click on
"Add")
Define the security rule
360
Chapter 6 - Security on Océ ColorWave 500 and Océ ColorWave 700
Содержание Oce PlotWave 750
Страница 1: ...Administration guide PlotWave ColorWave Systems Security information ...
Страница 8: ...Contents 8 ...
Страница 9: ...Chapter 1 Océ Security policy ...
Страница 18: ...Overview of the security features available per Océ System 18 Chapter 1 Océ Security policy ...
Страница 19: ...Chapter 2 Security on Océ PlotWave 300 350 PlotWave 750 PlotWave 900 and ColorWave 300 ...
Страница 97: ...Chapter 3 Security on Océ PlotWave 500 and PlotWave 340 360 ...
Страница 147: ...Chapter 4 Security on Océ PlotWave 345 365 and Océ PlotWave 450 550 ...
Страница 235: ...Chapter 5 Security on Océ ColorWave 550 600 650 and Poster Printer ...
Страница 299: ...Chapter 6 Security on Océ ColorWave 500 and Océ ColorWave 700 ...
Страница 382: ...Smart Inbox management and job management 382 Chapter 6 Security on Océ ColorWave 500 and Océ ColorWave 700 ...
Страница 383: ...Chapter 7 Security on Océ ColorWave 810 Océ ColorWave 900 and Océ ColorWave 910 ...
Страница 409: ......


