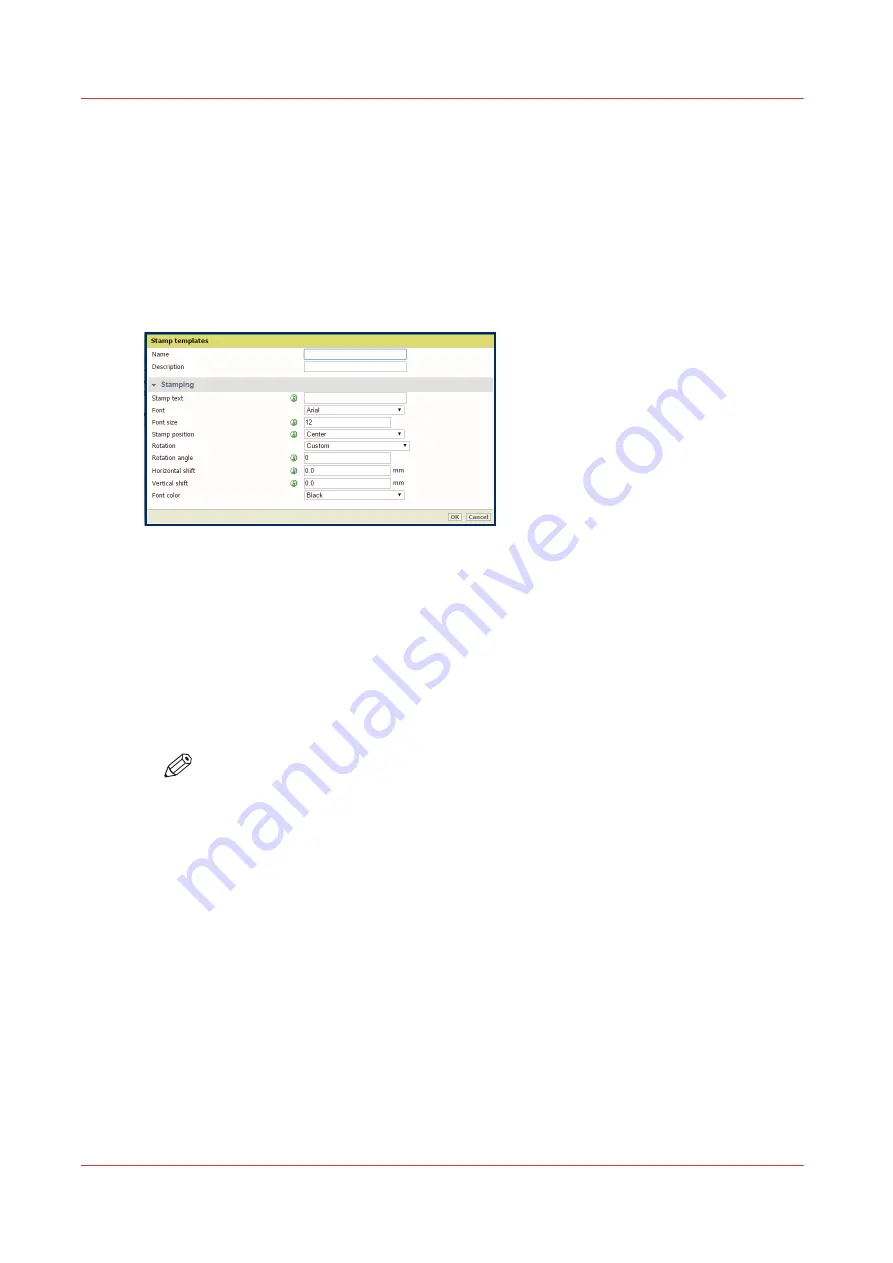
Create a stamp
Introduction
In the custom preset section of the [Copy job defaults] in Océ Express WebTools you can enable
the stamp functionality. Under the [Stamping] tab you can create your own predefined stamp.
Procedure
1.
Open the [Preferences] - [Stamping] tab.
2.
Click on [Create new] in the upper right hand corner .
3.
Enter a [Name] recognizable for the user.
4.
Enter a [Description] of the stamp.
5.
Enter the [Stamp text] that will appear on the stamp. If you insert text, also choose the [Font] and
the [Font size].
6.
Choose the [Stamp position] on the original.
7.
Choose the [Rotation] and the [Rotation angle], when you want to turn the stamp on the original.
8.
Enter the [Horizontal shift] and [Vertical shift] in mm, to specify the position you have chosen at
step 5.
9.
Select the [Font color].
NOTE
Most settings are optional, so you do not have to enter all settings if it is not necessary.
Result
Your stamp is created. You can now enable your stamp under [Preferences] - [Copy job defaults] -
[Custom image preset for copy] - [Stamping] to use it on the user panel.
Define the custom copy preset on page 92
Create a stamp
96
Chapter 3 - Define your Workflow with Océ Express WebTools
Содержание Oce PlotWave 450
Страница 1: ...Operation guide Océ PlotWave 450 550 ...
Страница 4: ......
Страница 10: ...Contents 10 ...
Страница 11: ...Chapter 1 Introduction ...
Страница 16: ...Available documentation 16 Chapter 1 Introduction ...
Страница 17: ...Chapter 2 Get to Know the Printing System ...
Страница 43: ...Chapter 3 Define your Workflow with Océ Express WebTools ...
Страница 142: ...Connect your mobile device to Océ Mobile WebTools 142 Chapter 3 Define your Workflow with Océ Express WebTools ...
Страница 143: ...Chapter 4 Use the Printing System ...
Страница 214: ...Clear the system 214 Chapter 4 Use the Printing System ...
Страница 215: ...Chapter 5 Use the Folder ...
Страница 226: ...Adjust the side guides of the belt 226 Chapter 5 Use the Folder ...
Страница 227: ...Chapter 6 Maintain the Printing System ...
Страница 245: ...Media types Chapter 6 Maintain the Printing System 245 ...
Страница 267: ...Chapter 7 License Management ...
Страница 273: ...Chapter 8 Account Management ...
Страница 280: ...Workflow on the printer 280 Chapter 8 Account Management ...
Страница 281: ...Chapter 9 Solve Problems ...
Страница 308: ...Print the print density chart 308 Chapter 9 Solve Problems ...
Страница 309: ...Chapter 10 Support ...
Страница 317: ...Chapter 11 Contact ...
Страница 329: ......


