

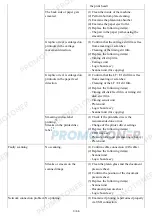


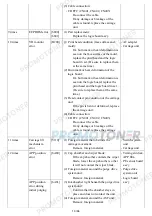


the print head)
The back side of paper gets
smeared.
(1) Clean the inside of the machine.
(2) Perform bottom plate cleaning.
(3) Examine the platen ink absorber.
(4) Examine the paper eject roller.
(5) Replace the following item(s):
- The part in the paper path causing the
smearing
Graphic or text is enlarged on
printouts in the carriage
movement direction.
(1) Confirm that the carriage slit film is free
from smearing or scratches:
- Cleaning of the timing slit film.
(2) Replace the following item(s):
- Timing slit strip film
- Carriage unit
- Logic board ass'y
- Scanner unit (for copying)
Graphic or text is enlarged on
printouts in the paper feed
direction.
(1) Confirm that the LF / EJ slit film is free
from smearing or scratches:
- Cleaning of the LF / EJ slit film.
(2) Replace the following item(s):
- Timing slit disk feed film, or timing slit
disk eject film
- Timing sensor unit
- Platen unit
- Logic board ass'y
- Scanner unit (for copying)
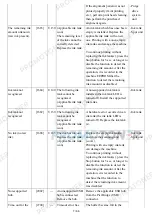
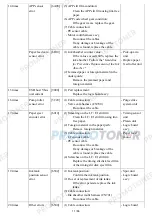
Smearing in disc label
printing
*2
.
Streaks on the printed disc
label
*2
.
(1) Check if the printable disc is the
recommended one or not:
- Change of the printer driver settings
(2) Replace the following item(s):
- CDR tray ass'y
- Pressure roller unit (if smearing is heavy)
- Platen unit
Faulty scanning
No scanning.
(1) Confirm cable connection (CIS cable).
(2) Replace the following item(s):
- Scanner unit
- Logic board ass'y
Streaks or smears on the
scanned image.
(1) Clean the platen glass and the document
pressure sheet.
(2) Confirm the position of the document
pressure sheet.
(3) Replace the following item(s):
- Scanner unit
- Document pressure sheet
- Logic board ass'y
Network connection problem No printing.
(1) Examine if printing is performed properly
via USB connection.
3 / 66
Содержание MG6110
Страница 24: ...5 Remove the main case no screws 20 66...
Страница 27: ...In reassembling attach the new protection sheet as it is over the remaining portions of the sheet 23 66...
Страница 36: ...3 Attach the cassette feed guide 4 Install the cassette feed roller unit 32 66...
Страница 44: ...4 Slowly lift the print unit to separate it from the bottom case 40 66...
Страница 58: ...54 66...
Страница 63: ...4 2 Integrated Inspection Pattern Print Print sample 59 66...
Страница 64: ...4 3 Ink Absorber Counter Value Print Print sample 4 VERIFICATION AFTER REPAIR 60 66...
Страница 68: ...64 66...