
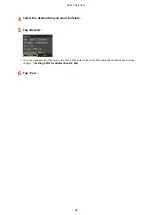


Entering Sleep Mode
0Y9U-01E
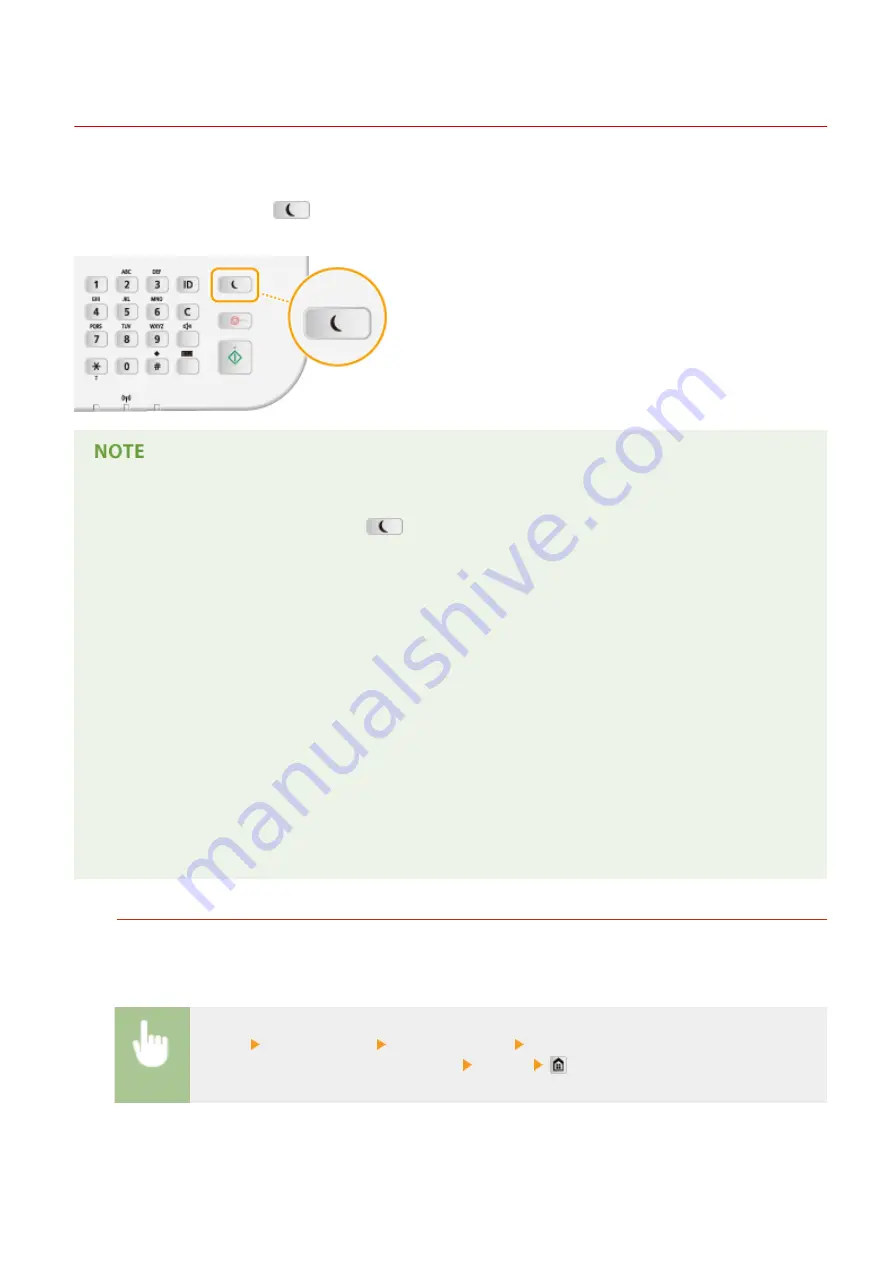
The sleep mode function reduces the amount of power consumed by the machine by disabling power flow to the
operation panel. If no operations will be performed on the machine for a while, such as during a lunch break, you can
save power simply by pressing
on the operation panel. You can also use the Auto Sleep Time setting to
automatically put the machine into sleep mode if it remains idle for a specified length of time.
When in sleep mode
●
When the machine enters sleep mode,
lights up yellow green.
Situations in which the machine does not enter sleep mode
●
When the machine is in operation
●
When the Processing/Data indicator is lit up or blinking
●
When the machine is performing an operation such as adjustment or cleaning
●
When a paper jam occurs
●
When the receiver of the external telephone or the optional handset is off the hook
●
When the menu screen is displayed
●
When a job is waiting to be scanned to a USB memory device or to a computer
●
When an error message is displayed on the screen (There are some exceptions. The machine sometimes
enters sleep mode when error messages are displayed.)
●
When the machine is communicating with an LDAP server, etc.
●
When the SSID/network key screen for Direct Connection is displayed
●
When settings data is being imported/exported
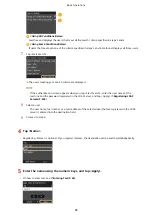
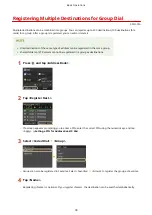
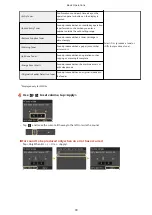
When You Want to Set the Auto Sleep Timer
The factory default settings for the amount of time that elapses before the machine enters auto sleep mode is 3
minutes (the user setting range is 3 to 60 minutes). We recommend using the factory default settings to save
the most power. If you want to change the amount of time that elapses before the machine enters auto sleep
mode, follow the procedure below.
<Menu> <Timer Settings> <Auto Sleep Time> Set the amount of time that elapses before the
machine automatically enters sleep mode <Apply>
Basic Operations
100
Содержание MF515 Series
Страница 1: ...MF515x MF512x User s Guide USRMA 0856 00 2016 04 en Copyright CANON INC 2016...
Страница 30: ...Power socket Connect the power cord Basic Operations 21...
Страница 41: ...LINKS Customizing the Home Screen P 33 Using the Display P 37 Basic Operations 32...
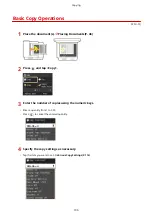
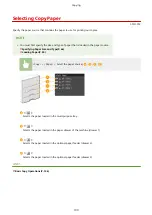
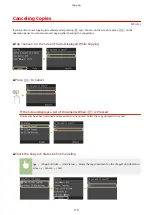
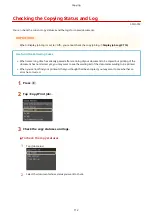
Страница 120: ...LINKS Basic Copy Operations P 106 Checking the Copying Status and Log P 112 Copying 111...
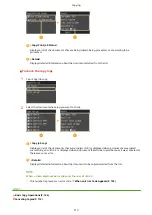
Страница 129: ...LINKS Basic Copy Operations P 106 Adjusting Density P 117 Copying 120...
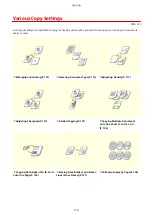
Страница 134: ...2 Sided Copying P 121 Copying 125...
Страница 169: ...LINKS Sending Faxes MF515x P 148 Faxing 160...
Страница 179: ...LINKS Sending Faxes MF515x P 148 Adjusting Density P 167 Faxing 170...
Страница 221: ...Faxing 212...
Страница 241: ...LINKS Checking Status and Log for Sent and Received Documents MF515x P 200 Faxing 232...
Страница 245: ...Using the Machine as a Printer 236...
Страница 270: ...LINKS Printing a Document P 237 Printing Borders P 259 Printing Watermarks P 262 Using the Machine as a Printer 261...
Страница 274: ...LINKS Printing a Document P 237 Using the Machine as a Printer 265...
Страница 284: ...Printing a Document P 237 Various Print Settings P 246 Using the Machine as a Printer 275...
Страница 287: ...LINKS Printing via Secure Print P 279 Using the Machine as a Printer 278...
Страница 297: ...LINKS Printing a Document P 237 Various Print Settings P 246 Using the Machine as a Printer 288...
Страница 357: ...Setting Gamma Values P 360 Using the Machine as a Scanner 348...
Страница 400: ...Can Be Used Conveniently with a Mobile Device 391...
Страница 402: ...4 Click Edit 5 Specify the required settings and click OK Use AirPrint Can Be Used Conveniently with a Mobile Device 393...
Страница 412: ...6 Click Fax Fax sending starts Can Be Used Conveniently with a Mobile Device 403...
Страница 420: ...Monitoring and Controlling the Machine with SNMP 508 Configuring Settings for Device Management Software 513 Network 411...
Страница 437: ...Connecting to a Wireless LAN P 418 Network 428...
Страница 449: ...LINKS Setting IPv6 Addresses P 441 Viewing Network Settings P 445 Configuring WINS P 496 Network 440...
Страница 451: ...4 Click Edit in IPv6 Settings 5 Select the Use IPv6 check box and configure the required settings Network 442...
Страница 461: ...LINKS Configuring Printer Ports P 453 Network 452...
Страница 466: ...3 Click OK 4 Click Close LINKS Setting Up Print Server P 458 Network 457...
Страница 562: ...LINKS Using Google Cloud Print P 405 Security 553...
Страница 566: ...Configuring Basic E Mail Settings P 464 Setting a Shared Folder as a Save Location P 475 Security 557...
Страница 598: ...The machine does not support use of a certificate revocation list CRL Security 589...
Страница 730: ...Troubleshooting 721...
Страница 806: ...4 Install the toner cartridge Fully push it in until it cannot go any further 5 Close the front cover Maintenance 797...
Страница 819: ...Maintenance 810...
Страница 855: ...For more information about this function see Scanning Using an Application P 311 Appendix 846...
Страница 882: ...The installation begins Wait a moment This process may take some time 8 Click Exit 9 Click Next Exit Appendix 873...
Страница 887: ...Appendix 878...
Страница 895: ...Manual Display Settings 0Y9U 0H2 Appendix 886...