background image

165

Adjusting Print Head Position

12

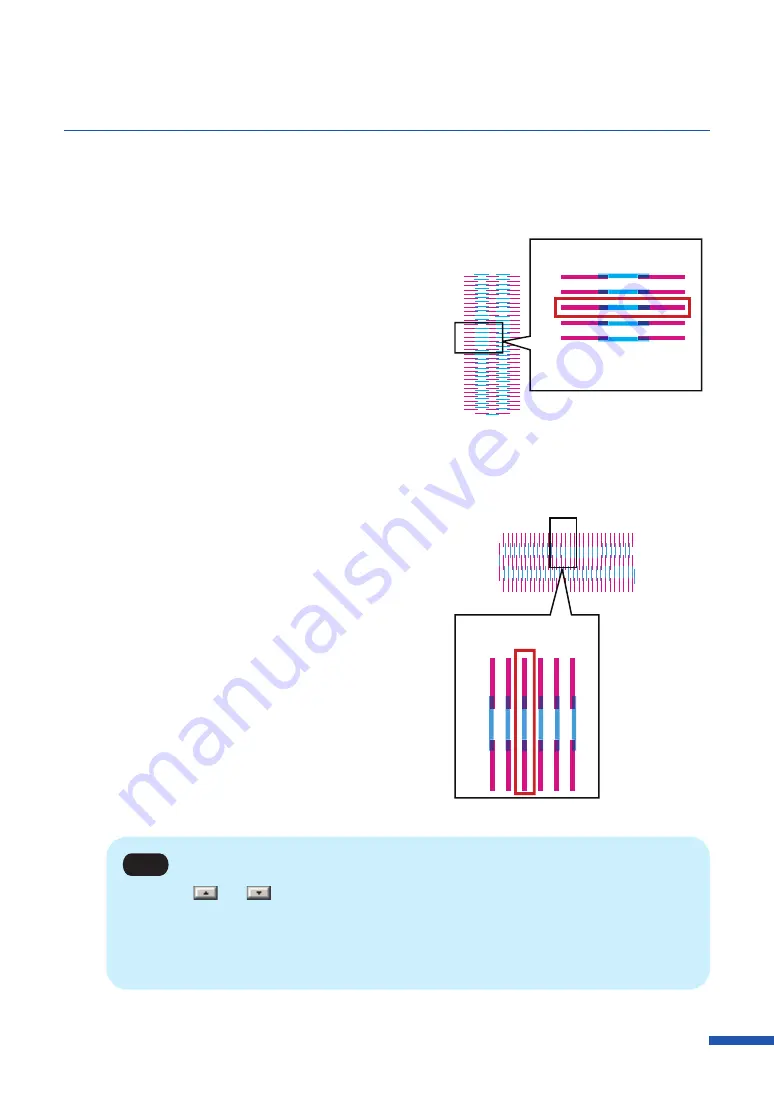
  Adjust the print head position for cyan and yellow.

• Vertical adjustment:

With regard to cyan and yellow, the adjustment 
value is found on the magenta and cyan (or 
yellow) lines which appear to be connected most 
smoothly (without steps).

For example, in the pattern shown on the right, 
the cyan adjustment value is +18.
Click the radio button (C) and then specify the 
vertical adjustment value.

Adjust yellow (D) in the same manner.

-28

-32

-24

-20

-16

-12

-8

-4

+28

+32

+24

+20

+16

+12

+8

+4

0

-20

-16

• Horizontal adjustment:

With regard to cyan and yellow, the adjustment 
value is found on the magenta and cyan (or 
yellow) lines which appear to be connected most 
smoothly (without steps).

For example, in the pattern shown on the right,
the adjustment value is +14.
Click the radio button (Y) and then specify the 
horizontal adjustment value.

Adjust yellow (Z) in the same manner.

+28

+24

+20

+16

+12

+8

+4

0

-28

-24

-20

-16

-12

-8

-4

+12

+16

Note

• Click the 

 and 

 buttons to increase or decrease the current value by one.

•  The vertical adjustment range is from -32 to +32, and the horizontal adjustment range is from 

-30 to +30. However, the adjustment range may be limited depending on the current setting. 

Specify the adjustment value between 

 and 

 shown on the slider scale.

Содержание LX-P5510

Страница 1: ...User s Guide CANON FINETECH NISCA INC 2023 4Y1 8649 010 LX P5510 COLOR LABEL PRINTER LX D5500...

Страница 2: ...dge of Paper 28 Using the Manual Cutter 30 2 How to Print MakingPrints 34 CancelingPrinting 37 CancelingPrint Jobs from the Status Monitor 37 How to Pause Printing 38 3 How to Use the Printer Driver O...

Страница 3: ...Timer Setting 108 Adjusting the Paper Stop Position or Cutting Position 111 Changing the Special Settings 114 Register TOF Level For LX P5510 Only 119 UsingPinpoint Color MatchFunction For LX P5510 O...

Страница 4: ...rectly 221 Status Monitor Does Not Start 222 Improving the Print Quality 222 Paper Is Jammed 225 Request of the print head check Appears on the Screen 229 List of Error Messages WarningMessages 230 Er...

Страница 5: ...improper use of the product be sure to read these indications Note Instructions including notes for operation and additional explanations Indicates an operation that must not be performed Read these i...

Страница 6: ...manual We can accept no responsibility for loss or damages resulting from the use of this printer or its software please accept this before you use the printer Legal Notice Legal Limitations on the Us...

Страница 7: ...Basic Operation This chapter describes basic things to remember before using this product Printer Part Names and Functions 4 Connecting the Printer and Computer 10 Turning the Printer On Off 13 Loadin...

Страница 8: ...r cover Keys necessary for operation and lamps to indicate the state of printer are provided on this panel When using the manual cutter open this cover 3 Ink tank door P 180 8 Maintenance cartridge do...

Страница 9: ...plate 5 USB port P 11 A serial number for identifying the printer is shown on this plate The serial number is required when you contact customer support or require any sort of printer repairs Connect...

Страница 10: ...r unit open lever 6 Maintenance cartridge Opens the upper unit Ink used to clean the print head is collected here 3 Jam release lever 7 Cleaning stick Pull down this lever when paper is jammed Use thi...

Страница 11: ...y feeds the paper backwards The possible back feed length is 300 mm 11 81 inch or less accumulated total When the auto cutter is installed it is 330 mm 12 99 inch or less accumulated total 2 Pause key...

Страница 12: ...ng etc Off Instructions and print data cannot be received from the computer offline mode or Sleep mode 7 Error lamp P 230 Lights when an error occurs Lit An operator call error has occurred Blink A se...

Страница 13: ...ically switches to sleep mode to save power when a certain amount of time elapses without receiving a print job or operating printer controls Power lamp is blinking and the Status lamp stays lit When...

Страница 14: ...is being booted before the desktop appears When the printer is printing When the printer driver is being installed When disconnecting the USB cable with the computer or printer powered be sure to rem...

Страница 15: ...ng with USB Cable 1 Connect the USB cable to the printer and then to the computer Note The printer driver must be installed prior to connecting the USB cable For instructions on how to install the pri...

Страница 16: ...ork LAN using a LAN cable Note Use a Category 5e or better twisted pair Ethernet cable Connection to a corporate LAN must be made by a network administrator For instructions on how to install the prin...

Страница 17: ...inter on 1 Press the Power key Printhead cleaning is performed the printer becomes ready for printing The status lamp stays lit when the printer is in the online mode PAUSE Note When the printer is in...

Страница 18: ...given length of time elapses after switching to sleep mode the printer is automatically turned off P 108 Important Make sure the power lamp is off before removing the power plug Removing the power plu...

Страница 19: ...he fixing screw of holder stopper and then remove the holder stopper 1 2 2 With the edge of the roll paper as shown below insert the roll holder Insert it firmly until the roll touches the flange of t...

Страница 20: ...der stopper in the roll holder and then tighten the fixing screw while lightly pressing it against the paper 1 2 4 Check that the printer is powered on If the printer is turned off press the power key...

Страница 21: ...17 Loading Paper 6 Push the lever of the paper guide to open it 1 2 7 Open the transport guide right and slide it as shown until it stops 1 2...

Страница 22: ...roll holder in the printer 9 Set paper Insert paper along the left guide under the transport guide left until it stops at the roller in the feeder slot Paper stopping at the roller in the feeder slot...

Страница 23: ...e the transport guide right in accordance with the width of paper Important Do not press the transport guide right with force against the paper edge A paper jam can result 11 Slowly close the transpor...

Страница 24: ...20 Chapter 1 Basic Operation 12 Slowly push the paper guide down until it clicks locks When it locks paper is transported automatically...

Страница 25: ...o prevent it from discoloring and curling Place the removed paper in the supplied plastic bag or box and store it in a place which is not exposed to high temperature high humidity or direct sunlight I...

Страница 26: ...nt The top surface of the fanfold paper stack must be lower than the level at which paper is set in the printer Rear feeder slot 150 mm 5 9 inch 700 mm 27 6 inch Place the fanfold paper stack so that...

Страница 27: ...g Paper 1 Open the properties window of the printer P 42 2 Click the Utility tab and click Special Settings The Special Settings dialog box will appear 3 Check Fanfold Paper Mode check box and then pr...

Страница 28: ...s loaded Be sure to close the roll cover before printing When loading roll paper uncheck the Fanfold Paper Mode check box in the Special Settings When using fanfold paper the temperature and humidity...

Страница 29: ...25 Loading Paper Changing Paper 1 Open the roll cover 2 Push the lever of the paper guide to open the guide 1 2...

Страница 30: ...26 Chapter 1 Basic Operation 3 Open the transport guide right and slide it rightward until it stops 1 2 4 While pressing the jam release lever down pull the paper out 1 2...

Страница 31: ...27 Loading Paper 5 Remove the roll holder 6 Load new paper P 15 Note Roll holder may idle when pressing BACK FEED Key with small remaining amount of paper...

Страница 32: ...aper is displayed on the Status Monitor and the printer stops To continue printing load new paper following the procedure described below 1 Open the roll cover Note Roll holder may idle when starting...

Страница 33: ...9 Loading Paper 3 Push the lever of the paper guide to open the guide 1 2 4 Remove the tape 5 While pushing the jam release lever down pull out paper through the delivery slot 1 2 6 Load new paper P 1...

Страница 34: ...nting is complete cut the label using the manual cutter Caution Use caution with the manual cutter be careful not to touch the sharp edges It may result in personal injury Be sure that the label print...

Страница 35: ...31 Loading Paper 2 Hold the printed label as shown 3 Cut the label by moving the cutter as shown below while pressing it lightly...

Страница 36: ...32 Chapter 1 Basic Operation 4 Return the cutter to its original position then close the cutter cover Note When the cutter has become dull contact your place of purchase Do not disassemble the cutter...

Страница 37: ...Chapter 2 How to Print The section describes how to basic printing procedure Making Prints 34 Canceling Printing 37...

Страница 38: ...electing Never in the Microsoft Windows Power Saver or Power Option settings will prevent the computer from entering a sleep state Follow the procedure below to open the Windows Power Saver or Power O...

Страница 39: ...t paper type to ensure optimal print quality P 62 If the paper size you want to select is not found in the list use the Customize feature to create a custom paper size P 53 See How to Use the Printer...

Страница 40: ...g paper size could cause ink to be ejected into the transport area If this occurs clean the transport area P 194 If the application software and printer driver have the same setting options such as Pa...

Страница 41: ...er will be canceled Note If the Status Monitor is not displayed check the following items Click the Status Monitor icon if it is minimized in the Status bar or Status Tray Confirm that the auto start...

Страница 42: ...e Printing To stop printing temporarily press the Pause key on the operation panel Press the Pause key again to resume printing PAUSE FEED BACK FEED STATUS ERROR BK C M Y MC Note Printing can be pause...

Страница 43: ...the function of the each item in the printer driver dialog box Opening the Printer Driver 40 Using Page Setup Features 43 Using Print Quality Features 70 Using the Overlay Settings Feature 87 Using Ad...

Страница 44: ...ng the Properties window P 42 Display the Utility tab to perform printer maintenance or change printer settings OpeningthePrinterDriverSetupWindowfromtheApplicationSoftware Note The procedure may be d...

Страница 45: ...Canon LX D5500 or Canon LX P5510 Manage Printing Preferences Windows 11 Select Canon LX D5500 or Canon LX P5510 Printing Preferences The printer driver setup window appears Important The settings tha...

Страница 46: ...ter properties window appears Important Some Windows functions and print settings are displayed in the printer properties window Print settings are located in the General tab and the Utility tab of th...

Страница 47: ...ges to paper size paper type number of copies page orientation and more can be adjusted in the Page Setup tab of the Printing Preferences window For LX D5500 1 2 3 4 5 6 7 8 9 12 11 13 14 10 For LX P5...

Страница 48: ...e P 52 Set a paper size 6 Custom Paper Size P 53 Set an optional paper size 7 Paper Type P 62 Set a paper type 8 Copies Set the number of copies to print 9 Orientation P 63 Set the orientation of prin...

Страница 49: ...Important Keep the following points in mind when running Obtain Printer Information Close the Status Monitor if it is running If this function is run on a shared printer make sure the Status Monitor...

Страница 50: ...tion software it is not possible to register or delete settings in from Favorites To do so display the Settings screen of the printer driver from the Printers scanners of Windows 1 Open the printer dr...

Страница 51: ...47 Using Page Setup Features 3 Click the Page Setup tab Make sure the Current Settings is selected from the Favorites 4 Click Register Delete The Register Delete Favorites dialog box appears...

Страница 52: ...g File Name entry box and then confirm the Setting Contents A confirmation message appears Note Entry in the Setting File Name entry box is mandatory Up to 16 characters can be entered Spaces and tabs...

Страница 53: ...eleting a Favorite To delete a registered favorite select if from the Registered Settings List and then click Delete Confirming a Registered Favorite Settings Clicking Check Settings on the Page Setup...

Страница 54: ...dpi Half tone Process Error Diffusion Color Correction Driver Correction Monochrome Print Off Print the gradation smoothly Off Sharpness 0 None Color Balance Bk C M Y All 0 Brightness Normal Density 0...

Страница 55: ...Automatic Speed Off Paper Speed 150mm sec 5 9 inch sec Print Order Ascend Color Correction Driver Correction Monochrome Print Off Economy print mode Off Sharpness 0 None Color Balance Bk C M Y All 0 B...

Страница 56: ...ified in a preview Standard label paper In addition to the three selections for standard paper sizes you can also register twelve custom paper sizes Paper Size Paper Form Paper Size W L mm Margins mm...

Страница 57: ...length etc which cannot be selected from the Paper Size pull down menu of the printer driver as Customize However this setting is effective only for the documents that are currently open Paper Size P...

Страница 58: ...ter Driver 1 Open the printer driver setup window from the Printers scanners P 41 2 Click Custom Paper Size on the Page Setup tab The Custom Paper Size Settings dialog box opens 3 Select a basic paper...

Страница 59: ...mal label paper The leading edge of paper is recognized on detecting a label gap Label Marker A TOF mark is printed on the back of label paper to identify the leading edge of the paper Label Marker Cu...

Страница 60: ...e paper size Gap Mark length and margin Top Bottom Left Right Items to be set differ depending on the paper form For the ranges of settable values see Ranges of Custom Paper Sizes P 58 6 Click Registe...

Страница 61: ...57 Using Page Setup Features 8 Click OK...

Страница 62: ...Gap Printing area Right gap Right margin Bottom margin Top margin Paper length Gap length Mark Label Marker Label Printing area Left margin Right margin Top margin 2 Bottom margin 2 Paper width Paper...

Страница 63: ...gin Right margin mm inch 1 5 0 06 Paper Width 3 0 12 Left margin Gap Mark length mm inch 2 5 0 1 9 5 0 37 Left Gap mm inch 0 5 0 02 2 5 0 10 Right Gap mm inch 0 5 0 02 95 5 3 76 Label Marker Tag Marke...

Страница 64: ...aper Width mm inch 25 0 0 98 120 0 4 72 Paper Length mm inch 6 0 0 24 500 0 19 69 Top margin mm inch 1 5 0 06 Paper Length 3 0 12 Bottom margin Bottom margin mm inch 1 5 0 06 Paper Length 3 0 12 Top m...

Страница 65: ...is a function to reduce consumption of the print head P 114 When activated left and right minimum margin is 2 7 mm 0 11 inch In the case of Label Gap the total of the left margin and left gap or the t...

Страница 66: ...ou select matte coated paper to print Matte Synthetic Choose when you select matte coated synthetic paper to print Glossy Paper Choose when you select glossy paper to print Glossy Polypropylene Choose...

Страница 67: ...int under Orientation Printed results for portrait and landscape orientation can be achieved by following the descriptions below Portrait Select this option to print the document rotated 90 degrees to...

Страница 68: ...izontally in relation to the direction of paper feeding Direction of paper feed 180 degree Rotation Check this check box to print a document set for Portrait or Landscape rotated 180 degrees Portrait...

Страница 69: ...rientation check box so that proper printing takes place according to the Orientation setting of the printer driver Document Print result Landscape Portrait Note Choose this setting when proper printi...

Страница 70: ...ting a document is in the Landscape Select Portrait from the Orientation of the printer driver Document Orientation of the printer driver Landscape Portrait When printing a document is in the Portrait...

Страница 71: ...etting Contents Click Check Settings to confirm the current paper settings Note On the displayed screen clicking Copy allows you to copy the settings To read the copied settings paste them to the page...

Страница 72: ...it is running If this function is run on a shared printer make sure the Status Monitor has not been launched on the client when working on a server or has not been launched on the server when working...

Страница 73: ...ck Obtain Printer Information to get information on the printer connected For LX P5510 1 Open the printer driver setup window from the Printers scanners P 41 2 Select Utility tub and then click Versio...

Страница 74: ...ttings Preview of the image to be printed with the current color settings 3 Resolution P 74 Select the resolution 4 Half tone P 75 Select a half toning method 5 Color Correction P 76 Select the color...

Страница 75: ...ome Print P 77 Select this check box to make black and white prints 8 Defaults Reset the Color window to its defaults Note The settings configured on the Detailed Settings dialog box do not change eve...

Страница 76: ...7 8 9 10 1 Paper Size Preview The selected paper size is displayed in a preview 2 Print Image After Changing Settings Preview of the image to be printed with the current color settings 3 Resolution P...

Страница 77: ...to adjust advanced color settings Color Balance P 78 Brightness P 79 Density P 80 Contrast P 82 Economy print mode P 85 Sharpness P 85 9 Defaults Reset the Print Setup window to its defaults 10 Set P...

Страница 78: ...ocessing it for a resolution of 1200x1200 dpi Longer print times but higher print quality occurs when printing with the Input Resolution 1200 dpi setting Input resolution 600dpi Prints data after proc...

Страница 79: ...y The dot pattern or half tone can be adjusted to control print quality Dither This method is suitable for printing of graphics requiring clear borders between colors Error Diffusion This method is su...

Страница 80: ...5510 Only Select this option to correct colors using the Windows color correction function of ICM Image Color Management Disable Image processing is performed at the highest speed without color correc...

Страница 81: ...or documents can be printed in black and white When black and white prints are made only black ink is used To print in black and white click the Monochrome Print check box Note Pinpoint Color Match ca...

Страница 82: ...The slider can be moved between 50 to 50 The more you move the slider to the left the color becomes lighter The more you move the slider to the right the color becomes darker Note Color balance value...

Страница 83: ...Settings in the Color tab P 70 For LX P5510 Click the Detailed Settings in the Print Setup tab P 72 2 Selecting from the Brightness pull down menu and then click OK Select one from the Brighter Normal...

Страница 84: ...htness can not be selected when Color Correction is set to Disable or Use ICM Brightness can not be selected when a paper type associated with Profile the start character is is selected Adjusting the...

Страница 85: ...nsity value can be directly entered into the entry box located to the left of the slider bar Alternatively clicking the arrows on both sides of the slidebar can decreases or increases the setting by 1...

Страница 86: ...driver as follows For LX D5500 Click the Detailed Settings in the Color tab P 70 For LX P5510 Click the Detailed Settings in the Print Setup tab P 72 2 Adjust the contrast by moving the slider and th...

Страница 87: ...be directly entered in the entry box located to the left of the slider bar Alternatively clicking the arrows on both sides of the slidebar can decreases or increases the setting by 1 Click Defaults t...

Страница 88: ...iled Settings dialog box The print image with selected color corrections is displayed in the Print Image After Changing Settings section of the window Print the gradation smoothly can not be selected...

Страница 89: ...although print quality is not as high as that of regular printing Use this mode to check printout data or lower print cost Setting the Sharpness You can improve contours edge definition and reduce blu...

Страница 90: ...and 3 Large The more the number the more the contour enhancement effect 2 Medium 3 Large Note Click Defaults to return the printer to the default settings in the Detailed Settings dialog box The prin...

Страница 91: ...rge capacity image data to the printer many times allowing the data to be printed quickly Overlay printing process Step1 Print fixed data image template etc to the printer to create a form file P 88 P...

Страница 92: ...template etc to the printer to create a form file 1 Open the data to be created as a form file using the application software used to create the data 2 Display the printer driver setup window from the...

Страница 93: ...89 Using the Overlay Settings Feature 4 Select Print the form to the file and then click Reference 5 Specify the File Name and location to save the form file and then click Save...

Страница 94: ...eated as form files they are stored as one file Important When carrying out overlay printing in the server client environment observe the following setting precautions Store the form file ofe in a sha...

Страница 95: ...format to RAW mode with the following procedure 1 Open the properties window of the printer P 42 2 Click on the Advanced tab and uncheck the Enavle advanced printing features The spool format will be...

Страница 96: ...erlay Printing 1 Open the data to be used as print data using the application software used to create the data 2 Display the printer driver setup window from the application software P 40 3 Click the...

Страница 97: ...ay Settings Feature 4 Select the Overlay Printing and then click Reference You can directly enter the file path name in the File Name entry box 5 Specify a form file and click Open Select the file wit...

Страница 98: ...the Preview panes To see the preview check the Preview check box Some form files may not show its information in the Form File Information and the Preview panes 7 Select the method of combining the do...

Страница 99: ...th simple setting check box is not checked However since both the form file and document are printed in the portions where they overlap colors of the form file and documents are mixed there When norma...

Страница 100: ...made for the document If any setting is different between them overlay printing cannot be performed Print settings Paper form paper size length width margins and print quality If the version of the p...

Страница 101: ...Advanced Settings tab of the Printing Preferences Window 1 2 3 4 1 Paper Size Preview The currently set paper size is displayed in a preview 2 Print Order P 98 Specify the order of printing 3 Print S...

Страница 102: ...rst or last page To print from the first page afterwards select Ascend to print from the last page upward select Descend Important The settings on the Print Order do not take effect when the Enable ad...

Страница 103: ...m sec 7 9 6 3 4 7 3 9 3 5 3 2 2 8 2 4 2 0 inch sec Note Check Automatic Speed to allow the print speed to vary automatically to suit the status of print data transmission Important When glossy paper i...

Страница 104: ...ers scanners P 41 2 Select Print Setup tub The selectable feed speed varies depending on resolutions When printing 1200dpi 150 120 100 90 80 70 60 50 mm sec 5 9 4 7 3 9 3 5 3 2 2 8 2 4 2 0 inch sec Wh...

Страница 105: ...ing settings a message appears and the Cut interval is changed If number of copies or last cut pages are less the min cut interval 60 9mm 2 40inch blank page will be transported for cutting If you don...

Страница 106: ...enance and control of some printer features is performed in the Utility tab of the Printing Preferences window or the Printer Properties window For LX D5500 1 2 3 4 5 6 7 9 10 11 14 15 16 For LX P5510...

Страница 107: ...sleep mode and the power off state 8 Ink Refresh P 198 For LX P5510 Only Clicking this button allows ink to flow in the print head and ink path to maintain the ink quality 9 Start Status Monitor P 14...

Страница 108: ...other floor in the same building 15 Shipping The Printer P 255 Prepares for long haul transport as on truck or aboard aircraft 16 Add Custom Paper Type P 135 Allows the user to adjust ink jetting amou...

Страница 109: ...Administrative privileges over this printer are required when configuring settings marked with on the Utility tab of the printer properties window If a user without administrative privileges over this...

Страница 110: ...lly when it has been left idle for a certain period of time under normal operating conditions Note By default the sleep timer is set to 4 minutes The printer is automatically switched back from sleep...

Страница 111: ...107 Using Utility Features 3 Click the Utility tab and click Sleep A confirmation message appears 4 Click Yes The power lamp blinks slowly and the printer is switched to sleep mode...

Страница 112: ...trative privileges proceeds with configuration of settings a message You do not have rights to printer management Please contact your system administrator appears For more details see Administrative p...

Страница 113: ...Features 3 Click the Utility tab and click Sleep Timer Setting v The Sleep Timer Setting dialog box appears 4 Enter the setting time of the sleep timer The time can be set in minutes within the range...

Страница 114: ...5 Enter the setting time of the off timer The time can be set in minutes within the range from 1 to 720 min If the off timer is not necessary uncheck the Enable off timer setting check box 6 Click Sen...

Страница 115: ...onfigure settings of this printer If a user without administrative privileges proceeds with configuration of settings a message You do not have rights to printer management Please contact your system...

Страница 116: ...e Printer Driver 3 Click the Utility tab and click Cutter Adjustment Cutter Adjustment dialog box appears 4 Drag slider to adjust the stop position or cutting position on the paper Using the manual cu...

Страница 117: ...d 10 0 mm 0 39 inch To reset the Stop position or Cutting position settings to the defaults click Defaults 5 Click Send A confirmation message appears 6 Click Yes The setting is transmitted to the pri...

Страница 118: ...ated it is 2 5 mm 0 10 inch The default setting is ON Fanfold Paper Mode Select this option when fanfold paper is used The default setting is OFF Tear Off Mode Tear Off Mode selects the printer behavi...

Страница 119: ...printing to begin and printing speed is slower than usual Prevent Paper Rubbing Mode When printing a high density image you can increase the gap between the print head and paper to prevent paper rubbi...

Страница 120: ...116 Chapter 3 How to Use the Printer Driver 1 Open the properties window of the printer P 42 2 Click the Utility tab and click Special Settings The Special Settings dialog box appears...

Страница 121: ...ded Note When the computer cannot communicate with the printer offline status the special settings that the computer received in the last communication when the printer was in the online status are di...

Страница 122: ...118 Chapter 3 How to Use the Printer Driver 5 Click Yes The changed special settings are sent to the printer 6 Click Close...

Страница 123: ...tect automatically In this case adjust the TOF Level of the sensor for detecting the leading edge of paper Note Use when label paper has a TOF mark printed on the back You can register only one TOF Le...

Страница 124: ...ore finished step 1 3 below 1 Pull out the paper in the transport section Refer to Changing Paper P 25 in step 1 4 2 Peel off the labels located up to the position more than 160mm from the paper edge...

Страница 125: ...portion of the liner with no labels is still inside the printer press the FEED key to deliver the paper completely out of the printer P 7 Important Directly printing on the liner label mount could cau...

Страница 126: ...privileges required for certain features P 105 The Pinpoint Color Match feature cannot be used with the following print settings The paper registered in Add Custom Paper Type P 135 is selected as Pape...

Страница 127: ...are to read from a source image the RGB values of a desired color for Pinpoint Color Match Note Example How to read the RGB values of a color using Microsoft Paint 1 Start Paint and open the image 2 C...

Страница 128: ...124 Chapter 3 How to Use the Printer Driver 2 Open the printer s Properties window P 42 3 Click Pinpoint Color Match The Pinpoint Color Match dialog box appears...

Страница 129: ...reen and Blue boxes of 1 Set input color Entering the RGB values allows you to preview the specified color Note Select color may be used to input a color 1 Click Select color 2 Select a color from Bas...

Страница 130: ...ing setting methods Print a check pattern to register the desired color P 126 Specify a specific color to register the desired color P 129 Printing a check pattern to register the desired color 1 Make...

Страница 131: ...B 131 R 249 G 27 B 128 R 249 G 27 B 122 R 246 G 27 B 122 R 246 G 27 B 119 R 243 G 27 B 122 R 243 G 27 B 128 R 246 G 30 B 128 R 246 G 24 B 128 R 246 G 30 B 122 R 246 G 24 B 122 0 1 2 3 4 5 6 7 8 9 10...

Страница 132: ...ister pinpoint color match P 130 When the desired color is not found proceed to Step 4 4 When the desired color is not in the printed pattern click Back to Print 5 Make sure that Use check pattern no...

Страница 133: ...pecific color to register the desired color 1 Select Use specified color and the color data previously entered in 1 Set input color appears in Specific Color 2 Click Step to register without print Not...

Страница 134: ...check pattern to register the desired color 1 From the pulldown menu choose the No 0 to 24 of the color closest to the one you wish to specify 2 Enter any name in Comment 3 Click Register Specifying...

Страница 135: ...lity Features 7 The specified color appears in Register List Click the cell of the registered color to preview it 8 When Pinpoint Color Match registration is completed click Close The confirmation mes...

Страница 136: ...d Export to use registered special colors for printing with another computer file extension bin Adjusting colors with registered colors Make adjustments using colors registered with Pinpoint Color Mat...

Страница 137: ...r Match 4 Mark the checkbox for Check Print Color Marking the checkbox generates a bitmap image of image data to be printed Folder for saving the image C Users Public Documents Canon Canon LX P5510 Fi...

Страница 138: ...it Clear the checkboxes for colors you do not wish to use for color adjustment 6 Click OK 7 Make prints and check the result of the color adjustment When the desired color is not created on prints reg...

Страница 139: ...ngs a message You do not have rights to printer management Please contact your system administrator appears For more details see Administrative privileges required for certain features P 105 When incr...

Страница 140: ...136 Chapter 3 How to Use the Printer Driver 1 Display the properties window of the printer P 42 2 Click the Utility tab and click Add Custom Paper Type The Add Custom Paper Type dialog box appears...

Страница 141: ...Using Utility Features 3 Select the profile from Paper Type Names For LX D5500 Matte Gloss Synthetic For LX P5510 Select one from Matte Paper Matte Synthetic Gloss Paper Glossy Polypropylene and GHS M...

Страница 142: ...ot be used cannot be used as the start character of the paper type name Set ink jetting amount Set ink jetting amounts for respective colors Moving the slider to the left decreases the ink jetting amo...

Страница 143: ...sage appears 6 Click Yes Note When registering a new media type specifying to increase ink jetting amount a confirmation message such as the following will be displayed Confirm the message and then cl...

Страница 144: ...140 Chapter 3 How to Use the Printer Driver 7 Click Close Note Deleting a paper type To delete a registered paper type select if from the Paper Type Names and then click Delete...

Страница 145: ...Chapter 4 How to Use the Status Monitor The status monitor allows you to check the current status of the printer Displaying the Status Monitor 142 Using the Status Monitor 147...

Страница 146: ...the Status Monitor will start automatically every time a print job begins You can also start the Status Monitor as soon as Windows starts up by selecting the specific function in the menu You can stor...

Страница 147: ...143 Displaying the Status Monitor 2 Click the Utility tab and click Start Status Monitor The Status Monitor starts...

Страница 148: ...method Start During Printing The Status Monitor automatically starts and displays when a print job starts The Status Monitor closes automatically when the print job ends This is the default setting St...

Страница 149: ...hile printing check box in the Start menu If both Start During Printing and Disable auto start function while printing are selected Disable auto start function while printing takes priority Only the a...

Страница 150: ...ow and stores the icon in the task tray 1 Click the View and select the desired option Click Start With Popup Minimize at Start or Start at Task Tray A dot symbol marks the currently selected item Not...

Страница 151: ...printing status will be displayed with numerical value and indicator 3 Cancel Print Job P 148 Cancel print job in progress 4 Cleaning This option is only effective when the Pause key of the printer i...

Страница 152: ...of a three page document in 10 copies is set 0001 0010 to 0010 0010 appears while the first page is printed The progress bar represents the status of printing the number of copies specified Total Cop...

Страница 153: ...ady to print Displayed when the printer is offline Background is gray Displayed when a warning has been issued Background is yellow A warning message is displayed with the printer status printing can...

Страница 154: ...ndicates a warning has been issued review the message printing will continue when a warning occurs Operator Call Error These errors are issued for a problem that requires your attention Review the mes...

Страница 155: ...nt to open another window to learn more details 1 Select the message to read and click Detailed Status Display button The description window opens and displays details of the message and provides trou...

Страница 156: ...ng Print Head Position 156 Detailed Printhead Position Adjustment 169 Checking Setting Values 177 Replacing the Ink Tank 180 Replacing the Maintenance Cartridge 188 Cleaning the Printer Cleaning the P...

Страница 157: ...fter light cleaning is performed Strong Cleaning Recovery operation performed when print head nozzle clogging occurs even after medium cleaning is performed Note Do not perform any other operation whi...

Страница 158: ...rform print head cleaning from the Utility tab 1 Open the printer driver setup window P 40 2 Click the Utility tab and choose Light Cleaning Medium Cleaning or Strong Cleaning A confirmation message w...

Страница 159: ...to clean print heads Important The Utility tab will not be available when the printer is paused 1 Press the Pause key PAUSE FEED BACK FEED STATUS ERROR BK C M Y MC 2 Select Light Cleaning Medium Clea...

Страница 160: ...lthough the adjustment method is the same The print head position cannot be adjusted while printing is in progress or if an error has occurred Administrative privileges over this printer are required...

Страница 161: ...k Print Head Position Adjustment The Print Head Position Adjustment dialog box appears Note Clicking The details of the adjustment method are here in the Print Head Position Adjustment dialog box will...

Страница 162: ...158 Chapter 5 Maintenance 4 Make sure the printer is not operating Step 1 Print adjustment pattern Click Print A confirmation message appears 5 Confirm the displayed message and then click Yes...

Страница 163: ...ection Adjustment pattern Horizontal Adjustment pattern Vertical Reference position black frame LX D5500 28 24 20 16 12 8 4 0 28 24 20 16 12 8 4 32 32 28 24 20 16 12 8 4 0 28 24 20 16 12 8 4 32 32 28...

Страница 164: ...160 Chapter 5 Maintenance 6 If the adjustment pattern has printed correctly click Yes If you select No adjustment pattern will be printed again...

Страница 165: ...on A and then specify the adjustment value Horizontal adjustment If the black frame is shifted leftward specify a positive value If the black frame is shifted rightward specify a negative value Click...

Страница 166: ...ck B Vertical Direction and X Horizontal Direction in adjustment pattern K Black Note If the radio button is selected the visible point in the adjustment pattern in Head Position Adjustment dialog box...

Страница 167: ...is found on the magenta and black lines which appear to be connected most smoothly without steps For example in the pattern shown on the right the adjustment value is 14 Click the radio button X and...

Страница 168: ...d position for cyan while looking at the adjustment pattern C and adjust the print head position for yellow while looking at the adjustment pattern Y Note If the radio button is selected the visible p...

Страница 169: ...djustment With regard to cyan and yellow the adjustment value is found on the magenta and cyan or yellow lines which appear to be connected most smoothly without steps For example in the pattern shown...

Страница 170: ...66 Chapter 5 Maintenance 13 When the entry is complete click Send A confirmation message appears 14 Click Yes The adjustment value is transmitted to the printer to adjust the head positions 15 Click O...

Страница 171: ...hat the head positions have been adjusted correctly Make sure the lines of each color are smoothly connected at 0 on the adjustment pattern If the lines appear to be out of alignment stepped readjustm...

Страница 172: ...168 Chapter 5 Maintenance 17 When the head position adjustment process is complete click Close A confirmation message appears 18 Click Yes...

Страница 173: ...on Adjustment but seek more detailed adjustment 1 Click Step 6 Go to Detailed Printhead Position Adjustment Detailed Printhead Position Adjustment dialog box appears Note Clicking The details of the a...

Страница 174: ...Chapter 5 Maintenance 2 Make sure the printer is not operating and then click Print A confirmation message appears 3 Confirm the displayed message and then click Yes Printing of adjustment pattern sta...

Страница 175: ...Printhead Position Adjustment Detailed printhead position adjustment pattern Transport direction 1 2 3 8 4 0 4 8 8 4 0 4 8 8 4 0 4 8 0 LX D5500 Transport direction 1 2 3 8 4 0 4 8 8 4 0 4 8 8 4 0 4 8...

Страница 176: ...ition for black Check 1 2 and 3 in adjustment pattern K Black and read and enter the value at the point of their intersection with the Magenta line Note If the radio button is selected the visible poi...

Страница 177: ...heck 1 2 and 3 in adjustment pattern C Cyan and Y Yellow read and enter the value at the point of their intersection with the Magenta line Note If the radio button is selected the visible point in the...

Страница 178: ...174 Chapter 5 Maintenance 8 When the entry is complete click Send A confirmation message appears 9 Click Yes The adjustment value is transmitted to the printer to adjust the head positions 10 Click OK...

Страница 179: ...on adjustment pattern and check that the head positions have been adjusted correctly Make sure the lines of each color are smoothly connected at 0 on the adjustment pattern If the lines appear to be o...

Страница 180: ...176 Chapter 5 Maintenance 13 Click Yes...

Страница 181: ...e the status monitor has not been launched on the client when working on a server or has not been launched on the server when working on the client The process may not be completed correctly if the St...

Страница 182: ...s I P A d d r e s s S u b n e t M a s k D e f a u l t G a t e w a y I n k L e v e l D e t e c t i o n M o d e B l a c k I n k T a n k C y a n I n k T a n k M a g e n t a I n k T a n k Y e l l o w I n...

Страница 183: ...X XXX XXX XXX XXX XXX XXX XXXXXXX XXXXXXX XXXXXXX XXXXXXX XXXXXXX dd mmm 20yy hh mm L X P 5 5 1 0 P r i n t e r S e r i a l N u m b e r F i r m w a r e R O M V e r s i o n D a t e a n d T i m e P r i...

Страница 184: ...reach of children If a child licks or swallows ink by mistake consult a physician immediately Important To maintain printhead quality printer stops operating before it is completely out of ink Therefo...

Страница 185: ...y period The ink tank positions are shown below The printer is designed so that ink tanks cannot be inserted in wrong ink tank slots Do not attempt to force ink tanks into the wrong slots Black Cyan M...

Страница 186: ...182 Chapter 5 Maintenance 1 Open the ink tank door 2 Open the ink tank cover 3 Slowly remove the ink tank...

Страница 187: ...k tank from the box Important Never drop or apply excessive force to an ink tank Ink can stain clothing and the work area To prevent soiling of the surrounding area damage to the ink tank and poor pri...

Страница 188: ...for water based pigment ink be sure to similarly shake it before installing to printer Important Because ink may leak from the ink supply port and get on clothing or blemish the surrounding area do no...

Страница 189: ...Load a new ink tank Insert the ink tank into the ink tank slot with the correct side up Caution There are sharp pins in the ink tank slots To avoid injury never put your fingers into this area 7 Close...

Страница 190: ...186 Chapter 5 Maintenance 8 Close the ink tank door Important Dispose the used ink tank according local laws and regulations...

Страница 191: ...TUS ERROR MC The ink tank must be replaced Blinking BK C M Y STATUS ERROR MC The ink tank is low Remaining ink level About 20 It is recommended to have a new ink tank ready Off BK C M Y STATUS ERROR M...

Страница 192: ...ly Important Do not leave the printer for a long time with the maintenance cartridge removed Do not insert or remove the maintenance cartridge except when replacing it Avoid dropping the cartridge or...

Страница 193: ...lacing the Maintenance Cartridge 2 Open the maintenance cartridge door 3 Slowly pull out the maintenance cartridge Important Be sure not to drop the maintenance cartridge ink may stain the floor or cl...

Страница 194: ...190 Chapter 5 Maintenance 4 Insert a new maintenance cartridge 5 Close the maintenance cartridge door The error message on the Status Monitor disappears and printing will begin...

Страница 195: ...tridge in the plastic bag Zip the plastic bag completely closed Important Dispose the used maintenance cartridge according local laws and regulations Avoid dropping the cartridge or storing it at an a...

Страница 196: ...p Display on status monitor Status Lit BK C M Y STATUS ERROR MC The maintenance cartridge is full and must be replaced Blink BK C M Y STATUS ERROR MC The maintenance cartridge has limited free space F...

Страница 197: ...may find its way into the printer resulting in poor quality prints To preserve the print quality clean the exterior of the printer periodically Caution Be sure to remove the power plug from the outle...

Страница 198: ...ransport area becomes dirty or clogged with paper dust paper may not be transported properly and prints may be dirty Clean it regularly to ensure quality prints Caution Be sure to remove the power plu...

Страница 199: ...nnect the power plug from the outlet Important While the power lamp is lit or blinking do not remove the power plug from the outlet A printer failure could result 3 Disconnect the power cord and inter...

Страница 200: ...196 Chapter 5 Maintenance 5 Remove the attached cleaning stick 6 Press down the upper unit open lever at the back of the feeder to open the upper unit...

Страница 201: ...Do not use paper towels or tissue paper Cut paper chips or paper dust could enter the printer and cause a failure 8 Close the upper unit Caution When closing the upper unit be careful not to touch th...

Страница 202: ...Call of the ink refresh function starts upon the installation of the ink tank If the ink tank is not replaced in 54 days Warning or Operator Call will appear on the status monitor Do not execute any o...

Страница 203: ...eding ink refresh timing 2 P 209 Appears when ink refresh is not performed at both Warning 1 and Operator Call 1 Printer will be forcibly stopped Note that performing ink refresh at this timing will c...

Страница 204: ...call for Exceeding ink refresh timing 1 appears on the status monitor Ink refresh timing 1 Exceeding ink refresh timing 1 Note The display shown below pops up as soon as the error message Exceeding in...

Страница 205: ...LX P5510 Only 1 Follow the on screen message to operate as follows When Ink refresh timing 1 appears 1 Close the status monitor 2 Open the printer driver setup window P 40 3 Click the Utility tab and...

Страница 206: ...Exceeding ink refreshtiming 1 appears Click Start Ink Refresh 2 All ink within ink flow channels is returned to the ink tank Preparation takes approximately 5minutes Do not operate the printer before...

Страница 207: ...203 Maintaining Ink Quality For LX P5510 Only 3 Follow the on screen instructions to stir the ink in each ink tank Open the ink tank door 4 Open the ink tank cover...

Страница 208: ...204 Chapter 5 Maintenance 5 Pull out an empty ink tank slowly 6 Slowly shake the each of the ink tanks 2 to 3 times with the ink supply port facing up as shown in the figure...

Страница 209: ...y leak from the ink supply port and get on clothing or blemish the surrounding area do not shake the ink tank with the port facing down Do not touch the ink outlet and terminal to prevent soiling of t...

Страница 210: ...8 Load all ink tanks Slowly insert the ink tank deeply into the ink tank slot with the correct side up Caution There are sharp pins in ink tank slots Never put your fingers into this area 9 Close the...

Страница 211: ...207 Maintaining Ink Quality For LX P5510 Only 10 Install all ink tanks and close the ink tank door 11 When you have finished the procedure click OK...

Страница 212: ...confirmation message appears Ink refreshing starts This operation takes approximately 5 minutes Do not operate the printer before the message Ink refresh completed appears 13 When the message Ink refr...

Страница 213: ...nk refresh timing 2 appears on the status monitor and printer is stopped Exceeding ink refresh timing 2 Note The display shown below pops up as soon as the error message Exceeding ink refresh timing a...

Страница 214: ...resh 2 All ink within ink flow channels is returned to the ink tank Preparation takes approximately 5 minutes Do not operate the printer before the following dialog box appears 3 Perform steps 3 to 11...

Страница 215: ...refreshing starts This operation takes approximately 15 minutes Important If ink refresh has not been performed until 90 days have passed the operation of Ink Refresh will take approximately 15 minut...

Страница 216: ...timing 3 appears on the status monitor and printer is stopped Exceeding ink refresh timing 3 Note The display shown below pops up as soon as the error message Exceeding ink refresh timing appears Cli...

Страница 217: ...213 Maintaining Ink Quality For LX P5510 Only 1 Click Start Ink Refresh The following dialog box appears 2 Perform steps 3 through 11 of Ink Refresh Part 1 Ink Refresh Part 1 P 200...

Страница 218: ...s operation takes approximately 20 minutes Important Only in conditions where printing operation has not been performed for 60 days or more the operation for Ink Refresh will take approximately 20 min...

Страница 219: ...Chapter 6 Troubleshooting For Troubleshooting Operations 216 List of Error Messages Warning Messages 230...

Страница 220: ...omputer and the printer correctly with the interface cable Is the correct printer selected Select the printer to be used with the Printing dialog box Are you printing something such as a large image I...

Страница 221: ...an ink tank with remaining ink is set Reinstall the ink tank P 180 Are the port settings correct Follow the steps below to confirm the port settings 1 Open the properties window of the printer driver...

Страница 222: ...settings open the printer used will be detected and the configured IP address will be displayed P 261 2 Confirm this computer s IP address 1 Enter cmd in the Search the WEB and Windows of the Desktop...

Страница 223: ...t Printers This printer will appear in List of Printers If this printer is not displayed click Limit detect area and search for the IP address 5 Enter the new port name in the Output 6 Click OK When y...

Страница 224: ...Settings tab of the printer driver and then check whether the settings in Print Speed P 99 Check whether the Special Settings is set Open the Utility tab of the printer driver and then check whether...

Страница 225: ...malfunctions Is the paper leading edge folded or is the paper curled If the paper leading edge is folded or curled the paper will not feed properly Also it can cause paper jams and malfunctions Check...

Страница 226: ...ion uninstall the printer driver and then reinstall the printer driver Improving the Print Quality Condition Solution Streaks appear on the print Confirm that the paper set size shape and type matches...

Страница 227: ...print Confirm that the paper set size shape and type matches the paper size shape and type configured by the application software or printer driver Adjust the position of the print head P 156 Set the...

Страница 228: ...differs from the color on screen Open Color tab of the printer driver and adjust the settings for image quality and color P 70 Confirm that the Display and Screen Properties are correctly configured i...

Страница 229: ...tions Paper Is Jammed When a paper jam occurs during printing the printing is interrupted and the Status Monitor will display an error message such as Paper jam Follow the steps below to remove the pa...

Страница 230: ...pen the upper unit 3 While pushing the jam release lever pull out the paper jammed in the transport section 1 2 Caution When pulling out the jammed paper from the transport section with the upper unit...

Страница 231: ...227 For Troubleshooting Operations 4 Cut the pulled out paper neatly 5 While pushing the jam release lever pull out paper in the direction opposite to the transport direction 1 2...

Страница 232: ...osing the upper unit take care not to touch the interface at the back with your finger Your finger can be caught in the interface resulting in injury 7 Load a paper again P 15 Printing restarts To can...

Страница 233: ...Error appears Request of the print head check will also appear as a pop up on the screen Because cleaning is more frequent than usual print head check is necessary If this message appears click Help C...

Страница 234: ...curs After selecting the message displayed if Display the details of the Status is clicked or the message of the Status Information is double clicked a separate screen will appear to confirm the messa...

Страница 235: ...t of position replace with correct paper or move the paper guide to the correct position If the application software or printer driver s configuration is different click on the Status Monitor s Cancel...

Страница 236: ...nized Either the ink tank is abnormal or an unsupported ink tank is installed Replace with a new ink tank P 180 Maintenance cartridge full X X represents number The maintenance cartridge s ink is full...

Страница 237: ...rror with overlay printing data Confirm the cable connection and retry printing Unknown error XXXX represents number An unknown error was returned If the same error occurs again update the printer dri...

Страница 238: ...LAN connection check the Extend Time Out value check box from the network utility P 275 If the printer is shared start Windows Task Manager and confirm that Canon XXXX Status Monitor Service where XXX...

Страница 239: ...ink tanks Once the ink level detection function is disabled the ink level function cannot be restored for that ink tank Replace with a new ink tank If the same ink tank is removed and inserted many t...

Страница 240: ...ontact your place of purchase Change XXXX print head XXXX represents Black Cyan Magenta or Yellow Time to replace the Bk C M Y print head Change purge unit Time to replace the purge unit Change blade...

Страница 241: ...d contact your place of purchase Unknown warning XXXX XXXX represents number An unknown warning was returned If the same error occurs again update the printer drivers and firmware to the latest versio...

Страница 242: ...n optional auto cutter is purchased it will cut paper at high speed This section introduces the names of the components of the auto cutter and how to use it Part Names and Functions 239 Settings for U...

Страница 243: ...livery slot If a paper jam occurs open and remove the jammed paper Cut paper is ejected Important Install the printer so there is enough space for the auto cutter If you cut the adhesive portion of th...

Страница 244: ...uctions on how to adjust the cutting position refer to Adjusting the Paper Stop Position or Cutting Position P 111 Cutter Setting tab becomes active only when the optional auto cuuter is equipped 1 Ch...

Страница 245: ...cut Set how to cut paper in the beginning and end of a job and in the middle of a job Setting How to Cut Paper in the Before and After of a Job To cut at the beginning of the job check Cut before the...

Страница 246: ...e middle of the print job check Cut during the Job check box During continuous printing or repeat printing Select this option to print continuously or print repetitively per the number of copies Cuts...

Страница 247: ...To cut paper per the number of copies set the number of pages per the number of copies in Cut Interval The settings of cutting position and cut Interval are displayed in a preview Cut Interval 1 page...

Страница 248: ...thin the group check box is checked also within each group at intervals of the number of pages set in Cut Interval Note Cutting within a group won t work if the number of pages set in Cut Interval is...

Страница 249: ...245 Settings for Using Auto Cutter 3 Click OK Sets a cutting interval Note To reset Cut Interval to its default click Defaults...

Страница 250: ...n optional auto cutter remove the jammed paper in the following manner Note Do not use incompatible paper in order to avoid paper jams and printer malfunctions Do not use of curled or creased paper in...

Страница 251: ...heck for paper jams Important Check to see if labels or any other foreign substances are stuck inside the auto cutter Labels or cutting chips stuck inside the auto cutter could disable successful perf...

Страница 252: ...Auto Cutter 4 Press down the upper unit open lever at the back of the feeder to open the upper unit 5 While pushing the jam release lever pull out the paper jammed in the transport section 6 Cut out w...

Страница 253: ...249 Paper is Jammed 7 While pushing the jam release lever pull out paper in the direction opposite to the feeding direction 1 2 8 Close the upper unit and auto cutter door 1 2 9 Set paper again P 15...

Страница 254: ...Chapter 8 Appendix Moving the Printer 251 Shipping the Printer 255 Uninstall Printer Driver 259 About Network Utility 261...

Страница 255: ...ilure This product weighs about 24 kg 53 lbs Be sure to lift the printer with 2 people grasping the handles located on the base from both sides in a firm embrace Lifting the printer in an abnormal fas...

Страница 256: ...error has occurred Moving The Printer cannot be executed Close the Status Monitor if it is running If this function is run on a shared printer make sure the Status Monitor has not been launched on the...

Страница 257: ...t takes approximately 2 minutes for the printer to prepare to be moved Do not operate the printer before the message indicating that removal of ink is completed appears Important During execution of M...

Страница 258: ...fter you confirm that the printer has stopped 6 Disconnect the power plug from the outlet Important When the power lamp is lit or blinking do not remove the power plug from the outlet A printer failur...

Страница 259: ...ich could damage the printer and cause a fire Before shipping the printer be sure to execute Shipping The Printer from the printer driver Shipping the printer without taking necessary measures could c...

Страница 260: ...ver or has not been launched on the server when working on the client The process may not be completed correctly if the Status Monitor is running Shipping The Printer consumes ink Execute it only when...

Страница 261: ...akes approximately 20 minutes for the printer to prepare to be moved Only operate the printer after the message indicating that the removal of ink has been completed appears Important During execution...

Страница 262: ...completed appears 7 Check that execution of Shipping The Printer is completed and then click OK 8 Turn the power off after you confirm that the printer has stopped 9 Disconnect the power cord and inte...

Страница 263: ...er confirming that printing is completed remove all interface cables after turning off the printer s power 2 From Start menu select All apps Canon LX D5500 or Canon LX P5510 Canon LX D5500 Printer Dri...

Страница 264: ...ll appear 4 Click Yes Restart Windows Note If No is selected always restart your computer before installing the printer driver again If the network utility is installed a screen such as the following...

Страница 265: ...When the network utility is launched it will automatically search for a printer but if the printer is not detected perform a search for the printer From the main screen s View menu click Find Again or...

Страница 266: ...admin To prevent people other than the network administrator from configuration it is recommended to change the default password at the time of purchase Configure the Installation Site Configure the i...

Страница 267: ...work Utility 4 Enter the printer s installation site into Location click OK When changing the configuration limit it to 15 characters single byte alphanumeric characters and some symbols For details r...

Страница 268: ...ministrator can change the settings 1 Select the printer to configure from the main screen 2 From the Settings menu click Printer settings Or click on the toolbar 3 Enter the password click OK The def...

Страница 269: ...er the password click OK 4 Click on the TCP IP tab select one of the followings Get IP address automatically If there is a DHCP server on the network the printer s IP address will be acquired automati...

Страница 270: ...the steps below when instructed by dealer Normally this is unnecessary 1 Select the printer to configure from the main screen 2 From the Settings menu click on Printer settings Or click on the toolba...

Страница 271: ...Follow the steps below when instructed by dealer Normally this is unnecessary 1 Select the printer to configure from the main screen 2 From the Settings menu click on Printer settings Or click on the...

Страница 272: ...r s network status 1 Select the printer to configure from the main screen 2 From the Settings menu click Printer LAN Status Or click on the toolbar The LAN s communication status will be displayed To...

Страница 273: ...re so that only computers with the designated MAC address can connect to this printer 1 Select the printer to configure from the main screen 2 From the Settings menu click MAC address filter 3 Enter t...

Страница 274: ...gured Note To remove a MAC addresses that was added Select a MAC address to delete from the list and click Delete 6 Click OK Important When the MAC address set had been wrong the computer will not be...

Страница 275: ...to configure from the main screen 2 From the Setting menu click Restore the factory default value 3 Enter the password click OK A confirmation message will be displayed 4 Click OK Note After executin...

Страница 276: ...printers search range and the network s time out value are described below Setting the Printers Search Range When searching for this printer the IP address to be searched for can be specified 1 From...

Страница 277: ...dd The IP address will be added Up to 16 IP addresses can be specified Note To remove an added IP addresses select from the list and click Delete Clicking Restore default will restore the content of t...

Страница 278: ...Appendix 4 Click the Display Items tab and check an item such as Installation Location check box to display Note Clicking Restore default will restore the content of the Display Items tab to its defau...

Страница 279: ...id resending print data due to the printer timing out or fix errors due to network delays Bidirectional communication error extend the network time out value 1 From the Environmental settings menu cli...

Страница 280: ...0 80 mm sec 7 9 6 3 4 7 3 2 inch sec Automatic speed 150 120 90 80 70 60 50 mm sec 5 9 4 7 3 5 3 2 2 8 2 4 2 0 inch sec Printable area W x L AIS mode ON 105 9 mm x 497 0 mm 4 17 inch x 19 6 inch AIS m...

Страница 281: ...tion 268W Sleep mode 9 W Dimensions W x D x H 386 mm x 570 mm x 394 mm 15 2 inch x 22 4 inch x 15 5 inch With optional cutter 386 mm x 687 mm x 394 mm 15 2 inch x 27 0 inch x 15 5 inch Weight Approxim...

Страница 282: ...ation direction Media front edge alignment 100 mm 3 94 inch and less from rear feeder slot to a backward direction Auto Cutter Option Type Rotary Cutter Installation configuration Screwed to the paper...

Страница 283: ...ustment 103 112 Cutter cover 4 Cutter Settings tab 241 D Default Settings 50 Density 80 Detailed Printhead Position Adjustment 169 Detailed Settings 72 E Error lamp 8 F Fanfold Paper Mode 114 Favorite...

Страница 284: ...w 44 Print Speed 97 99 Print status 148 Print with the selected orientation 66 R Rating plate 5 Rear feeder slot 5 Register Delete 44 Replacing Ink Tank 180 Replacing the Maintenance Cartridge 188 Res...

Страница 285: ...281 Index V Version Information 68 W Warning message 150 236...

Отзывы: