4
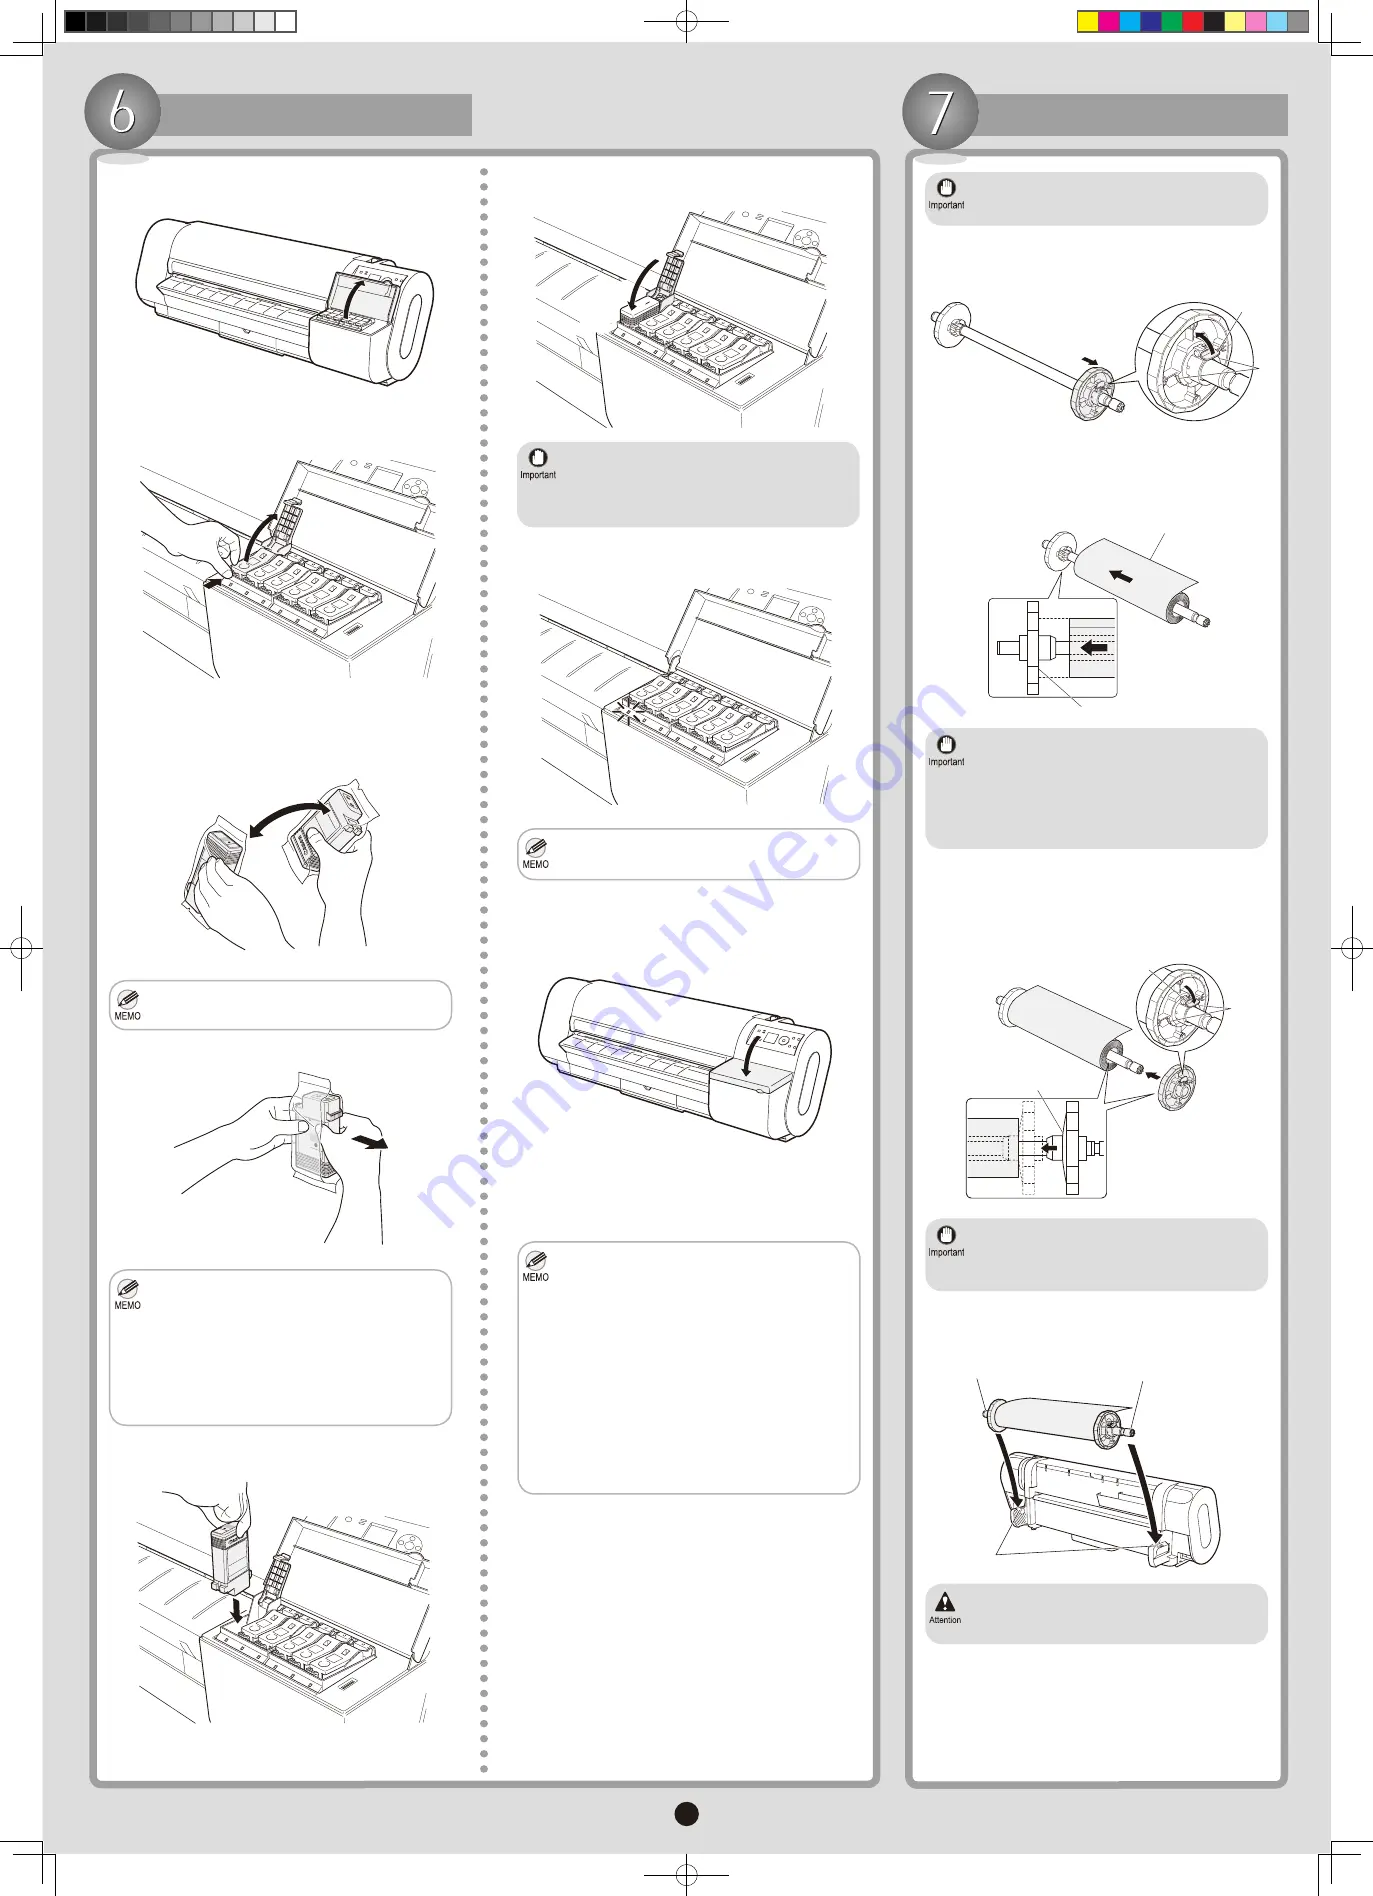
Install an Ink Tank
Load a Roll
Lift the
Holder Stopper
lever (a) from the shaft
side to unlock it. Holding the
Holder Stopper
at the
position indicated (b), remove it from the
Roll Holder
.
1.
With the edge of the roll paper facing toward the
printer, insert the
Roll Holder
shaft (a) into the guide
grooves (b) of the
Roll Holder Slot
on both sides.
4.
We recommend wearing clean cloth gloves
when handling rolls to protect the printing
surface.
•
With the edge of the roll paper (a) facing back as
shown, insert the roll in the
Roll Holder
from the
right. Insert the roll firmly until it touches the flange (b)
of the
Roll Holder
.
2.
Insert the
Holder Stopper
from the right in the
Roll
Holder
as shown. Holding it at the position shown
(b), push it firmly in until the flange (a) of the
Holder
Stopper
touches the roll. Lock the
Holder Stopper
lever (c) by pushing it down toward the shaft side.
Insert the roll firmly so that there is no gap
between the roll and the flange of the
Roll
Holder
. If there is a gap, it may cause feeding
problems.
•
Set the roll on a table or other flat surface so
that it does not roll or fall. Rolls are heavy, and
dropping a roll may cause injury.
•
Insert the roll firmly so that there is no gap
between the roll and the flange of the
Roll
Holder
. If there is a gap, it may cause feeding
problems.
•
Be careful not to put your fingers between the
Roll Holder
shaft (a) and the guide grooves (b)
when loading rolls.
•
Open the
Ink Tank Cover
.
1.
Press the tip of the
Ink Tank Lock Lever
of the color
for installation and open the
Ink Tank Lock Lever
.
2.
Never touch the ink holes or metal contacts.
This may cause stains, damage the
Ink Tank
,
and affect printing quality.
•
Avoid dropping the
Ink Tank
after removing it
from the pouch. Otherwise, ink may leak and
cause stains.
•
Open the pouch and remove the
Ink Tank
.
4.
If you do not agitate the
Ink Tank
, the ink may
sediment, which may affect printing quality.
•
Before removing the
Ink Tank
from the pouch, shake
it gently seven or eight times. Agitate the ink in the
Ink Tank
by inverting it repeatedly. Rotate your wrist
to turn the
Ink Tank
upside-down and right side up.
3.
Do not remove and shake the
Ink Tank
that has
already been installed in the printer. Ink may
leak out.
•
Insert the
Ink Tank
into the holder facing as shown,
with the ink holes down.
5.
Close the
Ink Tank Lock Lever
until it clicks.
6.
If the
Ink Tank
does not fit in the holder, make
sure the color of the
Ink Tank Lock Lever
matches the color of the
Ink Tank
, and check
the orientation of the
Ink Tank
before reloading
it.
•
Make sure the
Ink Lamp
is lit in red.
7.
Ink lamp
flashes when there is little ink left.
•
Repeat steps 2-7 to install each
Ink Tank
.
8.
Close the
Ink Tank Cover
.
9.
After you have installed the
Printhead
and
Ink Tank
,
the system automatically fills with ink. This process
takes about ten minutes.
During printer installation, ink fills the system
between the
Ink Tank
and
Printhead
. The ink
level indicators may drop to 80% immediately,
but this does not indicate a problem with the
printer.
•
Follow the steps below to change the language
used on the
Display Screen
.
•
Press the
Menu
button to display
Main Menu
.
1.
Press ▲ or ▼ to select
System Setup
, and
then press the ► button.
2.
Press ▲ or ▼ to select
Language
, and then
press the
►
button.
3.
Press ▲ or ▼ to select the language, and
then press the
OK
button.
4.
a
b
a
b
c
a
b
a
b
a
000_AB7-5374-V1_J531QSG_E.indd 4
2006/05/26 13:40:57


