background image

2

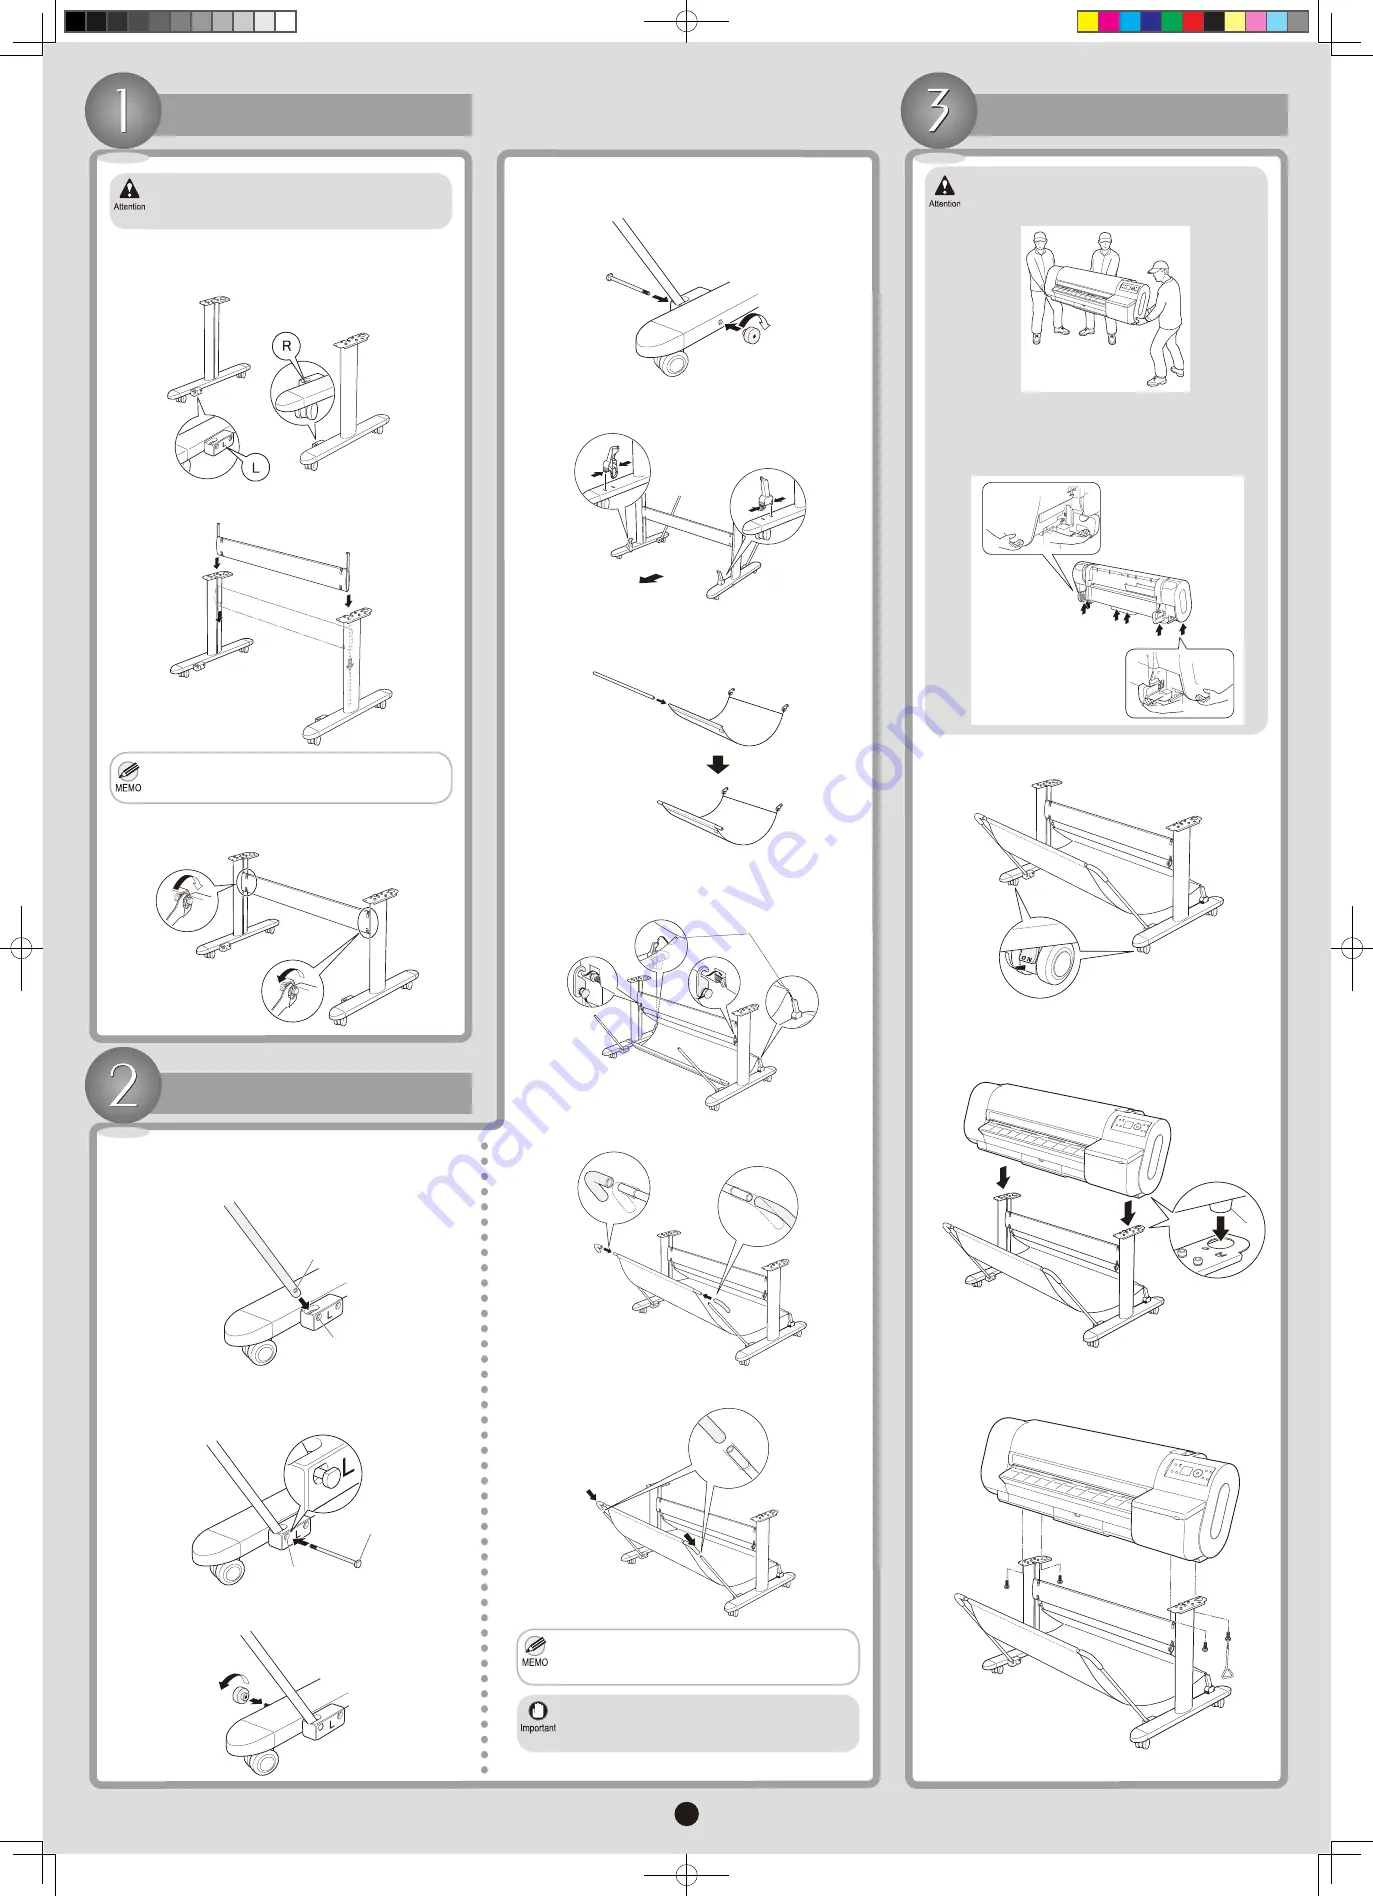
Assemble the Stand

Stand

 assembly requires two or more people. 

Assembling the 

Stand

 alone poses a risk of 

injury or accidental bending of the stand.

Position the 

Stand L

 and 

Stand R

 so that the 

Bascket Fastner L

 and 

Bascket Fastner R

 are on 

the inside toward the front.

1.

Insert the 

Stand Stay

 fully into the grooves of the 

Stand L

 and 

Stand R

 until it stops.

2.

While squeezing the 

Basket Holder

 in the position 

indicated with both hands, insert it in the hole on the 

back of 

Stand L

 and 

Stand R

.

5.

Use the 

Wrench

 to tighten the hex screws on the top 

and bottom of both sides and secure the 

Stand Stay

.

3.

Insert 

Basket Rod #2

 in the front holes of the 

Output 

Stacker

, opening the 

Output Stacker

 with the white 

tag at the front on the right and 

Basket Fastener A


on the back.

6.

Attach the side holes (a) in the middle of the 

Output 

Stacker

 to the 

Basket Holder

, and attach both 

Basket Fastner L

 and 

Basket Fastner R

 to the 

Stand Stay

.

7.

Be careful not to put your fingers between the 

Stand Stay

 fixtures and the groove of 

Stand

.

Repeat steps 1-3 to insert the other 

Basket Rod #1


into the 

Stand R

. Insert 

Basket Bolts

 and secure 

them with 

Basket Decorative Nuts

.

4.

Attach the Output Stacker

Move the 

Stand

 into position and make sure the front 

casters are locked.

1.

Insert 

Basket Bolts

 into the hole of 

Bascket Fastner 

L

, fitting the head of 

Basket Bolts

 (b) in the hole of 

Bascket Fastner L

 (a).

2.

Insert one 

Basket Rod #1

 into the hole of 

Bascket 

Fastner L

 so that the hole of 

Basket Rod #1

 (a) is 

aligned with the hole of 

Bascket Fastner L

 (b).

1.

Use 

Basket Decorative Nuts

 to secure the 

Basket 

Bolts

.

3.

Insert 

Basket Rod Caps

 on both ends of 

Basket 

Rod #2

 until they cover the lines.

8.

Insert 

Basket Rod Caps

 on both ends of 

Basket 

Rod #1

 until they cover the lines.

9.

When using the 

Output Stacker

, push down 

both 

Basket Rods #1

 fully toward the front, 

keeping 

Basket Rod #2

 level.

Moving the printer requires at least three 

people. Be careful to avoid back strain and other 

injuries.

Install the Printer

When moving the printer, firmly grasp the 

carrying handles under each side. Holding the 

printer at other positions is dangerous and 

poses a risk of injury and damage if the printer 

is dropped. 

With three people holding the printer carrying 

handles, align the legs of the printer (a) with the 

round holes on the 

Stand

 as you set the printer down 

on the 

Stand

.

2.

To secure the printer to the stand, use the 

Allen 

Wrench

 to tighten the two 

Main Unit Securing Bolts


on either side from under the printer.

3.

Always unlock the casters before moving the 

printer. Moving the printer while the casters are 

locked may scratch the casters or the floor.

b

a

a

b

Back

a

a

000_AB7-5374-V1_J531QSG_E.indd   2

2006/05/26   13:40:46

Содержание iPF700

Страница 1: ...procedures Instructions for network printing Printer Driver Functions The printer driver help includes the following information Printer driver function details Printer driver instructions Troubleshooting tips Printer menu descriptions Printer driver function details Specifications details on consumables and optional accessories and other information Supported Paper The Media Guide provides inform...

Страница 2: ...s are locked 1 Insert Basket Bolts into the hole of Bascket Fastner L fitting the head of Basket Bolts b in the hole of Bascket Fastner L a 2 Insert one Basket Rod 1 into the hole of Bascket Fastner L so that the hole of Basket Rod 1 a is aligned with the hole of Bascket Fastner L b 1 Use Basket Decorative Nuts to secure the Basket Bolts 3 Insert Basket Rod Caps on both ends of Basket Rod 2 until ...

Страница 3: ...he instructions This may stain your hands and damage the printer Close the Top Cover 5 Press the Power button to turn on the printer 1 Instructions are now shown on the Display Screen regarding Printhead installation Push down the Printhead Fixer Lever toward the back completely 10 Pull the Printhead Fixer Cover down toward the front to lock the Printhead in place 9 Push the Carriage Cover forward...

Страница 4: ...ts This may cause stains damage the Ink Tank and affect printing quality Avoid dropping the Ink Tank after removing it from the pouch Otherwise ink may leak and cause stains Open the pouch and remove the Ink Tank 4 If you do not agitate the Ink Tank the ink may sediment which may affect printing quality Before removing the Ink Tank from the pouch shake it gently seven or eight times Agitate the in...

Страница 5: ...mputer on Insert the provided User Software CD ROM in the CD ROM drive Turn the printer on In the Setup Menu window click Install Printer Driver You can install the following applications individually by clicking Install Individual Software Printer driver Software required for printing documents you create in various source applications To choose a different language click Language GARO Status Mon...

Страница 6: ...e printer driver is now installed If you selected the Media Configuration Tool check box follow the instructions on the screen to install it In the Finish window select Restart my computer now and click Finish The printer driver settings take effect after the computer restarts If you selected the PosterArtist check box follow the instructions on the screen to install it Use in USB 2 0 High Speed m...

Страница 7: ...the same time as the Media Configuration Tool provides information accessible from your computer on supported paper as well as paper handling tips If you select the check box after the printer driver is installed the Media Configuration Tool is started automatically if paper information must be updated After reading the software license agreement click Accept 6 Click Continue 7 Exit other applicat...

Страница 8: ...ue 6 Click Agree 7 Click Continue 8 Exit other applications and click Continue 9 Set up networking functions for AppleTalk connections In System Preference click Network to display the Network window 1 In Show choose Built in Ethernet Next click AppleTalk select Make AppleTalk Active and click Apply now 2 If the printer name is not displayed in Printer List click Add 4 Select the printer OS 10 4 M...

Отзывы: