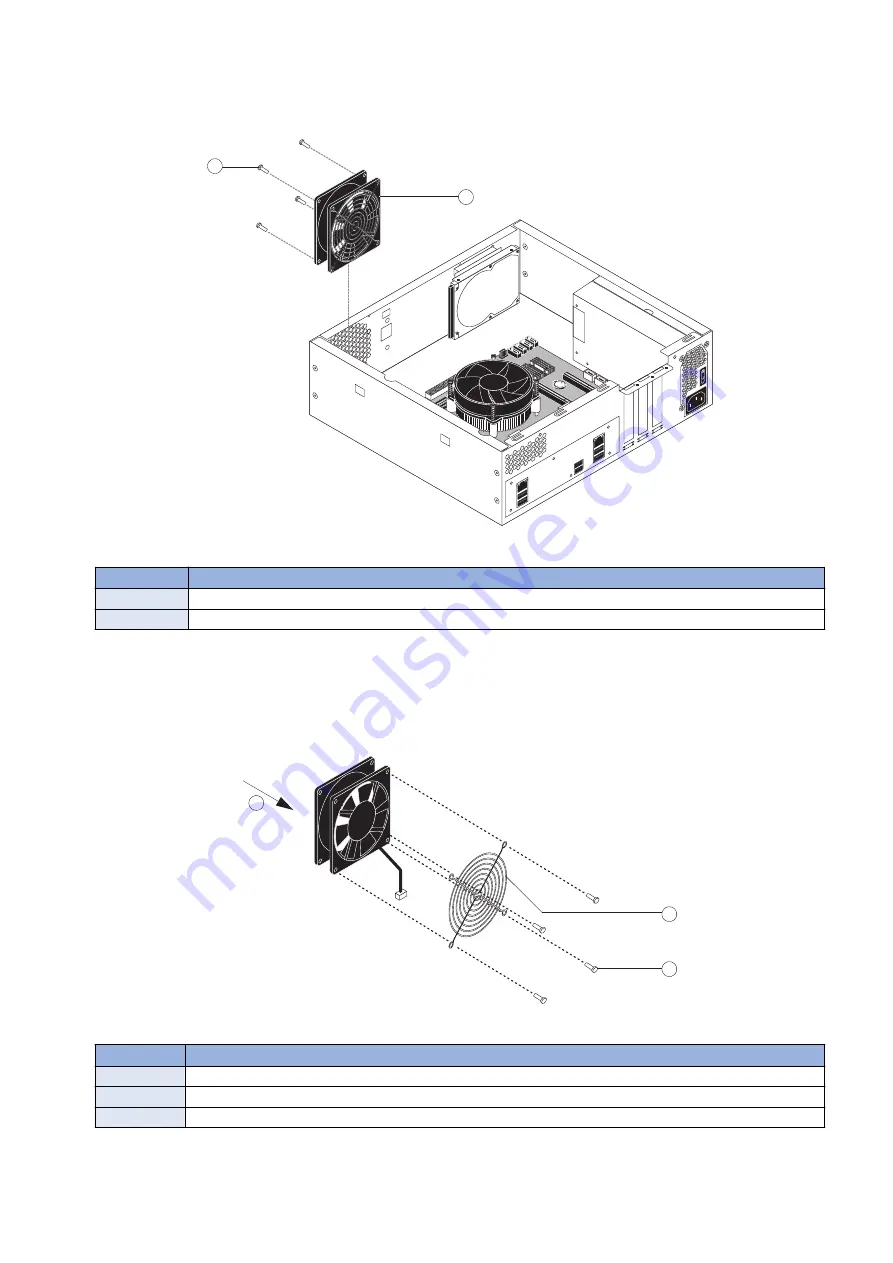
3. Remove the four plastic rivets that attach the fan to the chassis, and remove the fan.
To remove a rivet, use a flathead screwdriver to pry loose the rivet head on the outside of the chassis while squeezing and
pushing the locked end of the rivet with your fingers or a pair of pliers. Set the rivets aside so that you can replace them later.
1
2
Figure 22: Removing the chassis fan
No.
Name
1
Rivet (1 of 4)
2
Chassis fan
4. If you are removing the chassis fan in order to replace it with a new one, remove the fan guard from the face of the
fan (see below figure).
To remove the plastic rivets that secure the fan guard to the fan, use a flathead screwdriver to pry loose the rivet head while
squeezing and pushing the locking end of the rivet with your fingers or a pair of pliers.
Set aside the fan guard and rivets so that you can install them later on the new chassis fan.
1
2
3
Figure 23: Removing/replacing the chassis fan guard
No.
Name
1
Airflow direction
2
Fan guard
3
Rivet (1 of 4)
3. REPLACING PARTS
38
Содержание imagePRESS Server G250 V2
Страница 7: ...Introduction 1 Introduction 2 Specifications 7 ...
Страница 16: ...Using the imagePRESS Server 2 Using the imagePRESS Server 11 ...
Страница 20: ...REPLACING PARTS 3 Replacing Parts 15 ...
Страница 52: ...INSTALLING SYSTEM SOFTWARE 4 Installing System Software 47 ...
Страница 74: ...TROUBLESHOOTI NG 5 Troubleshooting 69 ...
Страница 86: ...INSTALLATION PROCEDURE 6 Before Connection 81 Installation Procedure 83 Settings After Installation 91 ...
Страница 94: ...9 10 11 2x 1x 12 1x Cross Ethernet Cable 1x 6 INSTALLATION PROCEDURE 88 ...


