background image

5-7

Reg

ist

er

ing
 D

estina

tions

 in

 the
 A

ddr
ess
 B

ook

(13)  Select <Apply> using [ ] or [ ] and press [OK].


Fax

 <Apply>

 Type: Fax
 Name: CANON
 Destination: 012345

...


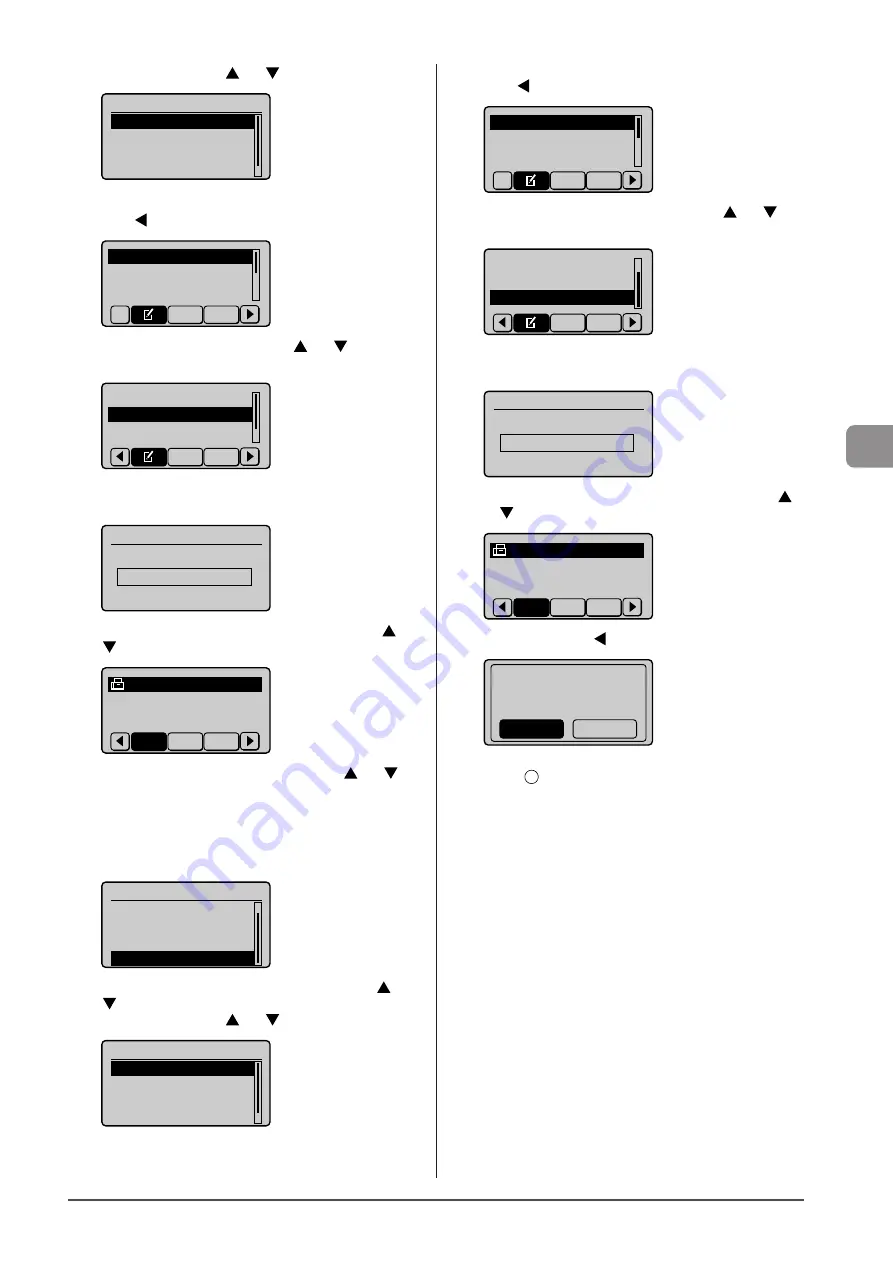
To edit a coded dial code

(1)  Press [ ].


Register New Destina

Edit Address Book
Address Book Details

All  A-Z

(2)  Select <Edit Address Book> using [ ] or [ ] and press 

[OK].


Register New Destin

...

Edit Address Book

Address Book Details

All  A-Z

When the address book PIN is selected

Use the numeric keys to enter the PIN and press [OK].


Address Book PIN


  (Apply: Press OK)

*******

(3)  Select the destination that you want to edit using [ ] or 

[ ] and press [OK].


     CANON 0123456789

All

A-Z

0-9

(4)  Select the item that you want to edit using [ ] or [ ] 

and press [OK].

•  Type
•  Name
•  Destination
•  Coded Dial


Fax


Type: Fax

 Name: CANON02
 Destination: 987654

...


Coded Dial: 002

(5)  When the edit is complete, select <Apply> using [ ] or 

[ ] and press [OK].

(6)  Select <Apply> using [ ] or [ ]and press [OK].


Fax

 <Apply>

 Type: Fax
 Name: CANON02
 Destination: 987654

...


To delete a coded dial code

(1)  Press [ ].


Register New Destina

Edit Address Book
Address Book Details

All  A-Z

(2)  Select <Delete From Address Book> using [ ] or [ ] 

and press [OK].


Edit Address Book
Address Book Details

Delete From Address

All  A-Z

When the address book PIN is selected

Use the numeric keys to enter the PIN and press [OK].


Address Book PIN


  (Apply: Press OK)

*******

(3)  Select the destination that you want to delete using [ ] 

or [ ] and press [OK].


     CANON 0123456789

All

A-Z

0-9

(4)  Select <Yes> using [ ] and press [OK].


Delete from
Address Book?

No

Yes

3

  Press [

](Back) to close the menu screen.

Содержание imageCLASS D1320

Страница 1: ...6 1 6 Using the Scan Functions P 7 1 7 Maintenance P 8 1 8 Troubleshooting P 9 1 9 Registering Setting the Various Functions P 10 1 10 Appendix P 11 1 11 Basic Operation Guide Be sure to read the manual before using the machine Keep the manual for future reference Network Setting Procedure Security Functions Searching the Installation and Connection Procedure See the Starter Guide See the e Manual...

Страница 2: ...ou can sort copies into sets arranged in page order You can reduce multiple documents to copy them onto one sheet You can make a copy of a 2 sided card onto one side of paper 3 2 1 1 1 1 2 2 2 3 3 3 3 2 1 3 2 1 3 2 1 Network Settings Remote UI You can copy with the background color of the document erased You can also adjust the background for each color Background Adjustment Quick View Perform Use...

Страница 3: ...sult on a computer display Some printer driver settings are provided as Profiles beforehand You can perform printing which suits your needs only by selecting a Profile Printing documents from a computer For details see Printing from a Computer from p 4 1 PrintingdocumentsfromaUSBmemory Mediaprinting For details see Printing in the e Manual Enlarged Reduced Printing Booklet Printing Watermark Print...

Страница 4: ...ent Directly from a Computer PC Fax For details see Fax in the e Manual Forwarding the Received Fax Registering Destinations in the Address Book For details see Registering Destinations in the Address Book from p 5 1 For details see Using the Fax Functions from p 6 1 There are a variety of fax functions that are explained in later pages of this manual as well as in the e Manual The machine is also...

Страница 5: ... can store the documents temporarily in the memory without printing You can print the stored documents at any time If you do not need them you can delete them saving paper to be used If an external telephone is connected you can switch to the fax receiving mode immediately by dialing the ID number for fax receiving using the dial buttons of the telephone during a phone call You can combine multipl...

Страница 6: ... dialog box Scanning from the Windows Fax and Scan dialog box Scanning from Windows Photo Gallery Scanning from an Application Saving the Documents Using the Operation Panel of the Machine Saving the Documents Using Operations from a Computer You can save scanned documents in a USB memory connected to the machine For details see Scan in the e Manual For details see Using the Scan Functions from p ...

Страница 7: ...Remote UI On Off Configuring the machine Communication mode Communication speed Waiting time for connection DNS WINS server Configuring a computer IP address Subnet mask Gateway address As needed Configuration for communicating with a computer LPD RAW WSD Port settings Sharing settings for the printer As needed Miscellaneous Settings Administration Settings Manager ID PIN Device name Installation ...

Страница 8: ...r Type 2 7 Printable Area 2 8 Loading Paper 2 9 In the Paper Drawer 2 9 In the Multi Purpose Tray 2 10 Precautions when Loading Paper 2 12 Paper Loading Capacity 2 12 Paper Loading Orientation 2 13 When printing paper with a letterhead or logo previously printed paper 2 13 When printing on envelopes 2 13 Setting the Paper Size and Type 2 14 For the Paper Drawer 2 14 Setting a Custom Paper Size 2 1...

Страница 9: ...dding Pauses 6 9 Sending to Multiple Destinations at a Time Sequential Broadcast 6 10 RX Mode 6 11 RX Mode 6 11 Auto mode 6 11 Fax Tel mode 6 12 Answer mode 6 13 Manual mode 6 13 DRPD Distinctive Ring Pattern Detection mode 6 13 Changing the Receive Mode 6 14 Advanced Settings for the Fax Tel Auto Switch Mode 6 14 Forwarding Fax Documents 6 15 Setting Document Transfer Automatic Forwarding 6 15 Fo...

Страница 10: ...t 9 5 Paper Jams in the Front Cover 9 5 Paper Jams in the 2 sided Transport Guide 9 6 Onscreen Message 9 8 Error Codes 9 8 When Incorrect Size Setting Appears 9 11 Troubleshooting 9 12 Check the Following First 9 12 Is the power switched ON 9 12 Has the power switch been just turned ON 9 12 Is the machine in the sleep mode 9 12 Are the settings properly configured 9 12 Is the Error indicator on or...

Страница 11: ...ion easily Important Safety Instructions Basic Operation Copy 1 Fax 1 Print 1 Scan Network Settings The e Manual is included in the User Software CD ROM Security Setting and Managing from Computer Troubleshooting Maintenance Setting Menu List Specifications 1 If you are using Macintosh see the following Driver Guides or Help for more details on these functions You can find the driver guides in the...

Страница 12: ...scribed operations Keys and Buttons Used in This Manual The following symbols and key names are a few examples of how keys to be pressed are expressed in this manual Operation panel keys Key icon Key name Example Stop Display Specify destination Buttons and items on the computer display Preferences Illustrations Used in This Manual Illustrations used in this manual Illustrations of the model D1370...

Страница 13: ...exposed to rain or snow A location near a water faucet or water A location exposed to direct sunlight A location subject to high temperatures A location near open flames When installing the machine gently lower the machine to the installation site so as not to catch your hands between the machine and the floor or between the machine and other equipment as this may result in personal injury When co...

Страница 14: ...he machine If these items come into contact with a high voltage area inside the machine this may result in a fire or electrical shock If these items are dropped or spilled inside the machine immediately turn off the power switches of the machine and computer and disconnect the interface cable if it is connected Then unplug the power plug from the AC power outlet and contact your local authorized C...

Страница 15: ...ed in a bundle A part of the power cord is put in an aisle The power cord is put in front of the heating appliance CAUTION The fixing unit and its surroundings inside the machine become hot during use When removing jammed paper or when inspecting the inside of the machine do not touch the fixing unit and its surroundings as this may result in burns When removing jammed paper or when inspecting the...

Страница 16: ...ome into direct contact with your skin If the toner comes into contact with your skin wash with soap If the skin becomes irritated or you inhale the toner consult a physician immediately Do not pull out the sealing tape forcefully or stop at midpoint as this may cause toner to spill out If toner gets into your eyes or mouth wash them immediately with cold water and consult a physician Others WARNI...

Страница 17: ...ower outlet for both the machine and any of the following equipment Copy machine Air conditioner Shredder Equipment that consumes a large amount of electricity Equipment that generates electrical noise When unplugging the power cord keep interval of 5 seconds or more before plugging it again Miscellaneous precautions The maximum power consumption of the machine is 1 100 W or less Electrical noise ...

Страница 18: ... machine is designed with the latest technology to provide trouble free operation If you encounter a problem with the machine s operation try to solve it by using the information in Chapter 9 If you cannot solve the problem or if you think your machine needs servicing contact Canon Customer Care Center at 1 800 OK CANON between the hours of 8 00 A M to 8 00 P M EST Monday through Friday On line su...

Страница 19: ...t that this product including the SOFTWARE is shipped transferred or exported into any country 2 Rights holders of the SOFTWARE retain in all respects the title ownership and intellectual property rights in and to the SOFTWARE Except as expressly provided herein no license or right expressed or implied is hereby conveyed or granted by rights holders of the SOFTWARE to you for any intellectual prop...

Страница 20: ...ant to Part 15 of the FCC Rules These limits are designed to provide reasonable protection against harmful interference in a residential installation This equipment generates uses and can radiate radio frequency energy and if not installed and used in accordance with the instructions may cause harmful interference to radio communications However there is no guarantee that interference will not occ...

Страница 21: ...e telephone company may temporarily disconnect service The telephone company also retains the right to make changes in facilities and services that may affect the operation of this equipment When such changes are necessary the telephone company is required to give adequate prior notice to the user However if advance notice is not possible the telephone company will notify the customer as soon as p...

Страница 22: ...le si vous communiquez avec les pays étrangers NOTE Canon vous conseille d utiliser une ligne individuelle conforme aux normes industrielles à savoir ligne téléphonique 2 500 pour appareil à clavier ou 500 pour appareil à cadran impulsions Il est également possible de raccorder ce télécopieur à un système téléphonique à poussoirs car la plupart de ces systèmes émettent des signaux d appel non norm...

Страница 23: ... cannot escape from the machine during any phase of user operation CDRH Regulations The Center for Devices and Radiological Health CDRH of the U S Food and Drug Administration implemented regulations for laser products on August 2 1976 These regulations apply to laser products manufactured from August 1 1976 Compliance is mandatory for products marketed in the United States CAUTION Use of controls...

Страница 24: ...xxiv ...

Страница 25: ... Fax Mode D1370 D1350 Only 1 6 Scan Mode 1 6 USB Direct Print Mode 1 6 Navigating the Menu 1 7 Entering the Menu Screen 1 7 Scrolling the Menu 1 7 Selecting a Menu Item 1 7 Configuring Menus Using the Navigation Keys 1 7 Returning to the Default Screen 1 8 Entering Text 1 9 Changing the Entry Mode 1 9 Entering Text Symbols and Numbers 1 9 Moving the Cursor Entering a Space 1 9 Deleting text symbol...

Страница 26: ... envelopes here 7 Auxiliary Tray Multi purpose Tray Pull it out and load the paper stack 8 Paper Guides Multi purpose Tray Adjust these guides to fit the document 9 Paper stopper Prevents paper from falling from the output tray 10 Output tray Printed paper such as copies prints and faxes come out from the output tray 11 Open Button Push to open the front cover 12 Front Cover Open this cover to rep...

Страница 27: ... facing up Printed paper is stacked in reverse page order The sub output tray is suitable for use when printing transparencies labels or envelopes that curl easily because the printed paper remains flat when output 8 Back cover Open this guide to clear paper jams Interior 1 Scanning area Used to scan documents from the feeder 2 Platen glass Place your documents on 3 Toner guides Used to insert the...

Страница 28: ...r to the right Press to increase the volume while the fax ring tone sounds OK key Press to confirm an action or setting Back key Press to return to the previous screen View Settings key You can check the settings 5 Numeric keys 0 9 Enter characters and numbers key Press to switch the character entry mode and press to switch between pulse and tone dialing to send a fax key Press to enter symbols Re...

Страница 29: ...gistered under one touch keys or coded dial codes 3 Coded Dial key Specifies recipients registered 4 Recall key Redial the last number called Only enabled when the mode screens for fax e mail or file server operations are displayed 5 Hook key Press when you want to dial without lifting up the handset of the external telephone 6 Pause key Press to insert a pause in the fax number 1 5 6 4 2 1 3 ...

Страница 30: ...sity 0 Original Type Text 2 Sided Off Fax Mode D1370 D1350 Only Press to switch to the fax mode screen Specify destination 01 01 2011 12 52AM RX Mode Auto Resolution 200 x 1 When the fax mode screen is displayed you can make your selection by using or The currently selected menu item is highlighted Press OK to proceed to the next screen Specify destination 01 01 2011 12 52AM RX Mode Auto Resolutio...

Страница 31: ...n press Back or Timer Settings Time Date Settings Sleep Timer Auto Reset Timer Screen After Auto R Back or OK or Menu Preferences Timer Settings Common Settings Copy Settings Navigating the Menu Configuring Menus Using the Navigation Keys How to configure menus What you want to do Screen example Procedure Adjust levels such as density on the scale Density Background Default Press or to adjust the ...

Страница 32: ...re Using the Machine Returning to the Default Screen Press Menu to exit the menu screen and return to the default screen NOTE If you press Menu before you press OK The changes made to the settings are not saved ...

Страница 33: ...i 4 JKL jkl 5 MNO mno 6 PQRS pqrs 7 TUV tuv 8 WXYZ wxyz 9 Not available 0 _ Not available Moving the Cursor Entering a Space Move the cursor by pressing or To enter a space move the cursor to the end of the text and press Deleting text symbols or numbers To delete text numbers or symbols press Clear To delete all text numbers or symbols press and hold Clear Example Enter CANON 1 Make sure that the...

Страница 34: ...1 10 Before Using the Machine 6 Press until the letter N appears on the screen Register Unit Name CANON Apply Entry Mode A 7 Select Apply using or and press OK The entry is complete ...

Страница 35: ...can set the auto sleep timer between 3 and 240 minutes in one minute interval The default is 5 minutes 5 Press Menu to close the menu screen NOTE When the machine enters the sleep mode Energy Saver lights green To enter the sleep mode manually Press Energy Saver The machine does not enter the sleep mode when the machine is in the middle of operation the Processing Data indicator lights or is blink...

Страница 36: ...ur Clock Specify the time display format Select one of the following display formats using or and press OK The formats include the following 12 Hour AM PM 24 Hour Current Time Settings Specify the current time and date Use or to enter time and date or to switch between AM and PM To move the cursor press or Current Time Settings 01 01 2011 12 52 AM Time Zone Settings Specify the time zone Select th...

Страница 37: ...er 2 9 In the Multi Purpose Tray 2 10 Precautions when Loading Paper 2 12 Paper Loading Capacity 2 12 Paper Loading Orientation 2 13 When printing paper with a letterhead or logo previously printed paper 2 13 When printing on envelopes 2 13 Setting the Paper Size and Type 2 14 For the Paper Drawer 2 14 Setting a Custom Paper Size 2 14 Registering the Default Paper Settings for the Multi purpose Tr...

Страница 38: ...aper 2 22 lb Bond 80 g m IMPORTANT To place your document Make sure any glue ink or correction fluid on the document is completely dry before placing it on the platen glass or into the feeder To prevent paper jams in the feeder Do not use any of the following Wrinkled or creased paper Carbon paper or carbon backed paper Curled or rolled paper Coated paper Torn paper Onion skin or thin paper Staple...

Страница 39: ...nt and Paper Handling FAX Platen Glass Feeder 1 8 3 mm 1 8 3 mm 3 64 1 mm 3 64 1 mm 1 8 3 mm 1 8 3 mm 3 64 1 mm 3 64 1 mm Scan Platen Glass Feeder 1 16 1 5 mm The whole document can be scanned without any margins ...

Страница 40: ...ng is complete remove the document from the platen glass Placing Documents in the Feeder 1 Spread the document guides a little wider than the document width 2 Fan the document stack and align the edges of the pages Thoroughly fan in small batches Align the edges on a flat surface a few times 3 Neatly place the document face up Place the document under the load limit guides A Make sure that the pap...

Страница 41: ...ot be scanned While scanning a document Do not add or remove documents When scanning is complete Remove the document from the document delivery tray to avoid paper jams Avoid scanning the same document more than 30 times When scanned repeatedly the document can become folded or torn which may cause paper jams Be sure to align the document guides with the width of the paper If the document guides a...

Страница 42: ... 3 Foolscap 8 1 2 x 13 215 9 mm x 330 2 mm 3 A foolscap 8 1 8 x 13 3 8 205 7 mm x 337 8 mm 3 Envelope COM10 4 1 8 x 9 1 2 104 7 mm x 241 3 mm 5 Envelope Monarch 3 7 8 x 7 1 2 98 4 mm x 190 5 mm 5 Envelope C5 6 3 8 x 9 162 mm x 229 mm 5 Envelope B5 6 7 8 x 9 7 8 176 mm x 250 mm 5 Envelope DL 4 3 8 x 8 5 8 110 mm x 220 mm 5 Index Card 3 x 5 76 mm x 127 mm Custom Paper Size 6 1 This type of paper can...

Страница 43: ...kled or creased paper Curled or rolled paper Torn paper Damp paper Very thin paper Paper printed by a thermal transfer printer Do not copy on the reverse side The following paper types do not print well Highly textured paper Very smooth paper Glossy paper Make sure that the paper is free of dust lint and oil stains Make sure to test print before purchasing large quantities of copy paper Keep the p...

Страница 44: ... When an envelope is printed the margin is 3 8 10 mm on top bottom right and left NOTE To enlarge the printable area Apply the following setting from the printer driver 1 Click Advanced Setting in the Finishing page of printer driver 2 Set Enlarge Print Area to ON Depending on the job the data may not be printed in a part of document edge or the bottom edge of paper or the following paper may be t...

Страница 45: ...r drawer 2 Slide the paper guides to the size mark for the paper to be loaded While holding the lock release lever A adjust the length of the paper guide A A If you want to change the size of the paper to be loaded be sure to register the paper size in Setting the Paper Size and Type P 2 14 3 Fan the document stack and even the ends Thoroughly fan in small batches Align the edges on a flat surface...

Страница 46: ... the load limit mark lines this may result in misfeeds A A A 7 Specify the loaded paper size and type Setting the Paper Size and Type P 2 14 In the Multi Purpose Tray Before loading paper in the multi purpose tray see Precautions when Loading Paper P 2 12 Use the multi purpose tray when you want to copy or print on a different paper size or type from the one loaded in the paper drawer 1 Open the m...

Страница 47: ...ten curls as shown in the figure 3 Gently insert the envelope into the multi purpose tray with the print side face up 4 Adjust the paper guides to the paper width without space IMPORTANT Adjust the paper guides to the paper width without space If the paper guides are too loose or too tight this may result in misfeeds or paper jams 5 Be sure that the paper stack is loaded under the load limit guide...

Страница 48: ...sult in misfeeds When printing on envelopes Load envelopes with the front side non glued side facing up You cannot print on the reverse side of envelopes Also be sure to close the flap before loading envelopes NOTE For more information on supported paper types Supported Paper Types P 2 6 Abbreviations on the paper guides inside the paper drawer Paper size Paper guide Legal LGL Letter LTR Executive...

Страница 49: ...tch Paper Feed Method us set to Print Side Priority Selecting the Print Side P 2 17 Multi purpose tray Portrait layout Landscape layout 1 sided printing 1 with the printing side facing up with the printing side facing up 1 sided printing 2 with the printing side facing down with the printing side facing down Automatic 2 sided printing with the front side facing down with the front side facing down...

Страница 50: ...lect a paper size using or and press OK Paper Size LTR LGL EXEC FOOLSCAP 5 Select the paper type using or and press OK Paper Type Plain 16 lb Bond 23 Plain L 16 lb Bond Recycled Color 6 Press Select Paper Settings to close the Select Paper screen Setting a Custom Paper Size You can register sizes and types of frequently used paper Multi purpose tray When Register Default Set is Off default The scr...

Страница 51: ...ss Select Paper Settings to close the Select Paper screen Registering the Default Paper Settings for the Multi purpose Tray If you want to always load the same paper in the multi purpose tray register the default paper using the following procedure NOTE If the default paper is registered The setting screen is not displayed when paper is loaded 1 Press Select Paper Settings 2 Select Paper Settings ...

Страница 52: ... select Custom Size Specify the size of X direction and Y direction of the custom paper 1 Select the direction using or and press OK Specify Size Apply X 0 Y 0 X Y 2 Specify the size using or and press OK You can also enter values using the numeric keys Set Length for X 3 8_1 2 3_0 0 3 Select Apply using or and press OK Specify Size Apply X 3 Y 5 X Y 9 Select the paper type using or and press OK P...

Страница 53: ...ded printing 1 sided printing 2 sided printing Front Back Select this setting when using paper types other than preprinted paper using preprinted paper only for 1 sided printing When Print Side Priority is selected All pages are printed on the first side for 1 sided printing so the odd pages are always printed on the first side for both 1 sided and 2 sided printing as shown below The side to be pl...

Страница 54: ... down Place the stack with the front side first page face up Print Side Priority Place the paper stack as shown below when Print Side Priority is selected Feeding direction For details on the procedure for loading paper when using multi purpose tray or when printing pages of the landscape layout see Paper Loading Orientation PaperLoadingOrientation P 2 13 The side to be placed face up is the same ...

Страница 55: ...cting the Document Type 3 5 Copy Settings 3 6 2 Sided Copying 3 6 Enlarging Reducing Copies 3 7 Copying Multiple Documents onto One Sheet N on 1 3 7 Collating Copies 3 8 Erasing Dark Borders or Frame Lines Frame Erase 3 8 Emphasizing the Outline of an Image Sharpness 3 8 Copying an ID Card 3 9 Registering and Using Combination of Copy Settings Mode Memory 3 10 Registering Mode Memory 3 10 Deleting...

Страница 56: ...ng Frame erase Sharpness NOTE Copy Settings When you combine multiple settings for use see Combination of Copy Settings P 3 4 The settings specified here are effective only for the current operation To make the settings effective for all the copy operations see Changing the Default Settings P 3 12 Register your frequently used settings into the Mode Memory It is useful See Registering and Using Co...

Страница 57: ...etails of the job that you want to cancel and press OK Checking and canceling a copy job using Status Monitor Cancel 1 Press Status Monitor Cancel 2 Select Copy Print Job using or and press OK Status Monitor Cancel Device Status Copy Print Job TX Job RX Job 3 Select Job Status using or and press OK Copy Print Job Job Status Copy Job History Print Job History 4 Select a job using or and press OK Th...

Страница 58: ... secify the Copy Ratio later Copy Ratio is fixed at 100 for ID Card Copy The frame width specified at Erase Frame increases decreases according to the Copy Ratio setting Paper Depending on its paper size selected paper source 2 sided copy is not available 4 on 1 2 on 1 If you want to copy a document in a copy ratio different from its default reduction ratio specify the Copy Ratio later This featur...

Страница 59: ...matic adjustment Manual adjustment 2 Adjust background color using or OK Selecting the Document Type Original Type Text Text Photo Text Photo Quality Photo Copy mode screen Setting screen When selecting Text Photo Quality 1 1 Copy Press Start 100 LTR Density 0 Original Type Text 2 Sided Off Select Original Type using or OK Select the appropriate document type using or OK Adjust priority using or O...

Страница 60: ...tation of the original document using or and press OK Original Orientation Portrait Landscape 4 Select how to open the original document using or and press OK Original Format Book Type Calendar Type 5 Select how to open the output using or and press OK Finishing Format Book Type Calendar Type To copy a document by placing on the platen glass 1 Place the next page and press Start Repeat this step u...

Страница 61: ...using or OK Output Size LTR Plain LTR Plain 1 Select Layout 2 on 1 1 2 on 1 2 4 on 1 1 4 on 1 2 N on 1 Off 2 on 1 4 on 1 ID Card Copy Setting screen n e e r c s e d o m y p o C Select 2 on 1 or 4 on 1 using or OK Select the size of the document using or OK Select a output size using or OK To specify the layout 1 Select Select Layout using or OK 2 Select the layout using or OK When your document is...

Страница 62: ...LTR Collate On Erase Frame Off Sharpness 0 1 1 Sharpness To clearly capture halftone photos adjust this setting to the appropriate level on the scale This can counteract the effect of moiré patterns uneven gradation and striped patterns To clearly capture text or lines adjust this setting to the appropriate level on the scale It is best suited for copying blueprints and very weak pencil manuscript...

Страница 63: ...tio 100 Di Paper LTR Plain N on 1 Off 1 1 1 4 Select ID Card Copy using or and press OK N on 1 Off 2 on 1 4 on 1 ID Card Copy 5 Press Start Proceed to the next step when the scan is complete 6 Turn sides Place the card with spacing of 1 4 5 mm from the left edge of the platen glass Align the center of the card with the arrow mark as shown below To place the card horizontally A4 B4 A5 A5 B4 A4 To p...

Страница 64: ...using or and press OK Copy Press Start 100 LTR Erase Frame Off Sharpness 0 Mode Memory Off 1 1 3 Select Register Delete using or and press OK Mode Memory Register Delete Mode 1 Mode 2 Mode 3 4 Select the place to register using or and press OK Select any registered place then you can edit settings Register Delete Mode 1 Mode 2 Mode 3 Mode 4 5 Select items to specify using or and press OK Mode 1 Ap...

Страница 65: ...ew Mode Memory is called all copy settings are replaced with that Mode Memory settings After the Mode Memory is called you can change and copy the settings as you like Keys to be used for this operation OK Start COPY 1 Place your document Placing Documents P 2 4 Supported Document Types P 2 2 2 Press 3 Select Mode Memory using or and press OK Copy Press Start 100 LTR Erase Frame Off Sharpness 0 Mo...

Страница 66: ...formation see Copy Settings P 3 4 5 Select Apply using or after you have specified the setting and press OK Change Defaults Apply No of Copies 1 Density 0 Original Type Text 6 Press Menu to close the menu screen You can confirm the settings of copy function which have been changed from the default setting Keys to be used for this operation Back View Settings 1 Press View Settings The current setti...

Страница 67: ...rinter Driver Installation Guide To view how to use each function Print Driver s Help To view how to display Printer Driver Installation Guide or Help in the Printer Driver see For Macintosh Users P 11 4 Preparing to Print from Your Computer 4 2 Printing from a Computer 4 3 Scaling Documents 4 3 Printing Multiple Pages on One Sheet 4 3 1 sided Printing and 2 sided Printing 4 4 Checking and Canceli...

Страница 68: ...he printer driver The printer driver is software required for printing from an application The printer driver will convert application software s print data to print data for the printer The printer driver for this machine has the following features The printer driver for this machine enables you to output print data at an optimum speed by dividing the workload using a computer and the printer As ...

Страница 69: ...ttings made in Page Size and Output Size 4 If you want to increase or decrease the magnification manually select Manual Scaling specify the scaling ratio for Scaling 5 Click OK NOTE Depending on the selected page size and printer model you are using you may not be able to magnify the document Depending on the printer model you are using you may not be able to magnify the document to the optimum ra...

Страница 70: ...upports 2 sided printing the default setting is 2 sided printing IMPORTANT Precautions on 2 sided printing Do not touch your document when making 2 sided printing until the process is complete After printing on the front side is complete the document is partially output reserved and fed into the machine again for printing on the back side Be sure to close the sub output tray before making 2 sided ...

Страница 71: ...rint Jobs You can check detailed information about print jobs or cancel print jobs in the middle of currently printing or waiting NOTE If the Processing Data Indicator on the operation panel is Turned on blinking A job is being processed Turned off No jobs are in the memory Keys to be used for this operation OK Status Monitor Cancel 1 Press Status Monitor Cancel 2 Select Copy Print Job using or an...

Страница 72: ...ect Yes using and press OK The print job is canceled Cancel No Yes 3 Press Status Monitor Cancel to close the screen NOTE Pressing Stop can also delete the print jobs You can delete the print job also by pressing Stop Press Stop twice to cancel the job when the machine holds one job only For checking only Press Status Monitor Cancel to close the screen ...

Страница 73: ...stering and Editing One Touch Keys 5 3 Registering and Editing from the Operation Panel 5 3 Registering and Editing One Touch Keys using the Remote UI 5 5 Registering and Editing Coded Dial Codes 5 6 Registering and Editing from the Operation Panel 5 6 Registering and Editing a Coded Dial Code Using the Remote UI 5 8 Registering and Editing Destinations for Group Dialing 5 9 Registering and Editin...

Страница 74: ...ppropriate coded dial code to select the destination Registering and Editing Coded Dial Codes P 5 6 Group dialing You can specify up to 199 registered destinations as a group address in one touch keys and coded dial codes Group addresses need to be registered in unused one touch keys or coded dial codes All you need to do is to select a key or code to specify group addresses Registering and Editin...

Страница 75: ...K Register Location Coded Dial One Touch 4 Select Fax or E Mail using or and press OK Destination Type Fax E Mail Group 5 Select the number to be registered using or and press OK Enter Registration No 01 Not Registered 02 Not Registered 03 Not Registered 04 Not Registered 6 Select Name using or and press OK Fax Apply Type Fax Name Destination 7 Use the numeric keys to specify Name Entering Text P ...

Страница 76: ...nation One Touch Fax Apply Type Fax Name CANON Destination 0123456 5 When the edit is complete select Apply using or and press OK 6 Select Apply using or and press OK Fax Apply Type Fax Name CANON Destination 012345 To delete a one touch key 1 Press Register New Destina Edit Address Book Address Book Details All A Z 2 Select Delete From Address Book using or and press OK Edit Address Book Address ...

Страница 77: ...er System Manager ID and System Manager PIN 3 Click Log In 1 2 3 4 Click Address Book 5 Click One Touch To register a one touch key Proceed to Step 6 To edit the registered one touch key 1 Click No Type or Name 2 Click Edit 3 Specify the required settings in the edit screen and click OK To delete the registered one touch key 1 Click Delete of the destination which you want to delete 6 Click the un...

Страница 78: ...ister Location Coded Dial One Touch 4 Select Fax or E Mail using or and press OK Destination Type Fax E Mail Group 5 Select Name using or and press OK Fax Apply Type Fax Name Destination 6 Use the numeric keys to specify Name Entering Text P 1 9 Name Max 16 char CANON Apply Entry Mode A 7 Select Apply using or and press OK Name Max 16 char CANON Apply Entry Mode A 8 Select Destination using or and...

Страница 79: ...using or and press OK Type Name Destination Coded Dial Fax Type Fax Name CANON02 Destination 987654 Coded Dial 002 5 When the edit is complete select Apply using or and press OK 6 Select Apply using or and press OK Fax Apply Type Fax Name CANON02 Destination 987654 To delete a coded dial code 1 Press Register New Destina Edit Address Book Address Book Details All A Z 2 Select Delete From Address B...

Страница 80: ... 2 Enter System Manager ID and System Manager PIN 3 Click Log In 1 2 3 4 Click Address Book 5 Click Coded Dial To register a coded dial Proceed to Step 6 To edit the registered coded dial 1 Click No Type or Name 2 Click Edit 3 Specify the required settings in the edit screen and click OK To delete the registered coded dial 1 Click Delete of the destination which you want to delete 6 Click the unre...

Страница 81: ... Book using or and press OK Register New Destina Edit Address Book Address Book Details All A Z When the address book PIN is selected Use the numeric keys to enter the PIN and press OK Address Book PIN Apply Press OK 3 Select One Touch or Coded Dial using or and press OK Register Location Coded Dial One Touch 4 Select Group using or and press OK Destination Type Fax E Mail Group 5 If you selected ...

Страница 82: ...ress OK CANON 2 Destinat CANON01 0123456 CANON02 9876543 A Z 0 9 All 4 Select Destinations using or and press OK Group Apply Type Group Name CANON Destinations 2 5 Select Add using or and press OK Destination s Apply Add CANON01 0123456789 CANON02 9876543210 6 Select the destination to be added using or and press OK CANON01 01234567 CANON02 98765432 CANON03 001122334 A Z 0 9 All 7 Select Apply usi...

Страница 83: ... A Z When the address book PIN is selected Use the numeric keys to enter the PIN and press OK Address Book PIN Apply Press OK 3 Select the group of which name will be changed using or and press OK CANON 2 Destinat CANON01 0123456 CANON02 9876543 A Z 0 9 All 4 Select Name using or and press OK Group Apply Type Group Name CANON Destinations 2 5 Change Name Entering Text P 1 9 Name Max 16 char CANON ...

Страница 84: ...ing a Destination Group Using the Remote UI 1 Start the Web browser 2 Enter http IP address of the machine in the address field and press the ENTER key on the keyboard Input Example http 192 168 0 215 3 Log on to the Remote UI 1 Select Management Mode 2 Enter System Manager ID and System Manager PIN 3 Click Log In 1 2 3 4 Click Address Book 5 Click One Touch or Coded Dial ...

Страница 85: ... to be deleted from Members List and click Delete 4 Click OK To change the name of the registered group dial 1 Click No Type or Name 2 Click Edit 3 Change the name of Group Name and click OK To delete the registered group dial 1 Click Delete of the group dial which you want to delete 6 Click the unregistered No Type or Name 7 Select Group in Destination Type to Register and click OK 8 Enter the gr...

Страница 86: ...5 14 Registering Destinations in the Address Book ...

Страница 87: ... Forwarding Received Faxes Stored in Memory to Other Destinations Manual Forwarding 6 15 Configurating Operations for Transfer Errors 6 16 Re fowarding Printing Deleting Documents in Which Transfer Is Failed 6 17 Managing Faxes Stored in Memory 6 18 Checking and Canceling Fax Jobs 6 18 Combining and Printing the Received Documents You Saved 6 18 Checking and Deleting Received Faxes 6 19 Checking t...

Страница 88: ...when the scan is complete When your document is placed on the platen glass Perform the following procedure 1 Select the size of the original document using or and press OK Scan Size LTR LGL STMT 2 Place the next page on the platen glass and press Start Press Start for each page 3 When all documents are scanned completely select Start Sending using or and press OK Your document is sent to your fax ...

Страница 89: ...sity Increase the density Sharpness Settings Fax mode screen Setting screen Specify destination 01 01 2011 12 52AM 2 Sided Original O Sharpness 0 Sharpness Select Sharpness using or Adjust this setting to emphasize the outline of the image or decrease the contrast To clearly capture halftone photos adjust this setting to the appropriate level on the scale This can counteract the effect of moiré pa...

Страница 90: ...o cancel the entered destination Press and hold Clear To delete the last character of the entered destination Press Clear When the wrong key is pressed 1 Press Clear 2 Select Yes using and press OK To clear all the scan settings specified press Reset Specifying destinations using coded dial codes Press Coded Dial and then enter the three digit registration number 001 to 181 with the numeric keys T...

Страница 91: ...Registering Destinations in the Address Book D1370 D1350 Only P 5 2 CANON01 01234567 CANON02 9876543 CANON03 0011223 All A Z 4 Select the destination using or and press OK CANON01 0123456 CANON02 9876543 CANON03 00112233 All A Z Specifying destinations using group addresses When group addresses are registered in coded dial codes Press Coded Dial and then enter the three digit registration number 0...

Страница 92: ... after the fax sending starts select Cancel using or and press OK Scanning Start Sending Cancel Destinations 1 No of TX Pages 1 You can also cancel the job by pressing Stop When a document is loaded on the platen glass When Scan Next Press Start is displayed follow the same steps as the above Scan Next Press Start Start Sending Cancel Destinations 1 No of TX Pages 1 2 Select Yes using or when Canc...

Страница 93: ... following reading settings are saved as well You can change them for redialing Resolution Density 2 Sided Original Sharpness Redial restrictions Manual fax sending is not saved in the history and cannot be redialed Notifying the Recipient of an Incoming Fax by Telephone Manual Sending P 6 8 When fax sending from the history is restricted redialing feature is not available Restrict History TX P 6 ...

Страница 94: ...inting scan setting will be invalid Check for a dial tone before entering the number When the number is entered before checking for a dial tone your call cannot come through or may be connected to a wrong destination Push button Telephone for Tone Dialing Some types of push button telephones require a push button line for example banks airlines or hotel reservations When the machine is connected t...

Страница 95: ...ternational access code using the numeric keys For more information on international access codes contact your telephone company Fax Number 012 Apply 5 Press Pause to enter a pause as needed The letter p is displayed to indicate that a pause is added The default pause length is two seconds To change it see Pause Time P 6 23 To add more pauses into the dialing sequence press Pause again The default...

Страница 96: ...nation New Specifying Destinations P 6 4 4 Repeat Step 2 and 3 to enter all the destinations 5 Press Start NOTE The number of destinations that you can specify for a sequential broadcast Using the numeric keys Up to 10 destinations One touch keys Up to 19 destinations Coded dial codes Up to 181 destinations To specify destinations using the numeric keys Enter the numbers and press OK For confirmin...

Страница 97: ...n the call is a fax When the call is a fax When the call is a voice call When the call is a voice call When you pick up the handset while the incoming call rings When you do not pick up the handset while the incoming call rings When the call is a voice call An incoming call rings for the specified number of times The machine receives the fax automatically The machine does not respond You can start...

Страница 98: ...ou can start talking as is The machine judges whether the incoming call is a fax or voice call 2 When the call is a fax When the call is a voice call The machine receives the fax automatically The telephone rings 3 When you pick up the handset during ringing When you do not pick up the handset during ringing You can start talking as is The machine hangs up the telephone or switches to the fax rece...

Страница 99: ... calls or receive faxes when the machine is set to manual mode Set this mode when you expect to receive more incoming telephone calls than faxes or when you receive few faxes Operation for when an incoming call is received The external phone rings When you pick up the handset while the telephone rings When the call is a fax When the call is a voice call When you do not pick up the handset while th...

Страница 100: ... to be used for this operation OK FAX 1 Press 2 Select RX Mode using or and press OK Specify destination 01 01 2011 12 52AM RX Mode Auto Resolution 200 x 1 3 Select Fax Tel Auto Switch using or and press OK RX Mode Auto Fax Tel Auto Switch Manual Answering Machine 4 Select the option using or and press OK Fax Tel Auto Switch Apply Ring Start Time 6 Incoming Ring Time After Ring RX Ring Start Time ...

Страница 101: ...sed for this operation OK Menu 1 Press Menu 2 Select System Settings using or and press OK Menu USB Direct Print Se Printer Settings Adjustment Maintena System Settings 3 Select Forwarding Settings using or and press OK System Settings Security Settings Communication Manag Select Country Regi Forwarding Settings 4 Select Off or On using or and press OK Forwarding Settings Off On On Starts to trans...

Страница 102: ...oded dial codes P 6 4 Specifying destinations using the address book P 6 5 CANON 0123456789 GroupA 2 Destin User01 01234567 All A Z Configurating Operations forTransfer Errors When received documents are transferred or when a transfer error occurs its details can be saved in a memory or printed Keys to be used for this operation OK Menu 1 Press Menu 2 Select System Settings using or and press OK M...

Страница 103: ...been reforwarded successfully is deleted Keys to be used for this operation OK Status Monitor Cancel 1 Press Status Monitor Cancel 2 Select Fax Forwarding Errors using or and press OK Status Monitor Cancel Copy Print Job TX Job RX Job Fax Forwarding Error 3 Select a job using or and press OK Fax Forwarding Errors 12 52AM 12 54AM Detailed information of the forwarding error job is displayed Details...

Страница 104: ...umber 0004 Status Sending Time 01 01 12 52AM 2 Select Yes using and press OK Cancel No Yes The sending job is canceled Fax transmission to all the destinations will be canceled for sequential broadcast 3 Press Status Monitor Cancel to close the screen To only check the details of the selected job Press Status Monitor Cancel after you have checked the details of the selected job to close the screen...

Страница 105: ...hecking and Deleting Received Faxes Check the details of faxes stored in memory Delete faxes that you no longer need NOTE About faxes stored in memory You can specify forwarding destinations Forwarding Fax Documents P 6 15 You can combine and print documents saved in the memory Instead of printing during receiving Combining and Printing the Received Documents You Saved P 6 18 Keys to be used for t...

Страница 106: ...eys to be used for this operation OK Status Monitor Cancel 1 Press Status Monitor Cancel 2 Select TX Job or RX Job using or and press OK Status Monitor Cancel Device Status Copy Print Job TX Job RX Job TX Job Confirm the sending job history RX Job Confirm the received job history 3 Select Job History using or and press OK TX Job Status History Job Status Job History 4 Select the job that you want ...

Страница 107: ...tings Fax Settings 3 Select TX Function Settings using or and press OK Fax Settings Basic Settings TX Function Settings RX Function Settings RX Print Settings 4 Select Change Defaults using or and press OK TX Function Settings Change Defaults Register Unit Name ECM TX Pause Time 5 Select the item using or and press OK Resolution Density Sharpness For more information see Changing the Scan Settings...

Страница 108: ...mmon Settings Copy Settings Fax Settings 3 Select TX Function Settings using or and press OK Fax Settings Basic Settings TX Function Settings RX Function Settings RX Print Settings 4 Select ECM TX using or and press OK TX Function Settings Change Defaults Register Unit Name ECM TX Pause Time 5 Select Off or On using or and press OK ECM TX Off On Select Apply when Apply appears on the screen after ...

Страница 109: ...or company s name sender s name Once the information has been registered it is printed at the top of each page that you are sending How to access the option Menu Fax Settings TX Function Settings Register Unit Name Fax How to register the sender s name Enter up to 24 alphanumeric characters Entering Text P 1 9 NOTE Where the sender s name appears on the page The information is printed at the top o...

Страница 110: ...Above Image Select the location where the sender ID is printed on the page Mark No as TEL FAX FAX TEL Select the symbol to be added in front of the telephone number Check Dial Tone Before Sending Specify whether to check for a dial tone before dialing How to access the option Menu Fax Settings TX Function Settings Check Dial Tone Before Sending Settings Bold Default setting Off Do not check for a ...

Страница 111: ...ng Ring Settings Bold Default setting Off The telephone does not ring on an incoming call On Ring Times 1 to 2 to 99 times The telephone rings on an incoming call You can set the incoming call ring time in rings in Ring Times Remote RX Specify whether to receive faxes remotely by dialing the ID number using the push buttons of the external telephone connected to the machine when an incoming call c...

Страница 112: ... not be clear as subtle details such as thin lines and light colors may not be clearly reproduced due to a small amount of toner remaining inside the toner cartridge Plus faxes are deleted once they have been printed How to access the option Menu Fax Settings RX Print Settings Continue Printing When Toner Is Low Settings Bold Default setting Off The machine does not continue printing received faxe...

Страница 113: ...ble Memory Lock On Memory Lock PIN Seven digit number Once the PIN is set you are prompted to enter it every time you change or disable the Memory Lock mode settings Print Report Off On Specify whether to print the RX result report when receiving a fax Activate Receive Results D1370 D1350 Only to enable this setting Memory Lock Time Off On When On is set received faxes are stored in memory only fo...

Страница 114: ...low Fax Driver TX Settings Bold Default setting Off Disallow sending faxes from the fax driver installed on your computer On Allow sending faxes from the fax driver installed on your computer Restrict History TX Specify whether to restrict sending faxes from the history IMPORTANT When settings are not immediately applied During manual redialing operations for example restriction settings may not b...

Страница 115: ...ion or a file server If you are a Macintosh user see the Mac Scanner Driver Guide To view how to display the Mac Scanner Driver Guide see For Macintosh Users P 11 4 Basic Scan Operations 7 2 Scanning Using Keys on the Operation Panel 7 2 Saving Scanned Documents to USB Memory Device 7 4 E mailing Scanned Documents D1370 Only 7 5 Sending Scanned Documents to a File Server D1370 Only 7 6 ...

Страница 116: ...ed you cannot scan Reduce the number of computers connected to this machine via a network e Manual Scanning Scanning Paper Documents and Saving Them to a Computer USB Network Connection Registering the Scanner in MF Network Scan Utility You can change the names for the displayed computers e Manual Scanning Scanning Paper Documents and Saving Them to a Computer USB Network Connection Using the MF T...

Страница 117: ...g or and press OK Select Next Action Scan Next Original Store and Finish Cancel Confirm Destination After saving the document the display returns to the basic scanning screen Note The location of saved scanned images After scanning the folder where the images have been saved to opens automatically By default folders named with the date when the data was created are put in the My Pictures folder in...

Страница 118: ...dia using or and press OK Select the scan type Computer Remote Scanner Memory Media 5 Specify the scan settings based on your purpose of the scan The following settings can be changed For details on the setting procedure see Scanning in the e Manual Scan size Color Mode File Format Density Original orientation Original Type 2 Sided Original Sharpness Data Size The settings specified here are effec...

Страница 119: ...h scanned documents to e mails and send them to a specified destination This section describes the basic procedure Note Preparing to Use the E mail Functions You can send scanned documents to your e mail application You can convert scanned documents into PDF files and send them to the destination e mail application as e mail attachments Please read Network Settings in the e Manual and configure yo...

Страница 120: ...ection describes the basic procedure Note Preparation for Scanning File Server You can send scanned documents to a file server You can convert scanned documents into TIFF files and send them a file server Before sending to a file server see Network Settings in the e Manual and configure the send settings Keys to be used for this operation OK Start SCAN 1 Place your document Loading Paper P 2 9 Sup...

Страница 121: ...usly scan the document press Start Scan Next Press Start Start Sending Cancel Destinations 1 No of TX Pages 1 To Cancel the scan 1 Select Cancel using or and press OK 2 Select Yes using or and press OK To confirm the destination Select Destinations using or and press OK To confirm the number of transferred pages Select No of TX Pages using or and press OK 8 Select Start Sending using or and press ...

Страница 122: ...7 8 Using the Scan Functions ...

Страница 123: ...Only 8 5 When White Streaks Appear on the Output or the Output Is Partially Faded 8 5 Supplied Toner Cartridge 8 6 About Replacement Toner Cartridge 8 6 Handling Toner Cartridge 8 6 Storing Toner Cartridges 8 7 Using the Toner Saver Mode 8 7 Purchasing Consumables 8 7 Before Replacing the Toner Cartridge 8 8 Replacing the Toner Cartridge 8 8 Precautions When Replacing Toner Cartridge 8 9 Recycling...

Страница 124: ...ings Adjustment Maintenan 3 Select Clean Fixing Unit using or and press OK Adjustment Maintenance Toner Saver Mode Black Text Processi Special Processing Clean Fixing Unit 4 Check if the supported paper is set in the paper drawer and press OK Supported Paper Size A4 LTR Type Plain Plain L OK 5 Check the procedure shown in the display and press OK The cleaning paper will be printed Steps Stare Pres...

Страница 125: ...ide the feeder may be dirty Clean the feeder scanning area and rollers 1 Turn OFF the power switch and disconnect the power cord 2 Open the feeder cover 3 Clean the rollers A inside the feeder with a well wrung out cloth dampened with water and wipe them with a soft dry cloth A 4 Close the feeder cover 5 Connect the power cord and turn ON the power switch Cleaning the Feeder Automatically If your ...

Страница 126: ...stick to the components or generate static charges NOTE About sending or receiving faxes When the power plug is unplugged the machine cannot send or receive faxes When a job is waiting to be printed The job is deleted when you turn OFF the power switch About jobs stored in memory Jobs can be stored in memory for approximately an hour after the power plug has been unplugged To view jobs stored in m...

Страница 127: ...r Cartridge P 8 8 We recommend that the toner cartridge be replaced before printing high volume documents Replacing theToner Cartridge P 8 8 IMPORTANT When white streaks appear on the output or the output is partially faded When white streaks appear on the output or the output is partially faded the toner cartridge has almost reached the end of its life even if no message appears on the screen Whe...

Страница 128: ...ct sunlight or bright light for more than five minutes Store the toner cartridge in its protective bag Do not open the bag until you are ready to install the toner cartridge in the machine Keep the protective bag for the toner cartridge They are required when transporting the machine Do not store the toner cartridge in a salty atmosphere or where there are corrosive gases such as from aerosol spra...

Страница 129: ...idge into the original protective bag or wrap it with a thick cloth About a new toner cartridge Do not take a new toner cartridge out of the protective bag until it is ready to be used NOTE About condensation Even within the storable humidity range water droplets may develop both inside and outside toner cartridges The formation of water droplets is called condensation Condensation will adversely ...

Страница 130: ...rtridge into the guides located on both sides of the machine and slide the toner cartridge into the machine until the toner cartridge comes to rest and is held against the back of the machine A A 5 Close the front cover If you cannot close the front cover Make sure that the toner cartridge is installed correctly Do not try to forcefully close the toner cover as this may damage the machine If there...

Страница 131: ...Insert the toner cartridge Fit A on both sides of the toner cartridge into the guides located on both sides of the machine and slidethe toner cartridge into the machine until the toner cartridge comes to rest and is held against the back of the machine A A 8 Close the front cover If you cannot close the front cover Make sure that the toner cartridge is installed correctly Do not try to forcefully ...

Страница 132: ...he high voltage contacts D or the electrical contacts E This may result in damage to the cartridge D E Miscellaneous precautions Do not expose the toner cartridge to direct sunlight or strong light Never disassemble or modify it Condensation may form in and on the toner cartridge if it is brought into an environment that exposes it to sudden changes in temperature and or humidity If you move the t...

Страница 133: ...n Canada through donations to the World Wildlife Fund Canada and The Nature Conservancy of Canada Since its inception The Canon Cartridge Recycling Program has collected huge amount of cartridges that otherwise would have been discarded into landfills or similar facilities Instead this rapidly growing program returns used cartridges to the manufacturing process thus conserving an array of resource...

Страница 134: ...ent exceeds the above limits please call 1 800 OK Canon for special shipping information Please Note Do not send defective cartridges for replacement Defective cartridges under warranty should be exchanged by an authorized dealer or service facility as provided in the warranty Shipping Apply the UPS authorized returning label provided in this guide Residents of Alaska and Hawaii Do not use the UPS...

Страница 135: ...tion box can accommodate eight individual cartridge boxes Place your eight individually packaged boxes of empty cartridges into the Canon collection box Seal the box Apply the Canon Canada Inc Canada Post label provided in this brochure Canon s labels are specially marked so that Canon pays the postage Deliver to any local Canada Post outlet or franchise Customers who hold a Commercial pick up agr...

Страница 136: ...e that the cover and tray are closed hold the handle on the front to lift and transport the machine Check the weight of the machine so it can be carried safely When the optional paper feeder is installed Remove the paper feeder from the machine install it in the new installation site then transport the machine Do not carry the machine with the paper feeder installed If you do so the paper feeder m...

Страница 137: ...before lifting carrying and relocating the machine CAUTION Set the machine down slowly and carefully Be careful not to hurt your hands or fingers WARNING When relocating the machine Be sure to turn off the power switches of the machine and your computer and unplug the power plug and interface cables Failure to do so can damage the cables or cords resulting in a fire or electrical shock ...

Страница 138: ...8 16 Maintenance ...

Страница 139: ...the power switched ON 9 12 Has the power switch been just turned ON 9 12 Is the machine in the sleep mode 9 12 Are the settings properly configured 9 12 Is the Error indicator on or blinking 9 12 Does a message appear on the screen 9 13 Is the telephone line connected or configured properly D1370 D1350 Only 9 13 If You Cannot Solve a Problem 9 13 When a Power Failure Occurs 9 14 Printing Results A...

Страница 140: ...atedly Check the followings Fan the paper stack and tap the edge on a flat surface to align the paper before loading it into the machine Make sure that the paper you are using meets the requirements for use e Manual Specifications Paper Supported Paper Types Make sure that you have removed all scraps of paper from the inside of the machine Do not touch the high voltage contacts A or the electrical...

Страница 141: ...d document by pulling it gently 8 Lift the document feeder tray and remove the document by pulling it gently 9 Put the document feeder tray back into place 10 Close inner cover 11 Close the feeder cover 12 Open the feeder or the platen glass cover and remove the document by pulling it gently 13 Close the feeder or the platen glass cover gently 14 Place document in the feeder ...

Страница 142: ...e on the display follow the steps below to remove jammed paper 1 Press Paper jam Press to display steps End Press OK 2 Remove the jammed paper by pulling it out gently If it cannot be removed easily do not pull it out forcibly Perform the procedure at the position that is indicated on the message display 3 When the following screen appears select Yes using and press OK The machine is ready to prin...

Страница 143: ... and Duplex Unit Referring to the procedure on the display follow the steps below to remove jammed paper 1 Press Paper jam Press to display steps End Press OK 2 Open the back cover 3 Remove the jammed paper by pulling it out gently 4 Close the back cover 5 Open the lower rear cover 6 Remove the jammed paper by pulling it out gently 7 Close the lower rear cover 8 When the following screen appears s...

Страница 144: ...ssible so that loose toner does not spill out 7 Slowly move the transport guide to its original position 8 Hold the part where the green seal is attached and open the roller cover 9 Remove the document by pulling it gently 10 Put the roller cover back in place gently 11 Insert the toner cartridge Fit A on both sides of the toner cartridge into the guides located on both sides of the machine and sl...

Страница 145: ... pulling it out gently 5 Holding the green tabs close the 2 sided transport guide securely Make sure that both ends of the paper exit guide are closed 6 Set the paper drawer 7 When the following screen appears select Yes using and press OK The machine is ready to print Is all of the jammed paper removed Yes No ...

Страница 146: ...he fax number Problem 2 The receiving fax machine may not be a G3 fax machine Action Make sure the receiving fax machine is a G3 fax machine If it is a G3 fax machine send the document again Otherwise switch to the communication mode supported by the receiving fax machine and send the document again 012 Problem The receiving fax machine is out of paper Action Make sure that there is enough paper l...

Страница 147: ...n the Departmental ID Management Action Specify the correct dept ID or PIN and redo the authentication Problem 2 The jobs with unknown IDs are restricted Action Need to deactivate the restriction Contact the system manager administrator for the details e Manual Security Specifying the Setting for Department ID Management Specifying Whether or Not to Receive a Print Job from an Unknown ID 703 Probl...

Страница 148: ...ly and that the network is operating normally 812 Problem The POP password setting is incorrect Action Enter the correct POP password Check the POP password in the settings notification documentation etc issued by the contracted provider or ask the network administrator 813 Problem The POP login name setting is incorrect Action Recheck your POP login name setting 822 Problem The job cannot be prin...

Страница 149: ...ults for example a part of the image may not be printed at all Changing the paper size in the Paper Settings menu to match the size loaded in the paper drawer or multi purpose tray Cancel the job and refer to e Manual Basic Operation Setting the Paper Size and Type For the Paper Drawer to change the paper size in Paper Settings menu IMPORTANT When printing from the printer driver Make sure that th...

Страница 150: ...on the operation panel to return from the sleep mode If this works Are the settings properly configured If the machine makes the error sound and does not start operating even after Start has been pressed the settings may not have been configured properly Check the configured settings Is the Error indicator on or blinking Make sure that paper is loaded properly in the paper drawer or multi purpose ...

Страница 151: ...operly D1370 D1350 Only Make sure that the telephone cable is properly connected Make sure that the cables for the telephone line port and external device port on the back of the machine are not connected inversely See the Starter Guide Make sure that the line type dial or push specified in the menu matches the type of line connected to the machine Select Line Type P 6 23 Make sure that the teleph...

Страница 152: ...o answer a call using the external telephone depending on your telephone system IMPORTANT To save documents in memory when the power supply is cut off If the power is lost due to a power failure or the power cord is accidentally unplugged data can be stored in memory for approximately 5 minutes so you can back it up To store document in the memory requires the printer s built in battery must be ch...

Страница 153: ...o 23 lb Bond 60 to 89 g m2 is loaded 1 Access the Page Setup tab 2 Set Paper Type to Plain Paper L Solution 3 Change the Special Mode V setting from the operation panel e Manual Maintenance Special Mode The effect becomes greater as the number goes up Off Mode 1 Mode 2 low high Paper curls and creases can be minimized by changing the paper type and usage conditions without needing to change the se...

Страница 154: ...or multi purpose tray meets the paper specifications e Manual Specifications Paper Supported Paper Types Cause 4 There is a foreign object inside the machine Solution Remove the foreign object from the machine Cause 5 Paper creases due to the paper type used or usage conditions of the machine Solution Change the Special Mode V setting from the operation panel e Manual Maintenance Special Mode The ...

Страница 155: ...ly the outline of text and images may be reproduced less clearly and images may appear slightly jagged If you cannot solve the problem even setting Special Mode X set Special Mode D to On Solution 3 To print received faxes or the print report Change the Special Mode C setting to On from the operation panel To apply the solutions to all the jobs Change the Special Mode D setting to On in the print ...

Страница 156: ...hange the Special Mode U setting to On from the operation panel e Manual Maintenance Special Mode Set this setting to Off unless the above mentioned problem occurs The print quality may become lower when this setting is enabled depending on the paper type used for example thin paper or usage conditions humid conditions The Bottom Edge of Paper or Following Paper Has Smudge Marks Perform following ...

Страница 157: ... Cause A document with no margins was printed Solution 1 Data is printed with a margin of 5 mm 10 mm for envelopes Provide a margin around the data Printable Area P 2 8 Solution 2 Perform the following procedure in the printer driver 1 Display the Finishing sheet 2 Click Advanced Setting 3 Set Enlarge Print Area to Off ...

Страница 158: ...M to 8 P M EST Monday through Friday excluding holidays for products still under warranty 1 800 OK CANON To find the location of the authorized service facility nearest you visit http www canon ca or call 1 800 OK CANON If the problem cannot be corrected via these technical support options repair options are available from the technical support personnel via the website at http www canon ca Please...

Страница 159: ... Registering Setting theVarious Functions You can set or change machine functions from the setting menu according to your purpose Setting Menu List 10 2 Printing a User Data List 10 2 Contents of the Setting Menu 10 2 ...

Страница 160: ...pply and press OK after specifying the setting Returns to the previous hierarchy Resets the settings Resets the copy scan fax USB direct print mode Menu Operations Back Reset Viewing the Route Map Register the following types of destination One touch keys Coded dialing Group dialing Address Book key Press Menu to exit the menu screen and return to the default screen About the menu options in the f...

Страница 161: ...ion No Enter Registration No Select Coded Dial One Touch Dial Destination One Touch Registration No Set Details ECM TX Speed Off On Long Distance Domestic International 1 International 2 International 3 P 5 3 Network Settings Keys to be used for this operation Paper Settings How to display Press Select Paper Settings 4800 bps 33600 bps 14400 bps 9600 bps 4800 bps IPv4 Settings IPv6 Settings TCP IP...

Страница 162: ... Settings LPD 1 to 515 to 65535 RAW 1 to 9100 to 65535 HTTP 0 to 80 to 65535 POP3 RX 1 1 to 110 to 65535 RAW Settings Off On WSD Settings WSD Print Settings WSD Scan Settings Off On Use Multicast Discovery Off Communication Mode Half Duplex Full Duplex Ethernet Type 10 Base T 100 Base TX Continues from the previous page Continues from the previous page Continues to the next page WINS Settings WINS...

Страница 163: ...atio Auto 97 95 90 75 RX Page Footer Off On Continue Printing When Toner Is Low Reduction Method Vertical Horizontal Vertical Only Gamma 1 0 Gamma 1 4 Gamma 1 8 Gamma 2 2 Image Quality in Text Photo Photo Mode Data Size Priority Normal Image Quality Priority Image Quality in Text Mode Data Size Priority Normal Image Quality Priority Name Ascending Name Descending Date Time Ascending Date Time Desc...

Страница 164: ...KTOP ISO11 ISO15 ISO17 ISO21 ISO4 ISO6 ISO60 ISO69 ISOL1 ISOL2 ISOL5 ISOL6 LEGAL MATH8 MCTEXT MSPUBL PC1004 PC775 Text Send Filter Receive Filter Graphics Images e g photographic images Resolution Gradation High Resolution Resolution Gradation High Resolution Resolution Gradation High Resolution Text Graphics Images e g photographic images Halftones Off On Print PS Errors Off On Halftones Job Time...

Страница 165: ...ROM CD ROM CD ROM CD ROM CD ROM CD ROM Off On Restrict History TX Off On Off On Fax No Confirmation Re Entry Off Restrict Sequential Broadcast Network UFRII LT UFRII LT XPS PCL5 PCL6 PS USB System Administrator Settings Device Information Settings Dept ID Management On Off Security Settings Communication Management Settings Forwarding Settings Store Print When Forwarding Remote UI On Off Restrict ...

Страница 166: ...10 8 Registering Setting the Various Functions ...

Страница 167: ...2 Printer Specification 11 2 Scanner Specifications 11 3 Fax Specifications D1370 D1350 Only 11 3 Telephone Specifications D1370 D1350 Only 11 3 Transmission Specification D1370 Only 11 3 Optional Drawer 11 3 For Macintosh Users 11 4 Displaying Driver Guides 11 4 Displaying a Driver s Help System 11 4 Content of the e Manual about Features that Are Unavailable on the Macintosh 11 4 Index 11 5 ...

Страница 168: ...0 25 to 4 00 1 increments Copy Speed Letter Plain Direct 35 cpm Continuous Copying Capacity Maximum 99 copies First Copy Time Letter 8 seconds or less The copy speed on Letter size plain paper on one side printing is measured during continuous copying Copy speeds vary depending on the paper type and size as well as the paper feeding direction Copy speeds on smaller paper sizes may be slower Plus t...

Страница 169: ... line conditions 2 Based on ITU T ITU Telecommunication Standardization Sector Standard Chart No 1 JBIG standard mode Telephone Specifications D1370 D1350 Only Telephone Specifications Telephone Type External telephone External telephone with the built in answer function Data modem Transmission Specification D1370 Only Specification for File Server Transmission Communication Protocol SMB TCP IP Da...

Страница 170: ...al Installing the MF Drivers on the WSD Network Some print features Examples Operating in the print server environment Watermark printing PageComposer Combining and printing multiple files Changing the halftone Adjusting the gamma value For information on the features that are available on the Macintosh see the Printer Driver s help system Reference in the e Manual Printing Documents from a Comput...

Страница 171: ... on 1 3 7 Copy Mode 1 6 Copyright xix D Date Settings 1 12 Density Copy 3 5 Disclaimers xx Display 1 6 Display Messages 9 8 LCD Standby Mode 1 6 Document feeder tray 1 2 Document guides 1 2 Documents Clearing Jams 9 2 Placing 2 4 Receiving Faxes 6 11 Requirements 2 2 Scan Area 2 2 Sending Faxes 6 2 Documents Requirements 2 2 E Error Code 9 8 F Fax Documents in the Memory Forwarding 6 15 History 6 ...

Страница 172: ...Storing 5 3 Operation Panel 1 2 1 4 Output tray 1 2 P Paper Clearing Jams 9 2 Loading 2 9 Paper Size and Type 2 14 Printable Area 2 8 Supported Paper Types 2 6 Paper Drawer 1 2 1 4 Platen glass 1 3 Power Supply xiii Requirements xvii Printing a User Data List 10 2 Printing from a Computer 4 1 R Registering Setting theVarious Functions 10 1 RX Mode 6 11 Answer mode 6 13 Auto mode 6 11 Changing 6 14...

Страница 173: ...rtridge Handling 8 6 Replacing Toner Cartridge 8 8 Trademarks xix Transporting the Machine 8 14 Troubleshooting 9 1 Clearing Jams 9 2 Error Code 9 8 If You Cannot Solve a Problem 9 13 When a Power Failure Occurs 9 14 When Incorrect Size Setting Appears 9 11 U USB port 1 3 W When Incorrect Size Setting Appears 9 11 ...

Страница 174: ...Success NY 11042 U S A CANON EUROPA N V Bovenkerkerweg 59 61 1185 XB Amstelveen The Netherlands CANON CHINA CO LTD 15F Jinbao Building No 89 Jinbao Street Dongcheng District Beijing 100005 PRC CANON SINGAPORE PTE LTD 1 HarbourFront Avenue 04 01 Keppel Bay Tower Singapore 098632 CANON AUSTRALIA PTY LTD 1 Thomas Holt Drive North Ryde Sydney NSW 2113 Australia CANON GLOBAL WORLDWIDE SITES http www ca...

Отзывы: